W-409 Posted May 31, 2013 Posted May 31, 2013 Great subject! I really like the engine too, Nothing beats W-Blocks! I like what you did with paint job and Foiling. Both look very good to me and nice interior work also. Looks like you got the opening doors fitted nicely, that is a common problem in my builds, if a kit has opening doors. Great work overall. Now when there are no bigger mistakes, you could add more details to the engine bay on your next one... ;) Really nice.
peekay Posted May 31, 2013 Posted May 31, 2013 Beautiful Impala Andrew! I specially like the interior and the upgrades from the Revell kit were worth the effort. I seem to remember building this one first around 1965 and it's still a good kit.
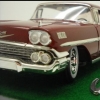
John Goschke Posted May 31, 2013 Posted May 31, 2013 Nice job! That 3/4 rear shot really looks great!
realgone58 Posted June 1, 2013 Posted June 1, 2013 Looks great to me! Harry's looks great too. I think sometimes it's the resolution of the pics that make foil look funny here and there. I've noticed it in my own pics. Sometimes a funny edge shows up that you swear isn't there when viewed in person. Kind of like what a picture or comp. screen for that matter, does to wire wheels.
Danno Posted June 1, 2013 Posted June 1, 2013 Looks great to me! Harry's looks great too. I think sometimes it's the resolution of the pics that make foil look funny here and there. I've noticed it in my own pics. Sometimes a funny edge shows up that you swear isn't there when viewed in person. Kind of like what a picture or comp. screen for that matter, does to wire wheels. It's the pixel pixies.
ImpalaBoy Posted June 1, 2013 Author Posted June 1, 2013 Great subject! I really like the engine too, Nothing beats W-Blocks! I like what you did with paint job and Foiling. Both look very good to me and nice interior work also. Looks like you got the opening doors fitted nicely, that is a common problem in my builds, if a kit has opening doors. Great work overall. Now when there are no bigger mistakes, you could add more details to the engine bay on your next one... ;) Really nice. Thanks! The doors were kind of a pain and the driver's side isn't as good as I want it to be, but I display it with the door open so I can see the interior better I would have done more with the engine bay, but after 7 months, I kind of lost my patience and just wanted to get it together.
ImpalaBoy Posted June 1, 2013 Author Posted June 1, 2013 Beautiful Impala Andrew! I specially like the interior and the upgrades from the Revell kit were worth the effort. I seem to remember building this one first around 1965 and it's still a good kit. Thank you! I did my best to make the "upholstery" as close to the 1:1 as possible. And wow! this kit sure has been around a while. I'll bet the mold quality was a lot better when it first came out
ImpalaBoy Posted June 1, 2013 Author Posted June 1, 2013 Nice job! That 3/4 rear shot really looks great! Thanks! Those rear shots are my favorite. I just love the way the chrome trim wraps around the tail lights!
ImpalaBoy Posted June 1, 2013 Author Posted June 1, 2013 Looks great to me! Harry's looks great too. I think sometimes it's the resolution of the pics that make foil look funny here and there. I've noticed it in my own pics. Sometimes a funny edge shows up that you swear isn't there when viewed in person. Kind of like what a picture or comp. screen for that matter, does to wire wheels. With every car I've built, the camera always brings out the flaws you can't see with the naked eye. The flash makes it even worse, which is why I recently made photo booth, which seems to help quite a bit. Nothing beats seeing the real deal in person, though!
ChevyCoupe41 Posted June 1, 2013 Posted June 1, 2013 Looks very nice! I'm fan of X-frame Chevys and W-blocks. Paint job and engine looks really good and like that interior too. Nice Job!
crazyrichard Posted June 1, 2013 Posted June 1, 2013 (edited) nice job def. a model to be proud of , love the simple display with the real chevrolet logo .. that really looks awsome.. you also posted some real macro / close up shots and thats something i always like .. really show of a model as is .. some post pics from a distance in post stamp size looking at the dash maybe you could use this > you know those wooden sticks for making sate (meat on a stick) ? they have a pointy side and a flat side ... i use those for the tiny details like knobs and stuff ... now you dont have the "chrome" paint available what i use but i use stuff from a certain dutch diy market and that turns out looking like chrome .. a bit like alcad .. (alcad is nicer but...) but using the wooden sticks is just awsome for details .. just put some paint in a bowl and dip the pointy side of the stick in the paint and make sure there is enough on to transfer but not so much it will run of the tiny part you want paint on (also depends on the thickness of the paint) just tab the point on the small part and that always gives a awsome result .. not one hand brush can do the trick as good as a simple wooden pin ...the wood holds the paint a bit and the point just wont toutch any other parts like the hairs of a hand brush can do .. could be you already know this technique but hey you asked for pointers Edited June 1, 2013 by crazyrichard
charlie8575 Posted June 1, 2013 Posted June 1, 2013 Great job on one of the toughest interiors to replicate well. I like the base, too. That script just sets it off perfectly. Very well done. Charlie Larkin
ImpalaBoy Posted June 3, 2013 Author Posted June 3, 2013 nice job def. a model to be proud of , love the simple display with the real chevrolet logo .. that really looks awsome.. you also posted some real macro / close up shots and thats something i always like .. really show of a model as is .. some post pics from a distance in post stamp size looking at the dash maybe you could use this > you know those wooden sticks for making sate (meat on a stick) ? they have a pointy side and a flat side ... i use those for the tiny details like knobs and stuff ... now you dont have the "chrome" paint available what i use but i use stuff from a certain dutch diy market and that turns out looking like chrome .. a bit like alcad .. (alcad is nicer but...) but using the wooden sticks is just awsome for details .. just put some paint in a bowl and dip the pointy side of the stick in the paint and make sure there is enough on to transfer but not so much it will run of the tiny part you want paint on (also depends on the thickness of the paint) just tab the point on the small part and that always gives a awsome result .. not one hand brush can do the trick as good as a simple wooden pin ...the wood holds the paint a bit and the point just wont toutch any other parts like the hairs of a hand brush can do .. could be you already know this technique but hey you asked for pointers Glad you like it! The dash didn't come out quite as neat as I would have liked but actually, I do use toothpicks to paint tiny details like that. I just dip the tip in the lid of the paint jar; there's a perfect amount of paint on there after shaking it.
bisc63 Posted July 15, 2013 Posted July 15, 2013 Very nice, love your color choices. If you haven't tackled it yet, when you wind your own coil springs. get yourself a small bolt, something like a 1/4x24, and wind your wire around it,allowing the threads to guide the wire. Perfectly spaced coils every time!
blunc Posted July 15, 2013 Posted July 15, 2013 I think the only way to improve on the dash would have been to use bare metal foil instead of silver paint. nice work on a tough old kit.
ImpalaBoy Posted July 16, 2013 Author Posted July 16, 2013 Very nice, love your color choices. If you haven't tackled it yet, when you wind your own coil springs. get yourself a small bolt, something like a 1/4x24, and wind your wire around it,allowing the threads to guide the wire. Perfectly spaced coils every time! That's an awesome tip! Thanks!
ImpalaBoy Posted July 16, 2013 Author Posted July 16, 2013 I think the only way to improve on the dash would have been to use bare metal foil instead of silver paint. nice work on a tough old kit. I did try several times to use BMF on the dash, but I just couldn't get it to look right. Oh well, I'll try again on the '57 Bel Air I'm working on now.
Recommended Posts
Create an account or sign in to comment
You need to be a member in order to leave a comment
Create an account
Sign up for a new account in our community. It's easy!
Register a new accountSign in
Already have an account? Sign in here.
Sign In Now