peekay Posted October 2, 2013 Share Posted October 2, 2013 (edited) I've actually been working on this one on and off for several years and now it has reached the one-step-forward-two-steps-back stage, as my models all do as they approach the finishing line. I am currently grappling with plumbing but it's never going to be highly accurate. Ferrari conoscenti should look away, it's done in the impressionist style. Here's a mock-up - I might yet lower it slightly and I'll cut the door glass out... to show the interior better... But I've now reached an impass; I've lost the left-side (passenger) turning light! Here is the right side (this has been painted, it's clear in the kit): I know it's a long shot, but maybe someone used the engine in a hot-rod (!) or something and doesn't need this part. I would actually need both sides so they match after paint detail. If so, I would trade all the RC2 Parts Pack tyres in this photo: If not I guess I'll have to buy another whole kit. More soon. Edited October 2, 2013 by peekay Quote Link to comment Share on other sites More sharing options...
slusher Posted October 2, 2013 Share Posted October 2, 2013 Your build is looking great. Sorry for your missing part Pete. l have been there, l don't know how many kits l have bought for one part over the years... Quote Link to comment Share on other sites More sharing options...
jeffs396 Posted October 2, 2013 Share Posted October 2, 2013 Looking GREAT so far! Maybe lay the light lens over some various windshields or backlights until a curvature match is found, then cut out that portion? Or use your existing one as a buck for a vacuum-formed piece? Quote Link to comment Share on other sites More sharing options...
Modelbuilder Mark Posted October 3, 2013 Share Posted October 3, 2013 (edited) Have you thought about writing Fujimi to see about getting a replacement light cover? Looking really good! Edited October 3, 2013 by Modelbuilder Mark Quote Link to comment Share on other sites More sharing options...
cobraman Posted October 3, 2013 Share Posted October 3, 2013 Lookin' good. Quote Link to comment Share on other sites More sharing options...
Duntov Posted October 3, 2013 Share Posted October 3, 2013 This is pretty cool...are the headers two piece? Quote Link to comment Share on other sites More sharing options...
Chillyb1 Posted October 3, 2013 Share Posted October 3, 2013 (edited) I love the engine and I love the body color even more! Let's get this thing finished already. Edited October 3, 2013 by Chillyb1 Quote Link to comment Share on other sites More sharing options...
peekay Posted October 3, 2013 Author Share Posted October 3, 2013 Carl, glad I'm not the only one!Jeff, it's a complex curvature and outline, beyond my skills, plus it has embossed detail - and - and what was the other thing?... oh yes, I can't be bothered.Mark, yes, writing to Fujimi is on my list of solutions - thought this way might be quicker.Bill, yes the headers are two-piece and a struggle. I didn't get it quite right but it only shows from underneath.And Curtis, thanks, I'm pressing on regardless. Quote Link to comment Share on other sites More sharing options...
BVC500 Posted October 3, 2013 Share Posted October 3, 2013 Hi, I might have an extra turn signal lens. Let me check tonight. Quote Link to comment Share on other sites More sharing options...
Modelbuilder Mark Posted October 3, 2013 Share Posted October 3, 2013 Heck yeah, if you can get it here, that is great. I was just thinking Fujimi vs buying another kit as you mentioned. I have never attempted to obtain replacement parts from them, so I did not even know if they did it or not. I have heard tho, that due to language barriers, you may have actually write Hobbylink Japan. Good luck! Mark, yes, writing to Fujimi is on my list of solutions - thought this way might be quicker. Quote Link to comment Share on other sites More sharing options...
Monty Posted October 3, 2013 Share Posted October 3, 2013 I've actually been working on this one on and off for several years and now it has reached the one-step-forward-two-steps-back stage, as my models all do as they approach the finishing line. I am currently grappling with plumbing but it's never going to be highly accurate. Ferrari conoscenti should look away, it's done in the impressionist style. I'm not knowledgeable enough about Ferraris to be counted among the cognoscenti but I'm curious as to where you think you've deviated from the 1:1 car on this build. If you're going to claim this is being built in the impressionist style, I say show me the Monet! Quote Link to comment Share on other sites More sharing options...
peekay Posted October 3, 2013 Author Share Posted October 3, 2013 (edited) BVC500, I've got my fingers crossed.Mark, I've successfully requested replacement parts from all the major producers over the years but it does take time from Japan - and I'm impatient to finish this one. "Progress" today involved spilling a bottle of Humbrol black and the aftermath. But did I get upset?YES!Monty, the main deviation here is that the spark wires don't quite reach the distributors, the result of a stupid miscalculation. But, as Frank Zappa once said, "without deviation there can be no progress". And I suppose I meant impressionism as opposed to photo-realism.BTW I didn't mis-spell "cognoscenti", I wrote it in Italian, without the "g".(There should be a smiley or two in here but I can't access the emoticons.) Edited October 3, 2013 by peekay Quote Link to comment Share on other sites More sharing options...
BVC500 Posted October 3, 2013 Share Posted October 3, 2013 Good news, I have both parts. Send me a message with your address. Quote Link to comment Share on other sites More sharing options...
ScrappyJ Posted October 3, 2013 Share Posted October 3, 2013 Looks good so far. Nice and clean. Quote Link to comment Share on other sites More sharing options...
GeeBee Posted October 3, 2013 Share Posted October 3, 2013 I've always loved the Daytona, and your doing a fine job of building it, I've had one in my stash for quite a few years, I really need to build it one day. Quote Link to comment Share on other sites More sharing options...
peekay Posted October 4, 2013 Author Share Posted October 4, 2013 Thanks for the encouragement guys.And a BIG THANKS to BVC500 who is sending me the missing parts and asking nothing in return. Such a gesture makes modeling all the more satisfying. Quote Link to comment Share on other sites More sharing options...
beeRS Posted October 4, 2013 Share Posted October 4, 2013 That's a fine job done there on the Daytona Peter. Its looking amazing! I built the Spyder version about 15 years ago and I remember it being an amazing kit - one of the best I've ever seen. I have bought a spare one of these kits because I needed the a second convertible top. It sounds like you've already got a pair of indicators on the way to you, but if things don't work out just let me know your address and I can send you a pair. Look forward to seeing this one finished. Quote Link to comment Share on other sites More sharing options...
peekay Posted October 4, 2013 Author Share Posted October 4, 2013 Sonny, thanks so much but it looks like I'll have the indicators soon. I'll keep your generous offer in mind though.Yes, it's an amazing kit alright but it's taking me an age to get it done - I'm more of a Johan/AMT builder otherwise. I'm at the stage now where for every part I attach, another falls off. I'm also looking forward to seeing this one finished! Quote Link to comment Share on other sites More sharing options...
peekay Posted October 8, 2013 Author Share Posted October 8, 2013 It's taken much longer than I anticipated to get to the next stage but the interior/inner fender assembly is now attached to the chassis. There were various fit problems, mainly the exhaust headers interfering with the inner fenders. I had to grind, trim and refit repeatedly, with bits falling off as I did so. They are now wrongly aligned and will not meet the exhaust pipes when they go on but I'm calling it done. (I've seen other builders on the net get this right so it's me, not Fujimi.) I attached the assemblys with wire rather than glue, in case I have to pull it apart again, but also to help lower the front a bit. The glass in the kit is one piece but didn't offer a clear view of the interior so I cut out the door windows, seperating back from front. I then did something stupid - I used 2 part epoxy and must have inadvertently mixed part A with part A, instead of B. Anyway, it never set and it was quite difficult to save the situation. I then attached the rear piece with double-sided and normal cellotape. I've done this before and it works quite well but you need quality, clear tape - I use Scotch Crystal. You might have noticed that the interior is also held together with this tape. This allows for some flex while attaching the body and is removeable if necessary. Did some other detailing: BMF matt under the hood and aliminium exhaust tips. The blue tape stripe on the headlight glass will be painted to match the body - luckily Humbrol has a metallic colour which will only need minimal adjustment to match the Sikkens lacquer. Next up is detailing and attaching the body - if all goes according to plan, which, of course, it never does. Quote Link to comment Share on other sites More sharing options...
BVC500 Posted October 8, 2013 Share Posted October 8, 2013 Peter, if you're using the plexiglass front end for the Daytona, the turn indicators should only be painted half amber, not full amber like in your previous photo. Google "Daytona plexiglass front" to see what I mean. Quote Link to comment Share on other sites More sharing options...
peekay Posted October 8, 2013 Author Share Posted October 8, 2013 Peter, if you're using the plexiglass front end for the Daytona, the turn indicators should only be painted half amber, not full amber like in your previous photo. Google "Daytona plexiglass front" to see what I mean.Thanks Bernard, but it looks to me like you could do either - different years or international regulations maybe? Given the choice I prefer the whole piece amber, works more harmoniously with the fender.In fact you'll hardly find two identical cars and the kit includes a couple of rear lighting variants too (as you already know, I'm sure).A couple of years ago I saw a PURPLE Daytona on a Zürich Autobahn! Quote Link to comment Share on other sites More sharing options...
sjordan2 Posted October 8, 2013 Share Posted October 8, 2013 Full amber would be completely correct.http://www.autosalon-singen.de/de/bilder-archiv-fahrzeug.html?fahrzeugid=01270_0032_01_02http://en.wikipedia.org/wiki/Ferrari_Daytona Quote Link to comment Share on other sites More sharing options...
lanesteele240 Posted October 9, 2013 Share Posted October 9, 2013 Stunning Quote Link to comment Share on other sites More sharing options...
ScrappyJ Posted October 9, 2013 Share Posted October 9, 2013 Very nice! Quote Link to comment Share on other sites More sharing options...
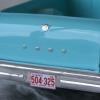
peekay Posted October 20, 2013 Author Share Posted October 20, 2013 Just a quick update... Got the rear done - except for the Ferrari script lifting, which is an easy fix. This and the "cavallino rampante" badge are chrome decals from China (Global Toy on Ebay). Reasonably priced, easy to use and very realistic. Still some exterior detail to add but I'm sure I can wrap this one up in the next day or two so the next pics will be in Under Glass. Quote Link to comment Share on other sites More sharing options...
Recommended Posts
Join the conversation
You can post now and register later. If you have an account, sign in now to post with your account.
Note: Your post will require moderator approval before it will be visible.