FASTBACK340 Posted April 12, 2014 Author Posted April 12, 2014 For both the car & yard! I just finished dinner, am watching Jeopardy, and afterwards will get to work on those side marker lights and some skim-coat on scratches.
FASTBACK340 Posted April 13, 2014 Author Posted April 13, 2014 This update should be entitled what NOT to do……...Watch as I salvage the build due to my carelessness. I decided to drill out the molded in side marked lights and install 3/32" aluminum tubing w/ amber & red plastic lenses, front & rear respectively. The first one I drilled I attempt to do with my Dremel: BAD! NO! DON'T DO THAT AGAIN!!!! I hogged out a hole you could drop a header tube through. The others I did by hand with a pin vise, and they came out fine. What the ^%$# I was thinking I don't know…. Here's how I saved it. I was drilling 3/32" holes for the tubing. I found a piece of PlastiStruct tubing that was 5/64ths with a 3/32" hole in the center. So I went out in the garage and got the drill bit. Here's the tubing I used. And here's the repair after being fused in with Tenax 7. And this is how the tubing slips in….. And here's how the aluminum Marker Lamp bezels look. Neighbors are having a yard party which means I'm not going to bed anytime soon (life in the big city…..) so I guess I'll be sanding and priming later. More to come….
charlie8575 Posted April 13, 2014 Posted April 13, 2014 Very nice save on that marker, John. Interesting technique, as well. I probably would've taken a piece of plastic, glued it in from behind, and then re-finished the surface with the plastic-glue goop some people use as filler, or maybe two-stage Bondo-type stuff and try it again. Like I said before, I hope you bring this to NNL, regardless of its stage of completion. Charlie Larkin
Belugawrx Posted April 13, 2014 Posted April 13, 2014 Nice tubing work Great save Hang in there bro Looking great Cheers
FASTBACK340 Posted April 13, 2014 Author Posted April 13, 2014 Here's another tool I make for scribing. If your REAL CAREFUL you can use something like this for the wheel wells, but on an open panel, you want a sharp, crisp definition. Here we're going to thin exposed panels. First I take a small scrap of angle shaped brass (or what ever scrap you can find…) and file two steps in it. The outside is the shoulder that will ride on the edge of the panel. The first inner step is the scraper. Pull it towards you in both directions. And this will give a thinner exposed edge, which makes an open hood, trunk, or door look more in scale. I just hit this lightly (the actual car has a thick lip) but you can see how the more you remove, the thinner the edge will be.
FASTBACK340 Posted April 13, 2014 Author Posted April 13, 2014 I washed the body last night, let it dry until about an hour ago, and I just blew on 2 coats of sand able primer. There's a gazillion sand marks and divots. The fun starts…..
FASTBACK340 Posted April 13, 2014 Author Posted April 13, 2014 (edited) After a thorough block sanding and leveling I got a good primer base coat. Now to drill the holes to pin the mirrors, door handles, and w/wipers. Another scuff and a coat of Tamiya very light grey surfacer. Then we break out the Scale Finishes bottle and squirt on some happiness….. Edited April 13, 2014 by FASTBACK340
FASTBACK340 Posted April 14, 2014 Author Posted April 14, 2014 6:30 this morning before work I was sanding & applying putty. Yeah.... I want to see it in paint soon!
Skypower Posted April 14, 2014 Posted April 14, 2014 Cant wait to see this in paint also. Looking good.
FASTBACK340 Posted April 14, 2014 Author Posted April 14, 2014 I'm sitting at the Dentist waiting on my wife, more concerned about getting the priming done tonight..... :-o
FASTBACK340 Posted April 15, 2014 Author Posted April 15, 2014 OK, Wife is resting after having some work done. I managed to go sand primer, set up the trim with pins, and drill holes so I can test-fit. The body is going to get sanded out tomorrow night and hopefully I'll be dropping on the light grey primer. But here's another installment on tips-n-tricks…. Separate trim pieces that install after painting can be tricky. Gluing on a set of rear view door mirrors can turn a clean build into a mess. Here's a neat method of mounting them I learned years ago. Gather all the exterior trim that's to be mounted after all paint work is completed. Here are the door handles. Find a smooth, flat area with some meat that you can drill a shallow hole (size to be determined by what ever gauge wire/pins you have on hand) and glue in a short piece of wire (guitar string is used here). And do the wipers….. And the door mirrors. And drill some well measured receiving holes. And when your done you can install, and remove, all the trim. Once the car is finished I'll place a small dot of epoxy on the pins and slip everything in place. More sanding…. more inspecting….. tedious work.
freakshow12 Posted April 15, 2014 Posted April 15, 2014 Very nice work. That is the exact same method I have used with great results. Good tip!
Ramfins59 Posted April 15, 2014 Posted April 15, 2014 Great tip on pinning the trim pieces John although, as you say, VERY tedious work drilling all those little holes and cutting all those short lengths of guitar string. You'll never have to worry about the trim getting knocked off. BTW, your camera takes GREAT closeup Macro shots.
1 bad55 stan Posted April 15, 2014 Posted April 15, 2014 Carn't wait to see this painted.Its awesome...
FASTBACK340 Posted April 15, 2014 Author Posted April 15, 2014 Believe it or not, all pictures are taken with my I-phone. I also failed to mention all the exterior trim is from the Dart kit. Hopefully this will be painted by the weekend. That gives me a week to stuff it together.
Mopar - D Posted April 16, 2014 Posted April 16, 2014 Yea John I use my iphone to it takes great pictures
Tom Geiger Posted April 16, 2014 Posted April 16, 2014 Great Work John. Can't wait to see it in person! I pin together much of my model, a technique that Joe Cavorley taught me to do back in the day. Like you, I pin on all the surface mounted items. I use straight pins. I cut the tip off and use the full pin that goes into the part. Then I can use the pin as a handle to work on the part. Here's a mirror that's going on my Chevette project. And the pin allowed me to mount it for painting. I drill my holes in the body to be tight with the pin. Once I'm ready to mount something, I cut the pin to the desired length and place it onto the body. There are times my fit is tight enough that I don't even need to glue. But most of the time, I glue the pin on the INSIDE of the body. So there's never any danger of the glue showing on the finished side.
FASTBACK340 Posted April 18, 2014 Author Posted April 18, 2014 Body is in final surfacer primer, hood is giving me a hard time. I also ran out of the Tamiya surfacer…. Hobby shop is open late on Fridays. Detour on my way home. Hood will be ready for paint on Saturday, Body is ready now….. As always, thanks for following. The next update should be color <fingers crossed>
Ramfins59 Posted April 18, 2014 Posted April 18, 2014 Can't wait to see it John. Looks like we both might be working til the last minute to have our car done for the BIG party in Wayne, NJ.
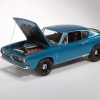
FASTBACK340 Posted April 19, 2014 Author Posted April 19, 2014 I managed to get everything ready for color. Tonight I got a late start, but fortunately didn't have much to do. I have to go into work for a few hours tomorrow morning and pick up out Easter Ham on the way home, but the afternoon is mine to spray on the color. The body looks really nice and smooth with level panels. Should look sweet! I can't wait!
freakshow12 Posted April 19, 2014 Posted April 19, 2014 Looks very good. I was at a car show today and saw a decent 69 340 s. I thought of your car right away.
Recommended Posts
Create an account or sign in to comment
You need to be a member in order to leave a comment
Create an account
Sign up for a new account in our community. It's easy!
Register a new accountSign in
Already have an account? Sign in here.
Sign In Now