om617 Posted January 17, 2015 Posted January 17, 2015 Hello. After little building because of weather i decided it was time to get going again. I thought i`d give this old Camaro a chance. It is molded in "lovely" orange and have tons of flash,but after some clean up,fitting and mock-up it is starting to look like a car. Still have the dead cow in trunk stance,i think it`s mostly because i have not glued the body to the chasis yet,but i`ll get on it. The wheels are sleeves from Pegasus with inserted original Rallye wheels. The engine who follow the kit was a joke. I had a spare 427 from the 67 Impala SS who got it`s home in this one,and it fit pretty good. I will also try use the plumbing from the Impala,and i found a period correct brake booster on Ebay,not to be found in the kit. Color and clear are from Tamiya. I thought i`l let it rest over night before i start fondle with BMF. This is the kit. Here is where i am at now. Thanks for looking.
slusher Posted January 17, 2015 Posted January 17, 2015 (edited) Man, your build is looking great. Did you have to modify anything to get the 67 impala engine in there...?? Edited January 17, 2015 by slusher
om617 Posted January 17, 2015 Author Posted January 17, 2015 Man, your build is looking great. Did you have to modify anything to get the 67 impala engine in there...?? Thank you. The only thing i had to do was to drill the hole in the oilpan a tiny bit bigger,then it slip right in there.
Monty Posted January 17, 2015 Posted January 17, 2015 Tommy, I hope you won't mind a friendly nudge, but you need to reverse your valve covers. The four bolts go on the outside edge. Body paint looks great. Which Tamiya silver did you end up using?
om617 Posted January 17, 2015 Author Posted January 17, 2015 Thanks James,Mike and Monty. Turned the valve covers around,not sure how that could go wrong. The paint is Tamiya TS30 with one coat of TS13 clear.
espo Posted January 17, 2015 Posted January 17, 2015 I think what Monty meant was that the valve covers should be rotated 180 degrees from where they are mounted now. If you look at the valve covers from the end you will see that one side is taller than the other. The taller side should be on the bottom or lower edge of the head.
matthijsgrit Posted January 18, 2015 Posted January 18, 2015 Love the idea of the wheels. What sleeves did you use exactly?
om617 Posted January 18, 2015 Author Posted January 18, 2015 David: That is what i did. Stephen: Thank you. Matthijs: I cant find pictures of the ones exactly i use because i have thrown away the package. One thing is for sure they are not "23,mine are 19" or 20" max,15" wheels slip right into them. This is what the package did look like (Mine is not "23)
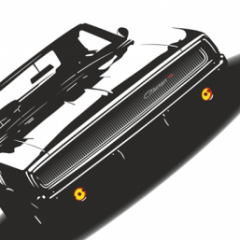
om617 Posted January 18, 2015 Author Posted January 18, 2015 Did some BMF today and detail painted the wheels. The "28" behind the Z should be white,getting on it. Have cut the spindles to correct the bad stance on the car. I consider give this a front spoiler and skip the one on the trunk. Hope it gets warm enough to get on painting the engine.
tbill Posted January 19, 2015 Posted January 19, 2015 looking good! I don't know about you, but I have a hard time foiling silver cars, hard to tell where the foil ends, and color begins at times, really plays with your eyes sometimes.
jaftygas Posted January 20, 2015 Posted January 20, 2015 (edited) That car looks great! Edited January 20, 2015 by jaftygas
mustang1989 Posted January 20, 2015 Posted January 20, 2015 (edited) I've always wondered who the manufacturer of that kit was because I had one of these a long time ago and always wanted another shot at one of these. My first build was pretty bad as I recall. You're doing wonders with this kit and like the upgrades you're doing. Where's the fun in leaving builds all stock anyways? Edited January 20, 2015 by mustang1989
om617 Posted January 20, 2015 Author Posted January 20, 2015 (edited) Thanks for the comments and suggestions. Tom: I find most attempts on foil a nightmare,but i agree on silver being a challenge. Joe: Thank you,and i always fail trying to go completely stock lol. But this kit is so crude i dont have the skill or patience to even attempt trying to make it stock. Well,the engine is in. Had to find a new radiator in the parts box,so this,cooling and radiator hoses arent in yet. Edited January 21, 2015 by om617
Recommended Posts
Create an account or sign in to comment
You need to be a member in order to leave a comment
Create an account
Sign up for a new account in our community. It's easy!
Register a new accountSign in
Already have an account? Sign in here.
Sign In Now