Lunajammer Posted November 5, 2014 Share Posted November 5, 2014 Tim, the interior looks excellent. Very crisp. That stuff takes patience. Matthew the tailgate worked out good. Interesting. Quote Link to comment Share on other sites More sharing options...
wrecker388 Posted November 5, 2014 Share Posted November 5, 2014 I might as well drop out now. I've hardly even started my GTO and there is only a month left. Two years in a row I've dropped out now. Sorry guys, keep on me next year and I'll try to see you at the starting line. Quote Link to comment Share on other sites More sharing options...
TimJ Posted November 6, 2014 Share Posted November 6, 2014 Thanks Mike. More progress today. The interior has been fitted and the body attached to the frame. The front and rear panels have been assembled and are ready for fitting. Quote Link to comment Share on other sites More sharing options...
W-409 Posted November 6, 2014 Share Posted November 6, 2014 I'm almost at the same point with my Formula Niko, I think I got the body right but wont know until priming and sanding to find out. With 26 days to go a lot of stuff needs to go right for it to make it to the line. Mine wasn't quite ready for paint yet, but another coat of Bondo and some more sanding fixed that problem. Now the body is in Primer again and so far it looks smooth. Can't say it for sure though when it's not completely dry. I also sanded the Bondos from the rear spoiler and hood and shot some Filler Spray on them. Chassis was also primed. Getting closer to paint! Quote Link to comment Share on other sites More sharing options...
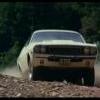
W-409 Posted November 7, 2014 Share Posted November 7, 2014 Well the Charger Daytona was smooth and ready for paint. So today I screwed up the paint job. There was something wrong with the spray can as there came a couple of big lumps of paint to the surface and there's a major orange peel too. It might be recoverable when I'm gonna sand it tomorrow and replaint it with a new can of paint. Stupid Mopars . Quote Link to comment Share on other sites More sharing options...
MLMDesign Posted November 7, 2014 Share Posted November 7, 2014 Update for 34 ford pickup i cut the sides of the hood off and did some body work. Quote Link to comment Share on other sites More sharing options...
Lunajammer Posted November 7, 2014 Share Posted November 7, 2014 Well the Charger Daytona was smooth and ready for paint. So today I screwed up the paint job. There was something wrong with the spray can as there came a couple of big lumps of paint to the surface and there's a major orange peel too. It might be recoverable when I'm gonna sand it tomorrow and replaint it with a new can of paint. Stupid Mopars . The kind of setback that just takes the wind out of your sails. Sometimes old paint is no bargain. However I'm confident you'll come through something amazing, as usual. Quote Link to comment Share on other sites More sharing options...
Pat Minarick Posted November 8, 2014 Share Posted November 8, 2014 Well my photo bucket account is almost full ,I have to make some room for my Lil express truck pictures ! I am ready to start painting everything and putting it together, just made headers for it ,so I only need to finish the cage and exhaust stacks. Quote Link to comment Share on other sites More sharing options...
zenrat Posted November 8, 2014 Share Posted November 8, 2014 Well the Charger Daytona was smooth and ready for paint. So today I screwed up the paint job. There was something wrong with the spray can as there came a couple of big lumps of paint to the surface and there's a major orange peel too. It might be recoverable when I'm gonna sand it tomorrow and replaint it with a new can of paint. Stupid Mopars . That sucks Niko. Good luck with the respray. Quote Link to comment Share on other sites More sharing options...
TFchronos Posted November 8, 2014 Share Posted November 8, 2014 Well the Charger Daytona was smooth and ready for paint. So today I screwed up the paint job. There was something wrong with the spray can as there came a couple of big lumps of paint to the surface and there's a major orange peel too. It might be recoverable when I'm gonna sand it tomorrow and replaint it with a new can of paint. Stupid Mopars . Man that's harsh, given your skill level and quality of your builds I'm sure you'll get it worked out and it will look like a winner in the end. Quote Link to comment Share on other sites More sharing options...
W-409 Posted November 8, 2014 Share Posted November 8, 2014 Thanks Guys! It really sucks when it happens and especially when working with a model that needs to be done before the race starts. But looks like I fixed it so it wasn't Mopar's fault. So I gave the body a light sanding so that it looked a bit better and shot some more paint on it from a new spray can. It's not perfect as there is some orange peel still visible, but it looks so much better now that I'm thinking a clear coat and polish will make it look good. Now I will let it dry properly though before shooting any clear on it. Of course I need to install the Bumble Bee stripe on place too. I also worked with the engine. My order from Ted's Modeling Marketplace arrived a couple of days ago and it contained Pro Tech's Blower belt & pulley set that will be used on this build. As this is a Road Racer though, I had to install an alternator to the engine. The pulleys were cut from kit's original part and the belt will be done tomorrow, just like the alternator mount so there will be no floating alternators! I also added an electric water pump motor and installed a its wire on place. Once the engine is glued in, I can continue wiring that water pump by running the wire to the firewall. My plan for tomorrow is to install the blower belt and the pulleys on place as well. We will see if I can make it or not... Quote Link to comment Share on other sites More sharing options...
DynoMight Posted November 8, 2014 Share Posted November 8, 2014 looks good Niko Quote Link to comment Share on other sites More sharing options...
maltsr Posted November 8, 2014 Share Posted November 8, 2014 Good save Niko, engine looks great too. Quote Link to comment Share on other sites More sharing options...
Jantrix Posted November 8, 2014 Share Posted November 8, 2014 (edited) Okay folks, Nick started the Cannonball this year, but life has kept him from participating much. It happens to all of us. I spoke to him through FB and I'm going to finish up this years run for him, and run next years CBP. I am going to start a thread for completed builds in a minute. If you have finished your build, please post it up. Multiple builds are fine. As long as they were posted in this thread when you started them, per the rules on Page 1. 2.) You must show a picture of the kit, collection of parts, or re-builder that you are starting with. Edited November 9, 2014 by Jantrix Quote Link to comment Share on other sites More sharing options...
1/24DragAndStreetCars Posted November 8, 2014 Share Posted November 8, 2014 We can still build right? Until december 31st right? Quote Link to comment Share on other sites More sharing options...
zenrat Posted November 9, 2014 Share Posted November 9, 2014 Deadline is December 1st. You can build up until then. Quote Link to comment Share on other sites More sharing options...
zenrat Posted November 9, 2014 Share Posted November 9, 2014 ...there is some orange peel still visible, but it looks so much better now that I'm thinking a clear coat and polish will make it look good. Satin clear works wonders on orange peel... Quote Link to comment Share on other sites More sharing options...
1/24DragAndStreetCars Posted November 9, 2014 Share Posted November 9, 2014 Oh, then im probably out unless some magic happens. Good luck everyone Quote Link to comment Share on other sites More sharing options...
MLMDesign Posted November 9, 2014 Share Posted November 9, 2014 (edited) Okay folks, Nick started the Cannonball this year, but life has kept him from participating much. It happens to all of us. I spoke to him through FB and I'm going to finish up this years run for him, and run next years CBP. I am going to start a thread for completed builds in a minute. If you have finished your build, please post it up. A driver can only drive one car at a time. So if you have multiple builds, please pick ONE to post for the CBP winners poll. It must be a model that you built this year and had posted WIP pics of in this thread. I really hate the fact that only one car can be posted i am busting my but on 3 model kits i and everyone else should be able to post all the car we worked so hard to build to me this is not fair if i cant post all 3 i will not post any of them it was not like this when Nick was hosting the Cannonball Run why change it now when the deadline is so close why cant you do this for next years Cannonball Run. Edited November 9, 2014 by MLMDesign Quote Link to comment Share on other sites More sharing options...
Jantrix Posted November 9, 2014 Share Posted November 9, 2014 Okay. Nicks original rules. It says multiple entries allowed in the build off. He did not stipulate the rules for the winners poll. Because of this we'll allow multiple entries in the poll. I'm not happy about it, but as you say, I can change it next year. Quote Link to comment Share on other sites More sharing options...
MLMDesign Posted November 9, 2014 Share Posted November 9, 2014 Okay. Nicks original rules. It says multiple entries allowed in the build off. He did not stipulate the rules for the winners poll. Because of this we'll allow multiple entries in the poll. I'm not happy about it, but as you say, I can change it next year. Thank you so must for allowing it. Quote Link to comment Share on other sites More sharing options...
bill_67 Posted November 9, 2014 Share Posted November 9, 2014 Just posting some of the progress that i've made so far. Lots of detailing left to do today on the chassis, engine and rear suspension. I have decided on using the rear exhaust instead of the sidepipes, there built already just need to be painted. I will post pictures of the of the interior, should be finished by next weekend. Quote Link to comment Share on other sites More sharing options...
W-409 Posted November 9, 2014 Share Posted November 9, 2014 Now I got the alternator brackets scratchbuilt to the Hemi. I scratchbuilt them from beer can aluminum and then I made the belt from Pro Tech Blower Belt & Pulley Set (Picture #1). From the same set I used the Blower belt pulleys and the belt of course. The bracket for the idler pulley was made out of sheet styrene and then the belt was glued on. Tomorrow's project will be painting and installing the carburetors. Hopefully I can start working with the chassis too. Quote Link to comment Share on other sites More sharing options...
maltsr Posted November 10, 2014 Share Posted November 10, 2014 Excellent work Niko Quote Link to comment Share on other sites More sharing options...
W-409 Posted November 10, 2014 Share Posted November 10, 2014 Thanks Paul, I appreciate it! I did some test fitting today as the body and chassis were touch dry. First I test fitted only the body, interior and chassis together and they all fit very nicely. I was afraid of the hood as I did the scoop before I thought this should end up being Blown and as I thought it didn't fit under the scoop. Because the Blower should never be hidden under the hood, I removed the scoop and made the hole a bit larger to make the hood fit. Wheels and tires are from Plastic Performance Products. My test fit shows that they fit fine otherwise, but the rear tires need to be brought a bit closer to the body, now they're too far inside the fenders I think. Sorry for the low quality pics. Now when it's late Autumn / almost Winter it gets very dark in here after 4 PM which makes it hard to take any pics. Quote Link to comment Share on other sites More sharing options...
Recommended Posts
Join the conversation
You can post now and register later. If you have an account, sign in now to post with your account.
Note: Your post will require moderator approval before it will be visible.