Ferbz
-
Posts
316 -
Joined
-
Last visited
Content Type
Profiles
Forums
Events
Gallery
Everything posted by Ferbz
-
Thank you! I'm getting close to finally wrapping up this build. It's been a long 5+yrs since I've started lol
-
Thanks man! The real car has been one of my all time favorite Mercs 🙂
-
Thank you! It's not exact, but it's my best effort at copying as many of the details from the real car as possible. I'll be posting the progress as I approach the finish line.....it's getting close! 🙂
-
Thanks! Yeah I'd like to think and hope he would be 🙂 I'm in touch with Rod Powell and he's helped me along the way with paint info and various details I dont recall when i saw the car in person back in the day. He's appreciating the progress of this project which is a huge compliment to me 👍
-
Thank you! I'm discovering over the years that my model building skills jump ahead quite a bit when I'm merely able to solve 'weird' problems with 'weird' solutions lol
-
Chopped/channeled 50 Ford Custom Pickup
Ferbz replied to Ferbz's topic in Model Trucks: Pickups, Vans, SUVs, Light Commercial
Thanks! Yeah, in my eyes this truck's factory design was a custom challenge begging to go 'under the knife'. It was a great design exercise for me 👍 -
Chopped/channeled 50 Ford Custom Pickup
Ferbz replied to Ferbz's topic in Model Trucks: Pickups, Vans, SUVs, Light Commercial
Thanks! This is a 'curbside' build which has no engine or chassis detail. I imagine it would have an updated and dressed up period correct OHV motor, like an early cadillac or Buick nailhead 🙂 I dont have any good interior pics. I may try to take some and if i do, I'll post them here and try to tag you 👍 -
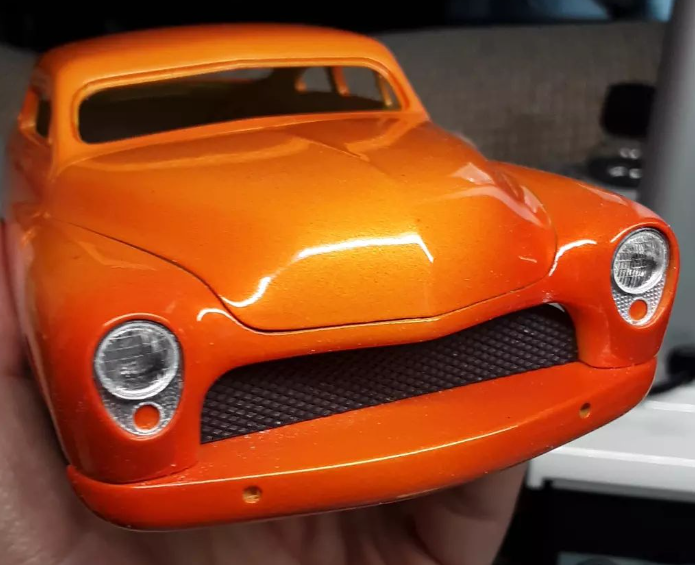
Another update for the front end is the grill area: I made the background from railroad brass mesh spray painted flat black and backed up behind it with a sheet of styrene painted dark gray. The original 1:1 car used a 63-64 Buick grill bar and bottom valance piece. I could have built the grill bar from scratch with dicey results...lol but instead I wracked my brain for a bit trying to think of something to at least start with. I finally recalled that the Chrysler grill piece from the old AMT parts pack had a center bar and central cylinder in it that looked very similar to the Buick piece I needed. I cut it out what I needed from it and drilled out the center cylinder. I found a suitable bullet that was a clear red tail light and glued it into place. Some prepping and gloss black paint followed by Alclad chrome finished up the grill bar. The bottom valance piece was scratch built from sheet styrene sheet cut to shape and grooved thin aluminum sheet also cut to shape and then glued onto the styrene piece. The complete unit was then covered in BMF. Everything was mounted and glued into place. It's not exact, but it's close enough in my eyes to give the right impression!

-
Thanks! Some fellow modelers have mentioned that I could've purchased a pair of resin Buick headlight pieces, but I wanted to see if I could make them from scratch. I'm pretty happy with the results 🙂
-
More progress ensues! Focusing on the front end, here's how I made the headlight inserts and buckets: I cut some foil backed plastic pill packets to make the textured insert. I cut/shaped a pair to fit the front fender opening, then used a hole punch to make the turn signal lens area. However, the hole punch ended up mangling the insert and making them unusable! I decided to make another pair, except this time I punched the hole in the pill packet material FIRST, then cut and shape the inserts around the turn signal hole....that worked much better. 2nd time is the charm, right? 🙃 The headlights are made from the AMT 49 Merc kit's round headlight bucket pair with the bezels sanded down to fit inside the Buick shape:
-
Thanks! I believe you can do a search in the WIP for Curley Tremayne Merc. You should be able to find my initial post on the project. In there are more pics of the bodywork process when I first started it all. Among the pics I posted there is this one that shows the steps I took to scratch build the frenched headlight area at the front of the fenders, and a general description of the steps. I'll soon also post how I started to build the insert/lights:
-
Thanks! I've chopped a handful of AMT mercs prior to this, but this one is my best effort so far.
-
Thanks! It doesn't 'glow' quite the same as the real car, at least the way I remember it, but it'll have to do. I'm NOT repainting it a 3rd time! lol
-
Thanks! It was a HUGE hurdle mentally to get the body work fixed after the stripping. I really dislike doing things over, but in the end I'll have a neat story to tell (hopefully!)
-
´68 Buick Riviera Custom - John D'Agostino's Pantheon
Ferbz replied to Koellefornia Kid's topic in WIP: Model Cars
I just now got a glimpse of this build....nicely done! I myself am working on a scale replica of a real 1:1 custom....not easy to do! The details and modifications HAVE to be faithfully reproduced in order for it to be a good copy. Your chop is particularly successful! -
Thanks! I've tried out some new custom body mod techniques on this build I've not done before. I'm still not sure how it's all going to come together (lol!) but I'm happy with the progress so far.
-
It's been quite some time since I posted about this build, mostly due to the fact that the initial paintjob went sideways on me! lol The candy coats went on fine, but the clear started fogging in a way I had never seen before. Feeling deflated about the whole thing, I stripped it all and let it sit (for a couple years apparently!) I ended up not liking the graininess of the Testors Inca Gold metallic I used as a basecoat anyway. It had the right tone, but the metallic felt out of scale on the model. After some more testing, I ended up using Tamiya Yellow Pearl as a base. I also added just a couple coats of clear with Interference Pearl powder over it just to brighten it up a bit. Candy is tough to get even! (at least for me) but I was able to do a decent job. It's nowhere near perfect as it still has it's problems, one of them is the candy red fades being a bit too heavy handed and not exactly the same on both sides. This 2nd attempt is better than the 1st so I'm keeping it. I am NOT repainting it a 3rd time! The 3 panel pic is how it looked after I stripped it. Alot of the careful putty work got removed along with the paint so that had to all be redone. That was depressing because I really dislike doing it lol It's crucial to get it as nice as possible in order to yield the best results so I gave it my best shot (again!) I've also been working on some of the detail work that I'll also share. Stay tuned.....
-
Thanks! I did my best to think of this build as kind of a 'redesign' 👍 BTW I see your location is Waipahu, Hi......I grew up there in my early childhood! Howzit brah! 🤙
-
Thanks! I dont usually put alot of extra work into the interiors of my builds but because the window openings are so large on these cars I knew the interior would be seen quite a bit 😊
-
Thanks!
-
Yeah those C pillars in particular are very delicate. I actually had to strengthen them a bit at the bottom where they connect to the body by backing them with styrene strips. It's definitely not how a real 1:1 belair might get chopped but I knew it would yield the right look for what I was after!
-
Chopped/channeled 50 Ford Custom Pickup
Ferbz replied to Ferbz's topic in Model Trucks: Pickups, Vans, SUVs, Light Commercial
Thanks! Traditional customs are my favorite subject matter and it was refreshing to do a pickup in the old 50s style 👍 -
Chopped/channeled 50 Ford Custom Pickup
Ferbz replied to Ferbz's topic in Model Trucks: Pickups, Vans, SUVs, Light Commercial
Thank you! -
Chopped/channeled 50 Ford Custom Pickup
Ferbz replied to Ferbz's topic in Model Trucks: Pickups, Vans, SUVs, Light Commercial
Thanks! A 'shave and a haircut' and a 'nip and tuck' in the right places can beautify almost anything I think 😊 -
Thanks! I recently started using a new airbrush which replaced the old worn out one. It helped a lot to have a good airbrush! lol