Brinx
-
Posts
291 -
Joined
-
Last visited
Content Type
Profiles
Forums
Events
Gallery
Everything posted by Brinx
-
plumbing.....air lines and such
Brinx replied to tbill's topic in General Automotive Talk (Trucks and Cars)
I think its good to revisit topics from time to time Tom. Here's my recent attempts, starting with what most would probably consider the industry standard. 1) Speaker wire from Radio Shack( the 3-pack of red, black and green). The stuff will hold a coil, but I feel it doesn't have the right "lay" to it aft of the pogo stick, more so that it is rigid and does not have a natural droop or drape to it. 2) The RS speaker wire again. This time, just the outer casing. This is great for the old-school, straight airlines but again, the stuff has a memory (from being on the spool) so it also lacks that "draped" look coming off the stick (maybe warming it and re-working it to the right shape, haven't tried that yet). 3) Telephone wire: this stuff is thinner in gauge and will hold a nice tight coil but looks a bit small in diameter. 4) Ear bud wire: Has a good diameter and seems to have a decent drape (in longer lengths) but is probably one of the more expensive options ($ versus usable length). 5) Paracord: This stuff is pretty cheap, looks the right diameter and comes in every color you could possibly think of plus three more. The only problem is it looks more like a fabric covered hose (I'd guestimate around 5/8" in 1:1 as I tried out as a 1" booster line on a fire truck reel and it came off looking too small). Edit: I assumed we are talking the service hoses and glad hands My conclusion, I tend to go with option #2, using the black wire casing (seems easiest to remove from the wire) and make three, old-school, straight lines, great for our older stuff but probably not what we're wanting for the more modern IH's and Petes. -
I think speaks for itself.

-
KW Snap W-900 {mud flaps}
Brinx replied to Old Buckaroo's topic in WIP: Model Trucks: Big Rigs and Heavy Equipment
(pulls up a chair)....these are always fantastic!! -
Kenworth rebuild
Brinx replied to junkyardjeff's topic in WIP: Model Trucks: Big Rigs and Heavy Equipment
Good start Jeff, glad you decided to rescue the old 925. I like your frame shortening method, works great with the walking beams. looking forward to watching this one come alive. -
Very nicely put together and looks very well engineered! You and KJ make a great team.
-
It's good to see you back at the bench JT. I'm looking forward to seeing some new orange rocking up and down I-45.
-
Scott, excellent weathering and build! I like especially your photo angles, really makes for a nice scene/diorama.
-
Original Oldschool 352
Brinx replied to OlSchoolRedo's topic in Model Trucks: Big Rigs and Heavy Equipment
Great looking Pete James! Colors look wonderful together and love the trailer. -
351 Peterbilt conversion
Brinx replied to Old Buckaroo's topic in Model Trucks: Big Rigs and Heavy Equipment
Great looking "old school" Pete, looks like she'll keep haulin' for a long time to come. -
Good looking truck Nick, hope to see more. I like the paint work, looks pretty smooth and straight. You show a lot of attention to detail. On the toothpick thing, my wife keeps wondering were her kitchen box of picks keeps disappearing to
-
DM 600 Container roll-off completed
Brinx replied to Tesla's topic in Model Trucks: Big Rigs and Heavy Equipment
Dennis, that is one well done hauler. We had one drop off a 20yd at the shop last month and the working features of your rig mirrored the actual drop off and subsequent call-back for container re-placement (oops!) of the actual WM rig. I too, really like the tarp deployment unit, spot-on. -
White Western Star
Brinx replied to The Modeling Hermit's topic in Model Trucks: Big Rigs and Heavy Equipment
Fantastic rig Doug! The photography is spot-on! -
I've had pretty good luck with the tire/wheel cleaner from the Dollar Store, Like the Simple Green method I have a plastic tub with lid and just drop the parts in. It can take anywhere from a few hours to 3-4 days. It works quite well with the automotive rattle can paints and even on a Testors paint job I can personally confirm was 30 years old! The stuff does a decent job removing chrome too. Again, plan on soaking for at least 3-4 days, but it has worked in as fast as several hours (rare though). The product has not disappointed me yet as far as the plastic goes, I currently have a car body that has been soaking for at least a month (yeah, yeah...I'll get around to it one of these days...lol) So the upshot is, the cheap stuff will give you a good job, but there is a time investment that for me, justifies the cost savings.
-
KW COE Aero / BJ McKay rig
Brinx replied to Old Buckaroo's topic in WIP: Model Trucks: Big Rigs and Heavy Equipment
Looking really good Sean, your paint work on the cab really hit it out of the park! Your signature line reminds me that I need to go watch that scene again Slim -
Luke, The whole rig is very nicely done. I especially like your headache rack design as it has boxes for the chains and binders. I have to admit, I've never been a big fan of the full, rear fenders look, that is until NOW. I love how you worked the two sets together, it really looks quite natural. The fenders matching the rack really compliment the rest of tractor. I really like this kit, massive potential. I find the hardest part is filling in that wedge on the cab roof (lots of putty and sanding I guess). The trailer looks quite well done as well. Makes me want to have another go at a detach goose neck again.
-
Daniel, very nice work, I especially like your oil blown Cat and the greased fifth wheel. Keep at it and like the friends above have said, feel free to ask for help/advise.
-
a different rubber duck question
Brinx replied to scottie's topic in General Automotive Talk (Trucks and Cars)
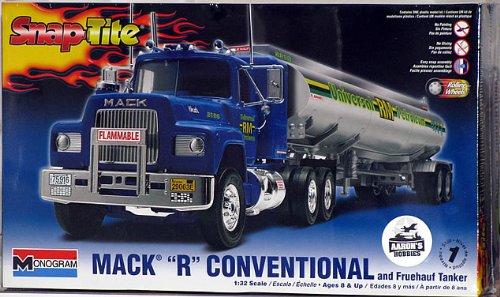
Scottie, if you can find one, the 1/32 snap Mack R model and tanker might be a good starting point, The trailer represents 10,000 gal (or is it 8000?) but if used in 1/25 scale, might be a bit more on par with Duck's tanker , which I believe was 5500 gal. There was a web site of a gent who restored/replicated a Mack rs700 as the movie rig and he was also able to find, in a junkyard, one of the actual trailers used. the site is : www.stlouisdumpretukcs.com (although it may no longer be active, but it is archived). Dave, Excellent resource for measurements , thanks for posting.
-
so.....ya......been awhile
Brinx replied to tbill's topic in General Automotive Talk (Trucks and Cars)
Yes Tom, I too have the feeling we're going to pay for this string of nice weather. I did manage to get both cars in the garage, the deck furniture is covered and I ran the snow blower last week so I'm ready! -
Nice looking rigs Bob, that you for sharing with us.
-
so.....ya......been awhile
Brinx replied to tbill's topic in General Automotive Talk (Trucks and Cars)
Ya know Tom, I just recently started a project that has been killing whenever I have to knock off for the day. Now it makes sense, I thought I was having that artist-flake thing going (last rig I built was around May 2k15), but Its the winter months, that ol' building instinct comes back. Oh sure, I've had several projects in mind that I've wanted to do, but during the summer its been one thing or another that keeps you busy (not a bad thing), and of course, who can lay down a good layer of paint when the humidity is entering into the "you gotta be kidding me" zone. I am quite lucky, I have a warm place to paint during the dead of winter (nice and dry). My Boss lets me paint in the shop during our down time, long as your truck is in position within 3-minutes (any ARFF guys, you know what I'm talking about). So I'll close by posing this quest, since we have a nice representation from the tri-corners of the Country (so far), Winter....tame or gonna really kick out butts? -
I hit a forum milestone! (I guess).
Brinx replied to Petetrucker07's topic in General Automotive Talk (Trucks and Cars)
I think the prize is: buy one tube of model glue, and get the SECOND one for REGULAR price! Seriously congrats on the 5K, I've found your posts (along with many, many friends on here) to be topical, supportive and positive. These are things which make reading and sharing here a pleasure. Good Holidays to you all! -
I'm of like mind with Gino and Sean. Being a "rattler", I usually prime inside and out first, then shoot the interior colors. I find it a bit easier to touch up any over spray or bleed through on the interior side rather than the other way around. As of the underside, I typically leave that in primer with color overspray (a la Mopar style).
-
Two old builds from long ago
Brinx replied to Superpeterbilt's topic in Model Trucks: Big Rigs and Heavy Equipment
Terry, good looking rigs, I like the attention on the secured flatbed load.

.jpg.be2e7b05c7c5df4ca14a6623686f68c6.jpg)