
RyanSilva
-
Posts
736 -
Joined
-
Last visited
Content Type
Profiles
Forums
Events
Gallery
Everything posted by RyanSilva
-
I decided to change the intake setup to the fuel injected unit.. Looks more proper and less overkill. The engine is simply mock up, so height is debatable. I started lookng at the fuel injectors and man the flashing always kill using them, aluminum tubing doesnt cooperate well, so i used styrene rod chucked into my dremel. The styrene rod looks smaller because it does not carry the flare, but its ok, Im happy with them. I should order aluminum ferules for the future. Ok so here is a mock up..very quick..so height isnt what were going for here. It can be lowered and will be, both front frame and the engine itself. Fuel injectors are kept small in height too. Hosted on Fotki Hosted on Fotki Hosted on Fotki Hosted on Fotki
-
Thanks Dennis! The wheels are from Polar lights drag kits. Mine was stardust, but i believe they all have the same wheels. The tires are from AMT Altered (bantam blast or wild willy)
-
So here is a short how-to On making a Hot Rod fuel tank using a straw (a very large straw!) Some casting resin and some modeling clay. You will need some mold release..I used Petroleum jelly. aka Vaseline I do not know where i got the straw! Il have to ask in my household, I found it in the draw..yes i got lucky The clay is just regular cheap modeling clay, you dont need to use clay..use anything that will clock the bottom of the straw. The casting resin I use is ordinary fast setting resin. Hosted on Fotki I started by taking the straw, looking it over, seeing if it is round, this one was pretty round, so I used the clay making it pretty flat, I took some petroleum jelly and a small brush, and brushing the inside of the straw.,I then stuck the straw down into the clay. This will hold the resin in the straw so there is not leak, and hold the shape of the straw end to Hosted on Fotki Now I do not have a shot of the resin pouring, because thats up to you and what brand you choose. After i mixed up my resin (1:1 volume) I poured it into the straw. This is the result. Hosted on Fotki I used the end of my file to push the resin through the straw when it was cured. You will need to do some trimming, thats up to you, and how you do it. I used a hobby saw and small mitre box.. Hosted on Fotki Here is a sanded and complete tank next to a un finished one. Hosted on Fotki I used parts from a pocket watch for the fuel cap and neck Hosted on Fotki Here is the almost finished product, As you can see some pin holes are evident. But thats due to not using my pressure pot , and a fast cure resin, but its simple, a little body filler will rid that away! Hosted on Fotki
-
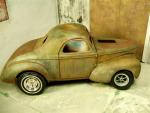
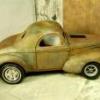
I swapped engines, The more radical the grill got, and the frame, I decided to up the engine aswell. Engine: Tony nancy -Nailhead. Pretty much as you see it is, from the nancy kit, cept for the valve covers which are Tommy Ivo! I might use the Fuel injection intake rather than the super charger. This engine is a original 1963 kit! Its the oldest and only old kit I own. I scored it (very incomplete) on ebay for around 11 bucks. It wont sit as high, but a tad bit lower.No that isnt the correct drop axle either I made the blower pulley from resin on my dremel. a while back, but will use it on this if this nailhead gets blown! Hosted on Fotki Hosted on Fotki Hosted on Fotki Hosted on Fotki Hosted on Fotki I like the halibrand wheels front and rear, rather than the chrome steelies in the back.. Il drill out the back wheels. Thanks Dave! Il take those ideas and see how they will work with the truck.!
-
Well the new mercury from revell has a nice bench, AMT 62 impala, Revell 48 ford convertible.
-
Late model ford bronco
RyanSilva replied to N~8~Ball's topic in Truck Aftermarket / Resin / 3D Printed
OJ simpson... -
Weathering and Rusting with Acrylics!
RyanSilva replied to RyanSilva's topic in Tips, Tricks, and Tutorials
Look forward to photos Jose! If you need any assistance.. PM me or email. Its not a problem at all. -
When i posted that, they were still 11.60 or whatever change it was. Not all kits but ALOT. I ordered after i posted that and the prices where the same. I went back later in the night and the prices were up 4 bucks!!!! to your 15.29....Thats alot when your buying more than one kit..because i lose out on 1-2 kits for the given price amount i have to spend. other retailers are looking much cheaper to buy from..such as megahobby on some items..and ehobbies.
-
Late model ford bronco
RyanSilva replied to N~8~Ball's topic in Truck Aftermarket / Resin / 3D Printed
LOL i was thinking the same thing! -
So earlier today I ordered 6 kits from tower hobbies..and had a coupon for 20$ off! The kits were 11.50 or so regardless of a sale (did not see a sale on kits) I just checked again..and the price went up to 15.60 for the same kits i ordered earlier! That normal? Ive never seen that before on there site..
-
Theres always tower hobbies... great prices there, 11.50 for most revell kits!
-
Seen him on TRaK..
-
Great Close up Camera, Sony DSC-W150
RyanSilva replied to stevehansen's topic in Tips, Tricks, and Tutorials
Fantastic! Those look impressive. I plan on a new camera this christmas, mine will be the canon a590 with the lens adaptor..so i can buy some big lenses -
Thanks Guys! I cant wait to weather this thing!! I cut up the 41 chevy bed and took the first half of it. At first it was gonna be open back without a tailgate..but the proportions looked off, so i reversed it, and it looks much better. Dont worry i still have the tail light! Had to remove it to trim the wood pallet. I made the gas tank by taking a big gulp nylon straw..this thing was HUGE.. i added some vaseline to the inside, and poured some resin inside..basically the straw was a mold. I simply pushed one end out of the straw and cleaned it up and cut to length. Its pretty round, slight oblong But you cant tell. The fuel filler was a watch part, the stem had a black oring on it..so i kept it on there! I do not like the bed side contour up top so i may grind them off and use some plastic rod so they come down to the same height as the cab..looks a little off. Hosted on Fotki Hosted on Fotki Hosted on Fotki Hosted on Fotki Hosted on Fotki Hosted on Fotki
-
These would be a tad smaller and shorter. Like this...
-
Shell Short Hauler
RyanSilva replied to Travis Waits's topic in WIP: Model Trucks: Big Rigs and Heavy Equipment
Aaron..look in the backround of the photo..theres a little image of the tanker -
Shell Short Hauler
RyanSilva replied to Travis Waits's topic in WIP: Model Trucks: Big Rigs and Heavy Equipment
Il dig up some photos. But the tank would look something like this..keep in mind this is a old tank..but the design did not change too too much.. http://www.truckpaper.com/listings/detail....82D5C5C8C350093 -
I got the firewall in place..just need to trim it away and putty it up. Its getting closer to paint..Whats next is the bellhousing tunnel will need to be made in the firewall, so i can mock up the flathead. I have a problem though, the seats will not work, so I will use simple padded cushions on the floor.Because its channeled so much, and the angle of the steering wheel and the pedals, you would need to be a midget to drive it! Its ok..i can fine adjust the floor pan with spacers to gain more clearance. Plus cowl steering! Hosted on Fotki The grill was made by chopping off the forward portion of the stock fenders of the f100 and mocked at an angle then glued. The radiator is made from the 48 ford kit..I my as well use up most ofthe kit seeing i abortioned it. Hosted on Fotki Hosted on Fotki Hosted on Fotki Hosted on Fotki
-
Hey guys! I'm going to be making a cargo box for 50's medium duty trucks for myself, just wondering if there's any interest from others, looking for the same thing? Theres a few Resin medium duty truck cabs out there..but never any cargo beds or freezer boxes, so I want to change this. I'm thinking a 12 foot Box would be appropriate, a good comprimise between the 9 footers and the 16 footers. These would be solid cast (foam filled, for reduced weight and resin cost) So dont count on cutting doors out or anything. Now Il be designing it to the 50's style..not so much a modern box on a 50's truck chassis.
-
I use Adblock addon in firefox..ive blocked every single signature picture just for the reason of annoyance
-
Fantastic work James! Love that cab!!!!!!!! nice colors, greens are great to work with.
-
Thanks JB! --------------------- Ok i got the dash template made and MEK glued to the dash, just gotta add filler and cover up the spaces to make it nice and pretty. It fits the curvature of the body.
-
Ok what i did today..(not much) but, i painted the drivers door and sealed it with dullcoat. It has 4 layers of browns. redoxide is my basecoat always, primer or sponged on acrylic..this case its sponged on. I made about 8 hinged, could not get any of them to fit properly, so i took the right side of a Revell Model A RPU cab and cut off the hinges, and glued them on with MEK. I have the bottom one obviously but i left it off so i can remove the door till final assembly. The door will be Yellow. The body....not sure, but maybe baby blue. Oh and i need to clean my desk..see how cluttered it gets at the start of a project? WOW! Hosted on Fotki Hosted on Fotki Hosted on Fotki Hosted on Fotki Hosted on Fotki Hosted on Fotki
-
any thoughts on this ebay resin caster?
RyanSilva replied to BigPoppa's topic in Car Aftermarket / Resin / 3D Printed
Stuff looks pretty good. I thought about trying them aswell, shipping looks a little high on those tiny items..i mean they could be shipped ina padded insulated envelope for 1.50..so order a few items to make the most of it! (Shipping price on the larger items though is cheap!) sorry just a petpeave of mine hehe (im not complaining..honest) -
anyways.. I opened the door! Just need to adjust the hinge. I will be only having one door open, the other side will be welded closed., like my sign? Hosted on Fotki Hosted on Fotki Hosted on Fotki Hosted on Fotki Hosted on Fotki Hosted on Fotki I will be adding another high just above this.