
RyanSilva
-
Posts
736 -
Joined
-
Last visited
Content Type
Profiles
Forums
Events
Gallery
Everything posted by RyanSilva
-
Help support our new advertiser
RyanSilva replied to Gregg's topic in Links to Aftermarket Suppliers
I dont mind ads, just dont do it like that "other" magazine forum..that is the worst ad setup I've ever seen! Thank gosh for adblock plugins for firefox! If there was a ad section, where all the ads were compiled..i would visit it. -
Looking good! The only resin item i would think is the grille, as AMT makes the bodies. The aircleaner , i have seen the same ones in AMT prostreet superbee. Roadrunner version might have them aswell..
-
That looks great!...I just wish the top chop was fixed though
-
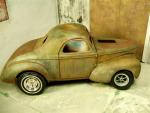
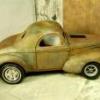
1950 Ford Pickup - Lowered , Rusty and Ratty
RyanSilva replied to RyanSilva's topic in WIP: Model Cars
Thanks Fella's! James, i did a tutorial,its in the tips section. Basicly its just multiple paint applications of acrylic paint, i use a brush with a tiny amount of paint on the tip to get the "calico" effect (multiple colors in a small area) Just apply multiple layers of acrylic paint, and rub them off with rubbing alcohol. Its much more in depth in my tutorial. -
So this was started about 2 months ago, i worked on it steadily in july...slacked in august, but Iwant to complete it! its pretty close. The bed junk is Green tea, i weathered with alcohol and black ink, glued it down with hair spray.
-
Awesome V! I LOVE that blue grille... and those seats look comfy...well one of them... Nice paint work, it all looks superb with the decals...it all "melts" together!
-
Were is gramps-xrds
RyanSilva replied to sdrodder's topic in General Automotive Talk (Trucks and Cars)
I spoke to him yesterday on a diorama forum, he seems to be ok, at least there was no mention that anything was wrong. Must be just busy! -
Weathering and Rusting with Acrylics!
RyanSilva replied to RyanSilva's topic in Tips, Tricks, and Tutorials
That sums it up! check out my other builds http://public.fotki.com/73OldsOmega/models/ using this technique. Virgil also tried a bit of it on his double cheese rat rods! (superb work V!) -
Weathering and Rusting with Acrylics!
RyanSilva replied to RyanSilva's topic in Tips, Tricks, and Tutorials
The 5th Paint Step: Rust streaks! You can play with the acrylics again. I use Artist acrylics specifically for this part. Why? Pigment, it’s much more rich and pure than craft paints. This doesn’t make craft paints bad...I’ve used them with good results; artist acrylics just do it better. I use Windex or rubbing alcohol to mix with my paint for streaks, never water unless it’s distilled. Normal water is to "hard" and doesn’t flow well, due to surface tension. Windex, distilled water or Rubbing alcohol cut through that tension. You want a drop of desired color for rust streaks. Use a darker shade and work to a lighter one. Break out the Brown Umber, squirt a dot of paint on your pallet, and get your dagger brush work in some alcohol into the paint. You want it watery, but still pure...you don’t want the color washed out. Apply rust streaks to fender crevices, door hinges; tail light areas...front fenders...trim lines...doors...its endless! Remember this. When you add a layer... don’t touch it to much, as you may remove the pigment and you end up with a bare spot. Let this completely dry or force dry it. To create those aged runny rusty streaks you see vertically on buildings, cars etc... Try this. Run your brush and paint horizontally across your area you want your vertical lines. Why horizontal? This is the starting point on how your rust got to streak! Buildup a nice transparent layer, it may take a few times. Once this horizontal layer is dry, Work on the vertical lines, paint long un-uniform transparent V's or triangles. Go over these in layers with different shades. When you complete the rust streaks, detail out the kit! Add chrome, black wash pigment powders, weathering chalks...your done, finished! You can seal every layer you did with Dullcoat and an airbrush, spray it thin! This will preserve your layers if you liked a specific pattern you created. I did not do that on this build Don't limit yourself to just this... i weather many different ways, and everyone has there on little tricks, the biggest step to any weathering is committing to try it! I vision every kit as a junked up project or clunker, it’s hard to picture a model kit and say “I’ll paint that one shiny!" -
Weathering and Rusting with Acrylics!
RyanSilva replied to RyanSilva's topic in Tips, Tricks, and Tutorials
I then added the Caribbean green. This went over the yellow that went over the pale green. Using the Alcohol I removed the colors. I will admit this car is a lot harder to do! It’s just so big... The Alcohol and Ink wash… When applying this, I use the round head brush. Apply it as you would with the regular alcohol...only DON’T soak it up! (You could use black wash instead of the clean version in previous steps for added depth. Let the wash sit on the paint, pickup excess with the sponge from the underside of the body panels, it usually drains in a few spots. -
Weathering and Rusting with Acrylics!
RyanSilva replied to RyanSilva's topic in Tips, Tricks, and Tutorials
The Body The primary colors I used are Wedgewood green (it’s a light flat green), Kings gold (a buttery golden yellow), and Caribbean green (a slightly bright pastel green, like grabber green!) Use the same steps like I used on the hood...only it’s on the body, although larger… Same principles apply. Work on one section at a time. I started with Wedgewood green I then added the alcohol, you can dab the brush to break up the layers. Next I added a coat of Kings Gold. Think of this… When you see primary colors fade, what other colors do you see? Take green for example; when it fades you may see some yellow, ever see sky blue? It gets so chalky it could look white, so use a white undercoat, then the blue top coat. The yellow is applied very transparent. -
Weathering and Rusting with Acrylics!
RyanSilva replied to RyanSilva's topic in Tips, Tricks, and Tutorials
The 3rd Paint Step: After your browns and tans have been applied, focus on more vibrant colors. Remember that you control the colors...did you see a rusty car with a white exterior that faded into green? Well apply green first then lastly white, see where I’m going with this? Use different shades of one color...or use a rainbow of colors! It does not matter it’s how you see it. I normally use Apple Barrel "Wedgewood green" or a lighter shade of blues. This does not mean you need to. When you have added a nice uniform and even layer of another color. The Hood The primary colors I used are White, and a pastel light blue, similar to sky blue. I started with a white coat, and let it dry completely. I then moved onto the pastel blue, what you see is a container filled with clean rubbing alcohol, my brush I apply it with, and the makeup pad I use to lift the layers. This shot shows the alcohol sitting on top of the paint, right now its softening it all up... I soaked up the alcohol...you should have something like this at the very least, the paint is softening up. Do that step again, depending on the results you got, here I did the previous step again...lift up the paint, and it revealed the rusty acrylic under it. I applied more alcohol A bit more alcohol… Remember, pressure and time plays a large role on what layers lift or wash off. Add a bunch of alcohol and hard pressure on the sponge, you risk removing a large amount of layers. Here you see where I goofed and I revealed the black primer coat. To avoid this you can seal the rusty coats with a thin airbrushed layer of Testors Dullcoat. I worked on the other half...this is the result. -
Weathering and Rusting with Acrylics!
RyanSilva replied to RyanSilva's topic in Tips, Tricks, and Tutorials
Making the Ink wash: India ink and Rubbing Alcohol creates the dark grayish black pigment you see on my work. You can say it’s not needed, or I overuse it...or even it looks over done. The point is, it is very reliable on making the layers of paint "pop" and I say its Highly needed!. To create this...use 1oz of rubbing alcohol to 3 drops of black ink. Keep in mind...this formula ratio can be worked with...it’s up to you to experiment. Use one more drop if you feel it’s to light; YOU control the look you will paint. The 1st Paint Step: Clean your parts, and make sure you get those mold lines removed! They show up easily. From there, prime your parts with your favorite primer or paint. I use Red Oxide Lacquer primer, this is shown as the under layer coat of paint. When you start removing layers of paints to get a rusty layer shown...this is what you will see. You can substitute this layer for any color you want...of any paint...don’t just think you have to have a rusty red layer. Use a regular color as the primer coat...work with what you have or like! But for the tutorial...we will be using black primer. Coat your parts as you would do with any paint step, don’t just think because you’re weathering...you can hack it! Once your happy with a uniform even layer of primer or color, let it completely dry. The 2nd Paint Step: Now comes the fun part. You can now add another color... I normally start with raw sienna or burnt umber, depending on how light or dark I want the layer to be. If you feel comfortable airbrushing your layers...feel free to do so...but I do not know the formula ratios. I apply my layers with a makeup sponge, why? Texture! It creates a tiny bumpy like texture that is to good to pass up! (For me)Use a scrap plank of wood or plastic as a pallet; squeeze your paints in tiny amounts. I cover my pallet with masking tape...it preserves the original item...and cleanup after is a breeze! (I change my tape after a few builds) It’s important to let your layers dry completely. Why? Well if you touch the layers and it feels cool to the touch...then it’s still wet! Wet layers will change colors if you add another color to the undried layer. Make sure your layers are even and thin. Let these dry completely. Feel free to add more shades of browns and tans...it’s up to you. I normally use 3 layers of different artist acrylic browns. You can force dry your layers with a hair dryer. When you add layers of any color, transparency is something to consider. Using light dabs of the cosmetic sponges, and a small amount of paint, will create a transparent layer, try “brushing†or smearing the paint to get a smooth finish. Here is the roof. This is one layer of Burnt Umber. It’s important to do one light cover of the first acrylic paint, Even though the previous primer coat should have enough “toothâ€, acrylics stick better to other acrylics, so start with a light first coat, then go a tad heavier on the rest, thereafter. The 1st color-heavy coat: ------------------------------------------------------------------------- 2nd color Here is the rest of the body, coated with the second color –Raw Sienna, see how you can notice the previous color underneath? You may find dust likes to attract into your paint, if you notice them remove them soon. The small dots you see that are textures are paint taken off from the makeup pads, sometimes it’s a good thing they show up in your paint, other times not so much. -
Ok i posted this on a few boards..so why not here?! Just sharing some information. I wrote this last week. I have a PDF version as well, that i can send out, for those who want it in a "offline" way to print out or..burn, whatever ya dig! Unlike other forums theres a picture limit built in, this is why its in multiple replies! ------------------------------------------------------------------------------ Weathering Aged and Decaying Paint with Acrylics By Ryan Silva I’ve slowly progressed into this particular style you have seen on my builds. I did not create this technique...but i have altered it into my own Style That I am comfortable using. Il describe how I paint and weather my 1/25 scale Model cars and trucks. Keep in mind, what works for me, might not work for you! But with practice anything is possible. I’m not a master, nor a Pro. I goof up and "hack it" quite often! The biggest step is to just try it! I hope this tutorial will get you or your friends to try it...just once! Is all I ask? You can email me at "73oldsomega@fotki(dot)com" or the forum with a PM, IL assist and answer any question you got, if you are in need of help. Reading is one thing...And trying is another...Some things won’t be clear until you attempt the techniques...I hope you have fun! Some items you will need are: Paint brushes- I use small and medium sized round heads the size I suggest is 3/8th round and “Daggers for streaking rust. Daggers are similar to what the pin stripe guys use...only the artist versions are a tad bit different and much smaller. They create straight lines much easier than any other brush I have used. The size “Dagger†I suggest you find is a 1/4th inch Cosmetic Wedges: These are wedge or triangular shaped sponges used by woman to apply makeup...these are the bread and butter for applying paint in this tutorial! I buy these at an "ocean state job lot" for $2.50, for 24 sponges. (Discount store in the north east with alternating stock, you may have one locally with a different name) Acrylic paints-I use craft paints and artist matte acrylics. It’s important to use both. Craft Acrylic Brands: I use Color Traditions, Apple Barrel, Anita's, And Folk Art brand craft paints. Cost is usually from 50cents to 1.50 dollars each for 59ML (2oz) Artist Acrylics: Liquitex Basics "Mattâ€, are what I have tried, thus far (they were on sale very cheap). There are much better quality paints out there than liquitex, but for an entry level artist quality, it does a superb job. These I got on sale for about 3.50 for a 75ML tube (2.54 oz) normal price is around 7 dollars each, if you find Winsor & Newton close in price, go with them, much higher quality. These paints go a long way! Colors to look for in both Acrylic Artist, and Craft paints are various browns, tans and yellows. From there grab on top coat colors you like... it does not have to be what I use. With practice...you will find colors that you do well with, mine are lighter shades of greens and baby blues. Craft paints have a more broad selection of color choices than artist quality, but you can make any shade with artist quality paints. The "pro's" about craft colors, are there already mixed to the shade...the hard part is done for you. Artist quality paints...I like using Red oxide, Burnt Umber, and Raw Sienna. Red oxide looks just like Red Oxide primer, Burnt Umber is a rich brown, usually used as dark older wet rust. Raw Sienna creates fresh rust, or a dry looking rust color. India ink: I use Pro-Art brand BLACK India Ink. A bottle should run around 5 dollars for 2oz's. Get the bottle with a dropper top, this gives you control on how much ink to use later. You do not need to use the brand I use...It was cheap, so I bought it... I plan to explore different brands and more colors, get a water proof India ink, if you buy another brand. My bottle says "can be diluted with water" keep that in mind when shopping for other brands. Rubbing Alcohol: 70% grade (there are 50, 70 and 90% that I have come across. (Isoprpyl Alcohol) This is highly needed to create the following weathering techniques, best buy a decent size bottle, but most bottles around $1.50 will be fine. Primer: Use a lacquer whenever possible, it’s the strongest and most handling resistant paint that found the easiest. Red Oxide is a top color to use. This serves as the "rust layer", you can use blacks, whites and grays...just get a red oxide artist acrylic color to go over, and you will be fine. You need a primer, no matter what though. Misc: Painting Pallet: Small containers from shredded cheese, butter, or just buying them...you will need something to hold your black ink wash. I use clear plastic 2oz bottles from AcMoore, or Michaels. They sell for around 50cents a bottle...give or take. Wood or plastic/glass to use as a painting pallet, cover with masking tape to make cleanup a breeze.I do suggest craft paints for starting out...it will get your feet wet...so to speak. And it’s a smaller investment than Artist quality paints. REMEMBER! Ac Moore, and Michaels craft stores have 40 and 50% coupons in your local newspaper. Use these for the expensive items...it really saves a lot of $$$.You can break up old Makeup sponges and reuse the clean parts to soak up excess alcohol, don’t waste these!
-
Detail master sells there version of the race blower PE detail set, its on the main page about halfway down.
-
Wow..they changed...the old first cd is so much better than the new..######.
-
This is usually the way my luck goes... "Oh wow look at that kit..i finally found one!, ohh! the seller has 3 more i want, ok..i check the shipping, what do i see? 9 dollars shipping *each additional item is just half the original shipping price!" I see that often as well..then it looks like just shipping will cost me $22.50!!
-
Count me in!
-
dumb question but
RyanSilva replied to sdrodder's topic in General Automotive Talk (Trucks and Cars)
Doesnt hurt to ask..or does it? ..as far as i know, Art has retired from resin casting for good. It would require some hefty time to cast something when your not in the buisiness anymore. As far as his stuff on ebay..some folks could have pulled there own molds off his work or modified his pieces and casted it as there own, it happens alot sadly. -
Revell delays more street dates
RyanSilva replied to Zoom Zoom's topic in General Automotive Talk (Trucks and Cars)
Ah! what else is new...i just hope there making changes that makes a better model -
dumb question but
RyanSilva replied to sdrodder's topic in General Automotive Talk (Trucks and Cars)
I read on SA a while back ..and ART said..he has most of his masters..and molds (that are survived)..I believe he said he wont part with any of them. (im not saying this to step on anyones toes..dont even quote me on this..but im pretty sure thats what i read) -
Sneak peek ....The IMC Tanker Trailer kit is back !!!
RyanSilva replied to SteveG's topic in Truck Kit News & Reviews
I agree! ive come close to cutting mine up also..but its just much to large...it would be so cut up to look right its just not worth it. I gotta get more c600's now! -
48-50 Chevy COE
RyanSilva replied to 82k5's topic in WIP: Model Trucks: Big Rigs and Heavy Equipment
Gotcha, you asked for the contact..so i gave it directly to the source Ive seen him post on ebay.. theres also a seller "miteymouse" (not msmiteymouse..his other account) He sells resin kits, and he usually has a 50 chevy cabover..but its a crewcab version. -
48-50 Chevy COE
RyanSilva replied to 82k5's topic in WIP: Model Trucks: Big Rigs and Heavy Equipment
Heres Race Motor Replicas site! http://www.freewebs.com/rmrresin/nf125.htm I plan on getting that tank bed and that ford COE in the future. -
Where can I find these wheels?
RyanSilva replied to slidinsideways's topic in WIP: Model Trucks: Big Rigs and Heavy Equipment
Il post when there finished! I was going to include tires in my sets..but...if your c600 kit (or whatever kit your using) has a 20 inch diameter wheel, these would fit. A good way to tell is if the louisville hauler wheels fit your tires..then these would also.