
RyanSilva
-
Posts
736 -
Joined
-
Last visited
Content Type
Profiles
Forums
Events
Gallery
Everything posted by RyanSilva
-
 Ive been working on replication the vintage wire wheel covers made of spun aluminum from the 20's-40's era. Usually found on cars like the Stu Hilborn roadster..or any wire wheel equipped car that ran at Bonneville or el mirage. Mine are tooled from resin, which il make my copies from..heres the master for standard 15-16inch wheels, they fit AMT bias ply style tires, and do fit Revell 1940 ford white walls, 1948 ford convertible blackwalls and 1937 ford pickup truck tires with some light sanding in the center of each style tires.. Im also making another but made for large diameter Model A wire wheels.. im still working on this one. But they fit AMT/MPC model A wheels from the woody kit. Id imagine the roadster have the same wheels and tires. I should have these casted in the next few weeks. Pictures are located here. Thanks for looking http://public.fotki.com/73OldsOmega/my-masters/
 -
A Childs View of Marrage
RyanSilva replied to Joe Handley's topic in General Automotive Talk (Trucks and Cars)
That was great..smart kids! -
got a tip for fuel/brake lines, mesh, wiring, and more.
RyanSilva replied to abedooley's topic in Tips, Tricks, and Tutorials
Use push pins (the long ones) they have colored plastic balls molded on top. I have mini ones that are 1/25 scale, you get about 100 in a box for a few bucks at art stores. Whats funny is a aftermarket model company who will remain nameless sells these very same " shifters" with the pointed ends cut off to "disguise" them..and they are priced at about 2 dollars+ each! so buy a box and save hundreds. -
Pre wired distributers and magnetos
RyanSilva replied to m408's topic in Tips, Tricks, and Tutorials
On there website (not ebay) they have a open apology statement, he exsplains everything. I have ordered from them this past month and got my order flawlessly. as far as magnetos.. make your own! http://s167.photobucket.com/albums/u129/73...chevy%20pickup/ i started with 1/16 alum tubing for the shaft, 3/32 over the 1/16 then placed a slightly shorter 1/8th tubing over the 3/32 so i could have a cap, i then drilled a hole with my pinvise, then chucked up the same bit in my drem and hollowed out the hole for the wires to fit. -
Laquer thinner on a rag takes off the shine and makes the tires very rubbery, then as harry said, dulcoat them and that shineless flat look will stay
-
Anyone know of a company who produces the
RyanSilva replied to abedooley's topic in Tips, Tricks, and Tutorials
Look into floquil paints, they make about a million million different colors John deer signage, try looking at railroad items, woodland scenics makes john deer logos on there sheets, there rub on dry transfers. HO building signs on my sheet i have here, are big enough to fit on the door of a 1/25 truck -
how to set up a public folder on
RyanSilva replied to evilone's topic in Tips, Tricks, and Tutorials
I dont think its possible Kevin, its either full public or full private..atleast thats how its apeared since ive been using it (past 7 years) Fotki has a single folder option to lock or make public, one of the many reasons why i like fotki, ofcoarse the downside is you dont have the linking options like you do with free photobucket, untill you pay for fotki. -
Ive got the revell model A pickup, and this comes with: 4cyl lake pipes 2carb downdraft manifold cragar crank case cover chrome head What other kits contain 4cyl parts? im trying to build up a flathead 4cyl list of speed parts If i recall the model a sedan from revell, has a riley 2 port head.. anyone else think of anything to add, to my shopping list?
-
i actually messed up.. In my straight six box i had fenton split exhaust manifolds, 2 and 3 carb manifolds, and chrome valv covers, but i believe those are from the 1951 fleetline, sorry. The 50 custom did have chrome valve covers and aircleaners, carb also i think. Now the 41 chevy pickup does have a custom intake with 2 carbs
-
Revell's 1941 chevrolet Revell 1950 F-1 (two versions are out, bone stock or a custom with ardun heads..custom is currently out and can be built stock) AMT 1950 chevrolet-great kit! theres stock or a custom version..custom cannot be built stock. but does have engine hopups. AMT 1955 and 1957 stepside and cameo, all kits are same, except different grill for the 55 and 57, and cameo fleetside beds.
-
Plug wires are around 30 gauge (29-31 gauge should be ok) Plug boots, use battery cable for those, around 26 Gauge. Or you can use shrink tubing..look for 3/64 dia, for the boots. I'm still looking for a solid source for multi colored plug wires..without paying the premium price from the hobby retailers.. i don't want the radioshack kind, but a flexible low memory wire, much like the ones psf or arrowhead hobbies sell, anyone got a source? to buy in long lengths/spool The starter wires will usually be about the same size as battery cables, around 26 gauge. common "detail" wire for speed o's or wiring harness/wiper motors would be around 35 gauge or smaller. Once you get to 40 gauge, there usually isnt any vinyl coating, but a lacquer
-
Looking for large Hilborne scoop
RyanSilva replied to djway3474's topic in Car Aftermarket / Resin / 3D Printed
Look at the stone wood and cooks willys kit. ACMOORE and Michaels usually carry them, and use the 40% off coupon on them, they retail for 20bucks at ACMOORE, but with the coupon it knocks it down to normal. -
Ok i was thinking earlier, you see alot of aftermarket Individual parts, such as those from curbside dioramics, they have parts such as cranks shafts, pistons, cylinder heads with detail! etc.. Im very curious, what kits (please be specific with model year,brand and type) have you come across, that contained very detailed individual items? It doesnt have to be held strictly to Engine internals, see a very detailed bellhousing or transmission? lets us know! From memory: (il look though my kits and update my list) AMT Chevrolet 1958 Bel air has a 348W with a detailed crankshaft seperate from the block. AMT Chevrolet 1966 Nova Prostreet has a detailed small block chevy with detailed cylinderheads and molded engine internals on a engine stand AMT 1970 Superbee has very detailed cylinder heads and block with hemi combustion chamber details, along with molded crankshaft, and rocker arm details.
-
Im located in New Bedford (SE) Ive been wondering about a club, even if its a get together online (i dont travel much) I might be intrested.
-
Submit Your Helpful Hints, Tips, and Tricks to MCM
RyanSilva replied to Gregg's topic in Tips, Tricks, and Tutorials
Ive used baking soda as carpet. Paint your floorpan or surface area with desired color. (craft paints work well), get a nice thin coat of paint on the surface, let dry, do another coat, well coated, then flood the area with baking soda, shake off, and let it totally dry out. When its really dry you can coat it with thinned paint. Another way is taking a dime size drop of craft acrylic paint in a paper cup, then add 4 tablespoons roughly of baking soda, jiggle the cup till the baking soda balls up, if it looks wet...add more baking soda, then stir it well with a popsicle stick, stirring very very well, let it dry out over the coarse of a day, stirring every few hrs, just to keep the powders from becoming rock hard. Once fully dry, you can sprinkle it to create colored texture for carpeting, trim, grass, moss..sand on a street..anything really. Crushed velvet? -
Looking for 1/24th scale Wheels
RyanSilva replied to white00gt's topic in General Automotive Talk (Trucks and Cars)
Your best bet is to make them yourself, because they dont exist.. You can most likely make similar looking wheels from the Japanese wheel kits. -
Correct no factory 427's..the highest the nova got from factory was the L78 Engine; 375-hp Turbo-Jet 396-cid
-
Ah i love a traditional gasser, keeping it real with a inline and steelies! love it man.
-
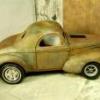
added a wash and some touch ups.
-
OMG two gems i see in my future, thanks for casting these!
-
Thanks you guys! I will do that Barbo when i cast a few more rows and more bricks, so il snap some shots of the sequence. Heres a shot of the other plaster ground, (i had these two already made from last year) Hardest part is blending them to match..which is why you should paint them all at once! just the basics are done. The cinder brick wall i hand carved from a thin strip of plaster, scaled the size to 8mmx16mm scale, more or less. I also coated it with latex mold rubber, bruched on, still need a few more coats, but when thats built up, il form a wood layout around it, and pour a plaster backing to support the latex mold. from there il remove the mold from the plaster to take out my master.
-
So Today it hit me.. i need a backdrop, Like Virgil has for his builds. Im pretty limited..fund wise to what i can do..but i will make it happen. Today i started a Form and made a rectangle like shape from plaster paris. Mixed up some plaster and here we are!, i started weathering it, this is my first time weathering concrete, its pretty hard, but with practice im sure it gets easier. I still need to blend in a little more, but i think the dirt will soften up once i add some gray bakng soda. The moss is made from baking soda mixed with craft paint. Few drops ina closed container and sprinkle plenty of baking soda, shake like crazy and you get tiny dough balls of baking soda, which you apply where ya want,then take a brush dipped in rubbing alcohol and drip it over the moss, it should melt a bit and adhere. From thre take a soft brush and dab the moss to get some texture. The base should look better once its got some dullcoat. I plan on widening and exstending this, this is just the first, then il add more and blend them in to match. The indentations are natural from the casting of the plaster, BUT i hand carved the scratech and cracks.. only one crack in the corner did i use the hammer and glue back method.
-
Awesome work Virgil, always been a fan of your work, love the body, not overdone, and flows very well, love those seats! what did you use for that? just printouts or?
-
I cant wait, im buying every one i see at my hobby shop, then resort to online.. i can build 3 dozen examples of novas..omegas,venturas, apollo! ahh i cant wait. I def want to do a omega (one of my 1:1) and helen gibbs 427 copo.
-
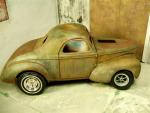
Thanks guys! Getting closer, whats left to do? Clean up door seams from the black wash mount windows, and make side windows. re-weather some goofed spots on the bed sides and the hood work in some green into the rust, to look a tad less spotty mount up interior, and weather engine bay. (no engine..its part of the diorama, its getting a new engine in the scene..)