MitchP
-
Posts
301 -
Joined
-
Last visited
Content Type
Profiles
Forums
Events
Gallery
Everything posted by MitchP
-
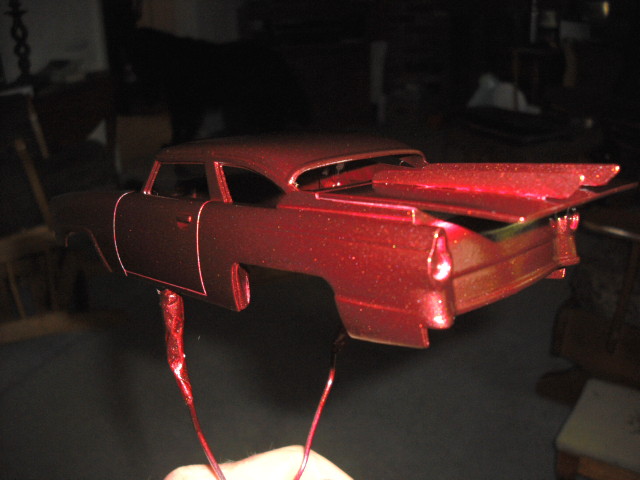
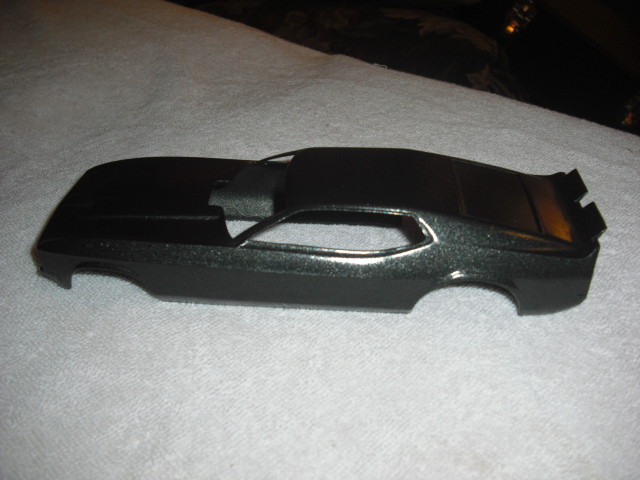
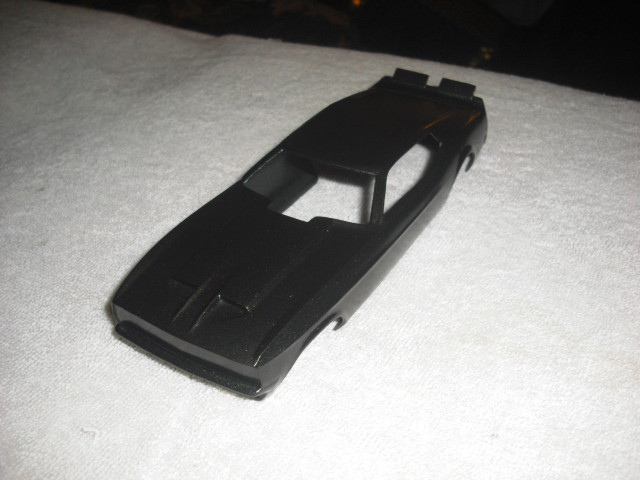
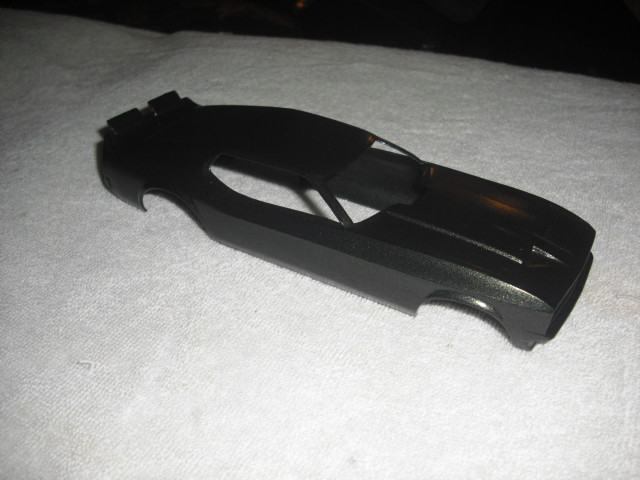
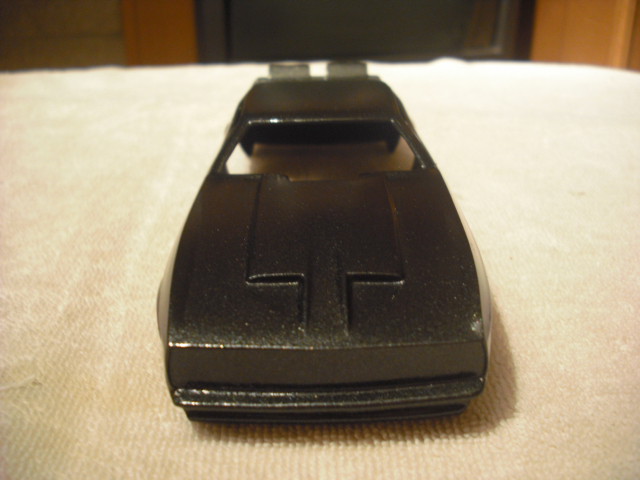
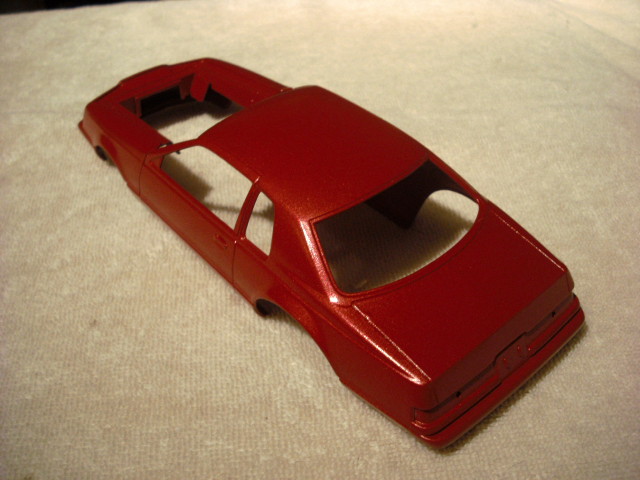
Well, no mo shoebox. The chassis was a perfect build for me (top thumbnails), but the paint job suffered from a bad clear job and clean-up. I went instead with a '55 Chevy body and it worked out great. Here's hoping I can attach some thumbnails of the body... When life gives you lemons, make a '55 Chevy...

-
Excellent Ron! I've finally met my match with posting pics here. I've got to go Fotki or something. I tried to attach some pics of my Hays T-Bird following your advice and everything fit so far including the Hemi with the blankets and safety straps. Just can't attach it to a post any more with MCM's upload. I need to grill you on your standard steering wheel mount with the flat screen Data Tech (or whatever) readout. Outstanding work and thanks for sharing your tips on the wheelie bar, cage and Revell chassis scores!
-

Chip King's "Green Machine" Daytona Pro Mod
MitchP replied to David Thibodeau's topic in WIP: Drag Racing Models
Dave: beautiful craftsmanship. Not blowing smoke either. I don't scratch build (yet, or perhaps ever), but there was an unanswered question or two I wanted to raise again. For instance, how is the jig made and to what dimensions? How do you know the basic construction of the tubing? Is there a standard technique to fabricating and locating the firewall/dashboard portion? Like I said, I only kit build, but I've already learned from am73grand how to use solder to fashion and fabricate a better cage for Revell based pro mod/sportsman cloned kits. I hope to also use some of your knowledge to improve my amateur skills so if I make the jump to scratch cars, I'll be better educated. One last question please: did you make your magneto using your lathe tools? I don't have this type of equipment handy and your work is excellent. I do have an RGE Sonny Leonard resin kit engine waiting to use, although I wish I'd chosen the Hemi version. The instructions are vague and the little xeroxed sheet of pictures is going to be a great challenge to work from. Anyway, I think Chip would be amazed by your crafting of his racecar. I wish someone had done Leah Pruett's car before she headed to top fuel but turbos aren't as impressive as a huge blower hat! Great job. -
Hi: Just got to this build and several things stand out: first you're doing one heck of a job, two, the streetburners I've build (or seen) that were focused on a pro sportsman build never had these many problems, and I have 3 Hemi top fuel engines I would have given you one for your build! Seriously, you're work is great. I never realized anyone made hex styrene rod and I spend overspend my budget on RB Motion and Detail Masters aluminum fittings, which I paint with Tamiya clear red and blue acrylic. Is the hex rod Evergreen brand and what diameters do they come in? Can't wait to see the finished work as you never gave up. One tip a friend gave me on roll bars/cages: use some solder inside the body to bend and conform to the approx. height you want the bar. Then, get some styrene rod and a candle (or other safe heat source) and slowly heat the rod to match the solder shape. Once you have the hoop done, you can add other bars as needed and if you want a pro-style cage, you can use the heating trick to avoid the sharp looking angles on the cage. BTW, your detailing is nice too. I think I saw a strap down for the fuel tank in one of the pics; a much missed detail that really adds a 1:1 touch. Good luck and cut some lights!
-
Round 2/MPC Arnie Beswick "Boss Bird"?!
MitchP replied to MitchP's topic in General Automotive Talk (Trucks and Cars)
Thanks for the info Mark. The interview though, quotes Arnie as say specifically it was a 1/25 scale. I know at over 70 years old Arnie wasn't probably wasn't completely up on all of the marketing promos as he was always an underdog, especially since Pontiac never provided the backing that Chevy did. -
Polar Lights Tommy Grove funny car?
MitchP replied to MitchP's topic in Model Building Questions and Answers
I've seen pics somewhere of a jig. It looked like a thin metal sheet with measured scribe marks on it's sides. Add a couple of 90 deg angles with magnets attached and you could ensure a square build area. I'm also going to check with a couple of scratch pro mod builders to see how they keep everything straight. -
Round 2/MPC Arnie Beswick "Boss Bird"?!
MitchP replied to MitchP's topic in General Automotive Talk (Trucks and Cars)
Mike: Do you remember when it was released or when you bought it? If it follows the actual car, it must have been a nice kit. -
I'm pretty sure it's a Round 2 reissue, but I found a Tommy Grove Mustang funny car on sale at my hobby store for $14.95. It's got a Logghe style multipiece frame and a Hemi with a choice of blower hat fixtures. I'd like to know what would help me put this style build together as all my prior funny car builds (3) have been one piece chassis. Do you have to build or buy some sort of jig or to keep the frame square? From the rather brief instructions, I can see that it appears there are some typical and some unique aspects of the build such as basic fuel system pieces, but it also comes with dual remote oil filters & fittings, separate blower belt and a nicely detailed Ford engine.
-
Just finished reading an excellent article on the racing career of Arnie "the Farmer" Beswick and he hinted a re-reissue of the Boss Bird 1972 match racing Firebird funny car. It was apparently released sometime in the past in 1/25 and Round 2 has talk of retooling it. Beautiful from original pics, blue frame and gold twin retro fuel tanks up front Arnie used to run a blown Ram Air V in it but switched to a 426 Hemi so I hope the kit would be based on that. I'd also like to see his latest pro mod Tameless Tiger '63 Tempest release by Round 2. If you can get ahold of the Spring 2014 issue of Elapsed Times Retro Drag Racing magazine, you'll find the scoop along with a great photo shoot of Cruz Pedregon's CA Charger retro f/c. If you like JJ fire burnouts and nostalgia, this is for you!
-
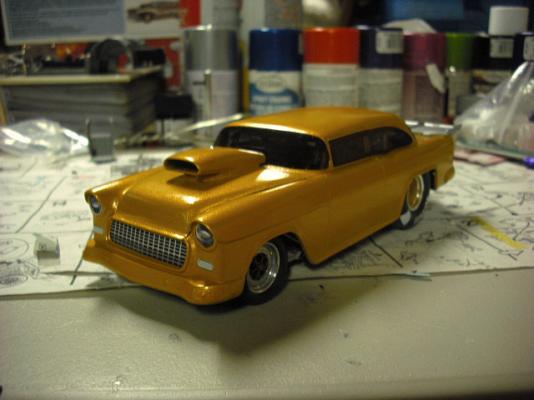
Hi Tyrone: I see you also use the DM blower detailing kit (at least I think that's where the blower tie-down plate came from). I just discovered them and I've stocked on a couple. You've also replaced the Pegasus rear wheels, which have been discontinued or out of stock for quite a while, although the fronts are available. If you ever decide to sell a set of rear wheels/tires, please PM me. The build is looking great; I hate to ask for secrets, it's kind of like asking DaVinci how he painted Mona Lisa LOL. I would like to know how you create such remarkably accurate MSD mags in 1/25. I've seen the preassembled 1/16 scale ones in pairs, but never preassembled in 1/25. Any tips would be helpful. I currently use M.A.D. mags and cut the standard bottom off. From there I replace it with same size styrene. One thing I can't imitate is the MSD circle cover over where the wires exit the mag. I wanted to ask you - I find the instructions almost worthless from Ross Gibson; it looks like my kit includes a clutch shield and part of a Lenco, but no details on how they go together? I intend to cut and install a thin piece of styrene sheet undernearth the chassis so hopefully the this won't be visible. Keep up the great work as it motivates a lot of us still learning. With the help of another member, I've got a primer now for fashioning my own pro type rollcage on a Revell two piece chassis from the '55 Sportsman Chevy kit. Now by pre-measuring and adjusting, I can select a similar sized body and fit the wheelbase accordingly. It's a start towards the ultimate goal of really building a full chassis by hand! Sorry for so many questions, but I hope you can answer a couple. Copying is the most sincere form of flattery! Mitch
-
Brett: this is fantastic. I wish I'd had this for my Kalitta/HOT ROD Mustang funny car build as it sits up way too high in the rear. However, I'm leaving well enough alone this time. I did pick up what appears to be a 1:25 Duster/Demon Revellution off Ebay. It's intact in bags, but no decals. The instructions are copied from the original with no front sheet so I don't really know what I have for sure. I do know that it has small plastic humps or air ducts that glue to the top of the forward front fenders so I figure it might be the Revellution or perhaps an early entry by Monogram into the f/c model competition. In any case, I'll be using these tips, along with sorting through the many slicks I have to create a better build. Thanks!
-
1966 Ford Falcon Pro Mod NOT MUCH LEFT TO DO NOW! 6/19/14
MitchP replied to am73grand's topic in WIP: Drag Racing Models
Hey folks: I've recently made Ron's acquaintence as he helped he locate a windshield for my first attempt at an over the edge build, a McEwen '57 Chevy from Revell (not the re-release, the original f/c) which I grafted a Kobelco blower & pro mod hat among a zillion other little mods (mostly incorrectly). The windshield was broken and although I found a replacement from the original dealer eventually, Ron followed through and sent me brand new glass. As we chatted, he let me in on his method of crafting pro mods for many different bodies such as this example. He's been a great resource of info on using Revell chassis for foundations and has linked me to his photo albums and this particular link, which I will no doubt use my spare Soff Seal chassis to attempt a home roll cage, as well as mods to select and utilize my own choice of body for a top sportsman build. I want to add my thanks for this awesome thread and mention a few things which were incorrect: a comment was made about the Lenco tranny being incorrectly attached to the engine used - this is impossible since I've built the Shoebox engine and the Lenco is oriented as is because it's molded to the rear of the block and the bottom of the engine/oil pan. In addition, the location of the distributor is not a mistake on Ron's fault; Revell used GM blocks for the Shoebox kit, hence the rear location. On the Glidden pro stock kits, the distributor is in the correct location because the engine is a Boss big block Ford. Just wanted to make sure people know someone of Ron's talent wouldn't make mistakes like these go by! Great job and plenty of learning to do for me!!! -
Good point Brett! Good price on those new re-releases too. I'll post below. BTW, Shift13 and I have been discussing his incredible ability to pick-up the Revell pro sportsman clone kits ('55 Street Burner, '57 Soff Seal, '55 Shoebox Ford), use the running chassis to build big pro mod motored monsters with a lot of homemade customization and then selling the leftover body, wing, etc for use by junkyarders and slot car builders. BTW, how how ya been?
-
Ditto Brett, nice build. I got the MPC "HOT ROD" version of this and detailed it up quite a bit. Then I had to file down the tinwork around the rear of the engine for the fuel distribution, not to mention the roll bar padding. This caused the tinwork to fit imprecisely and the tabs in the rear which fit into the chassis were positioned to far rearward. I had to cut them off and do some styrene magic to realign everthing to open and close correctly. Mine is painted Mystic Black and I had custom gold "Nitro Mare" decals made for it. I may have to scrounge around for other decals to use as sponsors because of the dark body. It's late and I'll post a pic tomorrow. I have a couple of different kit WIP threads I need to update as well. Your builds always look like the real thing, like you could slap a starter on 'em and hear the nitro cackle!
-
MH2: beautiful job! Is this built from a resin kit with SMBC parts or a styrene kit? I'd love to do a build like this. Well done!
-
Thanks all. I'm glad Revell has re-issued this kit; however, I'd hate to spend $25 just to lift the windshield to fix this build and then have a new McEwen kit 99.9% complete except for a missing windshield. I can always use the spare parts, but finding a replacement body of some kind with the same wheelbase might be hard. I'll ask around for anyone interested in a nearly full kit a reasonable price.
-
Goodbye shoebox, hello '55 Chevy door slammer. After fixing the clear spots and reshooting everyting to a beautiful 5 coats, along with a week's drying time, it was time for glass to go in and final details before decals to be attacked. The windshield was a little tight going in, so instead of sand paper, I took an xacto and gently scraped the paint on the inside of each a pillar.That's when the paint chipped; not only on the inside, but along the edge of the top fender next to the a-pillar. ON BOTH SIDES. I've gone through 3 successul paint jobs with no problems and tossed a coin on this one. I've been fighting with the fitment, the rear wing, etc since I got it. If my brainstorn doesn't work, it's in the dumpster. Revell put out clone chassis for several cars and many years where cars like the Shoebox can fit Soff Seal, '55 Sportsman and prolly others right on the same chassis. I checked out my Soff Seal last night and it's a perfect fit. I'm going to remove all the wing junk from the original body and get a universal promod wing from Ted's or a simple one from Comp Resins. If neither one helps, they'll be handy for oher conversions. I've lost patience with the Shoebox and think it's jinxed. Look out world, here comes another '55! Here's how close I got:
-
Alriight, here are the initial pics of the paint job for the '57 ex-McEwen as I've pictured it. Sadly, this is one of the original series and somewhere during shipping or the build, the windshield cracked cleanly in half. I tried to carefully CA glue it, but nothing would work. I was hoping SLIXX window supports would hide the glue attempt, but it didn't matter. Anyway, that's another fish to fry. Hope you like the paint and concept for an amateur. I'm gonna use the same decal company to create something for this car; maybe Godzilla, King of the Lizards of Terror of Tokyo with a cartooned Godzilla spitting flames. Please send me some ideas! I'll be using as many sponsor decals as I can considering it's the original kit and not the new one. I'd hate to buy an entirely new kit from Revell just to obtain that winshield!
-
'86 Iaconio Motorcraft/Budweiser P/S build
MitchP replied to MitchP's topic in WIP: Drag Racing Models
Well, I've got pics of the body with custom decals, although not all the sponsor decals are on yet. These were made by Firebird Designs after some input from me. I don't take very good pics, but hope these give you an idea of the assembled build!
-
'86 Iaconio Motorcraft/Budweiser P/S build
MitchP replied to MitchP's topic in WIP: Drag Racing Models
You're watching "Drag Racing Underground"!... I'm friended with Brett on Facebook and his picture is him with a couple of big, floppy eared bunny rabbits. They're his pets and it's a great pic! -
Andy: I didn't catch what scale this is, but if it's 1/25 I'm blown away by your scratch detail improvisation. Even if it's 1/16, it's mind blowing. I can't even fathom all the thought put into this effort much less the execution. Did you hand make the mag? If not, where I can I find these in 1/25 scale? I don't know if you've visted Ted's website, but he carries a lot of Protech's parts like the crank triggers and other hardware. Again congrats. And I wasn't trying to dis your use of a turbo for the procharger setup. I've only seen them mounted off to the side like the Novi's and Vortech units.
-
HOT ROD Mag Kalitta reissue with Hot Rod branding
MitchP replied to MitchP's topic in WIP: Drag Racing Models
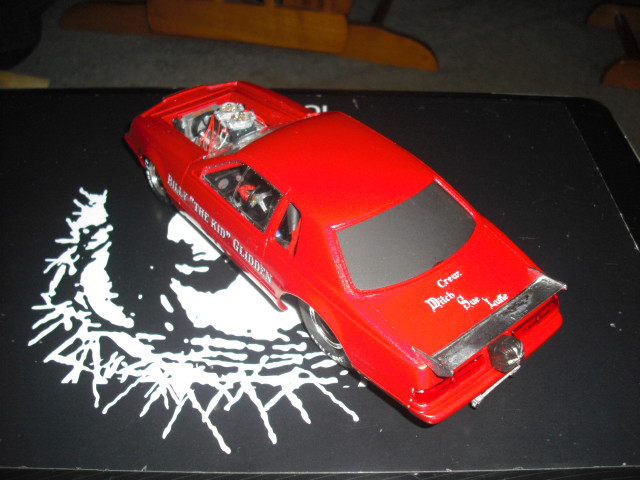
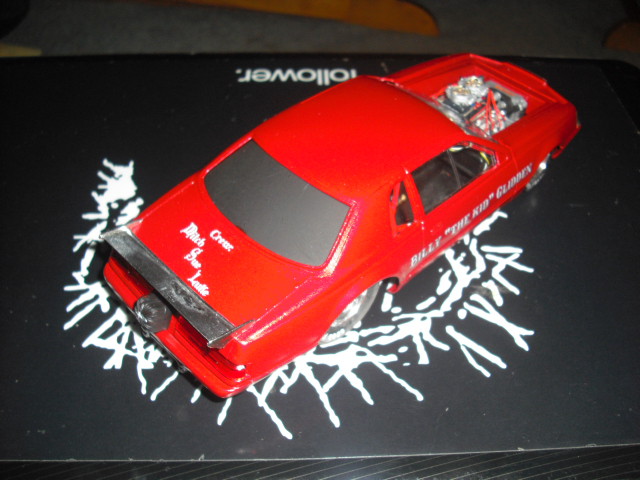
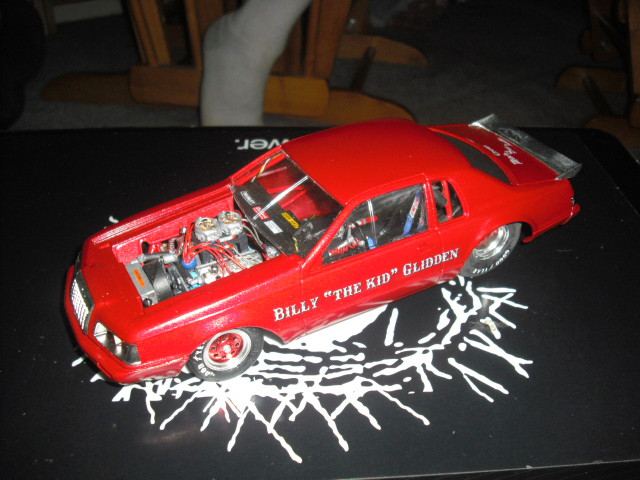
Thanks guys. Past time for some catch-up. I pulled the twin remove oil filter mount and plumbing to the pan as it hung way too low. It's not too late to use one I still have from Pro Tech. I'll place it on the outside of the frame, as long as it doesn't interfere with steering linkage. The rear wheels have been repainted more of a titanium color to match the paint/decal scheme I eventually settled for. Here are a couple of pics of the finished paint job: The custom Decals from Firebird Designs are in old English font in gold with a 3d effect. Rather than using "HOT ROD" kit decal which was never run, mine will say "Nitro Mare" with a crew list on the rear window consisting of me, my wife and son. Hope you enjoy the pics.
-
Nicely done Brett!` This color resembles the Testors "One Coat" rattle can I used on my second build, which was last year sometime. It was before I'd gone detail crazy and was just learning about using such stuff. I painted twine silver and then blue/red on the ends for fuel lines and actually installed my first aftermarket distributor and a tach/rollbar/firebottle from an Ebay purchase. The color was called Purpl-icious and had way too much metallic in it. When I was done, I was a little scared of using clear coat because of prior problems so I used some of that vinyl floor clean & shine stuff. It actually turned out pretty good. I've kept the build in a clear box since then, so I don't know if it would yellow under normal show conditions. Do you clear coat or polish and how/what do you use? I tried to use Testors One Coat clear in a shaker recently and although it was pre-warmed and pre-sprayed to clear the nozzle, it still managed to sputter on the roof and driver's side of the fully painted car. I had to let it all dry, lightly sand down the affected areas with 3600, then 6000 and wash & dry. I managed to get another 2 mist coats over the fixed areas and then 2 wet coats for evenness. I'll attach a couple of pics to show you how it turned out. Man, this body is on my list of pro mods to do. Can you tell me if it came in a particular kit or is it a resin body? Revell has just released a kit like this that might be consider a gasser instead: the 1/25 D&M '62 'Vette but it has the newer rear fascia, the reverse slant with 2 dot lights per side. I like it but it comes with a gasser style engine, blower and suspension/stance. As always bro, appreciate your input and admiring your work!
-
Shift13: Man that's beautiful work - not just the NOS but Hogan's welding and awesome detail work. Pretty much all systems are plumbed like this nowaways, right Comp? Having extra fuel added via a nozzle right beside the NOS nozzle put the two together in a mist I believe and creates better atomization (less risk of NOS boom-boom). As I remember, my tank only had a braided steel line attached and a open/close valve. Pro mods in the 70's/80's still used access hatches to open and close the valves. However, technology has allowed the creation of remote valve openers, so you'll need some type of power wiring to the tank also IMO. Per Ds98: Tyrone or Clay are great for authentication. I save used chrome parts trees for selonoids like this and the blue/red anodized fuel/NOS blocks I make from Evergreen Styrene. I paint them once with Tamiya flat alum and then Tamiya clear red or clear blue. As for the line on the engine, for that straight, tight appearance I've used either alum wire from Teds (about .018 to .020) or try buying a set of electric guitar strings, guage .56 (low E string) to .014 (high E). These are usually sold for "drop tuned" modern guitar bands like Tool or Korn. Hey, I don't listen to 'em, I just know what works Great build and good luck!
-
BTW, if you look at image #7, you can clearly see what looks to be Connie K. watching Shirley make her pass...