
Sportabout
-
Posts
220 -
Joined
-
Last visited
Content Type
Profiles
Forums
Events
Gallery
Everything posted by Sportabout
-
Does any company make 3D or resin AMC V8 engines? What about engine parts such as timing cover and different valve covers? Competition Resins has some cylinder heads and valve covers: https://ecsvr.com/cpr/shopexd.asp?id=397
-
Thanks guys. The first attempt with clear coating went wrong because of dust despite the paint booth. Is there a way to make the model antistatic so that dust doesn't stick to it?
-
Carbs are from Revell Firebird Match Racer kit.
-
The brake and fuel lines have been installed, as well as the carburetor linkages. I changed the rear springs to ones made of iron wire and improved the suspension in other ways. Interior is ready but there were some issues with the pedals and I changed them to the parts I found my parts box. Original seats looked a bit weird so I changed them too. The body is painted and needs clear coating. Stance testing with interior and engine. Could be a little lower.
-
This kit is quite modest and a bit lacking, but a good starting point for Pro Street. The tunnel ram that came with the kit needs a lot of work to be good. The original carburetors are replaced by after market parts. Modified tunnel ram looks better than original. I could not find ready suitable headers so they are modified from the kit headers. Making disc brakes is time consuming. I made brakes and rims from the parts of the kit and styrene rods. The drums had to be drilled with a 14 mm drill to fit the 11" disks inside the rim. I also made DIY brake booster because the kit did not have it. The front tires had to be glued together with the support.
-
This is a great project. As a Hornet owner, this is close to my heart. The first page article read that the transmission was a Borg Warner Super T-10s. The SC Rambler’s engine is from Jo-Han ’66 Marlin with upgraded parts and the transmission is an old torque tube manual. You can get the right T-10 4-speed manual from AMT's Bobby Allison's 1975 Matador.

-
The interior of the Rambler continues to be made after a short break. I made the 0.75 mm (0.030 ") styrene sheet panels according to the cardboard pattern and glued the plastic bar to the body to support the inner panel (test fitting with the panel in the picture). Then I glued the 1.5mm (0.060") quarter round bar to the top of the panel. The outer panels are made of 0.75 mm (0.030 ") styrene pieces and the actual panel patterns are made in them. Simple, isn't it?
-
This is cool AMC and very clean build. Very smart decision to change the chassis because Jo-Han used wrong coil spring and torque tube rear suspension in this model although '68 Ambassador used open driveshaft and four-link axle-location system.
-
Rambler Snow Plow
Sportabout replied to Sportabout's topic in Model Trucks: Pickups, Vans, SUVs, Light Commercial
Thank you for your kind words. I really appreciate them. -
Dodge L-700 V12
Sportabout replied to Sportabout's topic in WIP: Model Trucks: Big Rigs and Heavy Equipment
I will continue to build this after a short break. I found suitable exhaust stacks from Italeri "Truck Accessories" kit but I had to de-chrome them and put some putty to seams. Mud flaps are from the kit but supports are aluminium tube. Velocity stacks I bought from ebay years ago. I think this is starting to be what I thought.
-
This is cool. Love the color combination.
-
I have never made interior panels myself but I think it’s easier to make the panels from one part. I taped a strip of cardboard inside the body and put the chassis on. I drew the floor and window line on cardboard and cut it according to them. Next you need to make the plastic sheets of the panels with the cardboard model.
-
The benches are starting to get their final shape. Some putty and sanding is still needed before painting. After that it's the turn of the door panels.
-
The interior began with benches. Originally I was going to use Edsel’s benches, but they are the wrong size. Suitable benches were found on the AMT ’57 Bel Air but they need some modifications too. First I sanded the fabric patterns off. Benches are too wide at the top and too narrow at the bottom. In addition, the Rambler benches are more angular and thicker at the top.
-
Some changes needed to be made to the Comet's engine compartment to make it more accurate. I had to build a new radiator wall and firewall. Comet shock absorber towers got some putty too. After these changes the hood did not fit and it needed some thinning.
-
I continued with engine compartment but I noticed left fender was warped upwards. The fender did not fit properly to the chassis and left side trim was not straight. I scraped panel line open and bend the fender a little downwards. I glued it again and smoothed it with some putty. Now both fenders are in the same height. It will make it much easier to continue.
-
I have this model kit, but I bought it as spare parts for another project. Chevy kit looks reasonably good and I would be really happy if a similar kit had been made from the '58 - 59 Rambler.
-
How about a Pro Street style 1/1 Matador. I have built a scale model of such and the Pro Street is well suited for Matador.
-
Really great Matador. Not many have been built although kits are still available. Matador is one of my favorite AMC, but Javelin AMX '71 is number 1.
-
The engine paint caused a bit of a problem, but the Revell SM330 paint is pretty close to right and I already had it. The alternator is a wrong model, so I sawed it away and I'll replace it with original type. The engine had a manual transmission attached and I saw it away. I found the right type of automatic transmission (BW M-10) from Revell’s 1959 Ford Fairlane. The radiator is modified from Revell's '55 Bel Air radiator. Next, I finish the engine and install the transmission. After that the engine compartment details.
-
Paint Booths & Safe Ventilation?
Sportabout replied to Synister's topic in Tips, Tricks, and Tutorials
My paint booth has two 127 cfm 12 V explosion proof blowers and removable intake and exhaust filters. It is a bit loud (80 dB) with two blowers. One of them is connected to speed controller, which lowers the volume a lot when using only it and it is well enough for Tamiya spray paints. The 300W transformer is from a computer but a better transformer is coming. Painting requires a lot of light, so I bought a 16W 3 meter long led strip. I wrapped it around a plastic pipe and around it came white wood panels and plexiglass. The color temperature of the LED strip can be adjusted from 2700 to 6500 K, but 4000K is good for painting. The lighting intensity can be adjusted between 30 lx and 1200 lx. I covered inside of the booth with white card board and they can be replaced as needed. The upper part of the front has a plexiglass and the lower part is an openable window with a filter and holes for hands. -
Cool super Bee. I like the color combo and steel wheels with hub cabs. Did you get my messages?
-
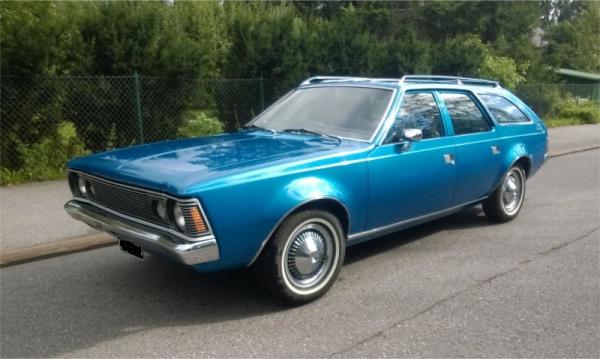
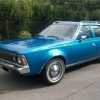
Thanks for the tip. The bumper-grill-headlight combination has caused little headache. The AMT Mercury '59 is a rare and expensive model. Fortunately, RMR is selling '59 bumper and hopefully it will have headlights included. https://rmrmodels.com/collections/bumpers-tail-lights/products/1959-mercury You have a nice wagon. 327 or inline 6?
-
The dashboard required little change. It was a little too narrow and upper dash pad portion was wrong shaped. Some sanding, sawing and putty helped. The dashboard should look like this, but not all the details are in the right place on my dashboard and changes are nearly impossible to do.
-
1969 AMC Rambler (Rouge) Jo-Han Hemi Streetmachine
Sportabout replied to Beamerman's topic in WIP: Model Cars
This is an interesting project. Blown Hemi is good choise for an engine but Is the intake manifold in the correct position? Jo-Han SC/Rambler is actually 1966 model with convertible interior.


