John Goschke
-
Posts
1,920 -
Joined
-
Last visited
Content Type
Profiles
Forums
Events
Gallery
Everything posted by John Goschke
-
Easy Run Engine Test Stand Something Different
John Goschke replied to BobbyG's topic in WIP: Model Cars
Beautiful work on this little gem! -
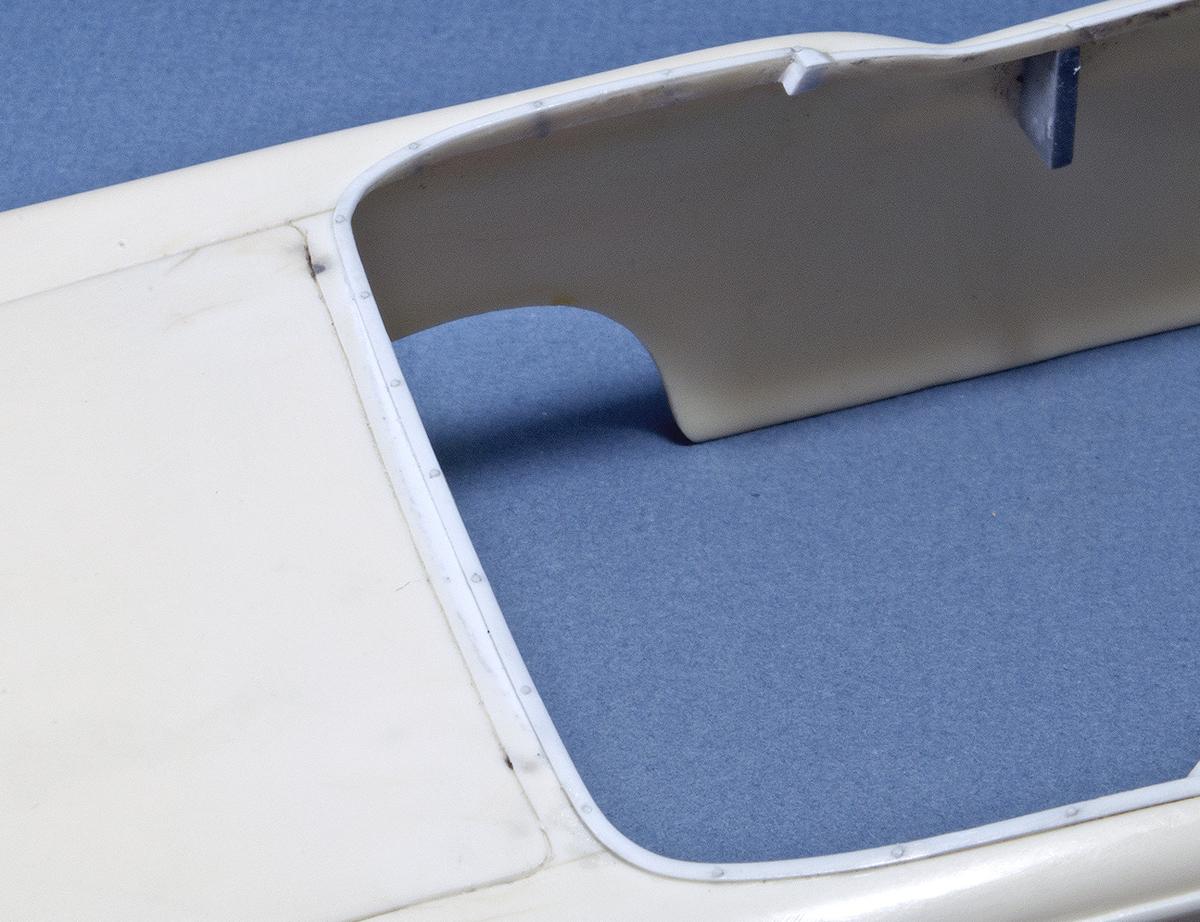
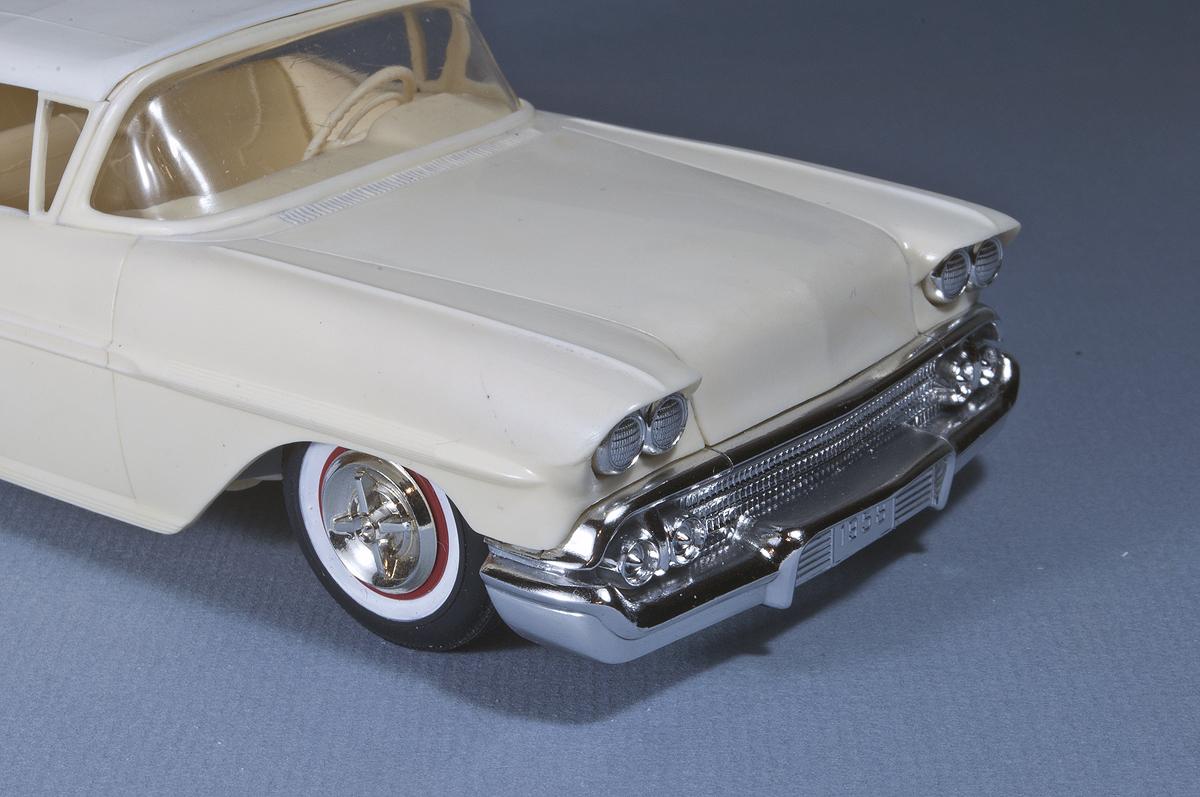
Top Boot Snaps These little buggers had me scratching my head for awhile and were part of the reason I decided to finish the '59 Ford before coming back to this model. As often happens, the solution wasn't nearly as difficult as I imagined. Knowing I'd need to use a fine drill and my shaky hand to make a series of even spaced holes through the center of that narrow molding had me pretty nervous. But the only way to get it done was to do it! Online pictures seemed to show that there were 15 snaps for the boot. To get the spacing I measured the distance around the top well molding using a thin strip of tape laid on top of the molding from the location of the first snap on the left to the last snap on the right. Then I peeled the tape off the model and laid it out straight on a piece of paper and measure it (as I recall it was something like 4.375"). Going to my computer and using Adobe Illustrator, I drew a horizontal line of the appropriate length, then placed a vertical tick mark at each end of the line with 13 similar marks dragged and copied along the line. Selecting all the tick marks, I then had Illustrator space them evenly along the line and printed the result. I cut another strip of masking tape the same width as the molding and laid it on my printout so the snap locations could be marked on the tape. The tape with the snap locations marked was then laid on the model. I transferred the locations by very careful poking through the tape with a fresh #11 blade, then peeled the tape off. The knife-pricked locations were highlighted with a little pencil lead rubbed in. The snaps themselves were made with lengths of .03" Plastruct styrene rod cemented into the holes drilled through the molding and the car body. Drilling all the way through enabled me to do all the cementing inside the body. After the cement was dry the lengths of rod were cut with nail clippers close to the right height on the outside, then very carefully sanded flat to the final height, where they stand just a bit higher than the molding. Finally thee rods were cut flush on the inside of the body.

-
Very nice foil work on this one, Dave! Nice color combo too. For your interior, white seems a good choice, with some accents in a darker shade of lavendar, especially for the carpeting, since it's more of a custom, with the lowered stance. As Steve pointed out Buicks, Oldmobiles and Pontiacs in GM's metallic "Lido Lavendar" all had metallic grey and silver interiors with white accents. I'd recommend painting your chassis, or at least the wheel wells, flat black, those areas need to recede from view and the red oxide is too distracting.
-
Looking good! Keep building it up and sandin' it down to get it slick!
-
Thanks, Don!
-
Thanks, Bill! Well, you know what they say, "Nothing says '58 like a kit from '58!" Although I've always thought AMT's Trophy series Impala looked pretty good and I was glad to see that the SMP '58 annuals compare so favorably with that classic kit. Particularly in comparison with the '59, '60, and '61 annuals, which leave a lot to be desired in the accuracy department! My favorite "detail" is on the '61 Impala kit, where the panel line for the doors are scribed on the body but not through the side molding. How would one open the door?! SMP did do a hardtop in '58 and just recently I've acquired enough rough built-ups to restore one. And I won't have to worry about poor-fitting opening doors or chrome moldings that fit in huge channels in the body!
-
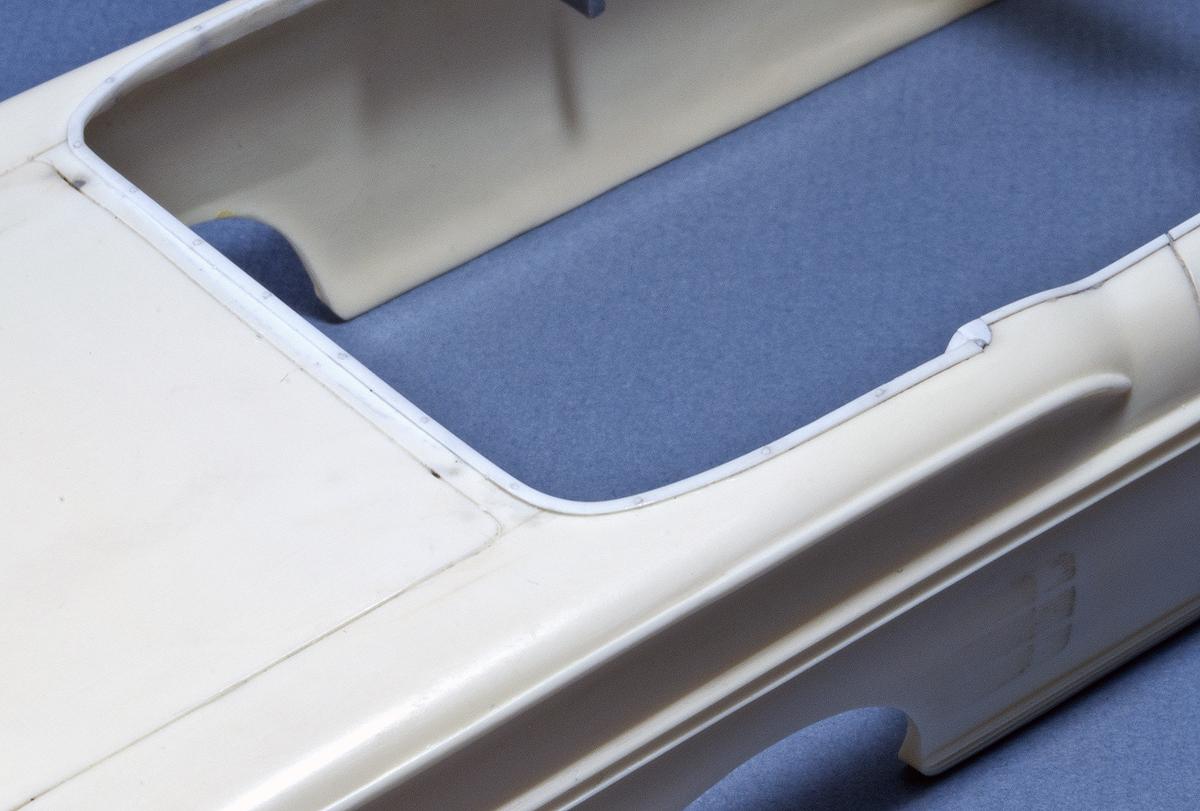
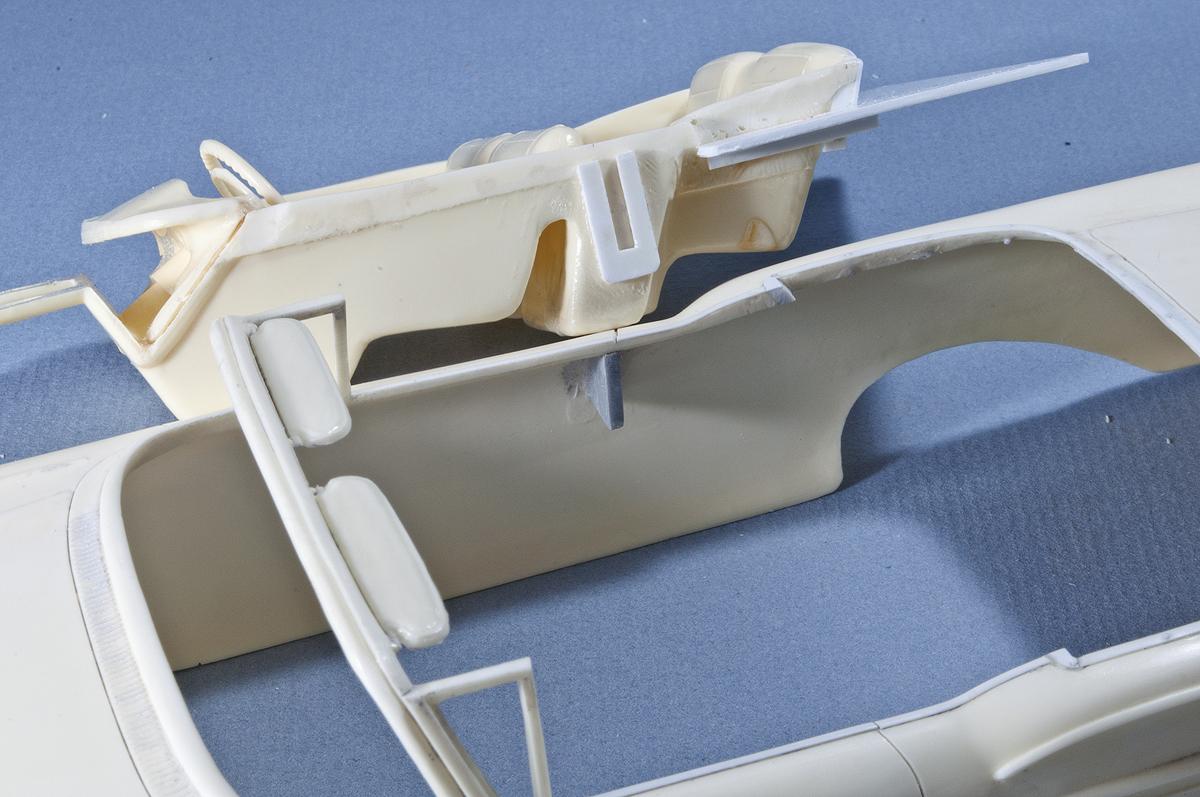
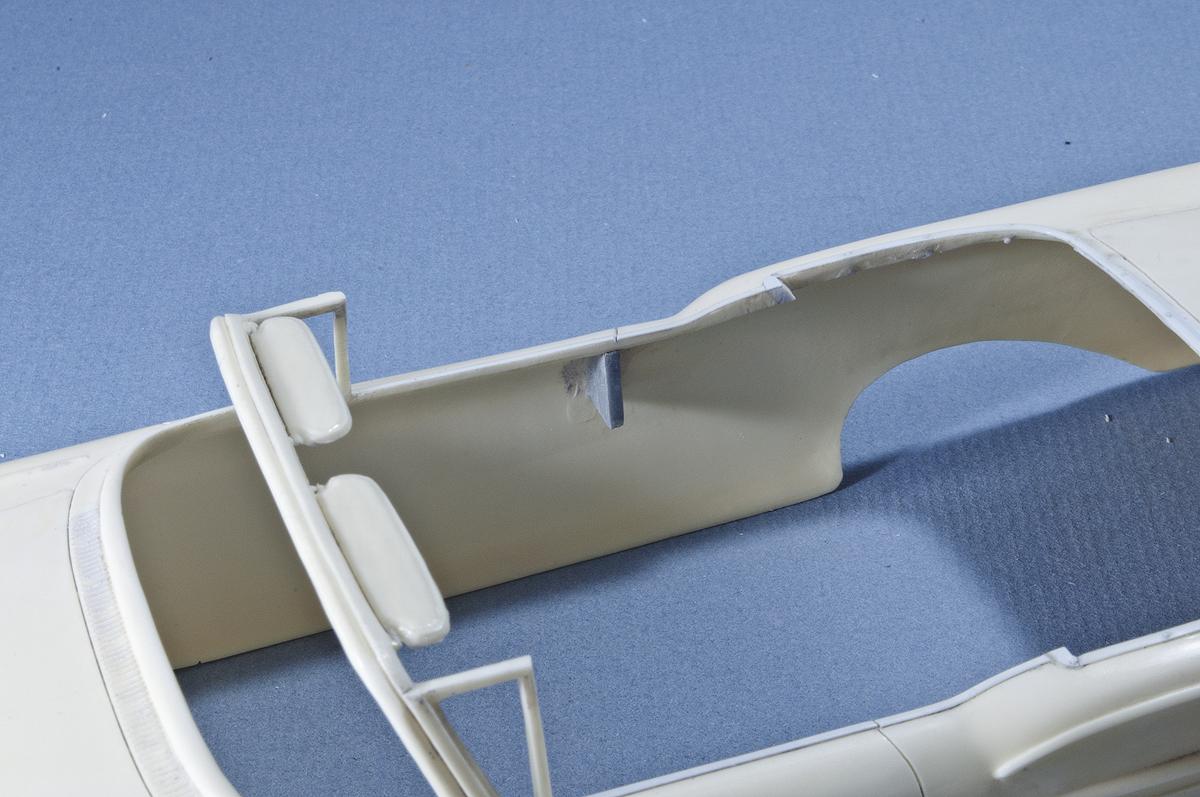
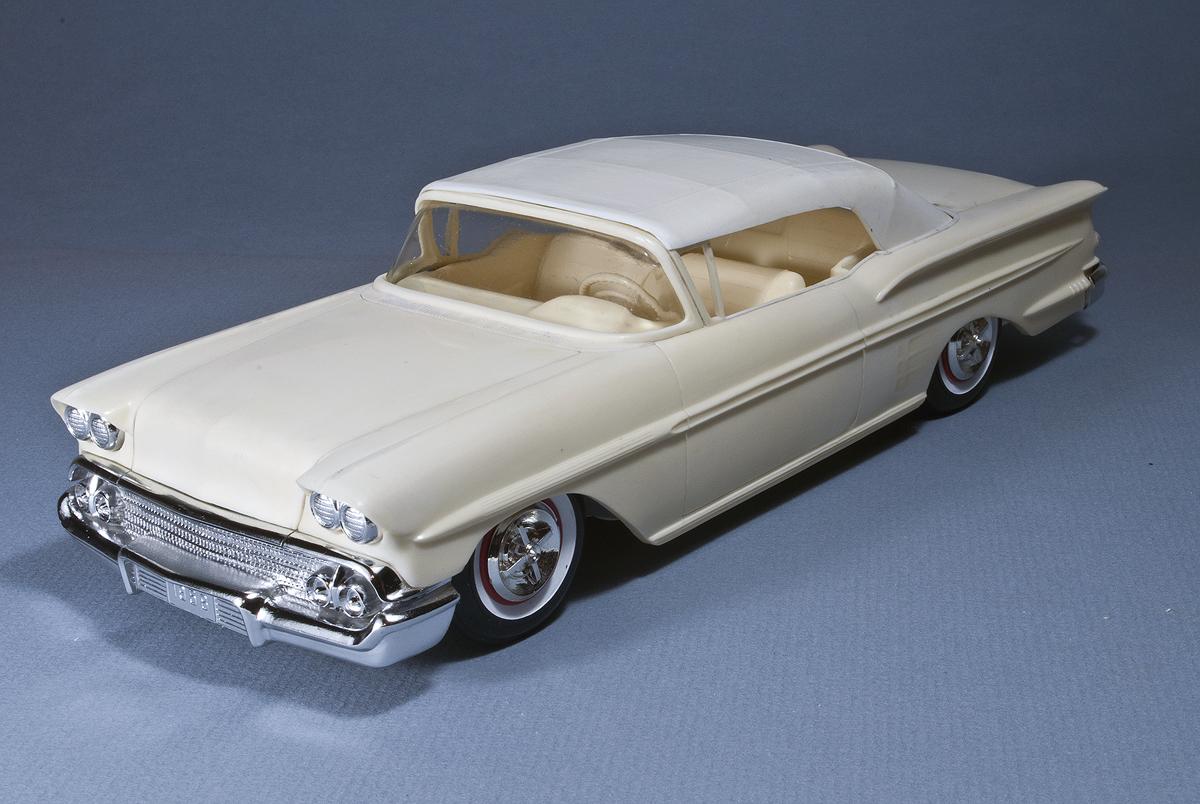
Top Well Non-detail Making a floor for this area was actually more about blocking viewers' sight lines to the inside of the body than achieving prototypical accuracy in this area. So I simply added a back to the rear seat then built out a flat floor that goes around the sides of the tub and back under the edge of the decklid. The main thing I want to achieve when building a convertible like this is a correct-looking top profile and to have the top fit inside the body, if that is prototypically correct, rather than having the top fit loosely on top of the body. In the case of this build it will likely mean that the top will stay on permanently. In the one shot you can see the replaced beltline molding along the top of the door and quarter panel and the panel line that was cut in the interior bucket to represent the door opening. Also visible is the line that needed to be scribed for separation between the front fender and the cowl.
-
Thanks, Dave. Often I will lay down a strip of tape and scribe several repeated light strokes against it to get started, then remove it for final scribing. Sometimes I'll use a pair of dividers with adjustable points when scribing a line parallel to an edge, like the molding that goes along the fin, by adjusting one out further then using it as a guide along the edge while the shorter point does the scribing.
-
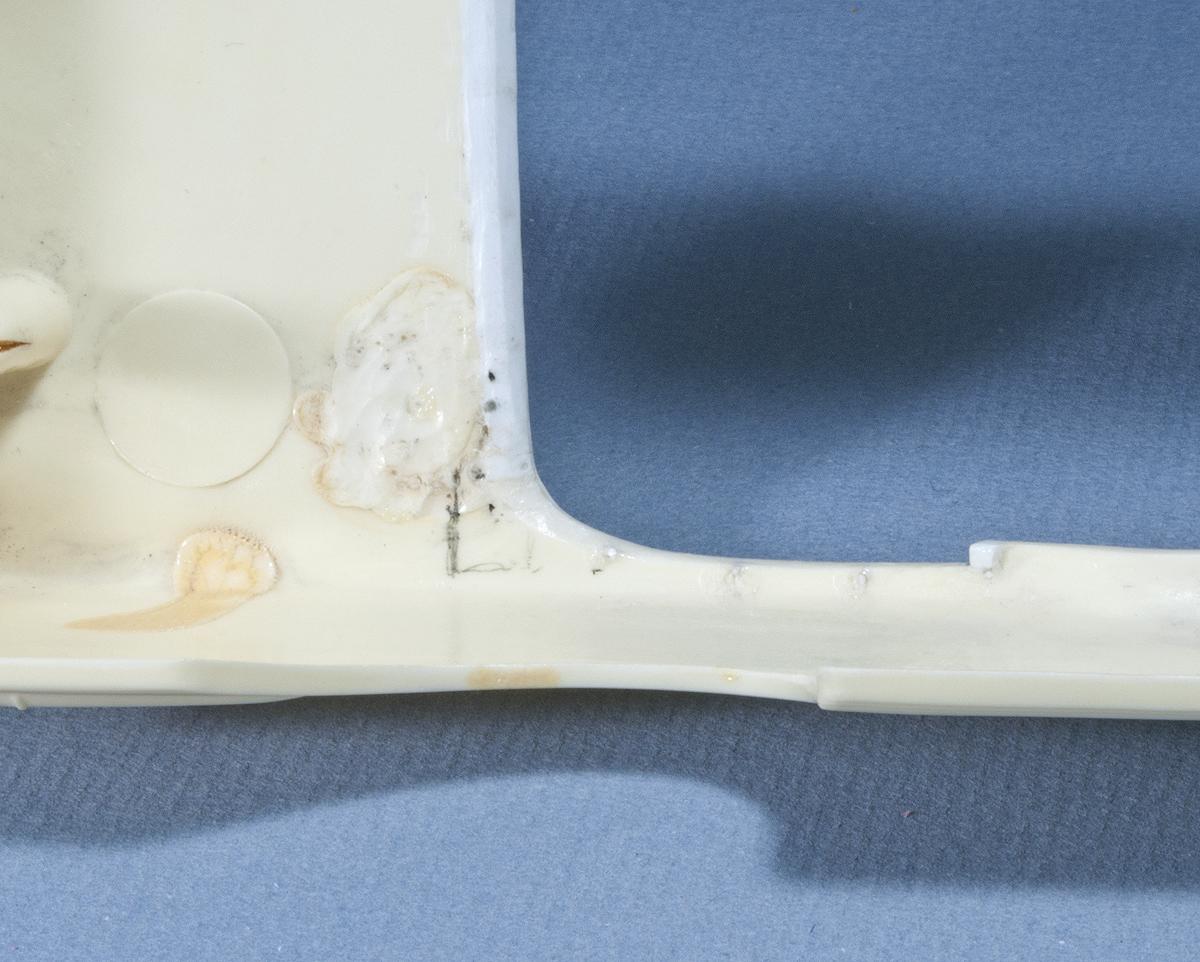
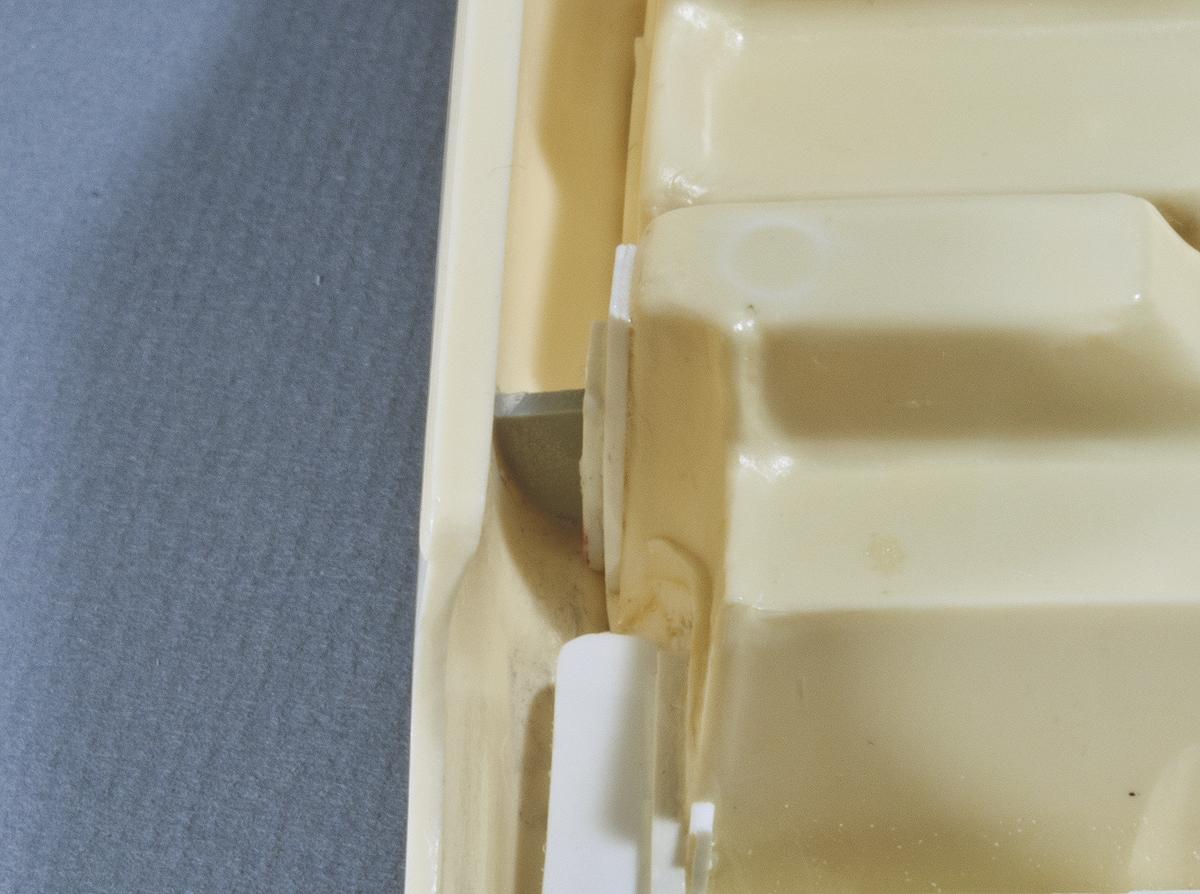
Interior attachment points The process of disassembling this old model when it arrived required grinding off the interior attachment posts and tabs inside the body where cement was used unsparingly by the original builder. This left the interior with no firm mounting points, a problem compounded by my desire to build a top-up convertible requiring the removal of the package shelf behind the rear seat and replacing it with some sort of representation of a floor for the top well. Before making the top well floor I wanted to make sure I could install, remove, and reinstall the interior in the same place consistently, and to have top edge of the interior and the top edge of the body line up every time. To do this I shaped two tabs of Plastruct ABS plastic to fit and cemented them inside the body, lined up with the door opening. I then cut a slot in a piece sheet of styrene to fit on the tab. The slotted piece was cemented to the side of the interior tub after the location was marked with a sharp pencil while the interior was held in place. Note that the side of the tub needed to be built out a bit because there was a step near the top edge. This is the first time I've used this technique and it worked great, and will come in handy in future rebuild projects.
-
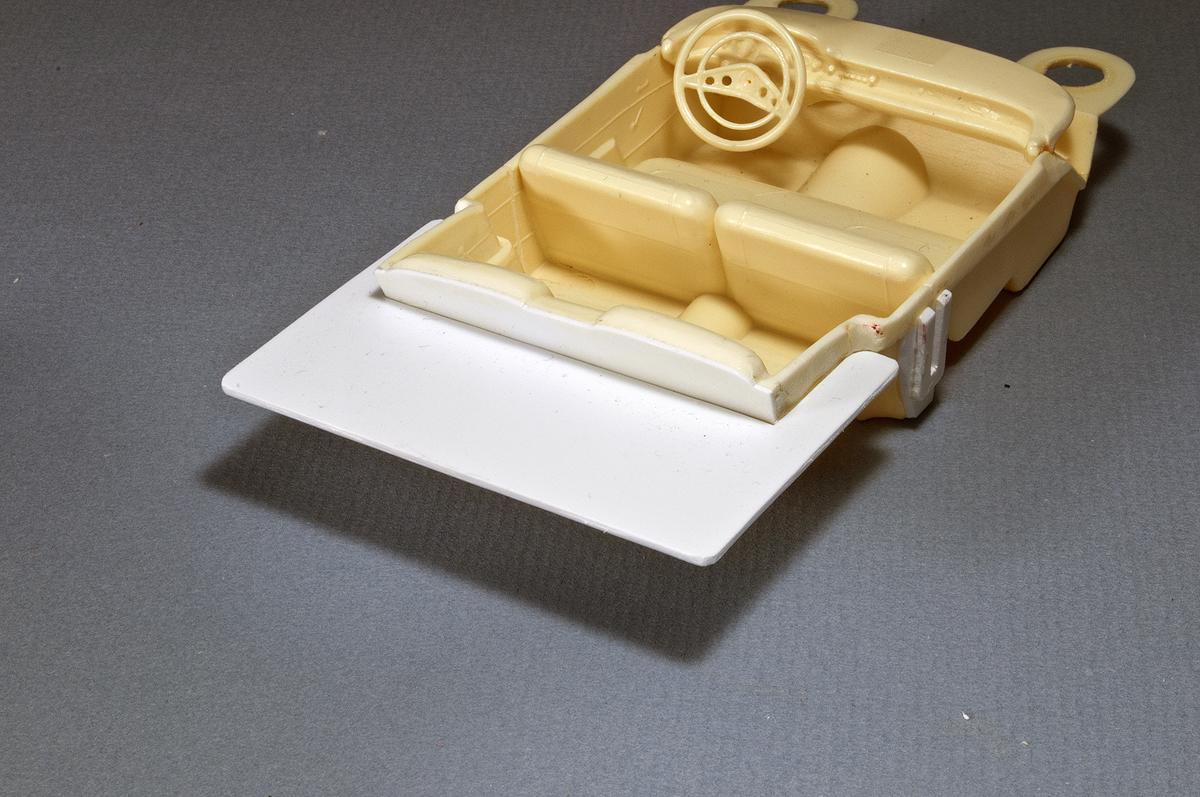
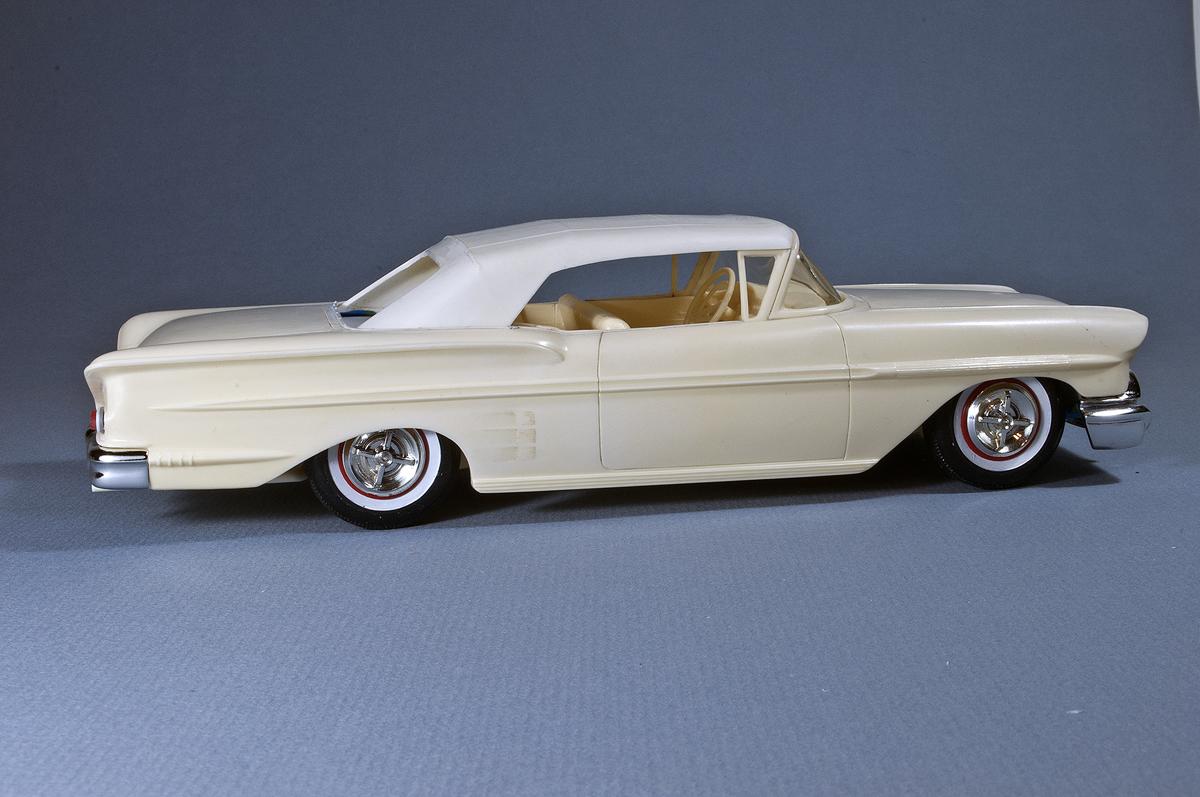
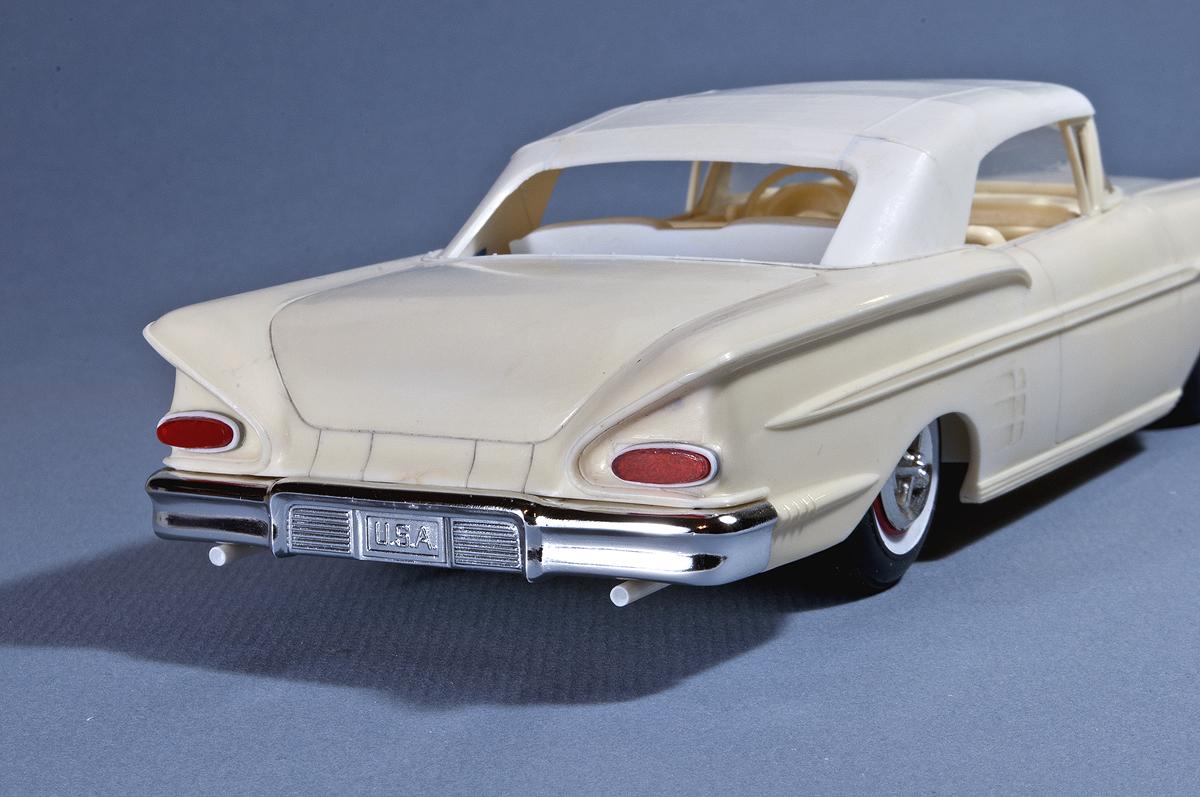
Rescue from the Shelf of Doom! I'm happy to report to some progress on this mild custom Impala that I've been attempting to concentrate on since finishing a '59 Ford convertible late last year. These shots show a complete mockup as it stands now. I'll do some subsequent posts that'll show some details of what was done and descriptions of how the work was done. Basically here's a list of the changes since the last post nearly three years ago!... 1. Replace belt line molding with styrene strip. Finish scribing missing panel lines (Rear fuel filler door and matching lines below trunk opening). 2. To smooth the body and simplify the design; removal of door handles and locks, trunk and hood emblems, front fender ornaments and "hash marks," Impala emblem and script from body sides, dogleg molding between side molding and fin molding, and windshield wipers. 3. Remove quarter panel "pitchfork" molding and fill remaining indentations with cyano, file and block sand quarter panel smooth. 4. Create secure attachment points for the interior. 5. Add "floor" to the convertible top well. 6. Add top boot cover snap detail to belt line and rear window molding. 7. Modify original kit chassis to close in wheel wells to block view inside the body. 8. Removal front bumper attachment tabs to lower the front of the car and resolve fit issues. Create new attachment points for the bumper. 9. Make dual tailpipe extensions. 10. Make custom '59 Pontiac Catalina taillights.
-
Back to the future
John Goschke replied to Greg Myers's topic in General Automotive Talk (Trucks and Cars)
Kinda looks like the registration line for the "Most Boring Car Show, Ever!" -
Nice paint! The stance is perfect. Looks great with the shaved bumpers.
-
Good for you, Uncle Scott! I don't think I'd responded to this thread since it came back from the dead, but, hey, if it provides another opportunity to bad-mouth AMT's '58 Plymouth, well... why not? Can't be said enough. And, since I've been closely following the 2016 presidential race, I don't think I'm in any danger of saying the most idiotic thing one could ever hear when doubling-down and saying, "AMT shouldn't be permitted to REISSUE anything until they correct the '58 Plymouth kit!" Meanwhile, I'll have plenty of fun building the old stuff, and the kits that look like what they're supposed to be.
-
Amazing workmanship and incredible detail! Beautifully done all around.
-
Great collection of well done models! The authentic colors make it really attractive.
-
Very sharp build!
-
"Le Rouge!" Very clever, Art! I have a feeling Edsel would've got a kick out of this. Ol' Henry, not so much. I wonder if "Le Rouge" did a coupe body for Duesenberg?
-
Good job bringing this one back from the dead.
-
1970 Toyota Corona 1600 sl ( from otaki)
John Goschke replied to The Danish sprue wrangler's topic in WIP: Model Cars
That looks like it could be fun as long as you're not too concerned with making an accurate or detailed model! Body looks cool – like it's been chopped and sectioned already. Lower it on some nice custom wheels, cleanup all those mold lines, give it a nice paint job and some BMF and call it done! -
Re-chopping the Revell 48 Ford Update 4-13-16
John Goschke replied to Jason Foster's topic in WIP: Model Cars
Really nice work! The shot in sliver paint looks terrific – perfect "flow" that's helped along by the replaced drip rail line. I think that krazy kustom grill is also from the '58 T-bird kit. -
Perfect!
-
1959 Chevy Impala-----FINALLY DONE! 4/9/16
John Goschke replied to MrObsessive's topic in Model Cars
I'm pretty certain the "flipper" weatherseal was eliminated on GM hardtops after 1957, and on Fords and Mercurys after 1958. -
Looks great! One of AMT's best kits from '59.
-
Came out great!
-
1956 Henry Steel: Stock X Not so stock
John Goschke replied to Lovefordgalaxie's topic in Model Cars
Like 'em both, but I love the blue one!