John Goschke
-
Posts
1,920 -
Joined
-
Last visited
Content Type
Profiles
Forums
Events
Gallery
Everything posted by John Goschke
-
Period perfect and beautifully done!
-
1962 Chrysler 300 Convertible. 1/1, Basically Done!
John Goschke replied to StevenGuthmiller's topic in WIP: Model Cars
Excellent work, Steven! -
AMT 1960 Ford Thunderbird Convertible
John Goschke replied to Ron Hamilton's topic in WIP: Model Cars
Great project, Ron! I'm looking forward to following along. You're right, this kit along with the T-bird hardtop, the '60 Buicks and the '60 Corvettes, were the first AMT annuals with engines and opening hoods. What I really like about the T-bird kit, is that it has a manual transmission! A relatively rare choice for that car! In addition, what AMT's Squarebirds lack in detail over Monogram's 24th scale kit, they more than make up for with a much more accurate overall appearance. -
Nice work on this one, David! Ride height looks good. Maybe it's the photo angle but it appears that the front axle is too far back. Is that a result of the fit issue you're having? Also, the track width on this kit seems too wide.
-
That looks great! I think you've sold me on this kit!
-
1990 BMW 850i-------Update! She's now clearcoated! 6/19/16
John Goschke replied to MrObsessive's topic in WIP: Model Cars
Nice color and smooth paint job, Bill! -
Two words... Virgil. Exner. Although Ford and GM designers were responsible for quite a few similarly novel, clever features of dubious functionality during the same time period.
-
59 Cadallic-Revell: Has anyone built this kit
John Goschke replied to 69NovaYenko's topic in Car Kit News & Reviews
Given the choice I'd build the hardtop version of the kit. The appearance of the convertible is severely hampered by an ill-fitting and out-of-scale windshield and windshield frame, as are the '59 Impala, '55 BelAir, and the recent '57 BelAir convertibles. The best way to make a replica of the Caddy ragtop might be to cut the roof off the hardtop, leaving the windshield frame in place, and making any other changes are needed to the tulip panel to work with the boot and uptop in the convertible kit. Then throw the convertible body and windshield frame in the dust bin. In spite of that, remembering when this kit came out and what a great thing it was to see a stake finally driven though the heart of 1/24th scale at Monogram. -
Wow! What an amazing model! Love all the little details you've lavished on this relatively obscure, but very cool, "more-door." I think my favorite touch is reverse side of the dashtop speedometer!
-
Thanks! Now I don't feel so bad about my little obsession with '58 Fords!
-
Beautiful, inspiring work on this project! Thanks for sharing it and documenting so thoroughly.
-
Thanks for the comments, guys! Finishing up a paint job for a friend and will be back on this car soon! Thanks, Dave Espo! I think the Mopar lights you're thinking of were '59 Plymouth taillights, which had an elliptical shape like the Pontiac lights but had a heavy chrome bezel that wrapped around the side. Another possibility would be '59 Plymouth wagon lights which were smaller.

-
Great fabrication, bodywork and paint on this little project! I like it!
-
1965 Plymouth Fury. Update, 7/27, WHEW!
John Goschke replied to StevenGuthmiller's topic in WIP: Model Cars
Sweet! Good job, Steve. -
1965 Plymouth Fury. Update, 7/27, WHEW!
John Goschke replied to StevenGuthmiller's topic in WIP: Model Cars
Steve, hope it's OK to make a suggestion before you start with color... Might it be worth the effort, given how far you've gone under the hood, to scribe the missing panel lines between the front fenders and cowl, and front fenders and rocker panel? Around here we call it "low effort detail!" -
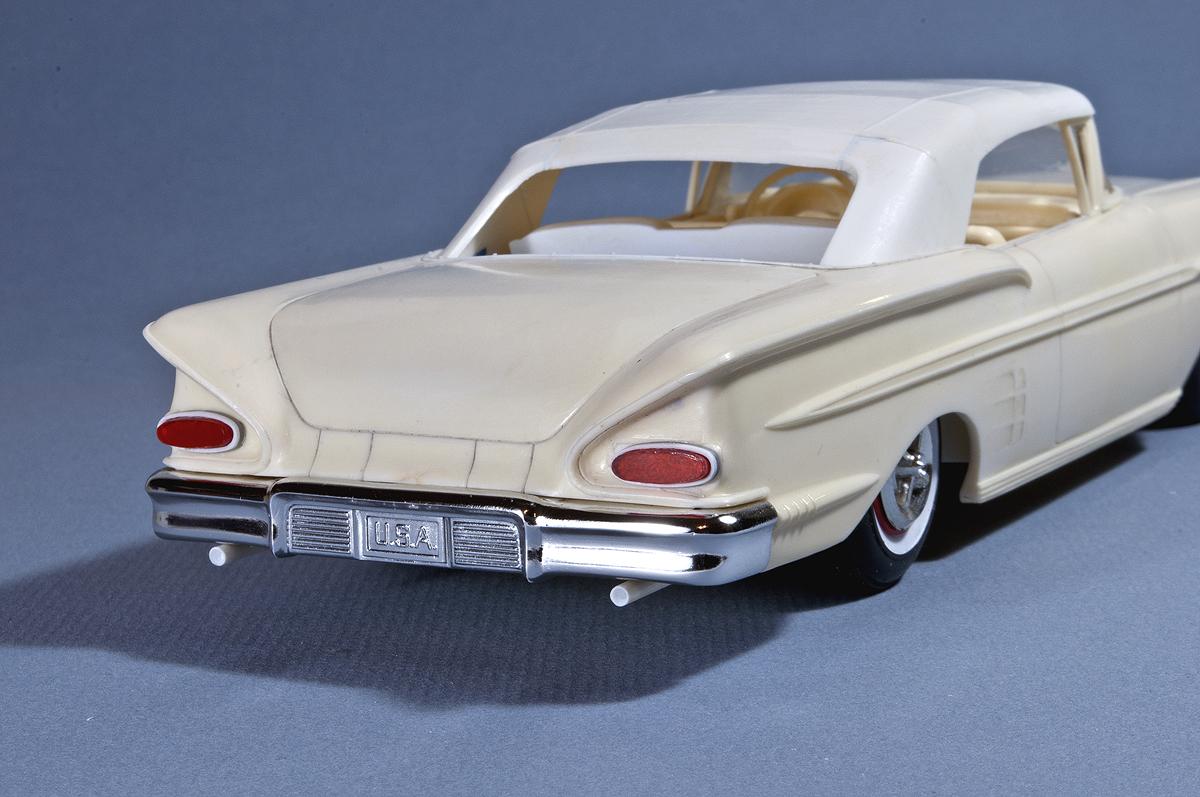
Custom Taillights from a '59 Pontiac Catalina One of the cars that inspired this build was a semi-custom Impala painted by Larry Watson for Jim Doss that featured '59 Catalina taillights. A clean design that fit well on that very smooth custom! I made mine using a couple reference photos from the web to create a scale pattern in Adobe Illustrator. The first step was cutting a hole for the inside of the bezel in a piece of sheet styrene, which was then cemented to a backing piece of grey ABS plastic. Then the bezel was shaped out of the laminated pieces using files and sandpaper. After the bezel was created the lenses were cut and shaped out of some flat transparent red plastic. During the carving process, each piece was checked by laying it on the pattern and the lenses were checked for fit into the bezels. The bezels were temporarily glued in place on the model for drilling and pinning with styrene rod. After a little further refining these parts will be "plated" with Alclad. Let me know what you think!
-
1965 Plymouth Fury. Update, 7/27, WHEW!
John Goschke replied to StevenGuthmiller's topic in WIP: Model Cars
Don't know how I missed this one, Steve! Great work so far – the underhood enhancements make a huge difference. The only '65 Furys I really remember were my Grandad's Fury I two-door sedan metallic red "work car," which I think had a 318 and 3-speed manual shift. The other was a clean light metallic turquoise Sport Fury I used to see in night-shift/day-shift traffic when I worked at US Steel in the '70s. A very pretty car! -
Those are some truly scary moldlines (moldsteps?)! Great work making something out of this funky kit!
-
Tailpipe Extensions After the chassis work was complete I bent up a pair of tailpipes from styrene rod. The rod was cut somewhat overlong and heated over a candle flame then quickly bent to shape. The fit was refined until the pipes were parallel with rake angle of the car. After the pipes were cut to the final length and the ends drilled out. They were then glued in place temporarily with watch crystal cement. After the cement was dry (overnight) I drilled through the pipes and the chassis. I then removed the pipes and cemented short lengths of thin styrene rod through them to serve as mounting pins. This way the tailpipes can be removed and replaced in the same place every time. Also shown here is the method I use for replacing the thick splined axles in these early kits in cases where I want to use the original reversible "lowering blocks." A 1/8" o.d. styrene tube cut to length based on the distance between the outside of the axle holes effectively works as a "sleeve," enabling the use of the later standard wire axles.
-
Improvements to the Original Chassis Notice I didn't say "Added detail!" No fuel lines or emergency brake cables here! Perhaps I could've used the more detailed chassis from the later Trophy series hardtop for this model, but it felt right to use the original kit part for this project. If for no other reason than the first thing I did on receiving the model was change the wheels and tires and set the wheelbase and ride height using the original chassis. However, like all the AMT/SMP '58 annual kits, this Chevy's chassis doesn't have any wheel wells, so when the model is viewed from the side, one can look in the front wheel opening and see out the other side. In a three-quarter front view the viewer is able to look into the body and see the interior tub. Because the rear wheel openings are lower the problem is less apparent there, but the view from underneath is even less finished looking. Not a huge deal for a curb-side model, but I didn't relish painting nearly the entire inside of the body flat black before final assembly! So I made some wheel wells for the front, and some panels to block the view in the rear wheel openings. In each case I made the piece over the frame rail first by tracing the outline of the frame onto some sheet plastic. The front wheel well's arch shape was outline with the wheels in place then the "swept-back" curve was drawn freehand. The piece was cutout and cemented in place with Tenax cement. The little "ears" at the front corners of the chassis were then cutout and cemented in place. I used 1/32" Plastruct ABS plastic for wheel arch itself since it is more flexible than styrene. The piece was a strip about 5/16" wide, cut over-length so I could cement it in place and trim off the excess. It's cemented around the top of the arch and tucked inside the front corner "ear" and at the rear it's bent back and glued in place with cyano on the angled edge of the chassis plate. Once the basic wheel arch was in place a test fit revealed the need for the piece at the rear of the wheel arch to completely block the view inside the body. Tape was used to create a pattern for the piece before it was cut from ABS and cemented in place for final fit adjustments. The chassis was also too narrow, leaving an approx. 1/8" gap on either side so I added strips of styrene cut from the chassis of another old kit and cemented them in place to fill the gaps.
-
Fixing a Bird (or There He Goes Again!)
John Goschke replied to MrObsessive's topic in Car Kit News & Reviews
Most excellent! This car appears to be a fairly simple design but there is some pretty involved sculpture around that rear window and tulip panel. -
Fixing a Bird (or There He Goes Again!)
John Goschke replied to MrObsessive's topic in Car Kit News & Reviews
Outstanding work, Bill! Thanks for illustrating the errors and the prescription for fixing them. How do your body revision compare to the Johan piece? -
Thanks for the kind words, gentlemen! Glad you like it, Tulio! My roots are in replica stock, and I like my models, curbside or not, to look realistic and I can get cranky about inaccurate body shapes, but after building replica stock cars and 1/72 British aircraft of WWII in IPMS, it's nice to build customs and hot rods to my own personal taste! I'll leave the stock stuff for you and Steve Guthmiller! Love your work!
-
Thanks, guys, for the comments! Bob, yes I believe you're correct, though I think it was AMT who did the pattern work. Many years ago I saw the wood pattern model for the AMT '58 Bonneville hardtop for sale at the Carlisle PA auto swap meet. It was in tough shape but still a beautiful piece of work. Wish I'd been able to buy it! I'm almost certain that the same pattern maker did this '58 Chevy. They are very, very similar in basic shape, proportion, and execution of detail.
-
50,s Ford custom ,UP DATE , PAINT IS ON ,
John Goschke replied to bpletcher55's topic in WIP: Model Cars
Wow, you work fast! Looks good. I like the color!