
RatRod
-
Posts
866 -
Joined
-
Last visited
Content Type
Profiles
Forums
Events
Gallery
Everything posted by RatRod
-
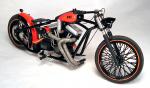
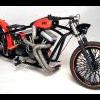
Man, I haven't posted a build on here in awhile, so here goes.... I originally built this for a contest on the Showrod forum that ended on April fools day this year. I had this idea (and the parts!) to do this one for years, so I'm glad I finally got to do it. How do you modify a classic like the Red Baron without losing the whole effect of what Tom Daniel originally came up with? Well.....I thought, what if Tom had done the R.B. when he was doing the crazy wide tire cars that were (and are) still really cool. Cars like the Horn Toad, Firecracker, Groovy Grader, ETC. So, what I came up with here is a chopped surfer helmet, lowered stance in the rear, wide tires, a few scratch built items, and here is a "what if" Red Baron. And a shot of it sitting next to a box stocker for comparison...
-
Great looking bike Tom!!! It's still great to see these kits being built.
-
That's simply the coolest "thing" You've built so far Chuck!!! I love it!!! (for some weird reason.... )
-
After all the hard work you did on this one, it looks fantastic Shane!!! Always love your builds man, nice to see ya do a rod.
-
Really nice TJ Taxi, but it's a Tom Daniel design, not Barris. (he gets enough credit for cars that weren't his)
-
Ditto what Charlie said, he's correct in all steps!! Good one Charlie....
-
I've always liked this kit, and am so glad to see it back. It's just a bodied Garlits Wynn's Jammer/Hemisphere, but it's another blast from the past!!! Yours looks great Bob!!! I always use 5 minute epoxy for final assembly, it's much cleaner, no risk of fogging, and any excess can be picked off before it completely sets.
-
Painting With Nail Polish Hints Please???
RatRod replied to impcon's topic in Tips, Tricks, and Tutorials
That body looks great!!! Clear coat will really make it pop too!!! Yes, it does take more thin coats with nail polish than regular lacquer, I think I put 5-6 thin coats on the dragster. It's better to thin nail polish a tad more, than not enough, it won't spray if it's not thinned right. As far as primer goes, I'm totally sold on Plasti-Kote sandable automotive primer as basic primers go, and Dupli-Color filler primer when I need that. The Plasti-Kote comes in white, gray, black, and red oxide. -
Painting With Nail Polish Hints Please???
RatRod replied to impcon's topic in Tips, Tricks, and Tutorials
I've painted with nail polish a few times with great success. I use the Pure Ice found at Wally World, and use a low temp lacquer thinner to thin it. You have to thin nail polish quite a bit more than regular lacquers because of all the fast drying chemicals they add to it, but does go an nicely. After priming, I'll shoot a couple coats of Dupli-Color white base, then airbrush the nail polish. Give it a try, it's a good cheap alternative to HOK pearls sometimes. Pure Ice Frosted Platinum Pearl on this trike.... I shot some of the platinum pearl over white, then masked the stripes, and shot several coats of Pure Ice Hot Tamale on this one.... -
Ditto the 5 minute epoxy!!! Either Devcon, or the Bob Smith that's available at HT USA. Best part about epoxy is that any excess can be picked back off with a sharp toothpick when it sets a little, just don't wait until it completely sets.
-
Something that has bugged me ever since I opened the Revell '32 5/W coupe is the zero offset wheels all around. Today I had a brainstorm (that doesn't happen to often) It's quick, easy, and best of all it works!!! All you need is a Dremel tool, a cut off wheel shaft w/screw, and a good #11 blade. Just put the rear wheel on the shaft upside down (the lug nuts hold it centered) tighten it down, and turn on the dremel using the back side of the blade cut out the center. Once you have the center out, clean it up a little. It will have a small gap all around when set in the rim, so I cut a narrow strip of thin plastic, and glued it on the edge of the center section. I ended up with a perfect fit, so I pushed the rim over the center, then pushed it up a little further, added some liquid cement, then pushed the center back down flush with the bottom. Doing it that way no cement gets inside the wheel making a mess. When it's all finished you end up with a nice deeper offset rear wheel, that looks 100% better!!! It took all of about ten minutes to do this. This is the way Revell should have done them in the first place.
-
This is a good subject, and I have to agree with Mark Taylor's list. That pretty much fits the bill. I'll be 52 next month, and have been an avid modeler since my Dad bought me my first kit when I was 7. Growing up, I ended up with an over abundance of kits (30, or so) that didn't get built, mainly because I was always busy doing other kid stuff too. I quit building models around '68-69, but never stopped buying them. I would travel around, and always hit stores, and hobby shops wherever I went, heck, on my first honeymoon I brought home a trunk full of kits!!! I got back into building in the early '80's, I told my wife that I was going to go get my collection because we had a large extra room in the house we had just moved in to, boy was she awestruck when it took all day, and 8-9 pickup loads to get it... From that point, I already had more kits than I would ever build. That was a fairly dead time in models, but it got better, and kits could still be found in retail stores, and hobby shops, along with (at the time) great prices. I've always bought more kits than I would ever build, and up until recent times you could still get quite a few models for $100. At present, my collection is in the thousands, ridiculous? maybe. Nowadays I only get a few rather than many, but I still support the industry, and the LHS. Downfalls to this.....I can never find a certain kit when I need it, thus I go to eBay, or a wanted section on a forum to get it, WOW, pretty pathetic huh? I have four kids, none of which are really interested in this hobby, so what will happen to this grand collection of unbuilt treasures, and the several thousand diecast toys I have amassed over the years? My kids will sell it as fast as they can, and squander the money even faster.... There's my story, and I'm sticking to it. Now, as far as the question that was asked, buy more kits!!! Write to the model company's and suggest kits you'd like to see, or see reissued. The model makers are strongly set on reissues right now, and that's just fine by me!!!
-
MPC Pro Stock Duster interiors
RatRod replied to ratnasty's topic in Car Aftermarket / Resin / 3D Printed
Good call Chuck!!! -
WIP.....69 Daytona Pro Mod..Updated 10/28/10
RatRod replied to 1320wayne's topic in WIP: Drag Racing Models
It's great to take some vacation time to get the house to yourself, and do some serious modeling.... This thing is awesome in every way Wayne!!! -
Ohio George "Mr. Gasket" Mustang gasser
RatRod replied to John Teresi's topic in WIP: Drag Racing Models
Very cool John!!! I have always been a big "Ohio George" fan. I have the original Malco Mustang by MPC, and the original AMT '33 Willys. This car is correct, in that George ran this '67 bodied car on a '33 Willys chassis in both the blue Malco, and red Mr Gasket livery's, the red car ran a blown 427 Cammer, but most remembered running a twin turbo-ed 1800 horse cammer. The red '69 bodied car came later, and ran a blown cammer once again. -
Rupp Super Sno-Sport Sno-Mobile Dragster
RatRod replied to Fuel Coupe's topic in WIP: Drag Racing Models
What? I thought we were friends Shane, but it sure looks like you coppied my build.... No, it looks great!!! I was glad that they re-popped this one, I had it as a kid, but never got passed the tracks. It's a simple looking kit, but it's kind of a booger to build. You did well!!! -
Utterly beautiful!!! I love that color!!! Great build.
-
Fantastic build!!!
-
I like it!!! Perfect colors, and wheel choice. I'm not big on the cowl hood on a '55, but the car as a whole is brilliant!!!
-
Ditto what Mark said, I never use a primer, and if at all possible I will polish the parts to be sprayed for an even better look.
-
Your best bet for window tint is to airbrush Tamiya clears, they work much better than Testors.
-
Good job making all the parts fit Chuck!!! The patina looks perfect!!!
-
My all time favorite dragster!!! I have it in 4 scales.
-
That is too cool!!! Very nicely done. Maybe if the Meyer's Manx sells well, we can convince Round 2 to bring back some more of the AMT & MPC dune buggy kits.
-
Everyone's right about using the sealer. I use it from the spray bombs myself (much easier) I buff it with diaper flannel after wards. It will rub off slightly, but if you handle it as little as possible you will be fine. Always make sure you do all your test fitting, and mock-up's beforehand, and always keep your hands clean!!! Another pointer that works well is if you possibly can polish the plastic with a triple grit polishing stick, do it, it will make a world of difference. Here is a Triumph engine that was done in metalizers, and buffed, no sealer.... Most of the parts on this dragster were done in different shades of metalizers...