Pete J.
-
Posts
3,982 -
Joined
-
Last visited
Content Type
Profiles
Forums
Events
Gallery
Everything posted by Pete J.
-
Why would you ever put this piece of jewelry in a model?? This needs a stand of it's own or a bare chassis at most. Your work keeps amazing me!
-

Autoquiz - #557 - Finished
Pete J. replied to carsntrucks4you's topic in Real or Model? / Auto ID Quiz
. -
What did you see on the road today?
Pete J. replied to Harry P.'s topic in General Automotive Talk (Trucks and Cars)
If I had a car like that, I would do exactly what he did. Get it as far away from everyone and park it so no one can park next to you. Looks like the Mustang is doing the same thing. My guess is the parking lot is a long way from full. I feel that way because back when I had(and could afford) a new 911 I went to the far end of the lot, all by my self and some jerk in a beater parked as close to has they could. No other cars for 50 yards. When you have something nice, people can really be jerks! -
Peter, Thank you for bringing this up. I had never heard of it before. I just watched a video on how to do this in Photoshop . The stacking is built in and mostly automated. Looks like I will be doing some experiments with it.
-
I've not heard of focus staking before. I will have to see if it is available in my "go to" editing software, Photoshop. I have to believe it is. The new tech is really quite wonderful. I am currently shooting with a Sony A7II and it's range is far superior to the Minotla XG-M I learned on, not to mention that it costs me nothing to shoot a bunch of photos. I was also considering the flip side of aperture priority settings. The same thing as stopping it down, could be done by setting the lowest ISO setting and the longest shutter speed. That should give you a very long depth of field.
-
Peter, your description of depth of field and it's relation ship to aperture is definitely spot on. However, especially with models, I disagree with you about not being able to get the entire model in sharp focus. I have used a technique for years that gives a "larger" depth of field for a given aperture setting. Unlike most people, I do not use either a macro lens or setting. I move away from the subject and use a top quality telephoto lens. I cannot tell you the exact mechanics of why that works(I knew it a long time ago, but the memories have faded), but it does work. Here is a 1:12 scale model shot form about 6 feet away. To my eye, it looks in focus.
-
What did you see on the road today?
Pete J. replied to Harry P.'s topic in General Automotive Talk (Trucks and Cars)
Didn't notice the hinges before, but now that you mention it, it is pretty funny. Nope, not FL! CA has is own breed of weird. -
What did you see on the road today?
Pete J. replied to Harry P.'s topic in General Automotive Talk (Trucks and Cars)
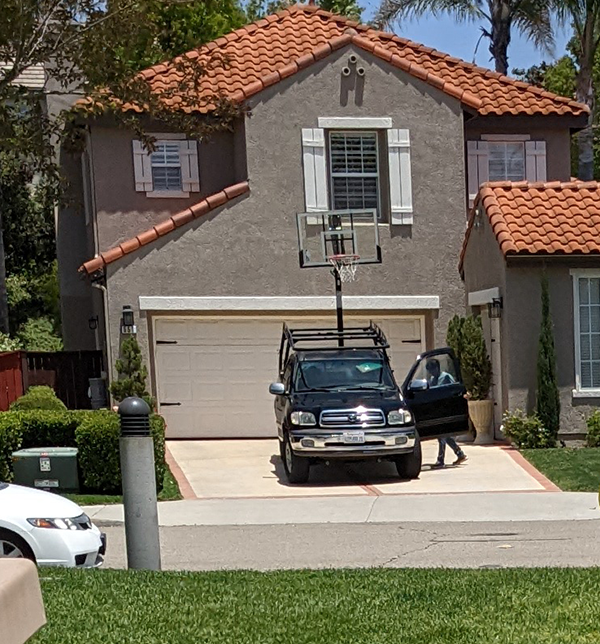
Saw this last week from one of my neighbors. They sold a basketball hoop at the garage sale over the weekend and the guy came by to pick it up. It is loaded in the back of the truck. I just hope he didn't go on any freeways!
-
The best bottled paint mixing balls!
Pete J. replied to Dpate's topic in Tips, Tricks, and Tutorials
I use the glass beads out of Tamiya spray cans. When the cans are empty, I open them with a pair of tin snips. I figure if they are good enough for Tamiya, they are good enough for me! -
Who doesn't love a mock-up? Let's see yours!
Pete J. replied to Belairconvertable's topic in WIP: Model Cars
I did, twice! After my win at Tamiya/Con I built two of them as thankyou's to the Staff at Tamiya. Unfortunately, it was a long time ago and I can't find the photos. Also, now the kits for these have gotten stupid expensive! -
Who doesn't love a mock-up? Let's see yours!
Pete J. replied to Belairconvertable's topic in WIP: Model Cars
I learned a long time ago that you can use the box art(especially Tamiya's side panels) to do plan modifications before you start chopping up plastic. This is one that I did years ago. The roof is chopped, the body sectioned and the bumpers were tucked in.
-
B-52 BUFF
Pete J. replied to Kit Basher's topic in All The Rest: Motorcycles, Aviation, Military, Sci-Fi, Figures
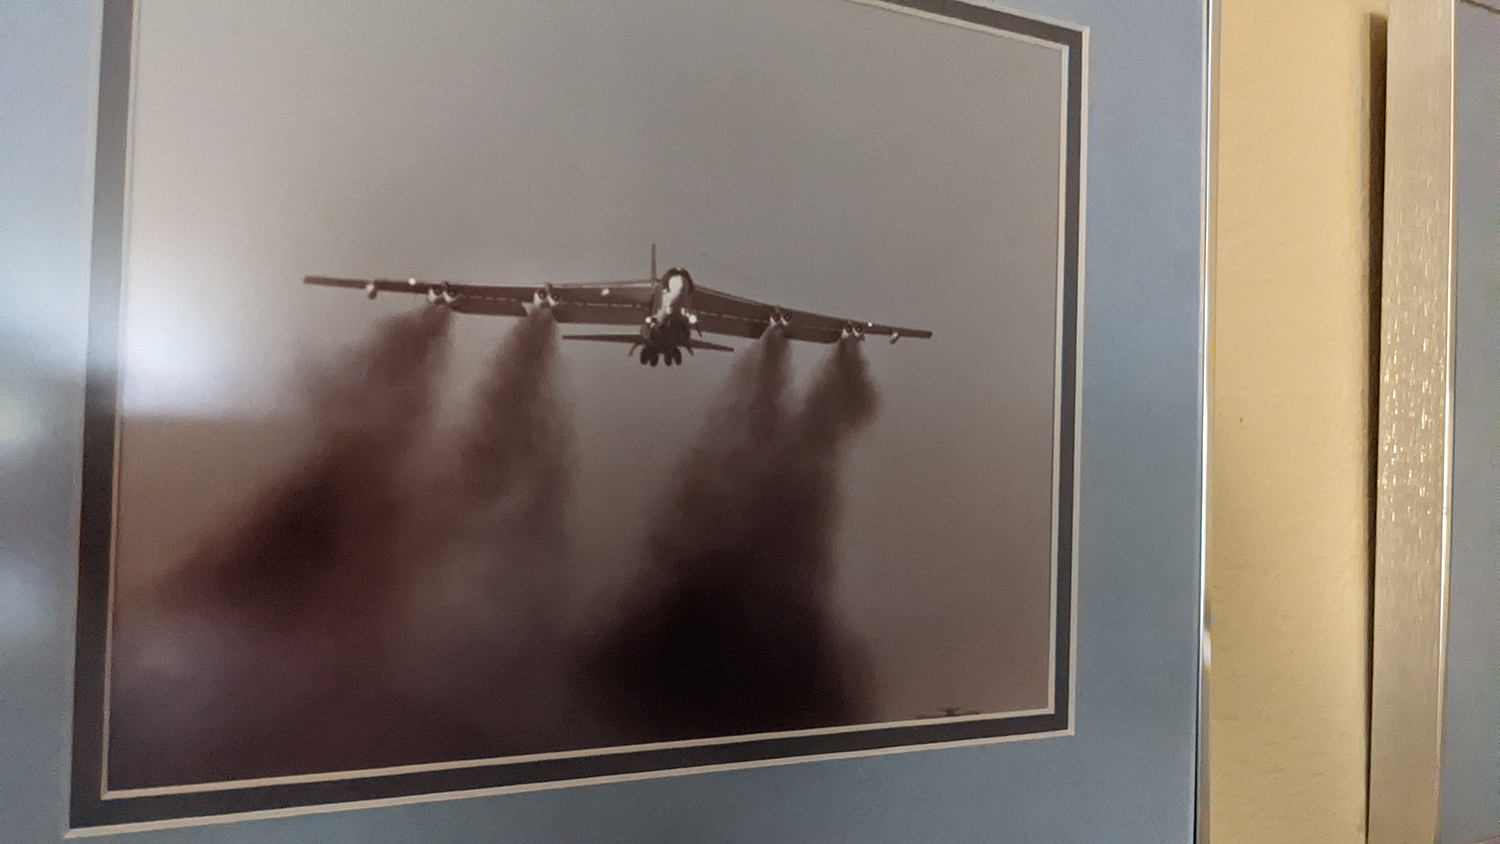
1,000 hours in the KC-135. Took this photo back in 1979 of early morning heavy weight take off out of Fairchild. In the lower right you can just make out the Tanker ready to go.
-
B-52 BUFF
Pete J. replied to Kit Basher's topic in All The Rest: Motorcycles, Aviation, Military, Sci-Fi, Figures
Nice replica of a Linebacker big belly buff. Saw more of these than I wanted to! This model had water burning engines that made a heck of a noise and a ton of smoke on takeoff. Scariest thing you could do short of combat was a minimal interval take off(MITO). 4 to 6 of these along with the same number of KC-135s rolling down the runway at 15 to 30 second intervals. On calm days you couldn't see 50 yards down the runway! -
I agree. I am just surprised to see that much drop on an airbrush. They generally don't have enough flow to make that big of a difference. I have to use this method for my Baby Iwata touchup gun(For large scale models). The basic pressure of the gun needs to be set to 13psi wide open.
-
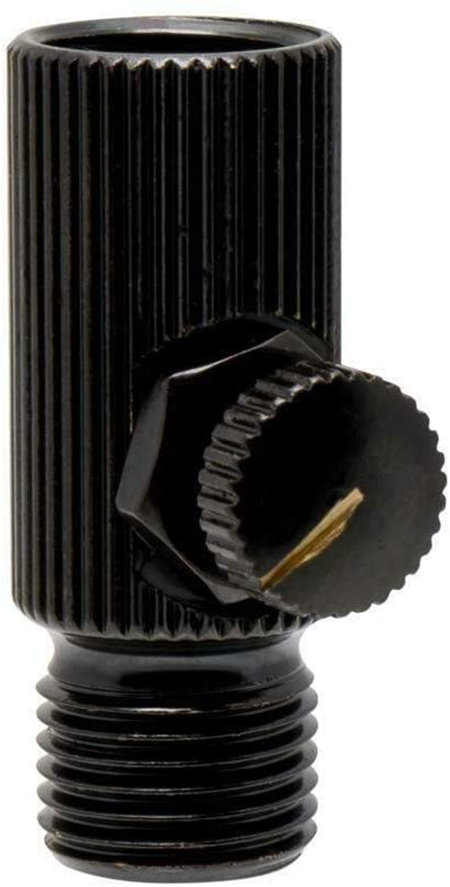
Hmmm... interesting. That much of a compressor shouldn't drop at all on an airbrush, so I suspect your regulator may be at fault. I would suggest an inline pressure valve like this Iwata inline MAC valve. You run the basic line pressure at a higher level and use the MAC valve to reduce it at the brush. You can get a very small gauge to determine the pressure after the valve. Set it with the brush air open all the way.
-
Even with a drawer full of clamps/clips, you can never have enough!?
-
Airbrushing: Jumping in with both feet and my wallet.
Pete J. replied to Bills72sj's topic in Tips, Tricks, and Tutorials
I agree with most of what you said. I really don't care that much about the price as it is such a small portion of the total spent on a build. However, if you read my original post, and not just this one out of context, you only need two 10ml bottles of LP to get 40ml of paint. I believe LP is suppose to be thinned 50/50 -
Airbrushing: Jumping in with both feet and my wallet.
Pete J. replied to Bills72sj's topic in Tips, Tricks, and Tutorials
Ok, that bumps it up to $1.56 for 10ml of paint as opposed to $2 for 10ml out of the spray can. Still cheaper than decanting rattle cans. To be forthright about rattle cans, I thin the decanted results a little so the net price is probably pretty similar. So it comes down to decanting rattle cans if you can't find the color you want in LP. -
Airbrushing: Jumping in with both feet and my wallet.
Pete J. replied to Bills72sj's topic in Tips, Tricks, and Tutorials
I have been struggling to come up with the actual cost of the LP bottles . I have heard that the proper thinning ratio is 50% paint, 50% thinner. If that is the case then that comes out to $1.25 per 10ml. The rattle cans would be $2 for 10ml. I would love to stop decanting rattle cans, but I am kind of use to doing that and I have not had occasion to use the LP's yet. -
Thank you. More brass work to come.
-
One-Off #22 (Deadline Apr, 3. 2022 12:00 PM CET)
Pete J. replied to carsntrucks4you's topic in Real or Model? / Auto ID Quiz
pretty sure I have seen this one. Now I just need to find it! -
Appreciate the suggestion. I to have done this and will probably use it for rear hood. The issue with the doors is that they are not an offset hinge like this. They are a piano hinge that runs the lower part of the door and are not really hidden, just flush with edge. Since the car was in production from 1948 to 1990 there are a plethora of door opening. I suspect a lot of the hinging process is a function of what hinge was available. Some have suicide doors on the front or rear and all other combinations. I chose having them both hinged on the B pillar as this was the combination at appealed to me. It also worked out from a builders perspective because the B pillar is very thin and it plastic not very stable. I could replace it with brass and improve the structural integrity of the model. When done, the doors will open and close without having to worry about snapping the pillar.
-
Airbrushing: Jumping in with both feet and my wallet.
Pete J. replied to Bills72sj's topic in Tips, Tricks, and Tutorials
Very true, but bubbles in the cup is almost always a problem with the needle seal. Most often a result of solvents acting on the seal. Some brushes come with solvent proof seals others don't. Replacing the seal with often solve the issue. Most brush repair places have solvent proof replacement seals. Also the seal will wear out over time. Many airbrushes have a compression fitting that will squeeze the seal for a tighter fit. I also use airbrush lubricant after every cleaning. Helps the seal last longer and improves the "feel" of the action. -
What did you see on the road today?
Pete J. replied to Harry P.'s topic in General Automotive Talk (Trucks and Cars)
An orange McLaren, yellow Lamborghini, a dayglo green Auston Martin, 5 Ferrari's in black and red, and umteen hundred Porsches in all flavors. Yup, just another trip up the 405 and 101 from San Diego to Camarillo to pickup the grandson. -
Hmmm, interesting. I may order a set just to see how they work. I think I am stuck with this design for now, but thanks for the information.