
Chas SCR
-
Posts
718 -
Joined
-
Last visited
Content Type
Profiles
Forums
Events
Gallery
Everything posted by Chas SCR
-
Sorry this is so late as I didn't know this thread was here. Chillyb1 is a great person to trade and fast. It was a little slow on my part and not his for he was faster then I thought about. Thanks again Chillyb1 any time you need any thing let me know.
-
3d Printed chassis from IRC 3d Imaging
Chas SCR replied to Chas SCR's topic in Car Aftermarket / Resin / 3D Printed
yes and plus this one here was done in .1mm per a layer. I can go as .050 or .008mm per a layer but your talking about time and money. The worst setting is at .3mm a layer and it looks like it came from a few places out there with a lot of grit and not smooth. For warping it's a up and down struggle and also the tolernice is not as good as I wish it would be but it works for my normal use of what I do with the machines. This is just an added on time is all. The machine has a .040 + - mm hit or miss on each part for thickness. This is a big issue for the companys but for what is at home use it's not going to get any better for the hobbiest side. I just paid for a set of ones done with some kind of lazer styling machine for the lettering on a valve covers .05x .1mm and it was over 200 just for the set of them to be done. -
Very nice work Mark, Here is my first try at making A arms in brass
-
3d Printed chassis from IRC 3d Imaging
Chas SCR replied to Chas SCR's topic in Car Aftermarket / Resin / 3D Printed
Deano it was done in multie parts because of the way it has to be done on some systems or it would cost way to much to do for the public. Each 90 degree angle that is not on the bed would have to have so many support parts added to it that it would cost time and money to the point you could not buy this frame. Ok for it being not squar at the time of the photo there was no parts connected and fulling line up. Danno It's all about money and being able to get it in some thing that is smoother then what is offard at this time. This is done using ABS plastic and does not need to have any thing put on it to paint it or glue it together. People also said the same thing about the R&D pot metal chassis and how they was. This stuff here is strong as brass when its done and removed from the machine. For your cost concerns I will give you and idea how long it takes to do just the front rail. 50min to heat the bed up, 1hr 30min to make the part and another 45min to cool the bed down for the part to be removed with out warping. -
3D printing growing as we speak
Chas SCR replied to bbowser's topic in General Automotive Talk (Trucks and Cars)
Full chassis with built in 2inch drop from RS (Roadster Shop) helped on it. But like any thing else that has been said doing 1/24 scale stuff as in lettering and such for the home machines are way far from it. Plus there is a lot more then you want to think about before buying one as in time, lots and lots of time for printing this chassis is 18hrs from start to finish for all the parts. For a motor block it's 12hrs and so on, yes bodys are achievable but think of not just 8 injecter pin spots but houndreds of to the support the 90 angle for the roff, trunck and so on. The 2 ply machines like what shapeways and the big industerial machines has you will never see them get to the home stage because of the hazmate laws. Even the one of the top leading companys out in Salt Lake that was there for the GSL said the same thing. We will be left with either ordering and paying the price for what you want like a normal machine shop will do the work for you or just go with out. -
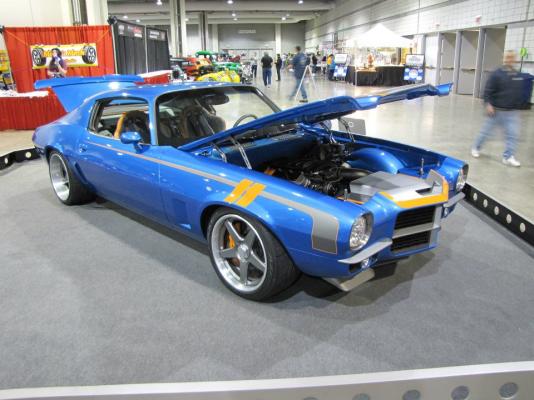
Here is the first look at the RS (Roadster Shop) Design chassis for the hard core Pro Touring G cars. The design was sent in from the great people at RS to have this done in scale and fits the 66 Chevelle body styles. Full upper and lower adjustable A arms with a built in 2inch drop and full Pro Touring G tie down sway bar. The rear cross member is fully detail and ready for the exhaust to be ran in side it. They also are working on doing the Corvette and Mustang chassis and plus a few other ones in store. contact info at irc3d@yahoo.com
-
Thanks for looking every one. Thank you John for the kind words! Here I did up a few sets of coil over shocks and will be using on this build and another build that i'm doing.
-
Did some work for the front end on Brute Force tonight, machine out the rotor plate and dust shield.
-
Machining the hood pin parts tonight, this is the first set but will make a new set tomorrow.
-
This is just getting better and better and also helps me on a lot of areas, Thanks for sharing a great build step by step.
-
Was able to get the under side of the hood painted this weekend, unlike the top of the hood with the two different clears this one is just all one clear and full shiny look to it. I do have a few spots to fix and will be easier to do as I can progress in this part and make the hood pin parts.
-
Mark i'm just doing the hood as if I screw up the paint on how it was done doing the gray and dullner in the paint and clear I can replace the hood a lot easier then stripping the body. The gray on the sides of the body are done in the same way and was not 100% sure on the mix of dullner to the paint and clear and how to get every thing to look right. For the nose im really close on getting back to it and start getting it shorter and trim it down. I did fix the air duct better and looks more real then how unsquare it was before.
-
Chuck it's at the collage in Macom County just north east side.
-
Thank you for the kind words guys, I will have an update tomorrow as i'm doing the under side of the hood. also this will not be at the Detroit show as I'm taking a different build car that I been working on for display there.
-
There was no such thing as a 409 turn into a 427 motor. In 63 the Z-11 package was just all aluminum front end, bumpers,grill,hood,fenders and a over size came called the Z came. The motor rating for 63, 409/409hp 409/425hp rated but really pushing 450hp, Diffenernt heads with aluminum intake and the radicatel came pushing the 409 to over 500+hp rated. The mistory motor was a complete different motor in all as it was the early 427 and between all of them that was made there was no interchange parts between the motors. This means if you had two of them nothing could be switched as they was trying a ton of new stuff all in each motor for nascar only. This car that you are doing and you have read it right was just a "What If" car, Hayden left Chevy at the early part of 63 after they left drag racing and this was the main thing as to wonder if Hayden and Chevy still was in drag racing in 63 what he would have been driving.
-
Brute Force- update as I get the core support done and air duct scoop put in as all one part. This lets me slide the radiator and oil cooler up from the bottom in place. Also did the hood pin locations and you can see the hood also fits flush like it's suppose to.
-
Retired for health reasons from GM 2003 as a C-N-C Programer for the interior work and dash board work.
-
Tonight's work was to get the hood done on top and wet sanded down and polished out, also did the nose a little more and looks a lot better now in the air duct and the two parts are the core supports so I can get that part done. The hood also is a lot duller with out the light hitting it then it's showing. Thanks for watching this build its been a lot of work and fun so far.
-
Hood is now drying and with every thing painted on it. The lines are the same weidth and spaced out for the edge of the front of the hood and the rear so it all stays the same. This painting is really a learning part for me using the flattener in both the paint and clear coat. But at the same time you can see what the under side of the hood will be shiny like this as Bob did not flat coat the clear for the under side of the hood or the floor pans and such under the car.
-
Doing the orange stripes and wet sand tomorrow and clear coat
-
doing the plug wires and fuel line that is missing on the intake for LS motors. You can see the plug wires are angle to the front of the motor as this is where the coil packs will be at.
-
Also getting more on the motor done tonight as I did the pulley for the power steering and the new box locating it to the drivers lower side. This is just high enough to get the coil packs in place between the frame and the motor.
-
With the hood getting it's first coat of the gray and then clear coated I can see from the flash there is a few spots that the blue came up but this will be taken care of when I'm done. First was using the flattener in the paint to kill the metal flake to a dull gray and then using it in the clear coat also to keep the gray down after it will be buffed out. The blue will come back as this part had no flattener in the 7900 clear. A lot of learnig the steps on how they gone about it to get the over all look of this car is a real challange.
-
Thank you for watching this.
-
"Brute Force" hood now starting on the paint for this, this will have three different colors and two different clears done to it. Both top and underside of the hood will match each other.