Straightliner59
-
Posts
5,811 -
Joined
-
Last visited
Content Type
Profiles
Forums
Events
Gallery
Everything posted by Straightliner59
-

AMT Pete 352 Day Cab
Straightliner59 replied to Straightliner59's topic in WIP: Model Trucks: Big Rigs and Heavy Equipment
Lee, it is easy to see why! You have to figure out which component is which, then plumb it, accordingly. It's even more confusing when two pictures of the same part look different! Very perplexing! Good luck. If you have some photos of your engine, maybe I can help. I'd be happy to give it a shot! Thank you, Dan! -
'34 Ford Coupe A/A--New Photos 07/26/20
Straightliner59 replied to Straightliner59's topic in Drag Racing
I would stick with the bar! I've never tried anything else, just because, when I was doing the research, that was the one that came up in most descriptions of the process. I think the bar, because it's easier to get a more uniform coat, that stays where you put it! ? I will say this, though. If I didn't have a bar of Ivory soap, I would certainly experiment. Thanks, Francis! It's always a pleasure, sir! -
'34 Ford Coupe A/A--New Photos 07/26/20
Straightliner59 replied to Straightliner59's topic in Drag Racing
This is how I learned to do it, and it's worked well: Once the coating is sanded off, use a bar of plain soap (Ivory is what I use, nothing scented, of course) to coat the sheet. Now, hit it with a torch. As soon as the soap turns black, quench the sheet. You're ready to have a whole new kind of fun, now! -
AMT Pete 352 Day Cab
Straightliner59 replied to Straightliner59's topic in WIP: Model Trucks: Big Rigs and Heavy Equipment
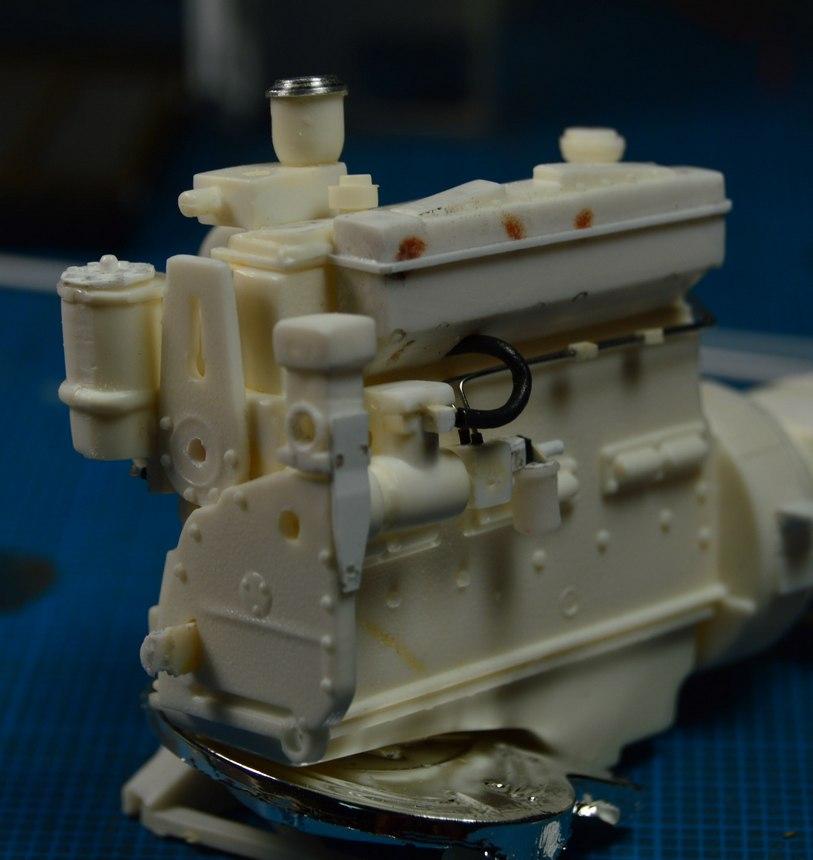
Thanks, Lee. With seemingly no two of these 350s alike, it's interesting, sorting out the plumbing on this thing, for sure! There are so many different things in so many different places, that, about all you can do is find the lines that are common between them, and install those. -
AWB '65 Chevy II--New Photos 07/26/20
Straightliner59 replied to Straightliner59's topic in Drag Racing
Thank you, Bill! I always try to make my stuff look realistic. I have a few things that look kind of toy-like, but, I really like my models to have some "grit", about them, if that makes sense. Thanks for your comment! -
Isky-U-Fab Special--New Photos 07/27/20
Straightliner59 replied to Straightliner59's topic in Drag Racing
Thank you, Bill. Appreciate it! -
AMT Pete 352 Day Cab
Straightliner59 replied to Straightliner59's topic in WIP: Model Trucks: Big Rigs and Heavy Equipment
More work done to the pulleys and compressor. I don't have photos, yet, but, the compressor is mounted.
-
Tamiya and testors cement issues
Straightliner59 replied to jamesG's topic in Model Building Questions and Answers
You can pick up a can of Weld-On 4 at Home Depot. It's very similar to Tenax or the Flex-i-File stuff. Lots cheaper, too! -
Isky-U-Fab Special--New Photos 07/27/20
Straightliner59 replied to Straightliner59's topic in Drag Racing
Thanks, Barry! Glad you like it! -
'34 Ford Coupe A/A--New Photos 07/26/20
Straightliner59 replied to Straightliner59's topic in Drag Racing
Yeah, I love the orange ones, too! Thanks, Francis! I think you should try the flashing. It's an excellent material. Two things, though, it has to be annealed, and, before that, if it's coated, the plastic coating needs to be sanded off. Once those two things are done, you're off to the races! Thanks, Scott and Larry! I appreciate your comments -
AWB '65 Chevy II--New Photos 07/26/20
Straightliner59 replied to Straightliner59's topic in Drag Racing
Thank you, Scott! It's all in the research, for sure! Thanks, Barry! I believe I remember you from the "old days" (SLM). I really like the way the "terrible towel" worked out. It looks good,and I didn't have to mess around with throttle linkage on the injector! Bonus! -
Junior Fueler. New Photos 07/20/2020
Straightliner59 replied to Straightliner59's topic in Drag Racing
Thanks, Francis. I appreciate you having a look, and commenting. Much appreciated! It took me a while to get my settings dialed-in, and, there may be a bit more, to do, toward that, but, these are much better than my earlier efforts! I love that flashing! I use it all the time! That and tooling aluminum. Not sure what I would do, without either! Thank you, Scott! I very much appreciate it! -
Isky-U-Fab Special--New Photos 07/27/20
Straightliner59 replied to Straightliner59's topic in Drag Racing
Thank you, Francis! Yes, it looks much better, now! -
I got more work done to the compressor and pulleys, for the Pete. Maybe I can get some paint on this engine, in a week, or so.
-
AWB '65 Chevy II--New Photos 07/26/20
Straightliner59 replied to Straightliner59's topic in Drag Racing
Thanks, so much, Francis! I was really hoping to capture the spirit of a privateer, on a regional match race circuit--the kind that might build their own headers. I appreciate your kind words, sir! -
AWB '65 Chevy II--New Photos 07/26/20
Straightliner59 replied to Straightliner59's topic in Drag Racing
If you see this, please delete this post. 'Twas an accident! -
My Old Friend (Is A Tool!)
Straightliner59 replied to Straightliner59's topic in General Automotive Talk (Trucks and Cars)
That's a nice setup! I've never had a Binks airbrush. My first one was that Badger rig you could get in the Auto World catalog, with the canned air. I never could get that thing to work properly. I didn't have any kind of patience, back then! ? -
AWB '65 Chevy II--New Photos 07/26/20
Straightliner59 replied to Straightliner59's topic in Drag Racing
Thanks, John! I really appreciate that. Modeling is an art form, and should be more generally recognized, as one! Thanks, Everyone for looking, and especially, for taking a minute to comment. It is very much appreciated! -
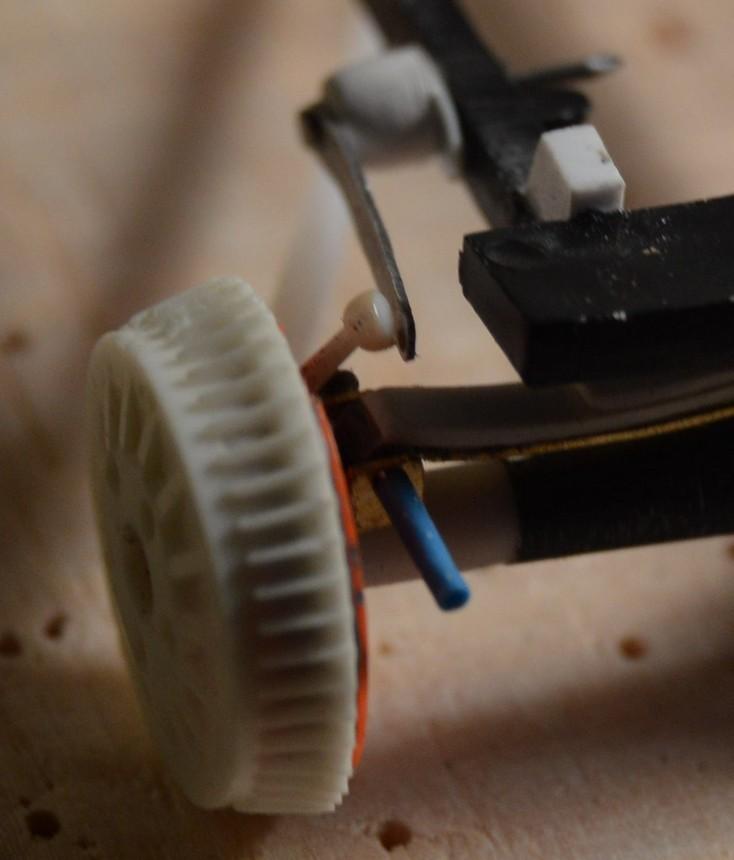
I did, indeed! I would guess that they are still available. I used it to make these ball mounts for the shock arms for the Model A.
-
I use it to stretch sprue, and also, to heat the ends of styrene rod, to make things that need a little ball on the end, or, as I will use it next, to make the body for some globe valves, since I have handles for them, but, no valves. It also works well for heat-forming sheet over a carved buck.
-
My Old Friend (Is A Tool!)
Straightliner59 replied to Straightliner59's topic in General Automotive Talk (Trucks and Cars)
Does anyone?! ? -
Isky-U-Fab Special--New Photos 07/27/20
Straightliner59 replied to Straightliner59's topic in Drag Racing
Ah, yes! It's been a while since I read "High Performance". It's easily the most comprehensive history of fuel racing. -
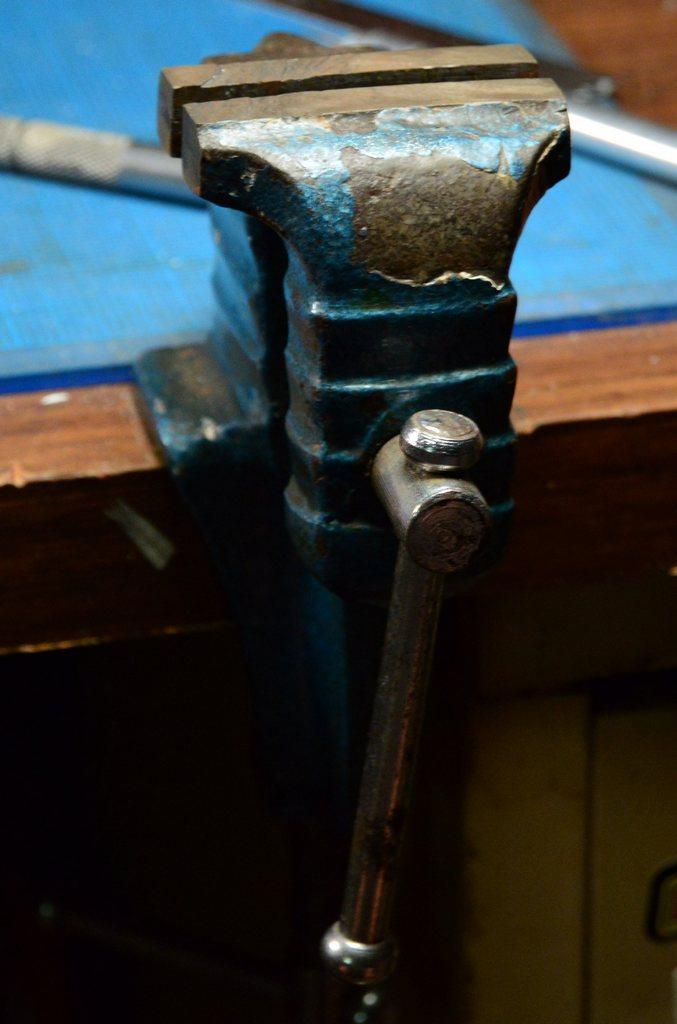
I was thinking, the other day, that this vise is really an old friend, at my workbench. I bought it at the Hedahl's Auto Parts store in Glendive, MT, in about 1974. It was in one of those "cheap tools" bins that every parts store seems to have. I think I paid $1.99, for it. I use it virtually every time I sit down at the bench. It's had its share of abuse, but, what a great companion this old Globemaster has been! Anybody else have an old tool they've had around forever that still gets constant use? I still have a pin vise I bought, about that same time, that I used, just earlier. It's the first pin vise I ever had, too.
-
AMT Pete 352 Day Cab
Straightliner59 replied to Straightliner59's topic in WIP: Model Trucks: Big Rigs and Heavy Equipment
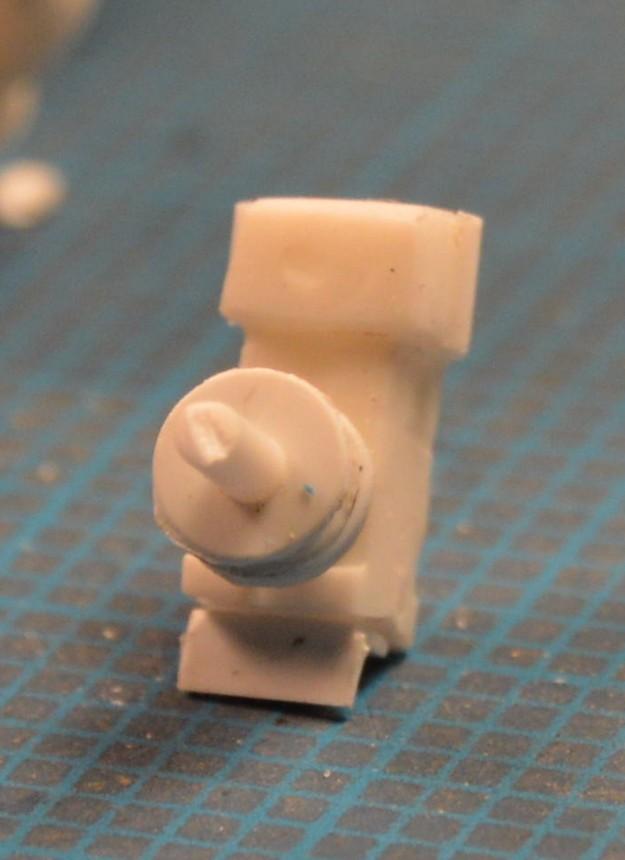
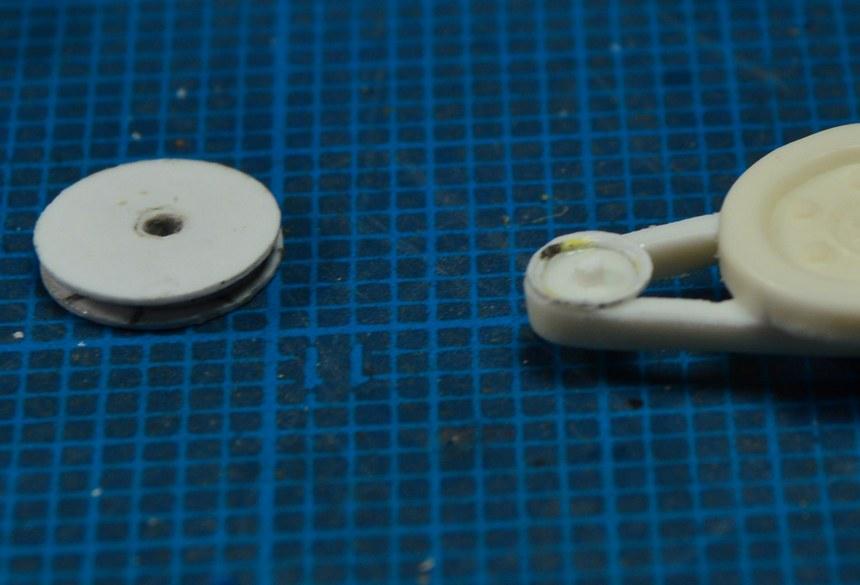
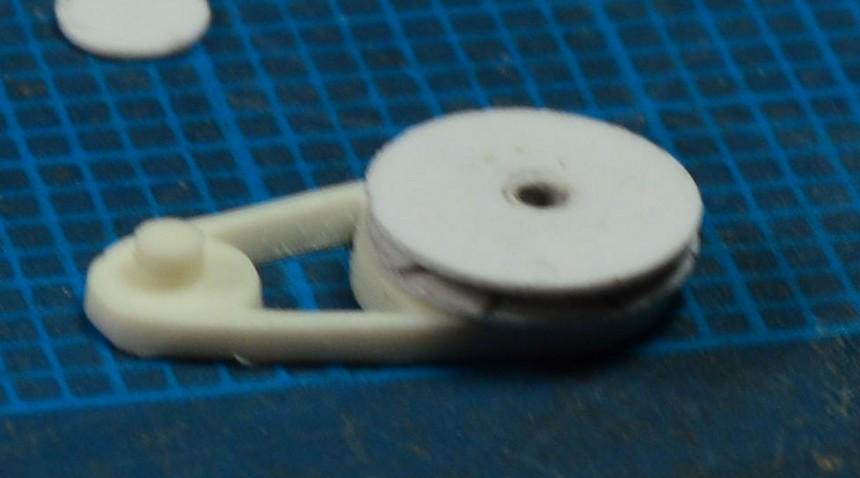
Engine progress. I've added little details, and been filling sinkholes. There are fewer sinkholes, in Florida, than in this kit! I have also begun work on the pulleys, which was necessitated by the fact that some of the components didn't seem to want to fit with the kit belt assemblies. Except for the crank pulley/harmonic balancer/alternator be;t assembly, the rest of the belts and pulleys will be scratchbuilt. As always, questions, critiques and comments are always welcome! Thanks fer lookin'!
-
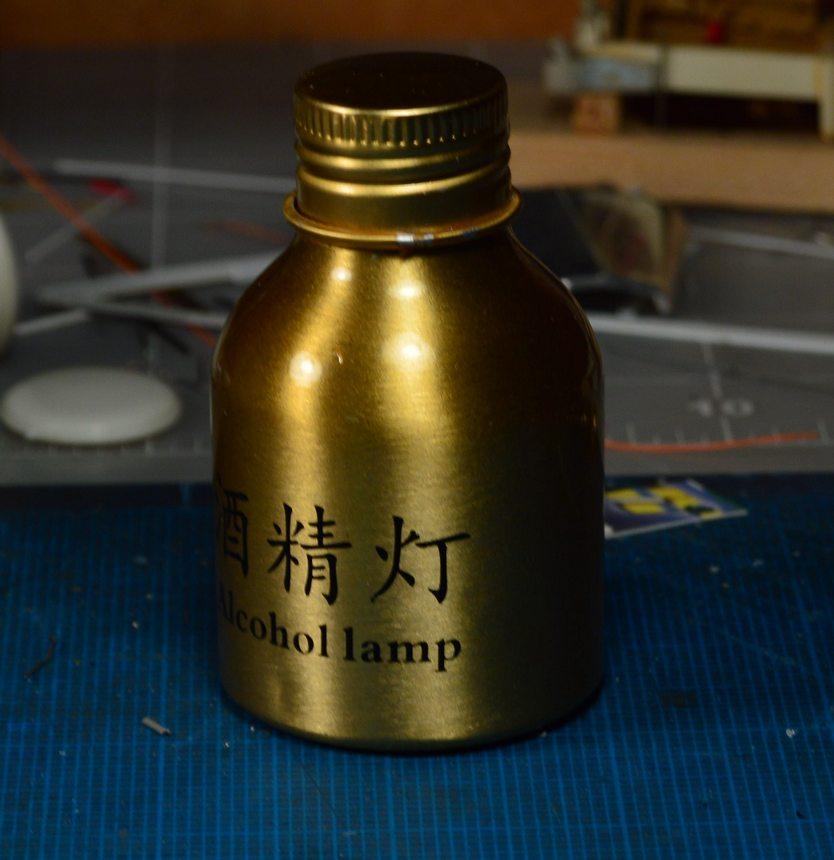
I didn't get this, today. I've had it for quite some time. I decided to post it, now, for two reasons: One, I found it on Ebay, for a dollar, shipping included. So, it's dirt cheap. Two, I got it down to use it, yesterday. I hadn't put alcohol in it, for at least two months, and I didn't fill it, then. Yesterday, it still had alcohol in it. Just thought I'd pass it along. It's cheap, and good!