StevenGuthmiller
-
Posts
15,071 -
Joined
-
Last visited
Content Type
Profiles
Forums
Events
Gallery
Everything posted by StevenGuthmiller
-
 I agree with the Johan Cadillacs being nice kits, but I wholeheartedly disagree with your assessment of the early AMT kits. Along with Johan, if it were not for the AMT annuals from the late 50s throughout the 60s, representation of American automobiles from that era, (with a very few exceptions) would be nearly nonexistent. They may not have been engineering marvels, but in many instances the accuracy of body shape and proportion still puts many modern kits to shame to this day. It’s my opinion the there is much more that constitutes a good kit, and what’s required to make a nice model, than just the number of parts contained in the box. Steve
 -
The AMT 1956 and ‘57 Ford Fairlanes, and the AMT 1958 Chevy Impala. Steve
-
Acceptance of 3D printed models?
StevenGuthmiller replied to jdhog's topic in Model Building Questions and Answers
Yes, but the question was, "what is our opinion" on 3-D printing. Not what do we think of every individual dumbbell that gets their panties in a wad because they think everyone else should think like them. And yes, I believe that's a two way street. Steve -
Acceptance of 3D printed models?
StevenGuthmiller replied to jdhog's topic in Model Building Questions and Answers
I don't speak for everyone else. I can only speak for myself. I understand that stupidity abounds, especially on some of the Facebook groups. Heck, I had a big argument recently with a guy on Facebook who although he claimed to be a model show and contest enthusiast for 55 years, had no idea what the NNL was and what the letters stood for. But that doesn't mean that everybody that has little or no interest in 3-D printing has an agenda against it. Are there nuts out there? Of course. But my guess would be that there are a great deal more that just don't have much interest in leaping on to the latest band wagon every time a new one comes along. We're happy with where we are. Steve -
Acceptance of 3D printed models?
StevenGuthmiller replied to jdhog's topic in Model Building Questions and Answers
Or, to be a little less abrasive, you could just say that some of us older modelers have evolved our way of doing things over many years of developing techniques and the use of certain materials that are comfortable to us, and at this juncture in our lives and modeling careers, are completely satisfied with that, and don't feel the need to start all over again with a whole new genre of technologies. I don't think that you can call that "closed minded". I think of it more as "disinterested". I don't have anything against 3-D printing, and if I ever happen to find a part or two for sale that I can't live without, I'm on it, but it's not likely to ever be anything that I'm going to go out of my way to embrace, and I certainly won't be doing any of it myself. I don't necessarily think that makes me a knuckle dragging neanderthal. I'm just not all that captivated or fascinated by it. Got by just fine without it for all of these years. I think I can do just fine without it for a few more. Steve -
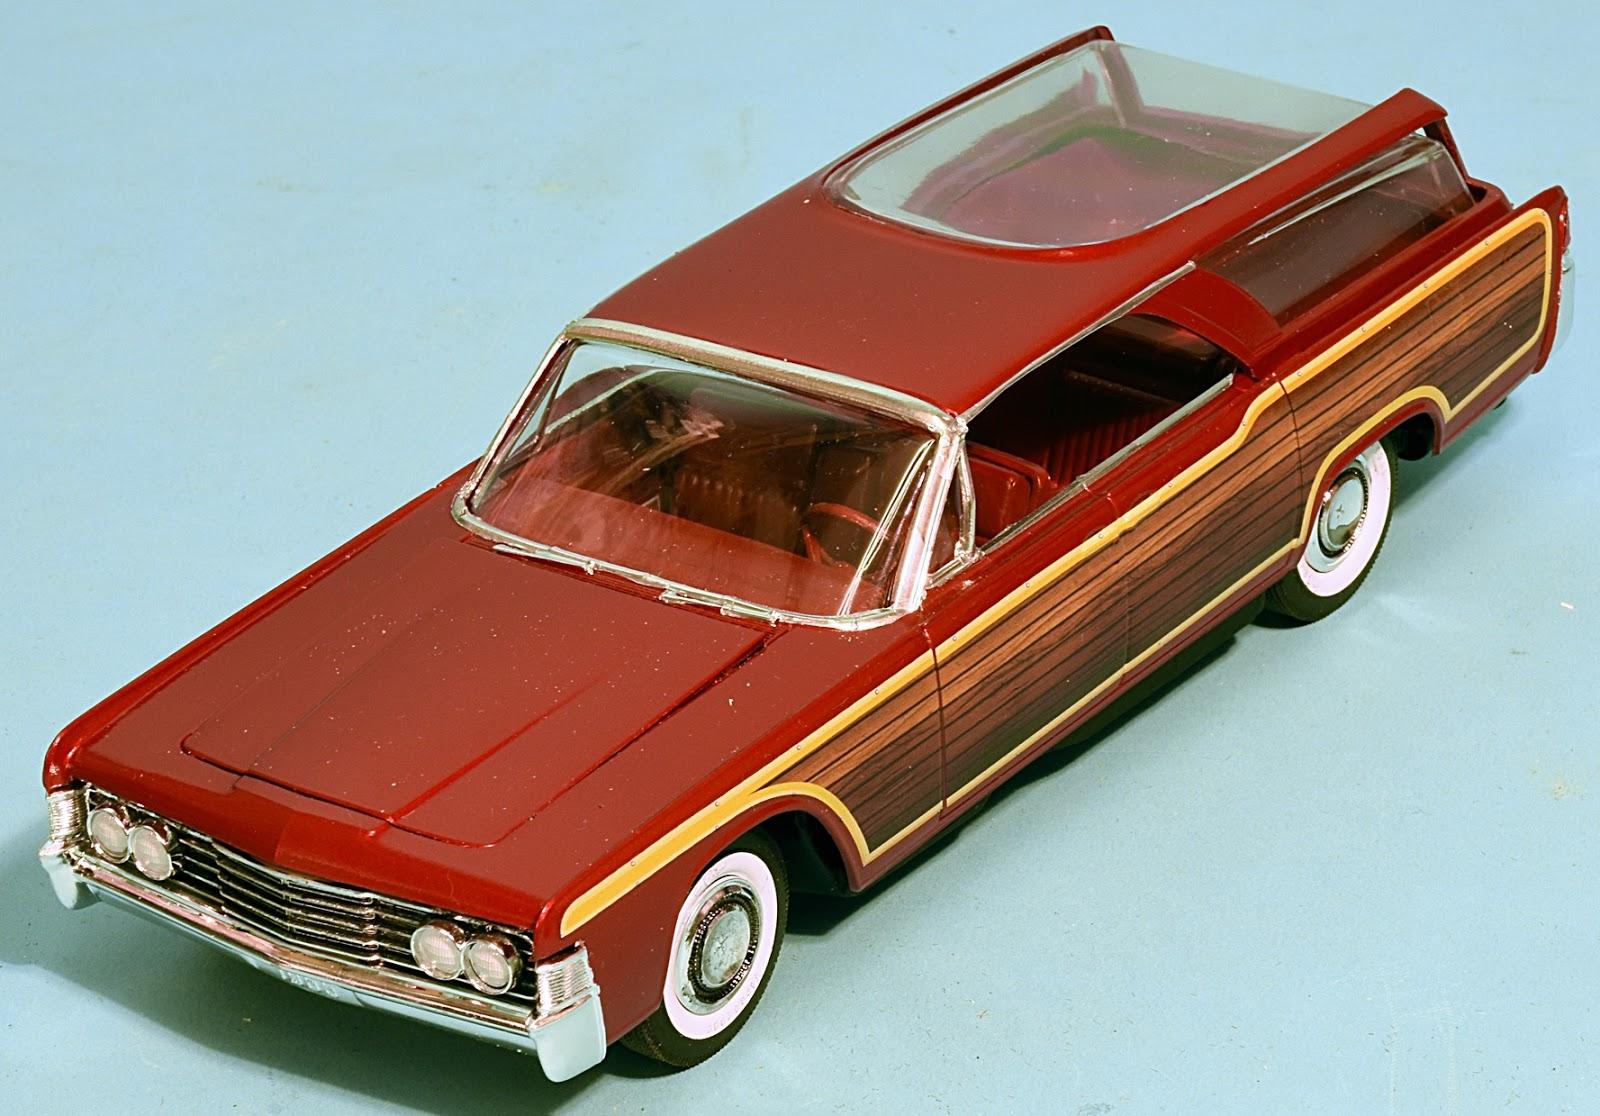
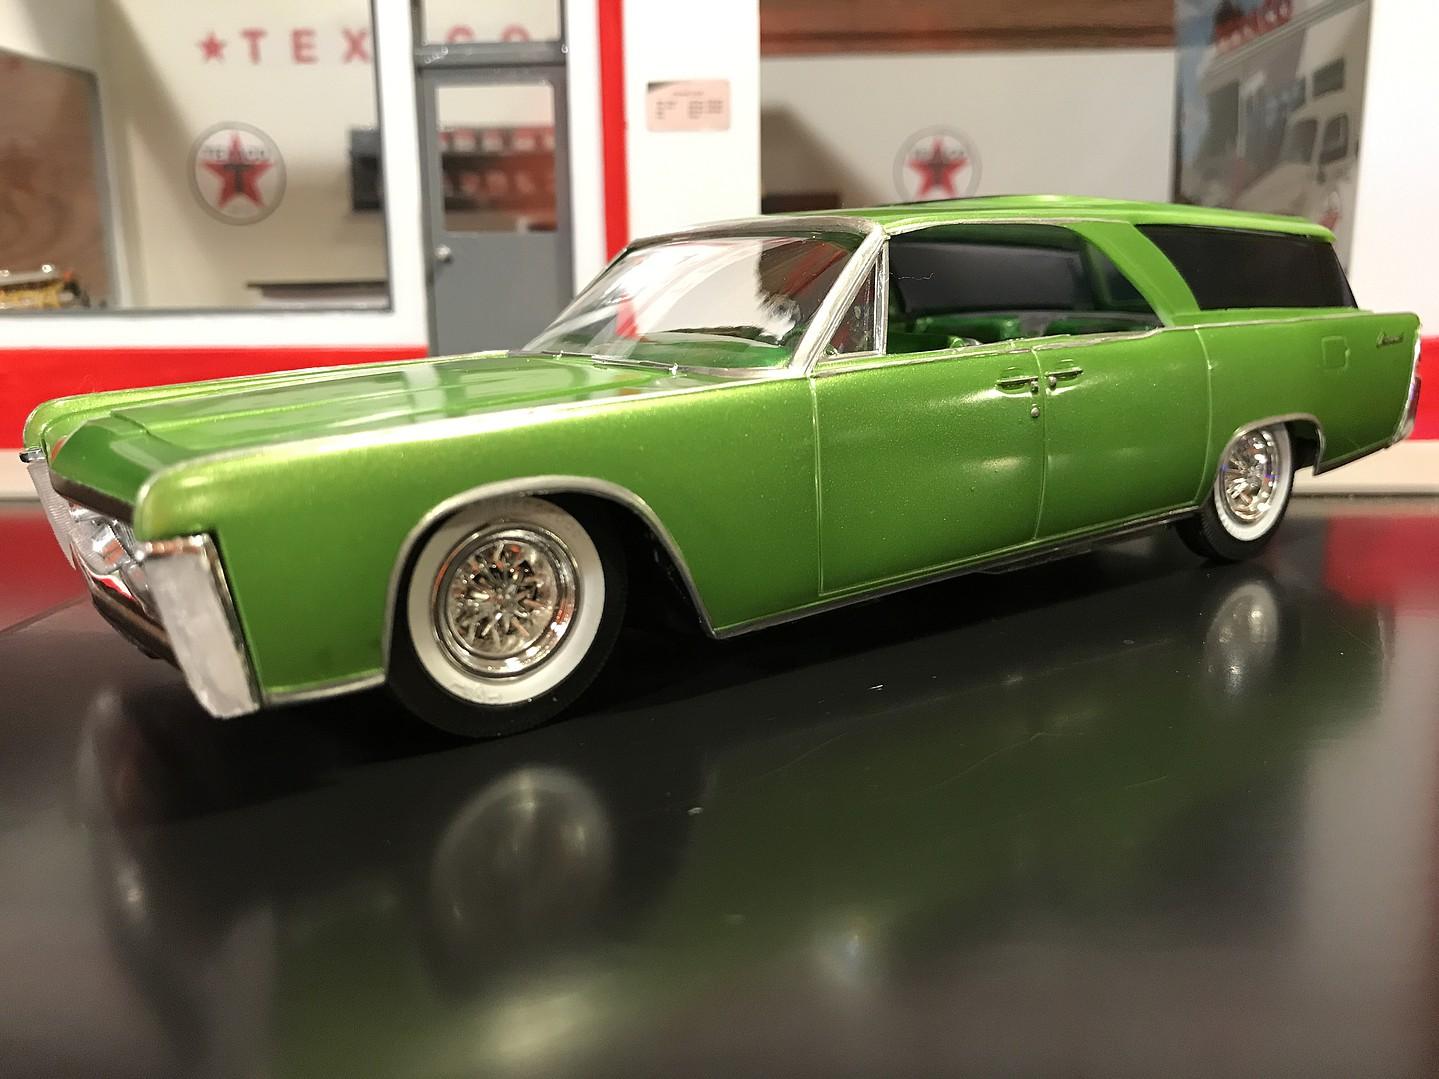
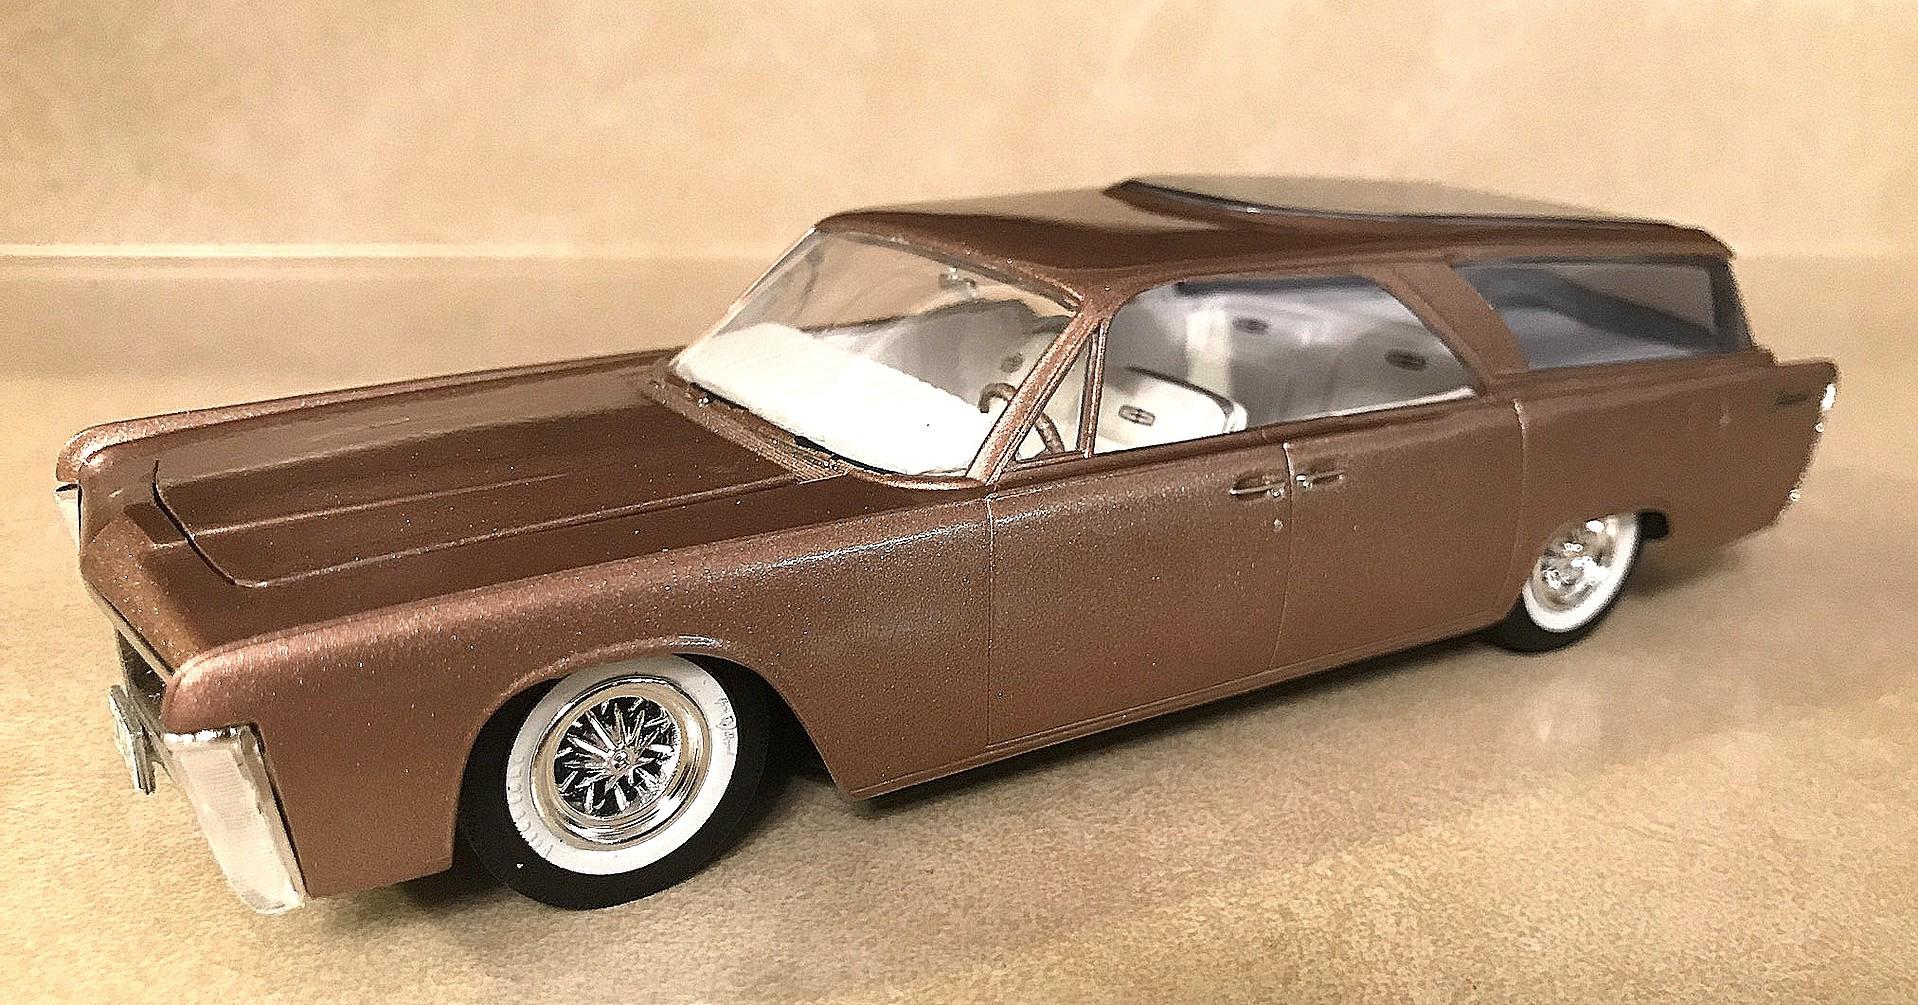
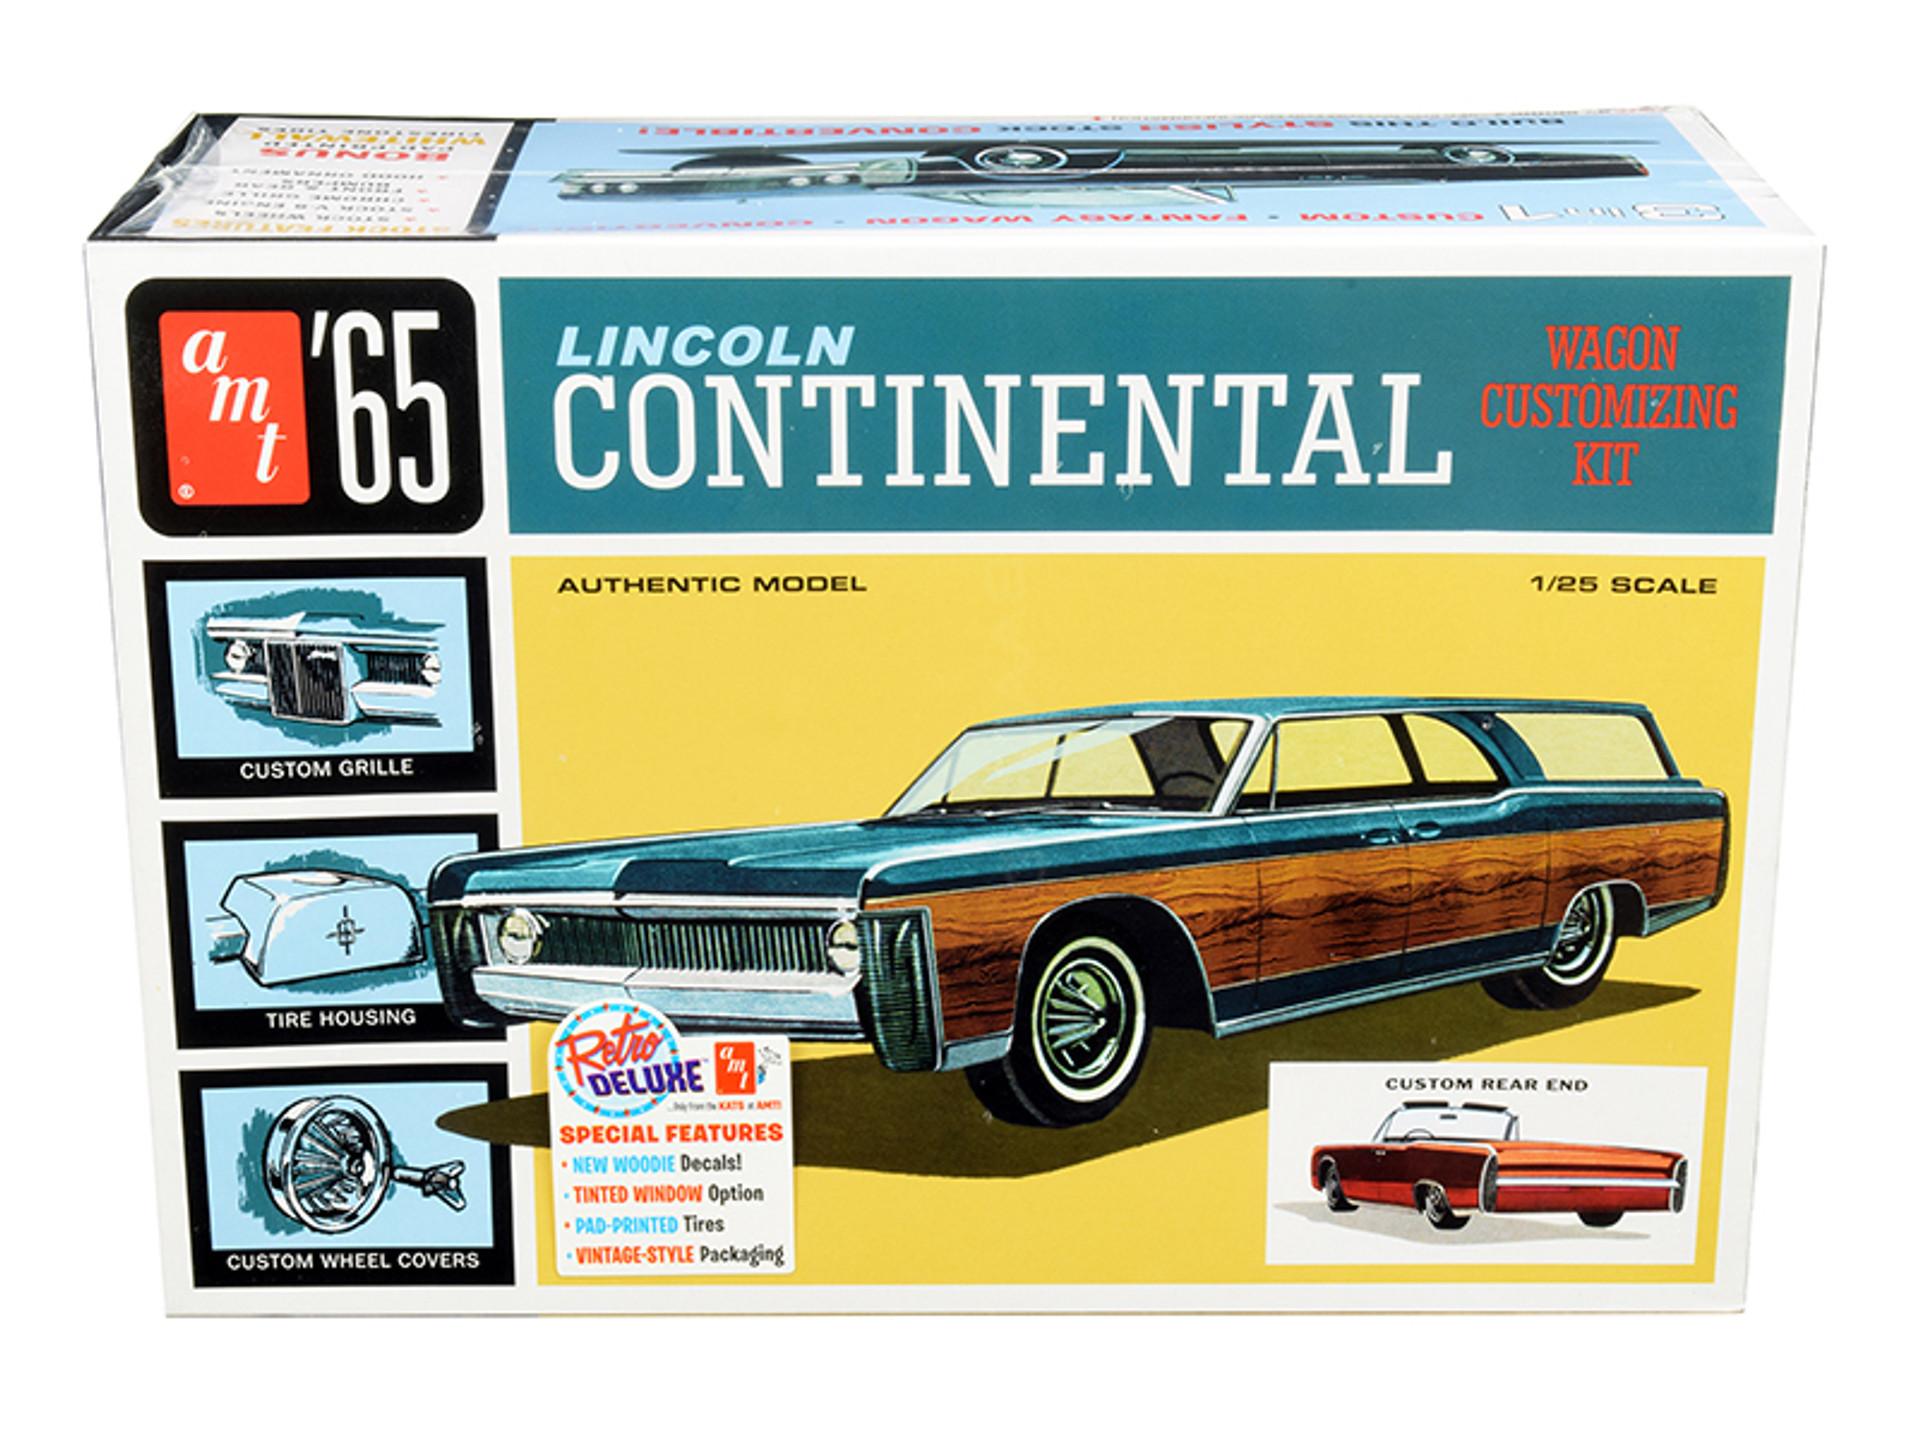
As Trevor stated, not an unusual kit at all. It's the AMT 1965 Lincoln Continental convertible kit with the optional custom wagon top added. Been around for a loooooong time. I have one of the "Prestige" versions. Just a few pics of others built in the same wagon configuration. This is the latest version of the kit as it's available now. Steve

-
Ollie's strike again
StevenGuthmiller replied to GLMFAA1's topic in General Automotive Talk (Trucks and Cars)
I can see that I'm definitely not missing anything by not having an Ollie's around. Steve -
Sanding Cloth, Sponge, etc
StevenGuthmiller replied to Zippi's topic in Model Building Questions and Answers
Micro-Mesh pads. ? Steve -
Headlights Tutorial, rewritten....
StevenGuthmiller replied to Allan31's topic in Tips, Tricks, and Tutorials
I’m really liking this idea for the reflectors! I’m always looking for ideas on how to do those. I might try an alternative method for the lenses, but the reflectors look great! Steve -
Of course, everybody has their own interests, but I think with the recent revelations from Round-2 of kits that were all but expected to never return, ie, the ‘64 Olds, ‘63 Nova wagon, ‘68 Coronets, ‘71 Demon, ‘64 Chevelle, the Ford trucks, etc, I think the only conclusion is that they’re exceeding all expectations. There will no doubt be more surprises in the future, and I’m certain that everyone will find something that they will be exceedingly happy with. Steve
-
You can replicate slightly rusted iron manifolds simply by spraying them with the metal finish of your choice, (I use Alclad) and then spray a very light mist of red oxide primer from a spray can from several feet away to create a light speckling of rust. I use this same technique for many rusted metals, including exhaust pipes. Steve
-
That might be correct. I know some makes and models jumped back and forth between manufacturers. It can be hard to remember what went where. In any case, the ‘65/‘66 Barracudas were produced by AMT, not Johan. Steve
-
This is the story that I have heard. I have heard nothing to make me think that it’s untrue. When Johan began struggling, probably as far back as the late 70s, employees began to go unpaid, prompting some of them to steal parts of some of the molds to hold for ransom. How much of that is true, I have no idea, but it gets worse from there. As the company began it’s downward spiral, molds were sold off and melted down for scrap, and whatever remained wound up in poorly maintained storage, where it rusted and deteriorated, rendering most of what remained unusable. To compound things, it’s my understanding that the injection molding equipment used was exclusive to the Johan molds, and vice versa, meaning that any remaining molds were useless without the specific equipment needed to make them usable. So, it appears that the entire situation was destined to be a disaster once the ball began rolling. In other words, with the exception of a very few items, the bulk of Johan’s inventory is gone forever, with virtually a zero percent possibility that it can ever be resurrected. The Barracuda kit spoken of was originally offered as a full customizing kit, with a stock body and all other stock parts by AMT in 1965 and 1966, as well as the ‘67-‘69 Barracudas. My guess is that there is a very good possibility that Round-2 might resurrect the ‘66 Barracuda at some point through their “reverse engineering” process. Steve
-
There are a number of reasons why Johan kits are not coming back, but the bottom line is that they’re not coming back. Steve
-
Is this a model or a promo
StevenGuthmiller replied to junkyardjeff's topic in General Automotive Talk (Trucks and Cars)
I guess you learn something new every day. ? Steve -
Molotow Liquid Chrome feed problem
StevenGuthmiller replied to Oliver77's topic in Tips, Tricks, and Tutorials
Bingo!! I suppose if you're going to spray it over some parts that you're not doing any detailing on, are never going to touch again, and are willing to take a chance on it turning green or flaking off or whatever, 5 or 10 years down down the road, it's a viable alternative. One thing that I always find a bit amusing, especially on the Facebook groups when the Molotow vs. BMF for body moldings discussion comes up, is that you never seem to get anything as far as definitive photographic proof from the proponents of Molotow that it performs, or looks as good as foil, even though that's almost always the claim. Usually just a single blurry photo shot with cheap phone from 6 or 8 feet away! In all honesty, with the thousands of Molotow users out there, I don't remember ever seeing a really good example of it being used for moldings. At least nothing ever approaching the quality of a good foil job. I suppose that there might be one or two examples in existence, as anything is possible, but I'd have to see a "LOT" of them to ever be convinced. Steve -
Is this a model or a promo
StevenGuthmiller replied to junkyardjeff's topic in General Automotive Talk (Trucks and Cars)
Never, ever, seen a promo with an engine. So, unless it's some strange anomaly, it's a kit. Steve -
I think we already know the answer to this question, at least in the short term. The 1960 Ford pickup. The 1963 Ford Pickup. The 1964 Chevy Chevelle. I think that's a pretty good start! Steve
-
Molotow Liquid Chrome feed problem
StevenGuthmiller replied to Oliver77's topic in Tips, Tricks, and Tutorials
In the end, I suppose it boils down to whatever you can make work for you. That’s the bottom line I guess. But I’ll never shy away from offering my opinion on the matter. Steve -
Molotow Liquid Chrome feed problem
StevenGuthmiller replied to Oliver77's topic in Tips, Tricks, and Tutorials
I agree. there’s nothing that I could do with Molotow that I can’t do twice as well with BMF and Alclad. Steve -
There are several problems with Rustoleum paint other than just long curing times that people need to be aware of. As Jon stated, the nozzles are horrible and clog up extremely easily. That might be attributable to the fact that the paint itself is exceedingly thick, which not only clogs nozzles, but will of course have the tendency to hide detail. The fact that it’s enamel always equates with increased possibility of runs, sags, fish eyes, etc. But the most troubling aspect of Rustoleum paint seams to be the extremely touchy re-coat windows. If suggested re-coat times are not followed to the letter, there’s a very high probability of failure. I can’t tell you how many ruined paint jobs I see on the Facebook modeling groups on a daily basis which are due to Rustoleum and their re-coat windows. It’s nearly epidemic proportions! Steve
-
Looks pretty darn good to me! Steve
-
Molotow Liquid Chrome feed problem
StevenGuthmiller replied to Oliver77's topic in Tips, Tricks, and Tutorials
I don’t use the stuff anymore, and haven’t for a number of years, but when I did, I used a small brush to apply it. The tips are garbage. Always have been. Might work okay for the graffiti art that they’re designed for, but they’re pretty much trash for the fine work required in model building. Steve -
What’s wrong with Lincoln and Edsel? ? Steve
-
Bingo! ? Steve