Impalow
-
Posts
1,065 -
Joined
-
Last visited
Content Type
Profiles
Forums
Events
Gallery
Everything posted by Impalow
-
yup thats the one i have... all sealed up.
-

3D printing growing as we speak
Impalow replied to bbowser's topic in General Automotive Talk (Trucks and Cars)
that is the one i have! works pretty good... a fun toy... not overly useful for making 1/25 scale stuff however. just a bit too rough. But for the price its a great first printer. -
Ohio Drug Mart Stores
Impalow replied to Sledsel's topic in General Automotive Talk (Trucks and Cars)
no worries I completely understand that. -
Ohio Drug Mart Stores
Impalow replied to Sledsel's topic in General Automotive Talk (Trucks and Cars)
I can Jim... I'm heading back up there today... Which foose Impala? -
Ohio Drug Mart Stores
Impalow replied to Sledsel's topic in General Automotive Talk (Trucks and Cars)
Some good stuff left... They even took the 25% off the clearance kits.. Got a mustang and a ssr for 7.50 -
Ohio Drug Mart Stores
Impalow replied to Sledsel's topic in General Automotive Talk (Trucks and Cars)
this was the clearance area when i was there 2 weeks ago... Ill get some more pics when I am there tomorrow. -
Ohio Drug Mart Stores
Impalow replied to Sledsel's topic in General Automotive Talk (Trucks and Cars)
sounds like a plan.. I will check tomorrow night! -
Ohio Drug Mart Stores
Impalow replied to Sledsel's topic in General Automotive Talk (Trucks and Cars)
Ill have to check my local store tomorrow... last friday i grabbed a blue bandito, tweedy pie and the new 67 camaro for 11.99 or less each... they were still stocked quite well then. -
Photoetched bolt heads/ washers on rubber backer
Impalow replied to Impalow's topic in Car Aftermarket / Resin / 3D Printed
Yup... need lots of those! That looks outstanding mike! Thank you for the help! -
Photoetched bolt heads/ washers on rubber backer
Impalow replied to Impalow's topic in Car Aftermarket / Resin / 3D Printed
Thanks Tom! Those are going on the old Christmas list... When Ive wanted more dimensional fasteners in the past I will use some hexagon rod, cut small pieces and attached it at the end of the scratch building stage. These look much better/cleaner than that. The photoetch ones i have been using as a final detail step... dab of future or matte varnish from a toothpick.. then plop these on at for a splash of detail here and there. I actually used them on the end of pinheads on my model T.. I wasnt sure how it would work, but i was very impressed with how it turned out. -
Thank you all for the kind words and compliments.... now i got to figure out how to top this one...
-
I have one of these sealed in the "collectors series" packaging... is it worth anything? I need it for my next project, but if it happens to be somewhat valuable, i will try and find a newer one to open and cut up. I just haven't seen this particular release at any shows, so i have no idea.
-
1926 Model T Sedan - SomesortaRod - Finally Done.. Only 2months late!
Impalow replied to Impalow's topic in WIP: Model Cars
Thank you all for the positive feedback! No Tom its just straight up bare metal foil... Sanded with a scotchbrite pad and then cleared with duplicolor enamel clear.... the light plays with the sand scratches in fun ways to make it have that look at certain angles. -
1926 Model T Sedan - SomesortaRod - Finally Done.. Only 2months late!
Impalow replied to Impalow's topic in WIP: Model Cars
Thank you all for watching, commenting and encouraging... Underglass post is up! -
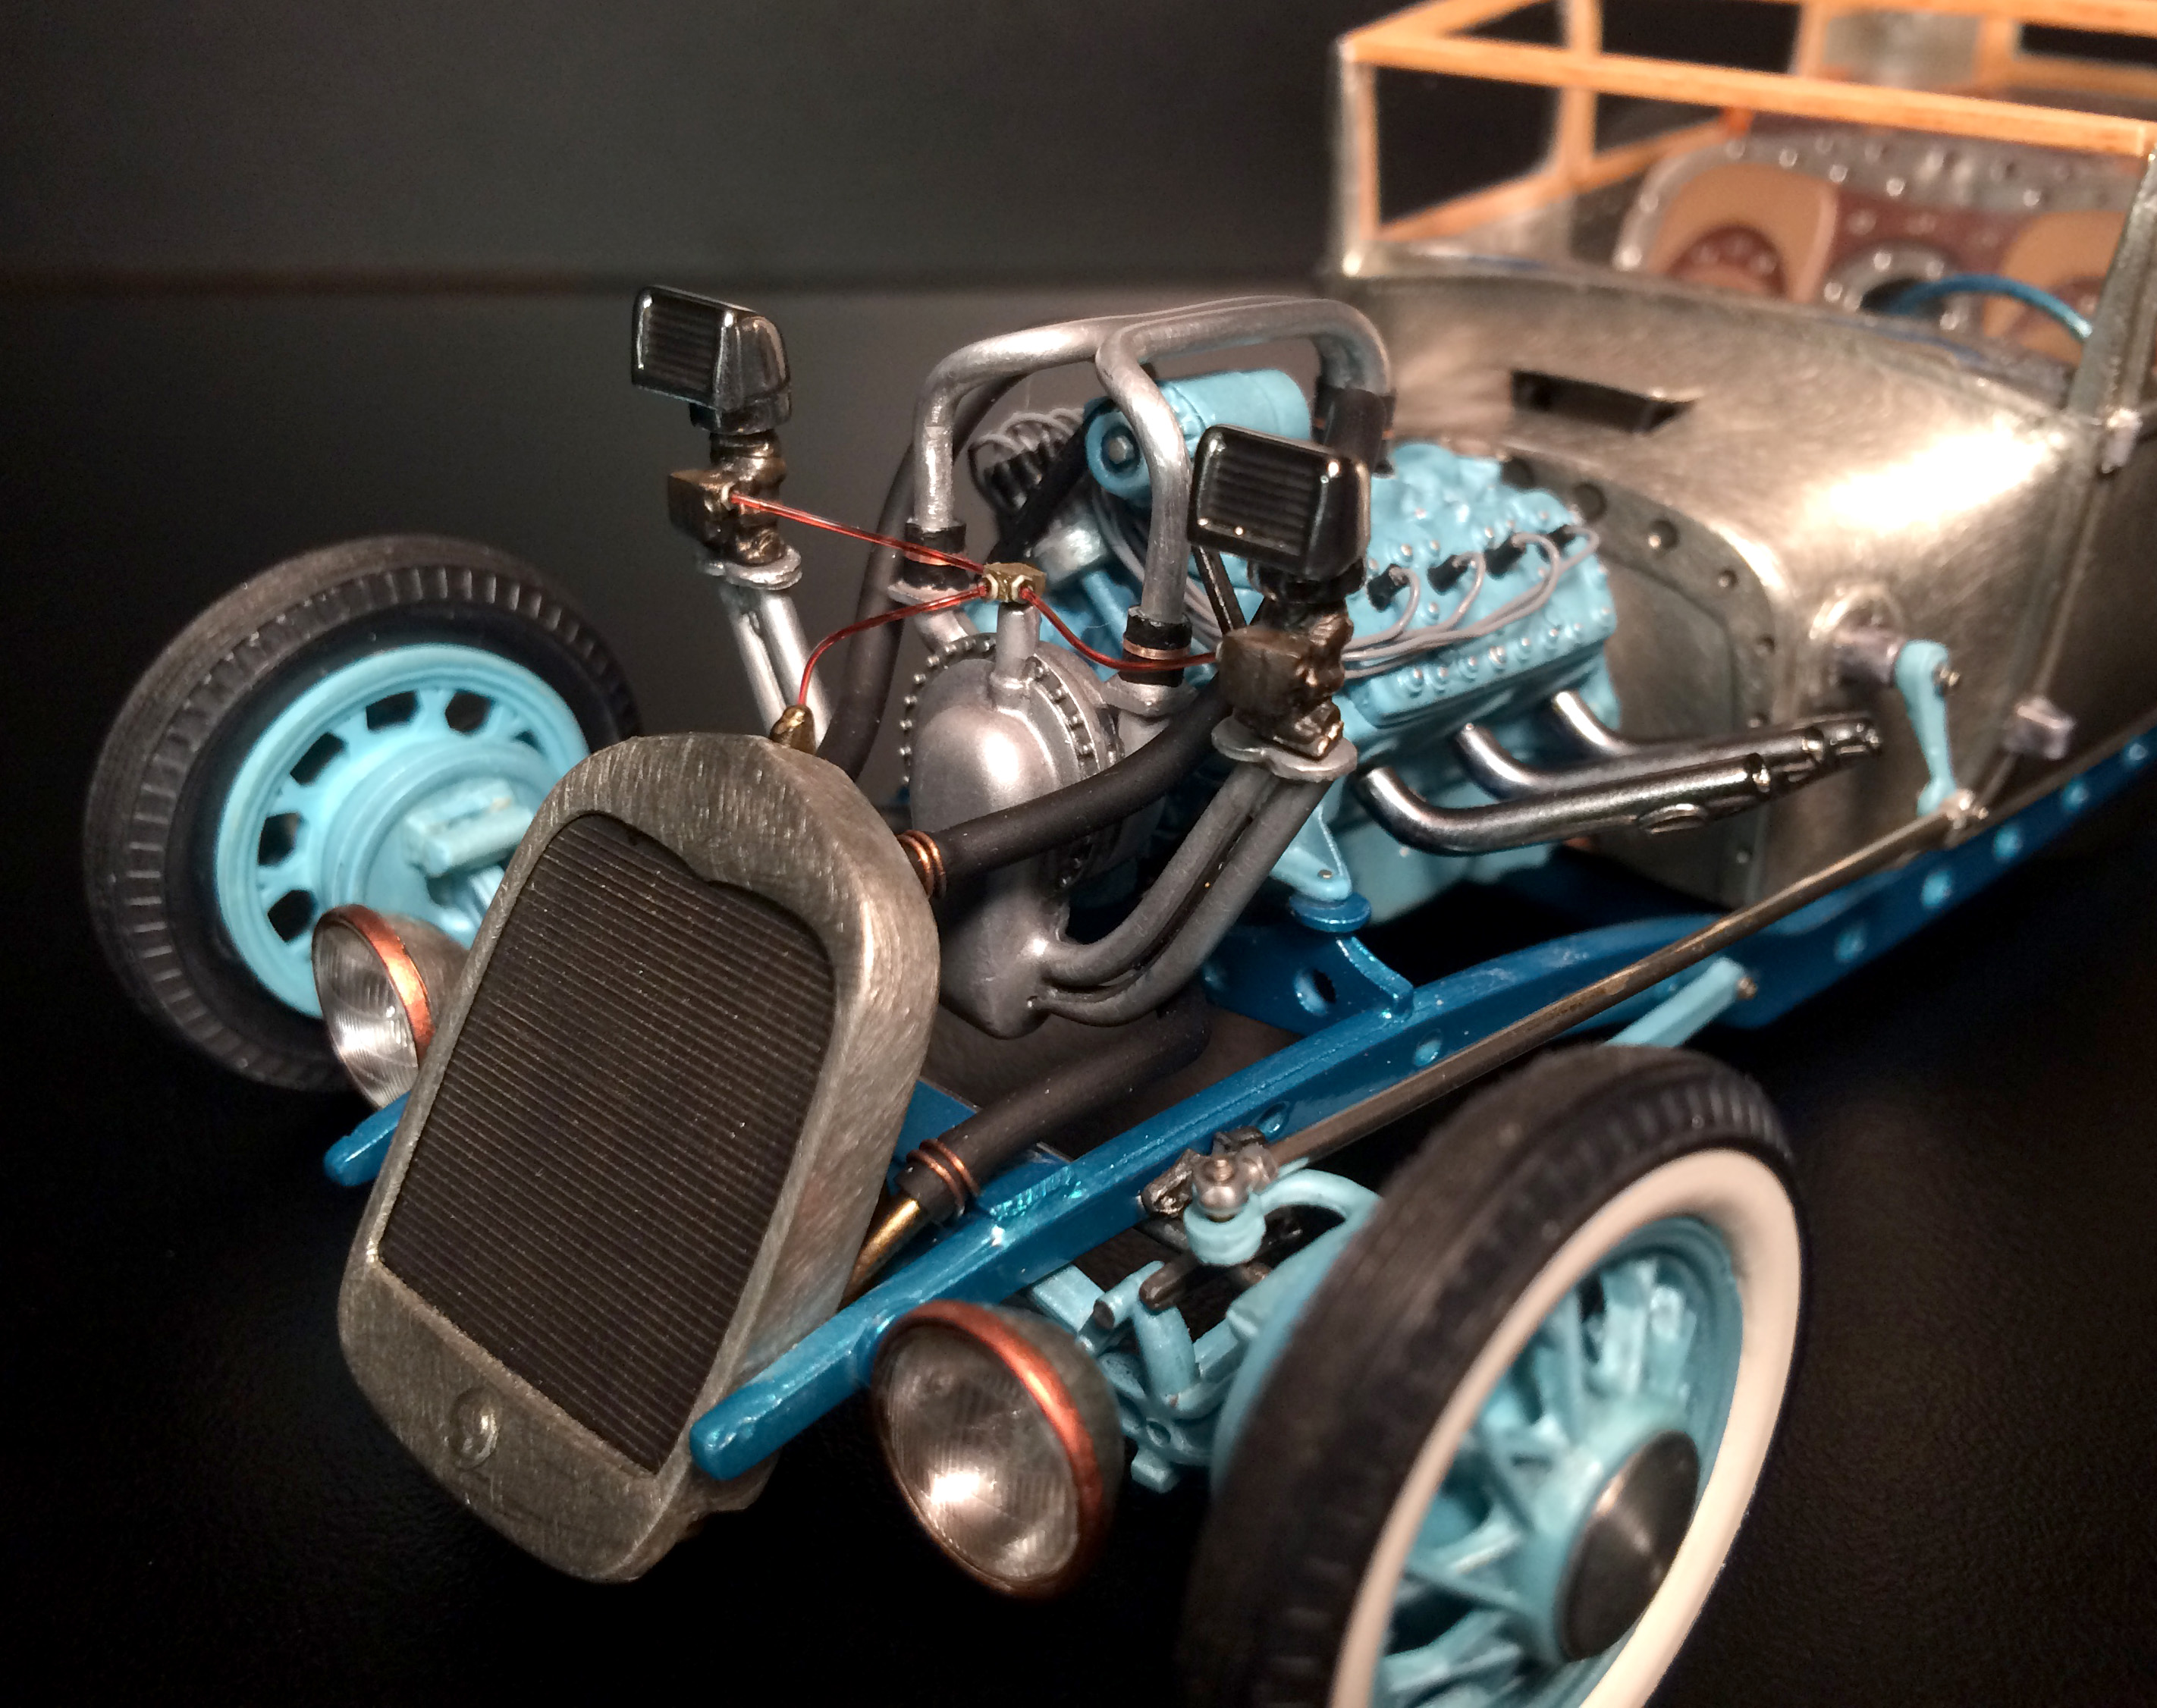
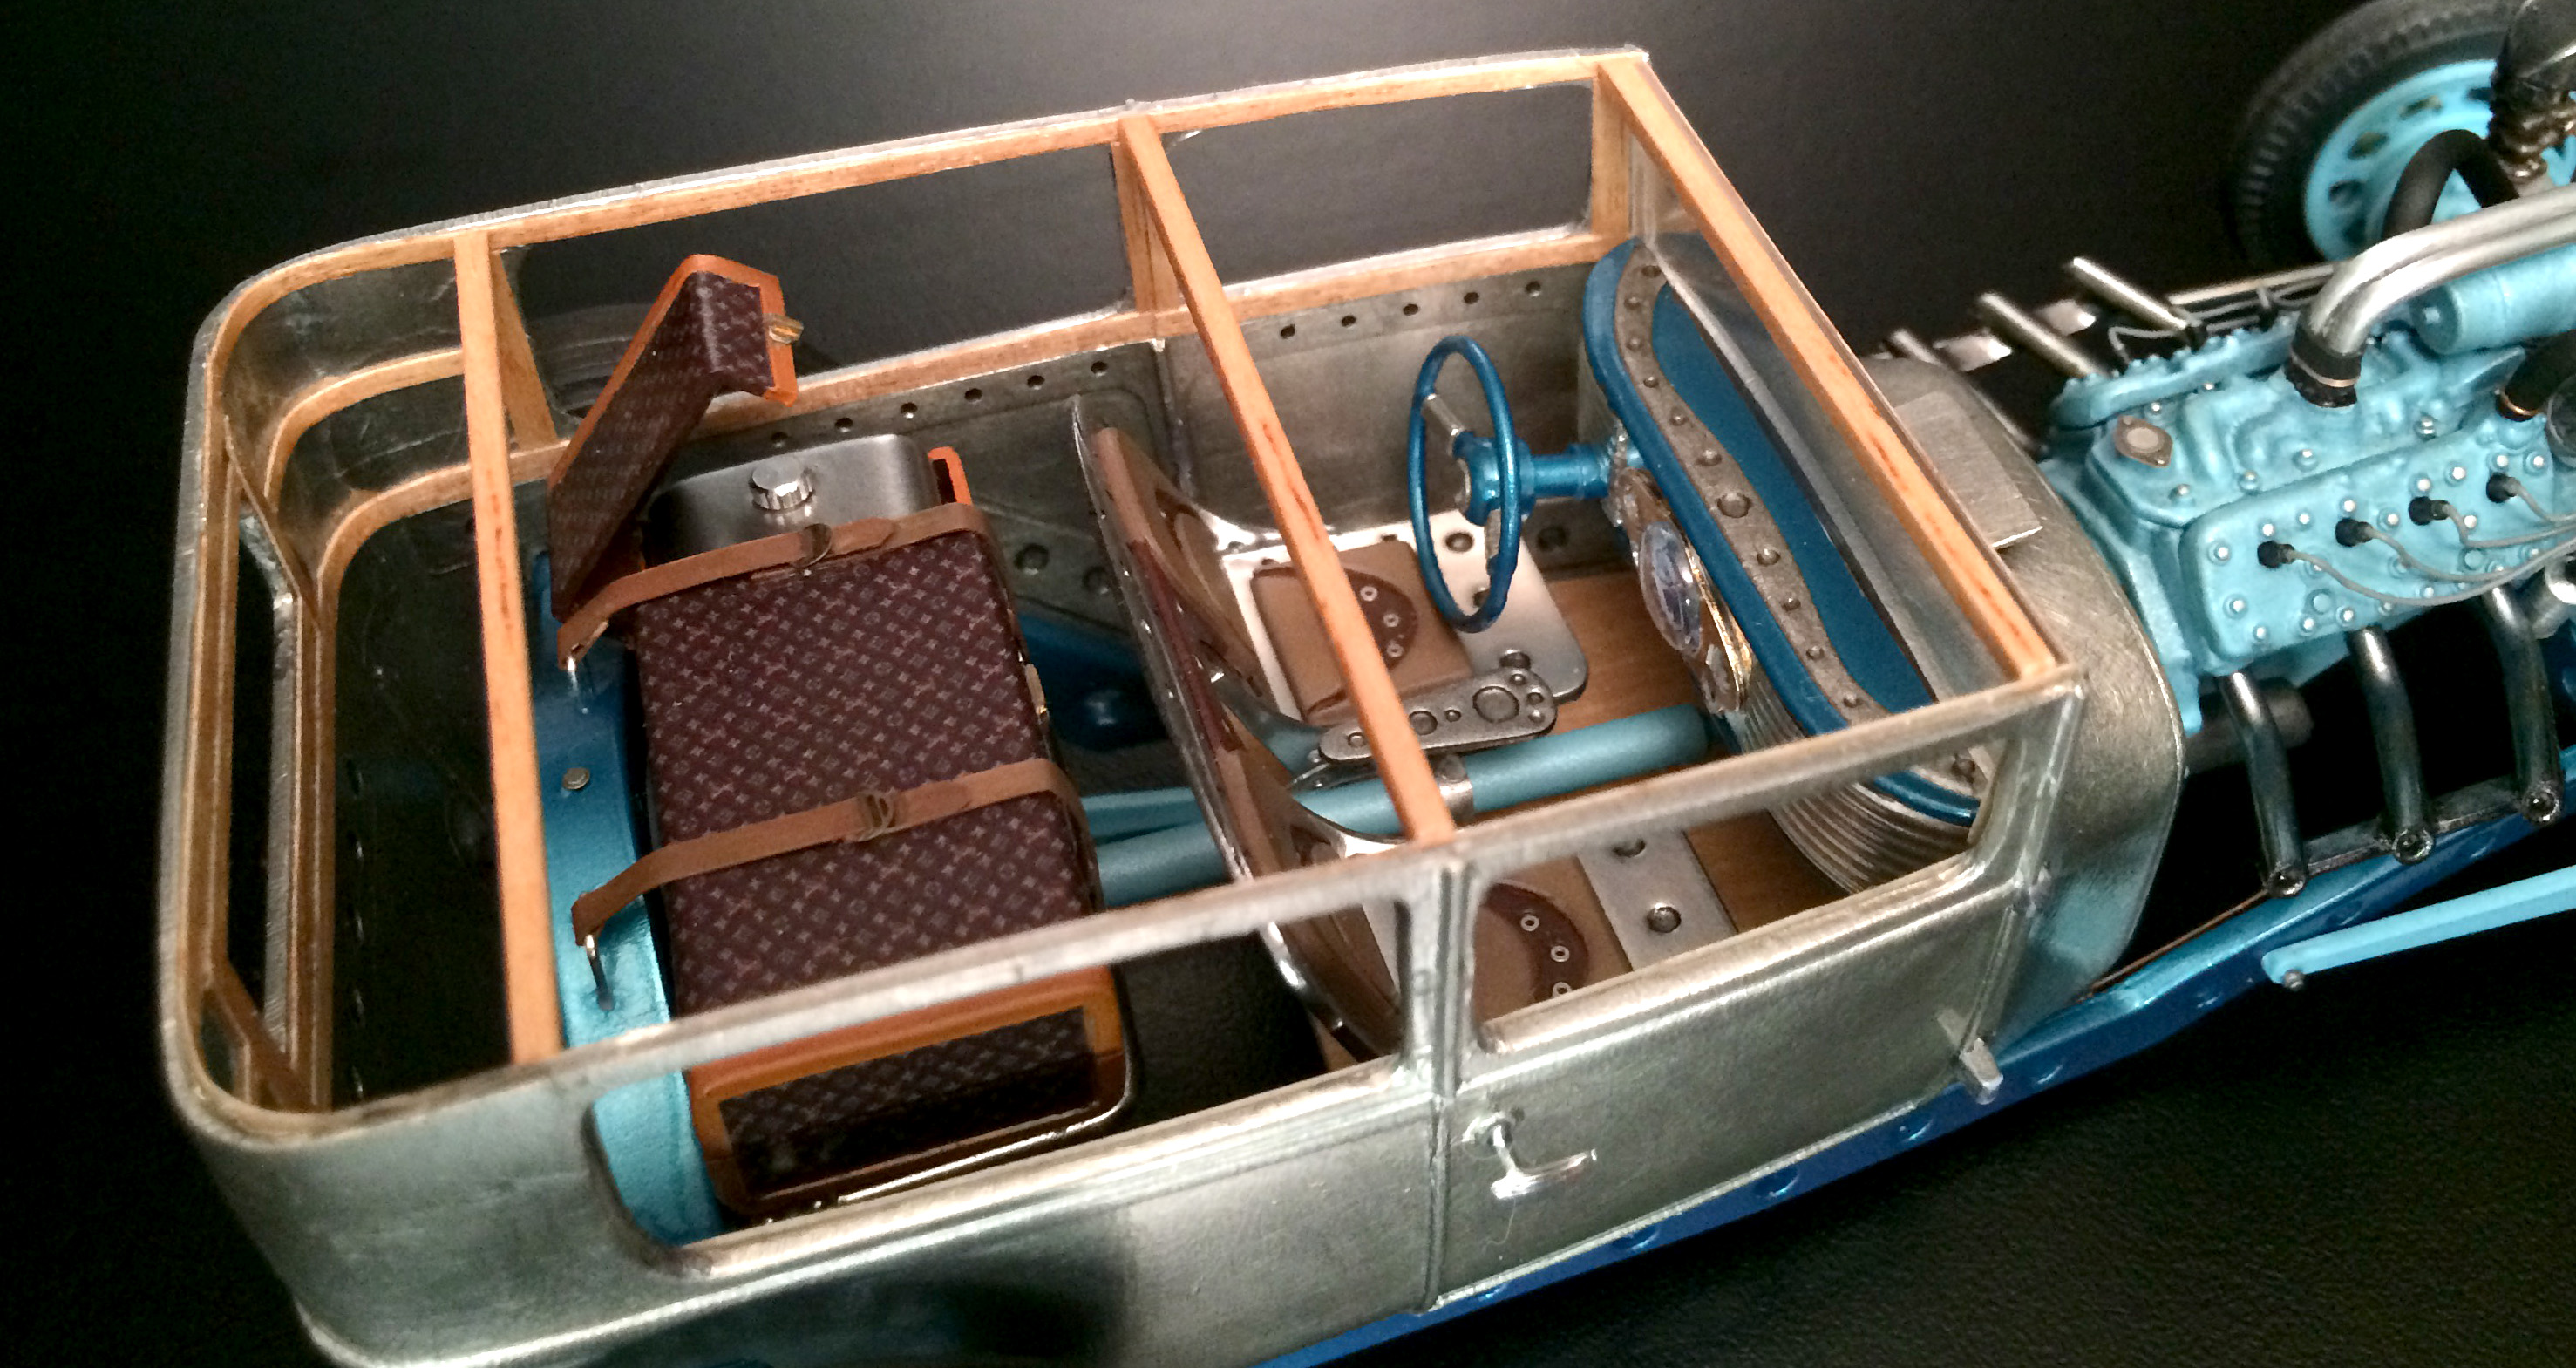
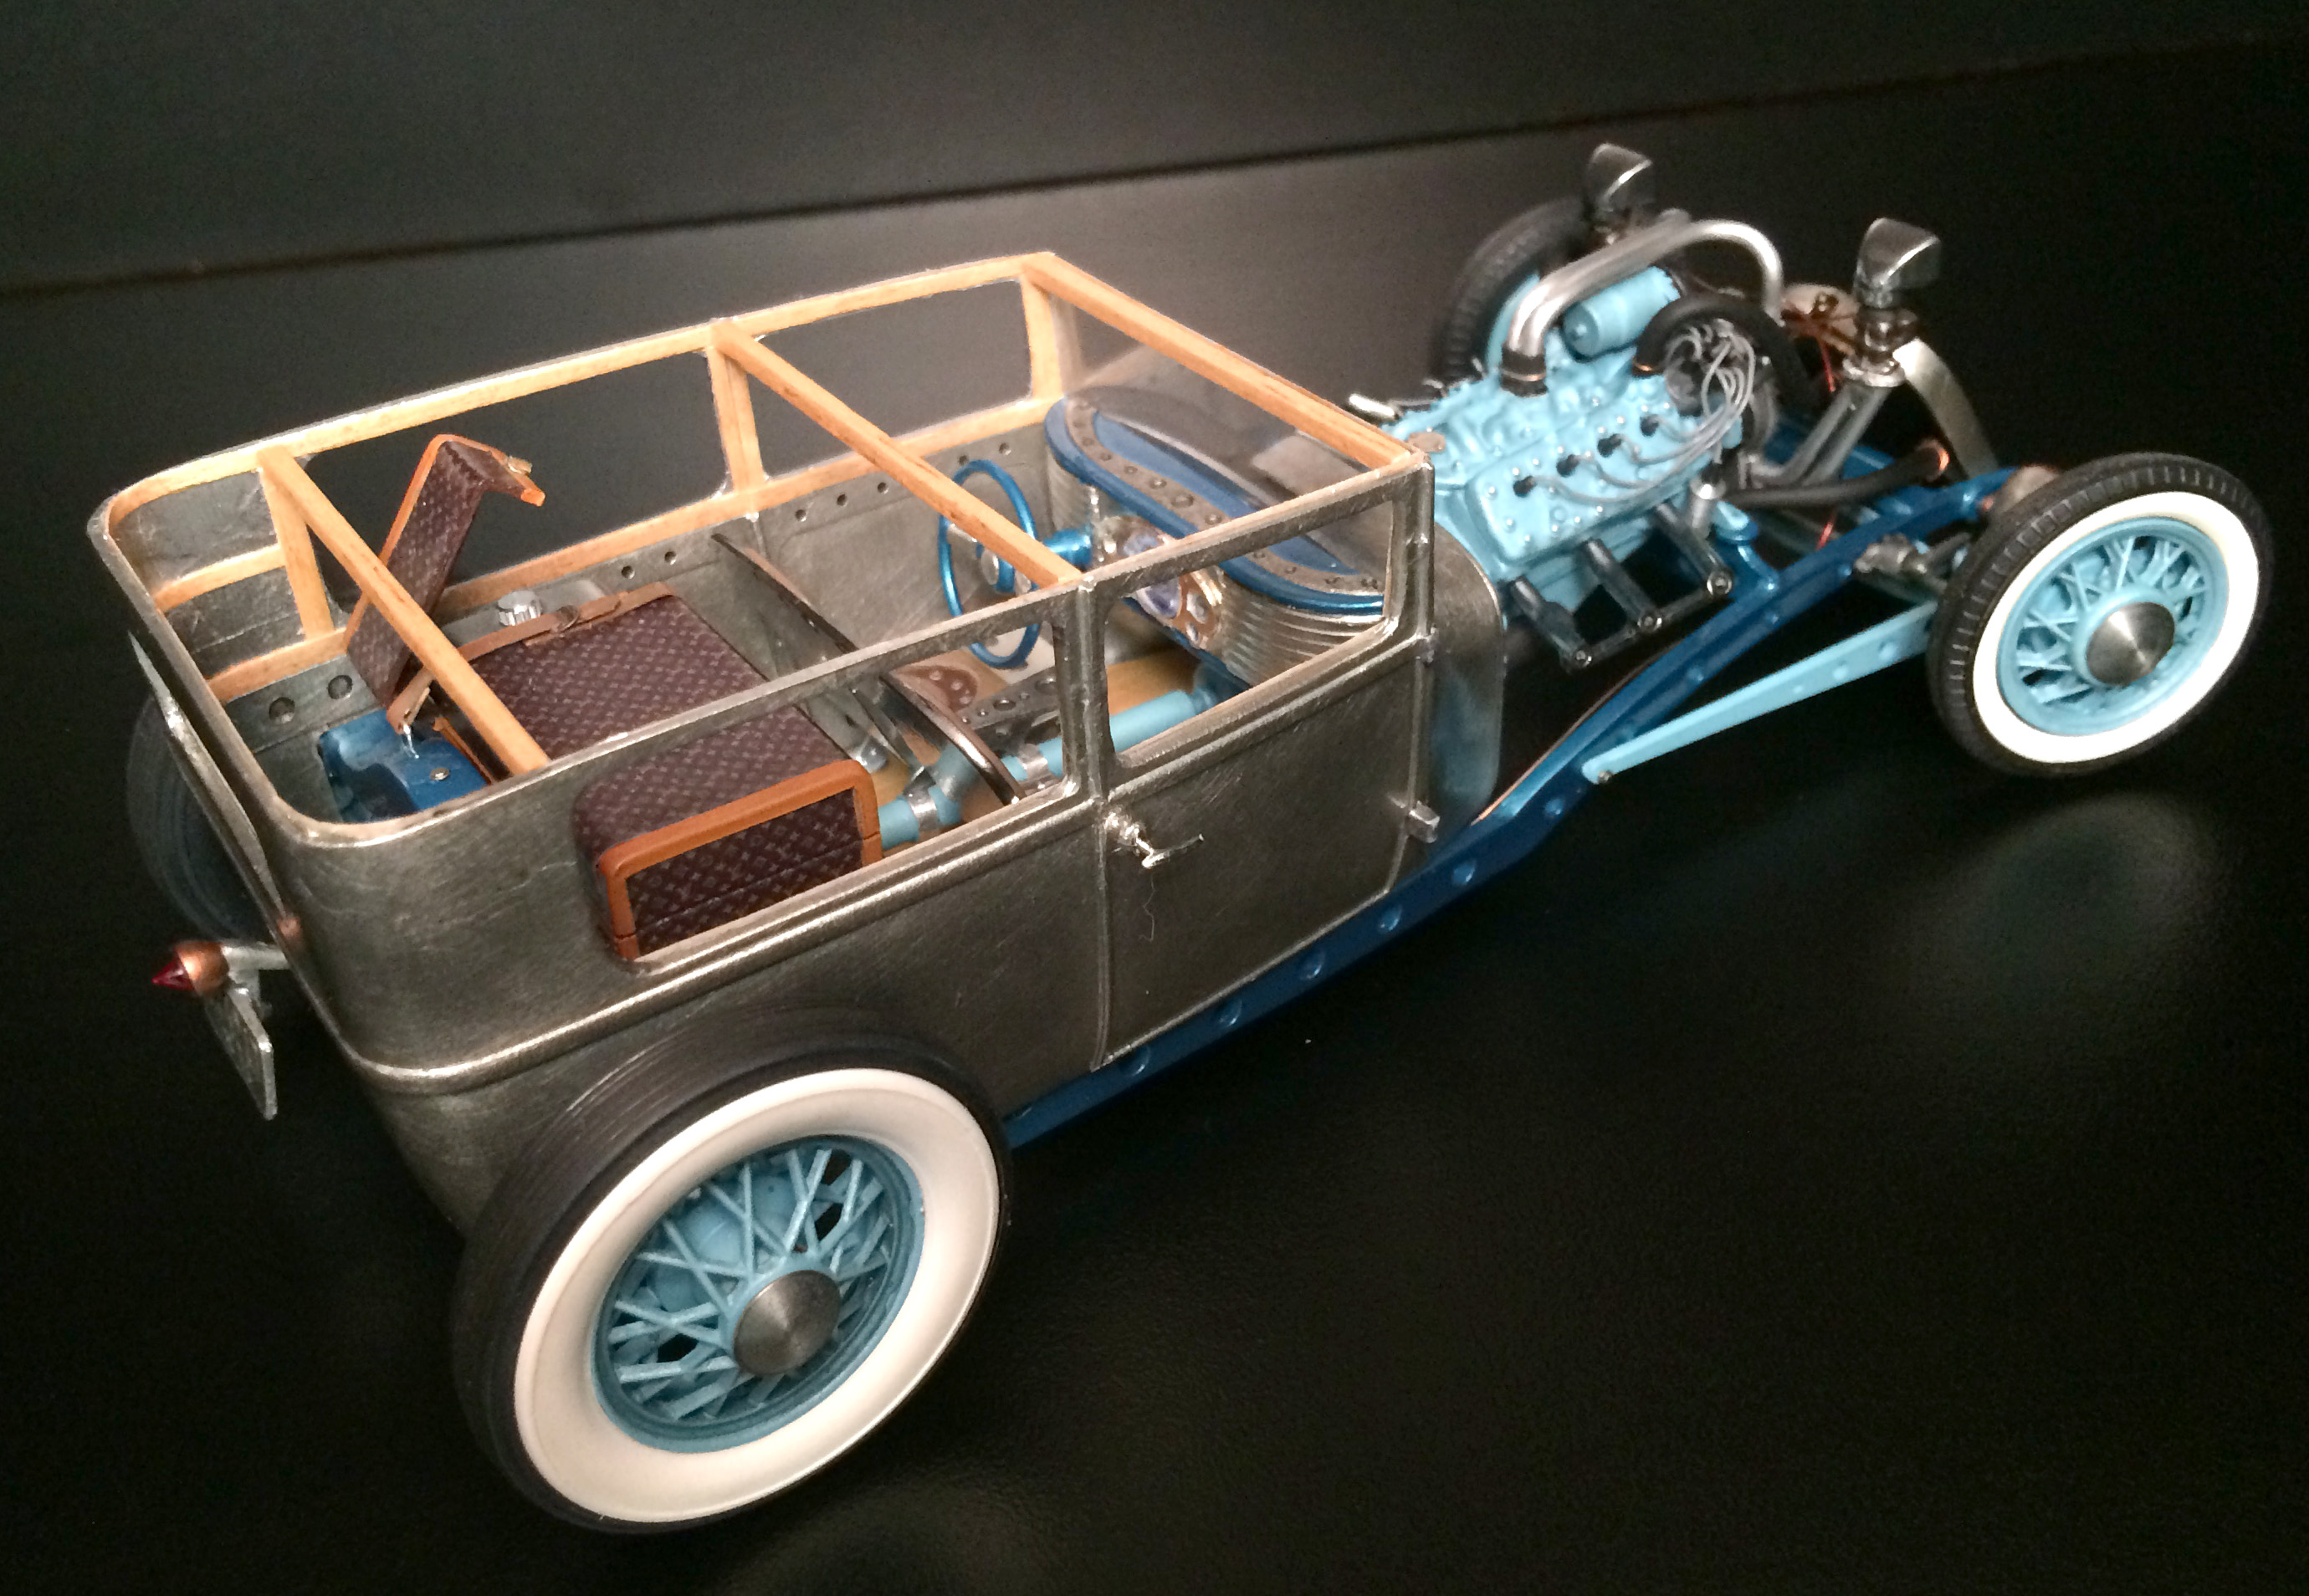
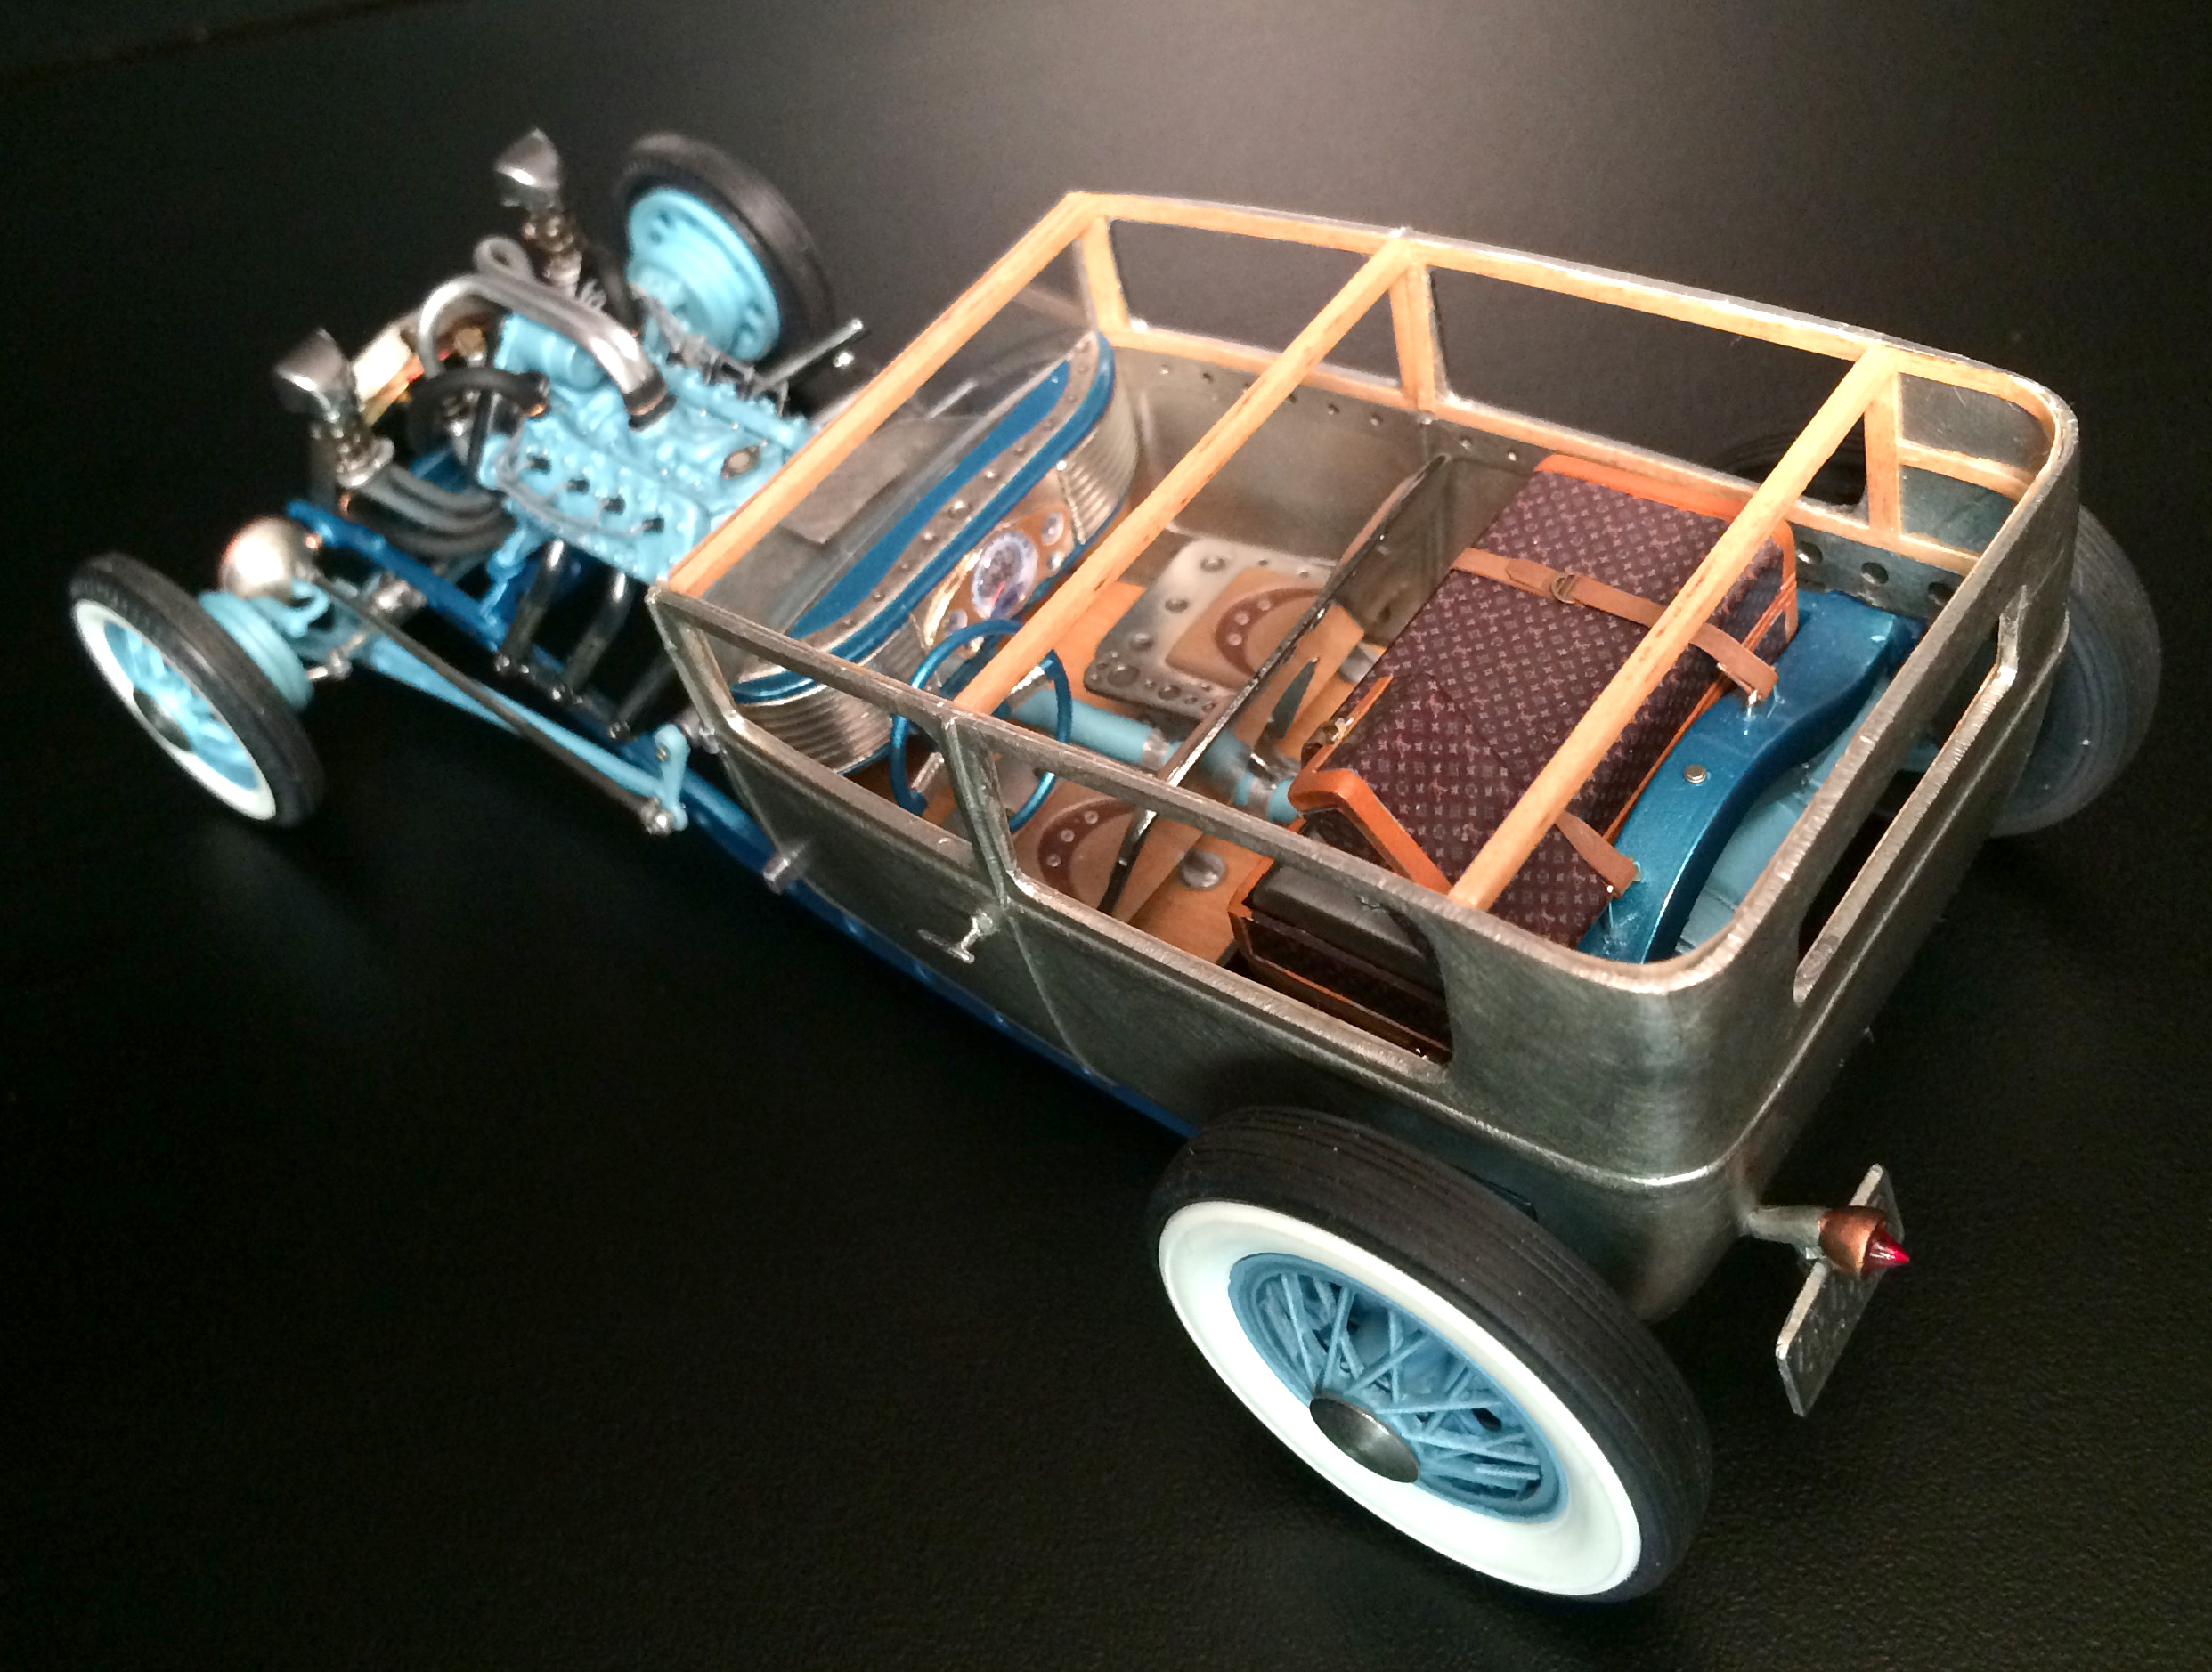
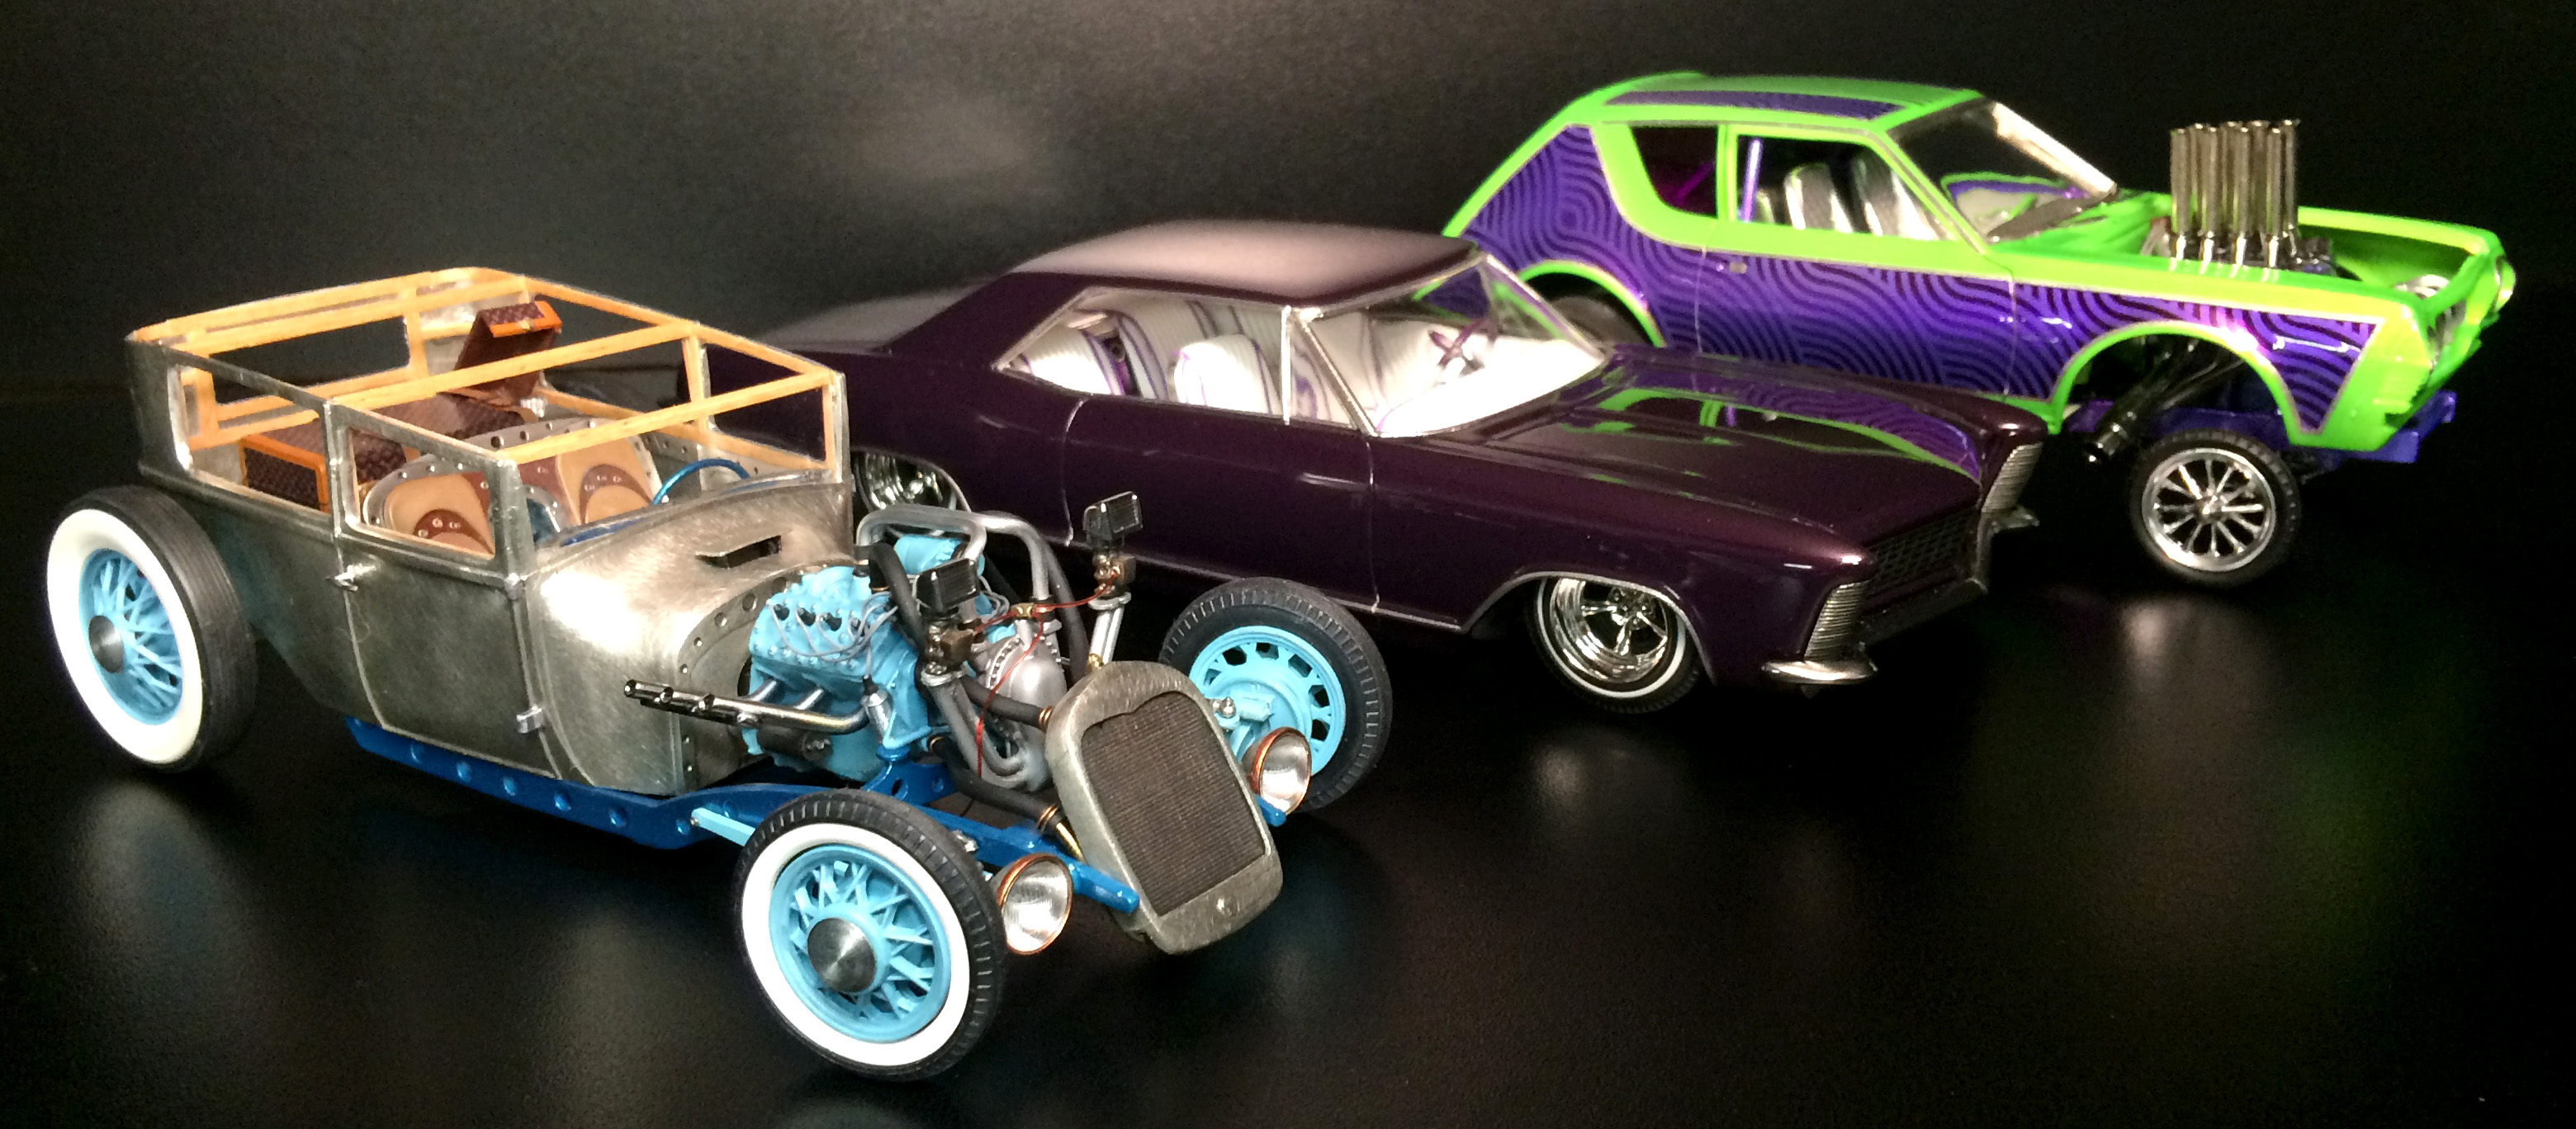
Finally done, Took about 2 months more than I was planing.. but the wait was worth it. Body is from the Revell 1926 Model T Sedan Delivery - Covered the entire thing inside and out with BMF then brushed it with a scotch brite pad and cleared. Engine is from the Monogram 1949 Ford Pickup with a duesenberg supercharger mounted on the front Front axle, rear cross member, radiator and grille shell from the 29 Rat rod pickup Rear axle from the Tweedy Pie Front tires and wheels from the connoisseur classics 1932 Chevy Roadster Rear Tires and wheels from the Monogram duesenberg Headlights from the new 1929 ford roadster Taillight from the Blue Bandito Door handles and steering wheel are from the revell 1932 ford 5 window Flame Arrestor Air Cleaners from Replicas & Miniatures Co. Pretty sure everything else is scratchbuilt.... Check out the build log here and feel free to ask any questions. Thank you for looking! I think this is gonna be my last completion for 2015... so far its been a good year!

-
This looks amazing!! great lines and proportions... beautiful custom!
-
That is beautiful Adam! Amazing work!
-
1926 Model T Sedan - SomesortaRod - Finally Done.. Only 2months late!
Impalow replied to Impalow's topic in WIP: Model Cars
Thank you Richard! She's done folks!! Here are a few teasers. Underglass post tommorow. -
Photoetched bolt heads/ washers on rubber backer
Impalow replied to Impalow's topic in Car Aftermarket / Resin / 3D Printed
thank you mike... that is perfect... so much easier than cutting them off sprue. -
Photoetched bolt heads/ washers on rubber backer
Impalow replied to Impalow's topic in Car Aftermarket / Resin / 3D Printed
boom! thank you... that helps.. Any others? with multiple sizes? -
Does anyone currently make these? I have a large old pack of S&S Specialties ones, and a pack of the old Model Car Garage ones, I love them, to the point I am going through them way to fast... Going to need to replenish my stock soon.
-
1926 Model T Sedan - SomesortaRod - Finally Done.. Only 2months late!
Impalow replied to Impalow's topic in WIP: Model Cars
Thank you all!! This build is getting dangerously close to finished. ummmm... genius! I bought the 1.00 bags of all the different sizes, i can see them having all sorts of uses.. Pat, thanks again for inspiring me on this build, I'm quite sure i would have never thought to cover this body with BMF without seeing your ford. Here is a quick holiday weekend update: Headlights from the new 29 model A.... Foiled, brushed, cleared... Vallajo copper painted rings. Headlights installed.. you can also get a good look at the finished engine detail here. Dash and winsheild installed..Wash added to the interior panels.. Top bows starting to be installed, made from balsa wood and stained Top bows done! Finally the posable steering arms and links.. each joint has a 1/32 brass bushing and pins to create the pivot. http://vid709.photobucket.com/albums/ww93/impalow/Rat Rod Sedan/18C24CF7-9F34-410B-B892-1AA4AB8B30AB.mp4 Here is a quick video in action... If you look close you can see the cowl vent is done as well. After that was complete... I added photoetched bolt heads to all the pinheads...makes for a pretty convincing steering joint. -
3D printing growing as we speak
Impalow replied to bbowser's topic in General Automotive Talk (Trucks and Cars)
completely understand... and agree... the $349.00 printer I purchased has been sitting dormant for several months for this reason. I will eventually find its niche, but for now its reserved to complex shapes, then adding the detail back in by hand. Sometimes its easier/cleaner to just scratch-build than even bother with it. I have no doubt the technology will get there...just not quite yet.... Its still a fun toy tho Debbie Downer x 2 hahaha -
oh man...I love it!!! amazingly clean job Luke.
-
man this is cool.... really liking this one Dennis.