
DRIPTROIT 71
-
Posts
7,190 -
Joined
-
Last visited
Content Type
Profiles
Forums
Events
Gallery
Everything posted by DRIPTROIT 71
-
Timpte reefer trailer
DRIPTROIT 71 replied to KJ790's topic in Model Trucks: Big Rigs and Heavy Equipment
You have a way with the vintage trailer! Excellent work as always!! -
Amazing!! Looks like the real thing!!
-
Awesome!! Looks amazingly real!!
-
1980 Ford LNT 9000
DRIPTROIT 71 replied to DRIPTROIT 71's topic in Model Trucks: Big Rigs and Heavy Equipment
Thanks guys!! The front bumper is out of a W9000 Ford kit. I'm not sure who made it, possibly A.I.T.M.. I'm going to build it as a WT9000 with a half bumper, so I robbed this bumper from it. -
Mack "R" vs Mack DM600
DRIPTROIT 71 replied to Luc Janssens's topic in General Automotive Talk (Trucks and Cars)
Just to add to what everyone has said, there was also the U model which was more of a highway version like the R model, but with the offset cab. -
TAT 2018 Dodge LT1000 Wrecker
DRIPTROIT 71 replied to DRIPTROIT 71's topic in WIP: Model Trucks: Big Rigs and Heavy Equipment
Thanks Gator!! -
x2
-
Marmon coe Topsleeper
DRIPTROIT 71 replied to Hermann Kersten's topic in WIP: Model Trucks: Big Rigs and Heavy Equipment
Looks awesome so far! -
TAT Mack B-61
DRIPTROIT 71 replied to landman's topic in WIP: Model Trucks: Big Rigs and Heavy Equipment
Looking good Pat!! -
Looks great Kerry!! I've never tried it on a Peterbilt and it wouldn't be 100% accurate, I often use doll house door hinges to mount my hoods. I mount them to the bumper and depending on how you mount them the hood can tilt 90 degrees. My LNT 9000 has these hinges as well as my Apollo 92 and my 9000 White. Most of the time AMT's hinge set up on all their big rigs don't work very well unless you mount the bumper too low.
-
1980 Ford LNT 9000
DRIPTROIT 71 replied to DRIPTROIT 71's topic in Model Trucks: Big Rigs and Heavy Equipment
Thanks for all the kind words guys!! -
N-scale 1918 Pierce Arrow flatbed
DRIPTROIT 71 replied to mecklm's topic in WIP: Model Trucks: Big Rigs and Heavy Equipment
Very impressive!! -
TAT 2018 Dodge LT1000 Wrecker
DRIPTROIT 71 replied to DRIPTROIT 71's topic in WIP: Model Trucks: Big Rigs and Heavy Equipment
Thanks guys!! I have a little more progress. I hope to get some more pictures soon. Thanks again!! -
TAT Mack B-61
DRIPTROIT 71 replied to landman's topic in WIP: Model Trucks: Big Rigs and Heavy Equipment
I like it!! Looking good!! I hate the glass battle too!!! I never got the glass in my Highbinder to suit me. -
Looks Excellent! That engine looks great white with the chrome valve covers!!
-
Make sure not to spray Lacquer over enamel! I also "usually" dullcoat my engines, but not always.
-
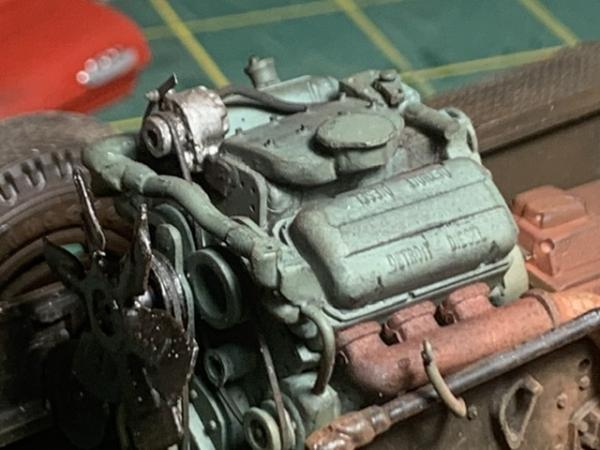
Much like all engine paint there was a slight gloss, depending on the surface and age as to how glossy. White can be tricky. I personally would recommend Lacquer instead of Enamel, because it goes on much thinner and doesn't hide detail like many enamels do. My L9000 Ford was painted with Napa brand white Lacquer in a spray can. White enamels are often thick and hide detail before you can get good coverage. Here's a 12v-71 in a KW. IMG_6191 by Brian Smith, on Flickr
-
TAT 2018 Dodge LT1000 Wrecker
DRIPTROIT 71 replied to DRIPTROIT 71's topic in WIP: Model Trucks: Big Rigs and Heavy Equipment
Thanks guys!! A little more progress to show. The bed is roughed together, the chassis is started and the engine is started too. IMG_9227 by Brian Smith, on Flickr IMG_9229 by Brian Smith, on Flickr IMG_9228 by Brian Smith, on Flickr IMG_9236 by Brian Smith, on Flickr IMG_9235 by Brian Smith, on Flickr IMG_9234 by Brian Smith, on Flickr -
Looking good!!
-
MB New Actros Lowliner
DRIPTROIT 71 replied to Hermann Kersten's topic in WIP: Model Trucks: Big Rigs and Heavy Equipment
What he said!! -
1980 Ford LNT 9000
DRIPTROIT 71 replied to DRIPTROIT 71's topic in Model Trucks: Big Rigs and Heavy Equipment
Thanks Guys!! Thanks! The glad hands themselves are actually the ones found in the Road Boss kit. -
TAT GMC crackerbox
DRIPTROIT 71 replied to jacobus's topic in WIP: Model Trucks: Big Rigs and Heavy Equipment
I like the engine choice!! -
What he said!!!!!!
-
Ferguson TE20
DRIPTROIT 71 replied to Tyler62990's topic in Model Trucks: Pickups, Vans, SUVs, Light Commercial
You have really captured the real thing on this one!! Your weathering is spot on! I don't own a Ferguson, but I did restore a Massey Harris that I had several years ago, and your weathering almost matches the way it looked before I restored it to a T. Excellent work!! -
Very nice!! I like it!!