Kmb0319
-
Posts
468 -
Joined
-
Last visited
Content Type
Profiles
Forums
Events
Gallery
Everything posted by Kmb0319
-
I only have1 at home and 1 I made for a friend, but will be changing that soon.
-
Neither did I. It was a job offer that moved us to Birmingham 9 yrs ago, and didn't want to leave, but had to. We were in the South Hampton neighborhood and loved it. Now we get to come home, but will be residents of Ballwin in a couple weeks. Never thought we'd be out in West County, but it's perfect for us... Can't wait.
-
Beautiful!! It gave me a little shiver, because it was a flashback to my high school days when MCs were everywhere, and 98% of them looked like this. They weren't all SS. Great idea and excellent work!
-
Thank you all for your suggestions... Suffice it to say all of them are far superior to my method, which is why I'm down a carburetor. Although I must concur with Charlie... Shot glasses have a higher purpose. (My last build, posted here, was the "new Christine" 67 GTX... Named that because the kit was possessed by Satan... Took nearly a whole bottle of bourbon to make it through) i was really trying to finish her up this weekend. Came so close, but we really started packing up the house today, and now I'm off for a 3-day business trip. It will be a little crazy from here, but I'm sure I'll fit it in. What's left? Front and rear clips, radiator hose, door handles, rear view mirror. Oh, and the horn... Which I totally forgot to paint. Anyway, ready for final touches... Man this thing fits together perfectly.
-
Good to know that there is another one!!! Can't wait to finally be home again!!!
-
I've not built the AMT 2011 kit, only the 2010/2011 (don't remember) Revell kit. Somebody else will have to chime in on the AMT kit. But, from what I've been told when I was complaining about the 68 AMT kit, the more modern the tooling with AMT, the better off you are. So, it's probably a nice one.
-
I didn't think of that. THANKS! I had put them in a baggie, so I thought they were safe, but the carb stuck in the baggie. Then when I went to pull it out, it slipped out of my hand and flew right down the drain. I'll try your method.
-
Here Jerry... I know you've probably gotten more advice than you want at this point, but maybe this will help, as I've built all 4 of your "contenders".... The Revell 69 Camaro is a great kit.. one of the best out there. It's a 1990s era tool... which means it's very detailed, but somewhat simplified compared to new toolings. That's not a bad thing, as it assures that it will go together very nicely. The kits are very detailed, but more of the detail is molded in that separate pieces. There are also so many versions out there, you can build it with almost any option (grill, wheels, etc) The AMT 68 Camaro makes a nice shelf model, and fits together nicely, but I've complained on this board before that it is one of the worst models I have ever built. There is a terrible lack of detail in the engine and it's worse in the interior, where they barely bothered to mold in door handles, window cranks and other necessary components, and didn't bother with armrests at all. It looks good from outside, but it looks like a toy... not realistic. The Revell 67 Camaro is one of my favorite kits ever. Highly detailed, lots of parts, and goes together beautifully. I saw a lot of complaints on the board about the shape of the rear end, and it does seem to have a little more slant than it should, but not enough to take away from anything in my opinion. I love it.. I've built 2 of them The AMT 70 Camaro is one of AMT's best... lots of detail throughout, goes together very nicely. Maybe you'd want to do 2 Camaros... one first gen and one second gen... but you won't go wrong with either Revell or this kit. Here are a few pics of my builds of each to help you decide: Revell 69 Camaro (I built the COPO version, wired the engine and added some hoses, seatbelts, etc) AMT 68 Camaro (box stock) Revell 67 Camaro SS (wired, seatbelts, etc.. I also used aftermarket wheels and tires. The kit tires are very skinny and wheels are small) AMT 70 Camaro Sorry for overloading with pics... but if you're like me, you don't really know if a kit is really one you want to get your hands on unless you see it built.
-
OK... Two weeks left living here. We go home for Memorial weekend, and really aren't coming back... I will come here on the night of the 2nd to be here for the movers the next morning. Been traveling for work all week, but I'm getting close to done with this Dart. Made a little progress this morning... Compounded and waxed the body and laid the decals, finished the interior, and finished detail painting and used Fireball decals on the kit tires.

-
INCREDIBLE! Not much else to say...
-
OK, I'll play along. My finishes aren't in the same class as most of these... trying to get better. This one is my favorite.... as much for the color as for the final finish.
-
OK, this is too fun not to play along. My list: - take some of the old Monogram kits... The 71 GTX, the 69 GTO that are still selling and update the tooling to modern Revell standards and detail - a GOOD 70-72 GTO, not that MPC garbage. - a new tool, updated 69 Chevelle SS 396 - someone at Round 2 PLEASE get the old MPC 70 Grand Prix body... It should take little modification to combine it with the 70 Monte Carlo chassis and make a nice kit. - love the idea of the 71 Cyclone from the Torino kit - a decent full detail kit of a GT40 in 1/25 or 1/24 - the new Mustang! We got a complete redesign two years ago of an icon and huge modeling subject, and all we have gotten is a snap kit??? - tires: lots of complaints about them... AMT put out their pad-printed pieces, but we need more.. And we shouldn't have to spend as much as we did on the kit to get decent ones. Upgrade what's in the box and maybe have some reasonable cost options to purchase separately - finally, this would be a more cost-intensive project, but reading this thread, I see a lot of requests for the BMW 3.0 CS, there hasn't been a decent Jaguar XK-E in forever... We get American cars and hot rods from the domestic makers. Tamiya, Fujimi and the Japanese companies give us mostly modern super cars and either rally or F1 racers. The entire market of great and historically significant vehicles from the 1950s to 1970s is ignored. Tamiya put out their great 300SL, but even Porsche 911s aren't well represented save for some old Fujimi kits and curbsides. Seems like a major sales opportunity is being missed.
-
You're right... that bothered me, too, but I was just getting the "gist" for comparison. I've shot the Cragars with Duplicolor chrome so they aren't so bright... then I'll look and decide if I want to leave them satin chrome or paint the gray back on, and then compare again.
-
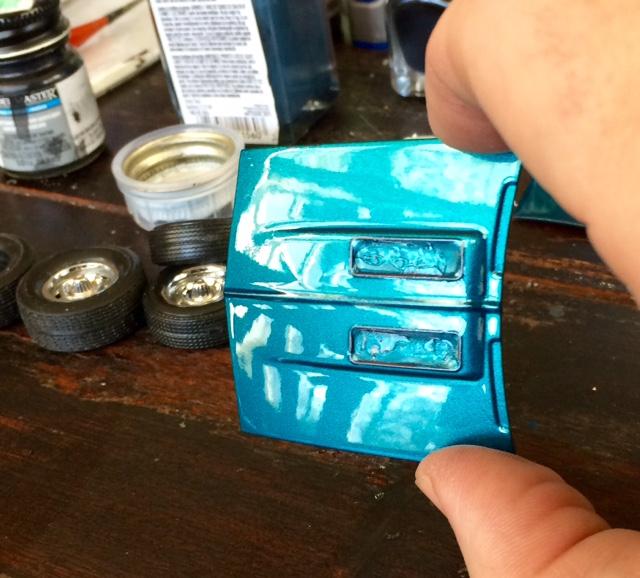
Painted my door panels... I like the upper and lower body color panels... Nice touch for the Dart's interior Now my question is what wheels and tires? I don't really like the kit tires.. Too plastic-looking and also too low-profile for a late 60s muscle car. (Sidebar: why can't Revell make any good tires? They cast some nicely detailed kits and use the same 3 cruddy tires across all of them). I have a set of the smaller Goodyear Polyglas tires, and some wheels from the AMT 70 Camaro that I painted to look like torq thrusts, and I like their look with this car. But, those lower profile kit tires are also larger diameter wheels, and getting the wheel backs to hold in the flimsy, hollow Polyglas tires may be an issue. Then I experimented a little: took the Cragars from my GTX kit that used the same tires and painted one to look like a torq thrust. I still prefer the Polyglas tires but I'll have to figure out what will work. Here they are side by side:
-
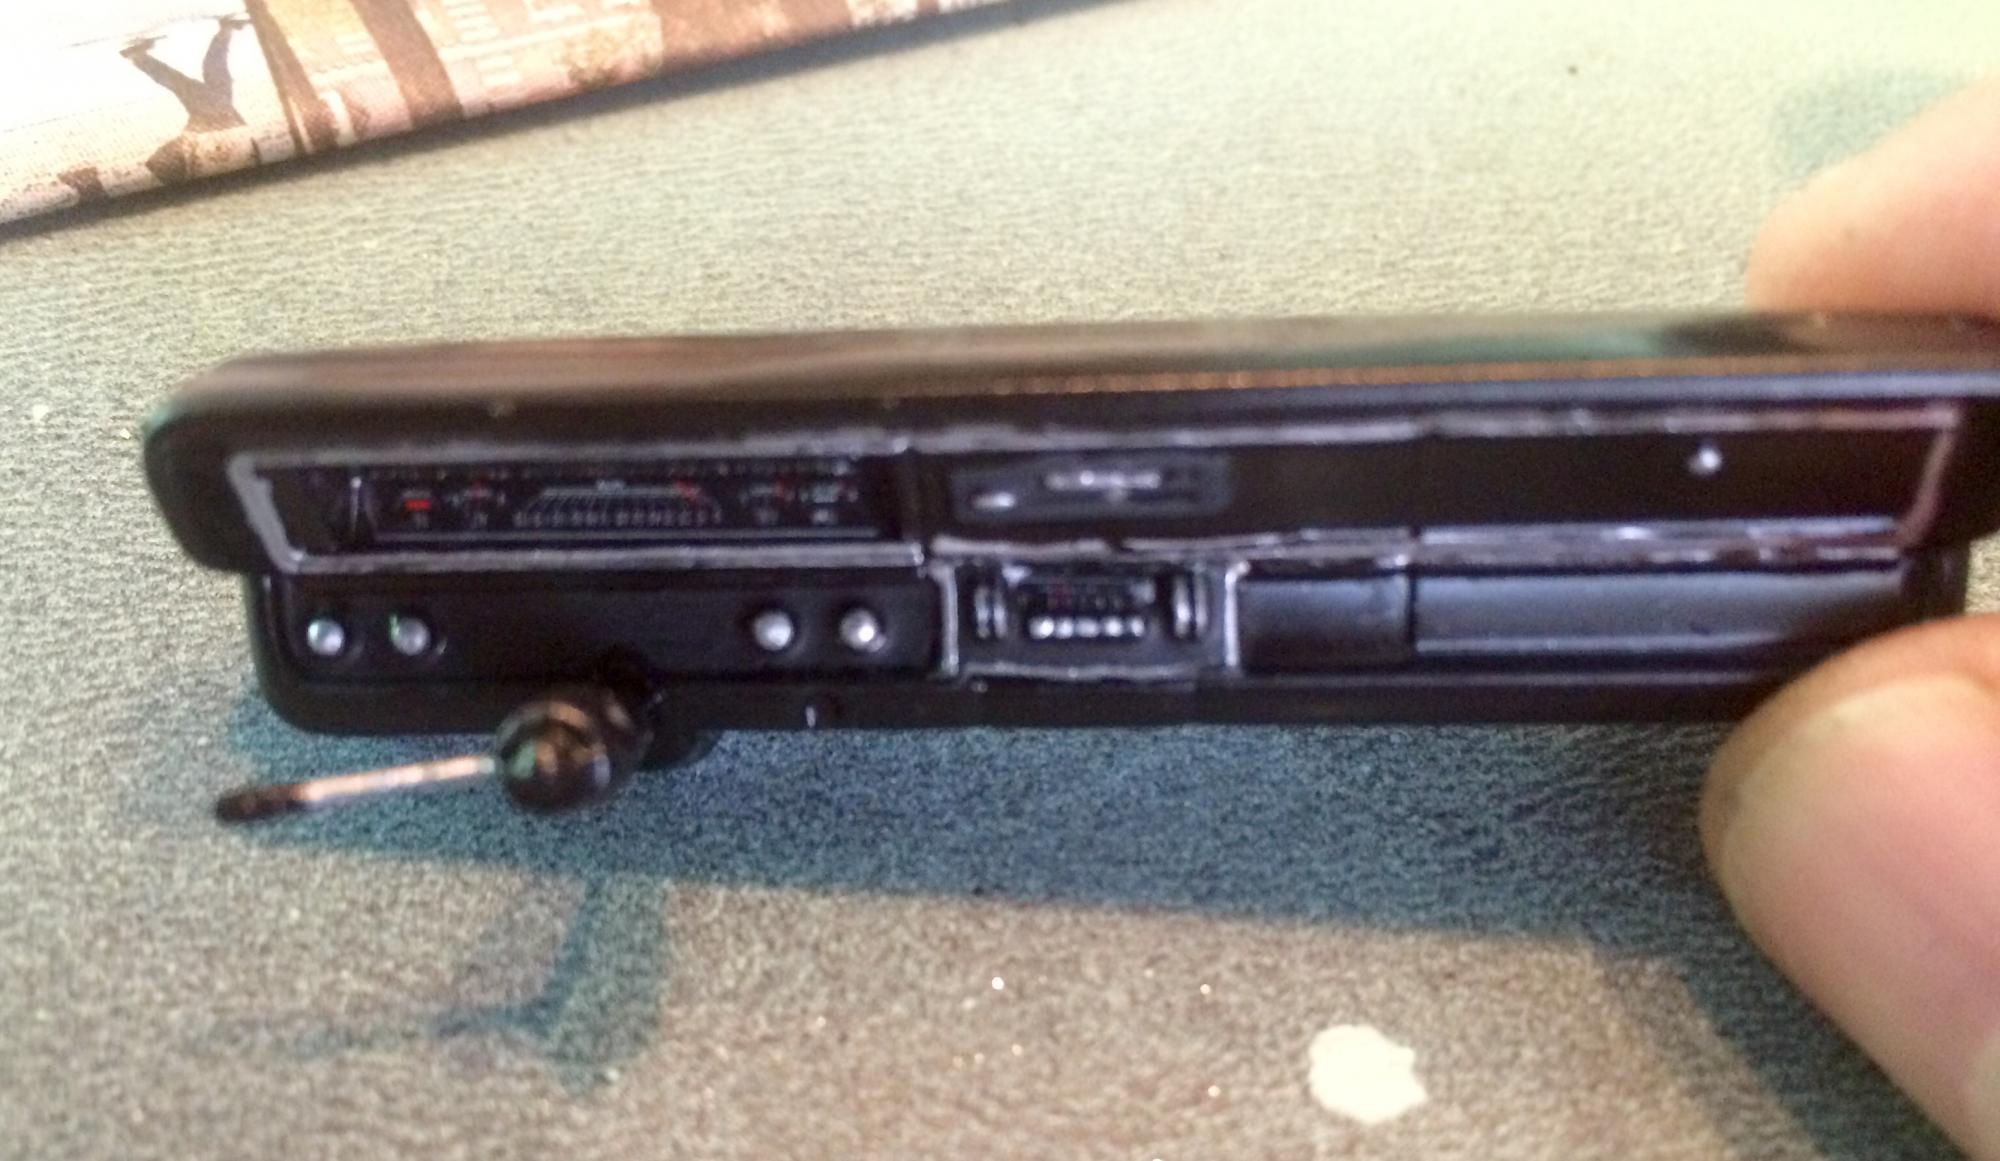
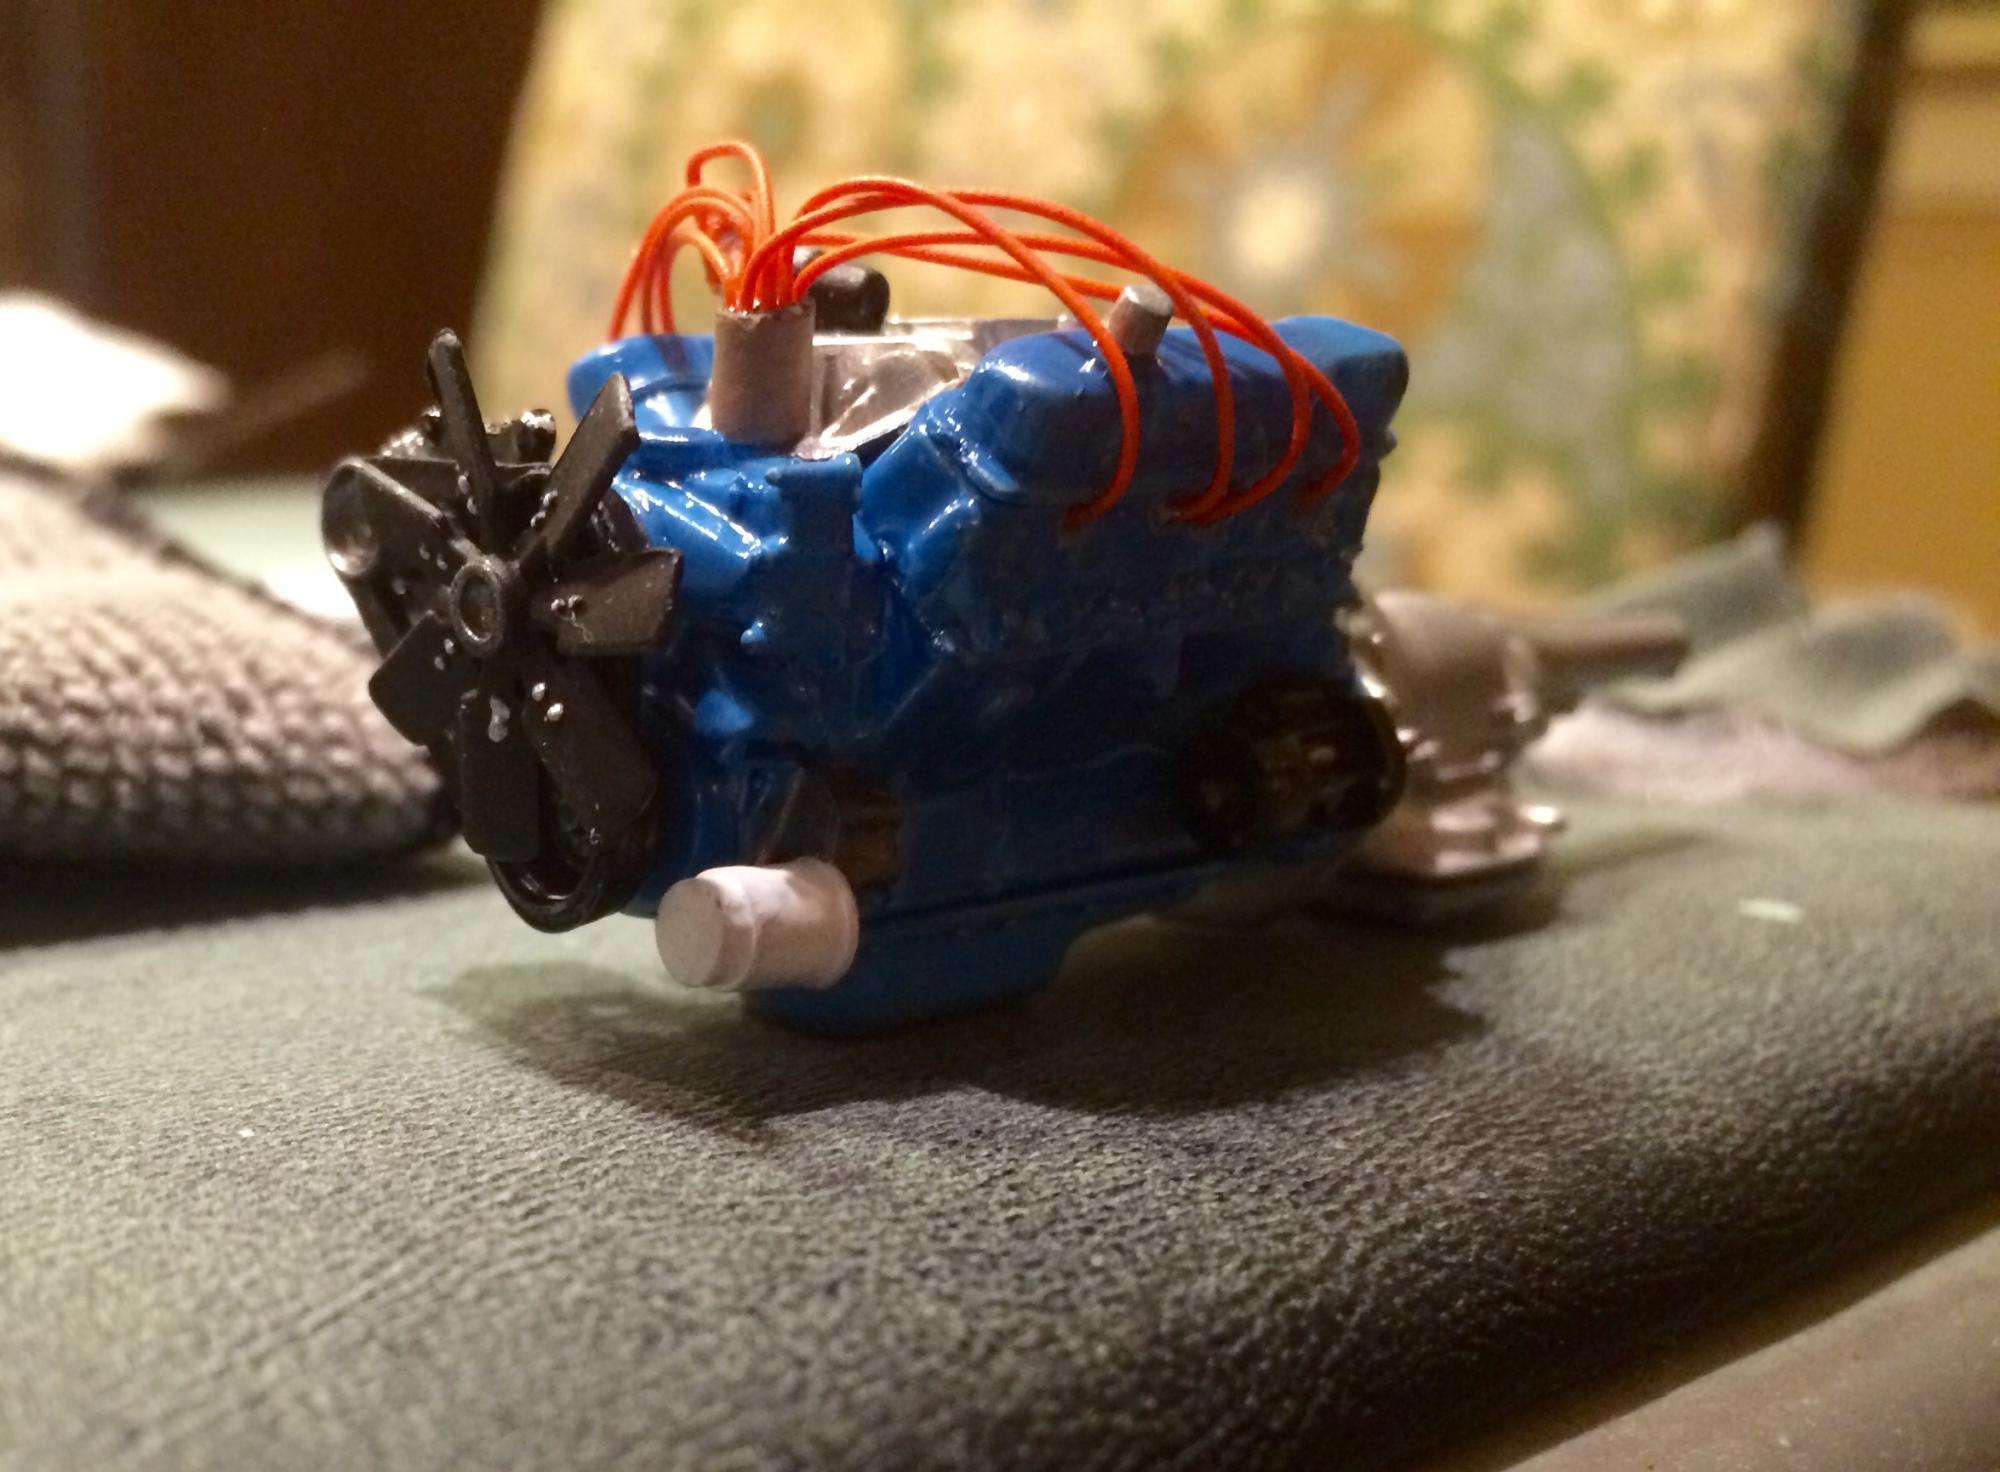
Made a little more progress tonight on the Dart.... Painted lots of bolt heads, got the fan/alternator mounted. I'm going to have to search the parts box... While de-chroming several parts, the carburetor went down the sink. Tomorrow I will work on some interior details. Here's my engine so far:
-
This is absolutely beautiful and a very thoughtful gift. Great job!!!!
-
Oh my word!!! Hopefully your company gave you some kind of major award for moving that many times and to ND during anything other than summer. I'm far enough along with the Dart that I should be able to complete it. I keep wanting to make more progress on the Charger, but I don't want to rush it or mess anything up in the move, so I'll table it.
-
-
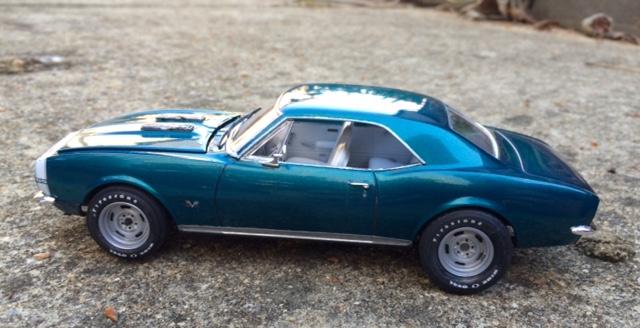
I'm born and raised in St. Louis... lived my whole life there until November of 2007, when a job offer moved me to Birmingham, AL. Two years later, I changed jobs, and was looking to go home, but the best offer was to stay here in Birmingham. About three years ago, everything finally came together here... found a dream house, bought a boat and had a beautiful lake 30 minutes away out our back door, great schools for the kids.. Birmingham finally became home. Last fall, our company did some reorganization, and I went from covering the Southeast to covering the Midwest. I need to reside in the region I cover, so we're moving back to STL. At the time we found our house in St. Louis, I had made a couple purchases and had 6 kits in my stash: The 67 Shelby Mustang and 69 Nova have already been posted. The 67 GTX just posted in the Under Glass section this morning. I found an old AMT 69 Chevelle SS coupe that I've committed to being a long-term project, as it needs a lot of help. The other two were favorite cars and kits I've always wanted to build. The AMT 71 Charger RT and the Revell 68 Dodge Dart GTS. Looking at them now, I've made significant progress on the Dart... not much on the Charger outside of paint. The movers come June 3rd. I don't want to rush the Charger, so I think it will be my first build once we're moved back home. This might be my last post for a while, but I hope to get the Dart under glass before we leave. So, I'll put a pic or two up of this Dart WIP, but my real hope is to finish it in the next few weeks. The Charger I'm really excited about, but it will wait until after the move: This is my Dart, and the one I hope to finish before we leave for MO: More to come... I hope.
-
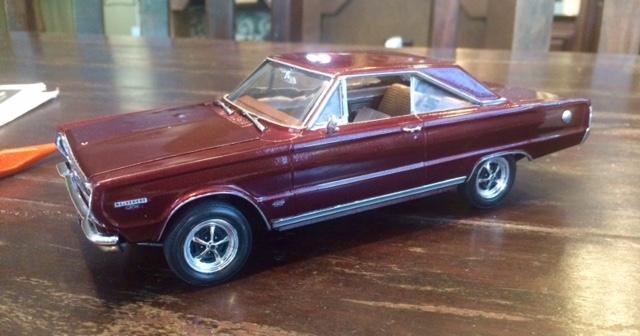
Well, it's done. I've looked at the Revell GTX for the last year as a "must-have" model, and I finally got one. My mom drove a 67 Belvedere with a 383 when I was little, and I LOVED that car, and have seen all the builds of this that look fantastic, so I was really excited to get it. As I purchased this, I also had purchased a 67 Shelby Mustang (AMT) and Revell's 69 Nova SS. I've already posted those other two, so this was "saving the best for last"..... I thought. The title of this post refers, of course, to the famed movie about the possessed Plymouth. Well, I've found a new one. It's NOT Revell's fault... overall, this is a great kit... but this particular model is the spawn of Satan. An unending stream of tragic events, some self-inflicted, but others just unexplained, bizarre occurrences befell this build. In the end, it's done, but it's less than what I hoped for and saw in my mind's eye. (we've all had them) A sampling: - First problem was all on me. I bought a Duplicolor midnight blue for this car and the deep jewel green for my Shelby Mustang. After laying the first coat of paint down on the body, I changed my mind. Stripped it, and painted this car deep jewel green and used the midnight blue for the Shelby - Got my paint on, wet-sanded, started clearing, and the clear coat just wouldn't quite settle on this body... more orange peel than others, and it just wasn't shining like it should. I got to 8 coats of clear (with sanding and compounding in between each) before I was satisfied (and satisfied in this case was "whatever, good enough") - Because I was working on the other two, I let this one sit for nearly a month. Then we had people coming over, so I gently set it in the box to get it off of the basement counter. Grabbed it the next morning, and the inside of the box lid had messed up the clearcoat on the roof. Really? - Stripped it again, and got a new idea. Bought a Duplicolor silver, and decided to do it in silver with a black painted roof (option code 292 on the real car). The reason for this change was in researching interiors, the one I liked best was the white interior with red... white seats and door panels, dark red dash and carpet. I thought I could use that interior and it would nicely set off the black/silver outside - Painted the silver, masked off and painted the black roof.. sanded... painted the clear, it curdled. Stripped, repainted. Clear didn't curdle.. but more wierdness as I was adding layers of clear to get the shine and smoothness. Somewhere around the third coat, the body did something I've never had happen before. While turning it to get all the areas, the body popped off of the old spray can I use as a stand, shot halfway across the garage, and bounced on both its side and roof, completely filling the wet paint with dust and crud. At this point, I decided the model was possessed. I stripped it again, and began wearing a cross whenever working on it. - I was now less enamored with the silver/black combo... with the white/red interior, I decided to go with a deep red metallic body. Got some dark toreador red at the auto parts store. Repeat the entire process again. Again, not really happy with the finish, but I gave up... it's not bad, just not good enough. - I should mention that somewhere in the silver painting/stripping/compounding processes, at different times, I managed to break out both of the front vent window posts, and snapped the entire roof at the point of connection with the left A-pillar. I reattached them, but the little posts are not perfectly aligned. - The final finish refused to wax. I let it cure for over a week, compounded, but when I put the same Meguiar's wax I use on every model on this one, it wouldn't buff off and was all streaky and cloudy. I wasn't going to paint AGAIN... I was seconds from throwing the whole kit in the garbage and buying a new one for another time, but walked away. Four days later, the streaks had magically disappeared. However, two weeks later, I wanted to add some more protection... even with a coat of wax on the car already, the same thing happened. (side note: inventing new cuss words is fun) - The whole idea behind the silver and then the toreador red was to do the white/red interior. Except when I painted it, two things happened; my dark red refused to give good coverage on the floor for the carpet, and by the time it covered, it was gloppy and looked terrible. It was also plain to see that my dark reds for the interior had a different base than the toreador red, and they really clashed badly... again, looking nothing like what I saw in my mind's eye. With the carpet already looking terrible, I stripped the floor pan and was just going to do the white/black interior, when... - My 7-yr old sometimes likes to come build legos or draw next to me when I'm working on models, so we're working together. It's very cute. However, he was drawing, and inadvertently set a sharpie marker down without the lid on it and the tip sitting on one of my front seats. I had a large purple spot right in the middle of the seat cushion. Now i have to strip and repaint the interior. With the red already stripped, I went with a tan/brown two tone. It's not factory, but I was over it.... went with it. Again, it's OK, but not as nice as I hoped - There were numerous other issues...glue problems, a paint brush snapped in half, and the ultimate.... missing parts! At one point, I lost a tire. Found it four days later, and the carb went missing. Found it, and the dashboard disappeared. Found the dash, and couldn't find the steering wheel. The rear bumper and air cleaner lost their chrome finish without being touched... over the days, it just disappeared. There were more... throughout this build, there was always a part missing, and it would always turn up in strange places. At final assembly, the hood ornament shot out of my tweezers and flew across the room. Maybe I'll find it someday and replace it, but I'm not holding my breath Anyway, I've never needed so much bourbon to complete a model car. This isn't what I thought it would be. It is a great kit. I do finally have a good idea for a better version of this. We're moving across the country, so it will be a while, but I'll get another one of these and try again. Besides, I need to let these memories settle before I look at more GTX parts. In the meantime, it will look OK on the shelf... it will just be on its own shelf... maybe with a crucifix behind it. Sorry for the diatribe. On to a few pics:
-
This is REALLY sharp!!! Beautiful colors, great details... Outstanding job!!
-
Outstanding job!!!! I'm with the others in that I don't like the wheels, but I'm a "stock snob"... This overall is one of the best builds I've ever seen of this kit... I love that color, the details are amazing! I'm starting on one of these... Going with verdoro green with steelies and dog dish caps... And this is a huge inspiration. Thanks for sharing with all of us.
-
Steve, these are incredible!!! In that upper echelon with the best builds I've ever seen. Your latest is gorgeous, but man that blue takes my breath away.
-
No... The wheels in the kit are Chevy rallys and the drag wheels. I generally love the rallys, but this particular kit version has smaller wheel slots and a more prominent center hub, throwing off the proportion a little to my eyes. The wheels on this right now are the magnums from the Revell 68 Charger. I'm going to get the COPO kit and build another one... I might use the 350 from this and use the 427 for something else, but haven't decided.
-
WOW... I just posted one of these, in dark green as well, and it wasn't nearly this nice. AWESOME JOB!!! It definitely makes a big difference to go with the raised suspension in the rear.... that looks great!