Kmb0319
-
Posts
468 -
Joined
-
Last visited
Content Type
Profiles
Forums
Events
Gallery
Everything posted by Kmb0319
-
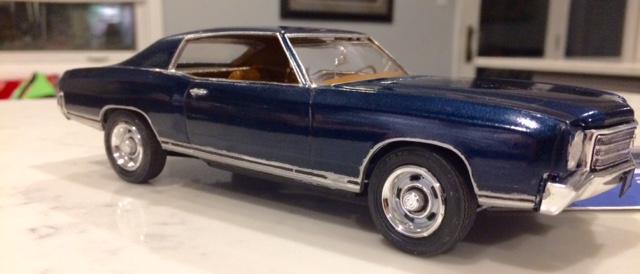
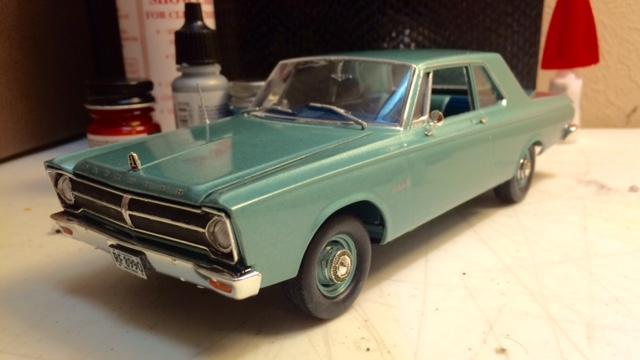
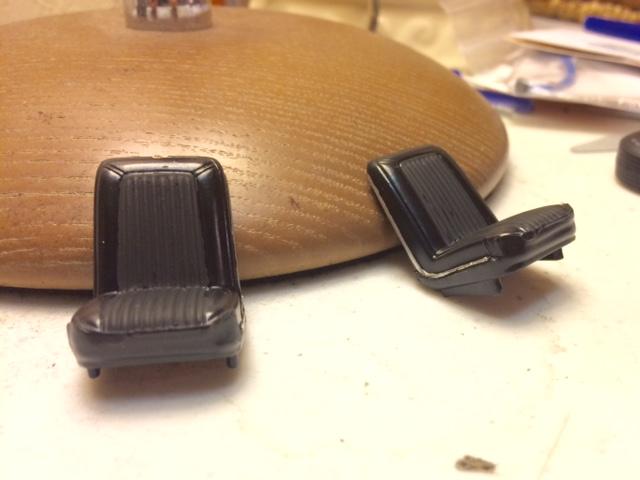
The AMT 70 Monte Carlo had always been on my list... it's one of the really good AMT kits, and I love the first Generation Montes. I sort of had one.... My first car was a 71 Chevelle that I loved, and was restoring, but it blew an oil line one night driving home, and I didn't know until the next morning when I came out to start it and found the engine was siezed. From there, I found a beautiful 73 Road Runner in great shape with a 360. I finished restoring that and drove it all through high school and my first 3 years of college. But, as a senior in high school, my dad was looking for a car as he'd just left a job that supplied him with a company car. His next job would give him a company car at his 1-yr anniversary, so he wanted to get something used to get around for the next 12 months. Well, I convinced him if he was going to get something used, he might as well get something FUN. (my father, left to his own devices, had HORRIBLE taste in cars... dad, walk away from the Pacer....) So, I "helped" him pick something out. I found a dark green 71 Monte Carlo with matching vinyl roof and interior, and a 454 under the hood. Even with my beloved Road Runner, I had to borrow dad's car a lot.... what a year!!! So, I didn't want to use dark green on this build. The MC was an "executive hot rod," and with the Grand Prix and Cutlass, the start of the "personal luxury car" movement. With the luxury and executive component very much a part of this car's heritage, I wanted a rich, power color. Green is the color of money, but with the word executive in my head, I thought of a power suit. The ultimate power suit is navy... so I wanted a dark blue. I went with the closest color I could find to replicate GM's saddle interior, and used a Duplicolor paint called Patriot Blue that I used and loved on my 67 Shelby Mustang. Kit was great, but I did have a couple issues... the body and chassis had a lot of problems going together, but eventually it all came together. I also had to reposition the front wheels, as they sat like a 4x4 when attached at first. Other than that, it was smooth sailing. Wired the engine, but other than that, it's box stock. This was the other one along with the 71 Torino already posted that I thought might get done in 2016, but carried over. On to the pics. Dash.. used my white pencil to do the guages, worked nicely Door panel and seat finished Thanks for looking.

-
SWEET!!! I just built my first model for someone else that was actually their car. I've built a couple for friends who said it was their favorite car that they'd always wanted, but it was much different to build a replica of someone's actual car they loved. Mine was extremely similar... my friend asked if I could build it because it was his dad's car, and his dad still talks about that car 40+ yrs later. I can't wait to see your build posted!!!
-
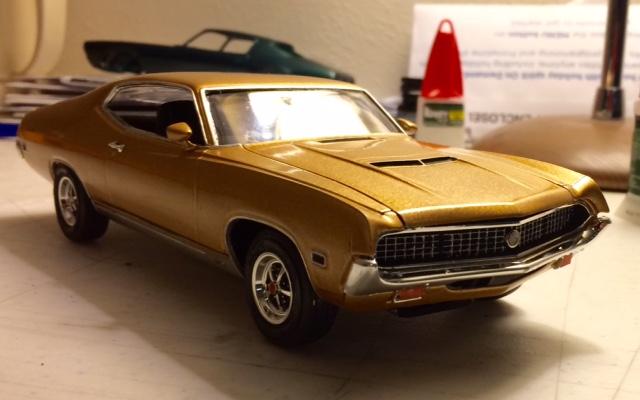
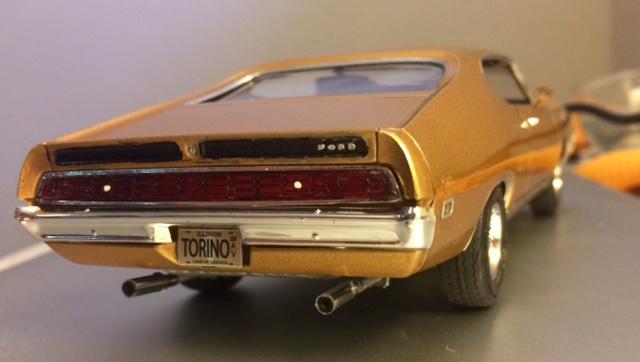
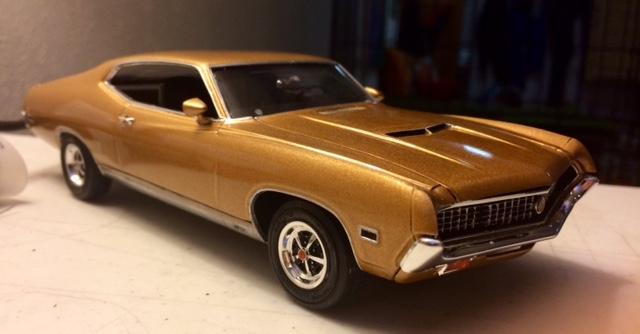
Over Thanksgiving, my wife's best friend and her family visited and stayed with us. Her husband is a great guy, and we always have a good time hanging out, playing guitars and drinking together. He's also a car guy, so he enjoys looking at anything I've built since he last saw me. I asked him if there was anything he would want me to build, and he had an instant answer: Not for him, but for his dad. When Josh was a kid, his dad had a 1971 Ford Torino GT Fastback. It was a 429, gold with black interior, no stripes, hidden headlight grill. His dad sold the car when gas prices got crazy in 75, but he's never let that car go... he still talks about it to this day. He asked if I thought I could do a version of his dad's car, and he'd give it to him. I got the great Revell 70 Torino kit. I had to make a couple changes, and there was one I couldn't make; I sanded off the side vents and painted the lower rocker panels chrome to replicate 1971 trim, but the grill center/emblem was different, and there wasn't anything I could do about that. So, it's not quite a 71, but as close as I can get. The paint is Model Master One Coat Gold, semi-gloss black for the interior. I used a Morgan Automotive pre-wired distributor, installed my own battery cables, a heater hose, ran a hose from the master cylinder to the brakes, added a vacuum hose from the breather to the carb, and ran a wire from the windshield washer reservoir to the wiper motor. (The "wiper motor" is the oil filter...oops! I accidentally reversed them, and had installed the oil filter decal before i realized my goof, so I trimmed the oil filter down a little and made it work). On the interior, I flocked the floor, made seatbelts from masking tape and bought a set of floor mats. The only other non-kit item is the tires.. the AMT Firestones I used were just the right fit to me.. wider without being too big. I sent some pics to Josh, he said his dad is gonna cry when he sees it. I've built a couple other cars for people, but they were the cars they wish they had. This was the first time I've built one that was somebody's baby... much more rewarding. Anyway, it's my first completion of 2017. Hope you like it: Interior before it went in: Engine without the air cleaner: Done:
-
Good Lord that's beautiful! Looks ready to fetch about $30 million on the auction stage. Amazing work!!
-
I think what everyone is trying to say is that we should commission a statue of you outside of the Model Cars Mag HQ. And it would be well-deserved. Fantastic work!!
-
Fabulous job... this is beautiful, and Tamiya did a nice job again.. looks like a real car. Way to bring it to life!!!
-
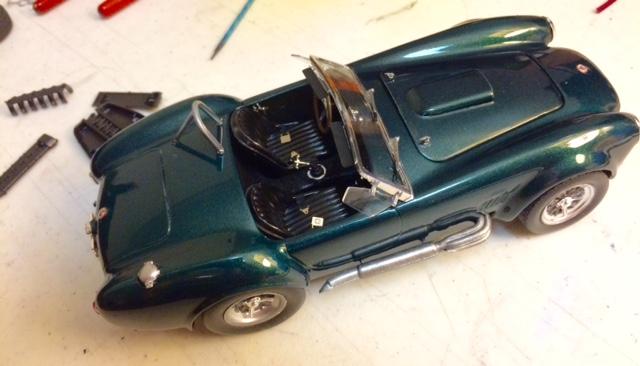
Well, funny you should ask... when I posted this Under Glass, I called it "the new Christine," because this particular model was possessed. I first painted it the same dark blue you see on the 67 Shelby Mustang. (my fault on this one, as I was going to go dark green on the Shelby and blue on the GTX, but when I saw the blue, I decided to reverse them) So, I then painted it with the dark jewel green. That green is just one of those paints that goes on perfectly... but it refused to settle on the GTX body. I stripped it twice, repainted, couldn't get a good finish. I gave up on the green, and got an idea... with the chrome piece separating the body and roof molded in, I thought silver with a black painted roof and a red interior would look great. More problems: First, even though I used the supposedly infallible Tamiya TS-14 black, the roof looked bad. After lots of wet sanding and laying 4 coats down, I was finally happy with the roof paint, only to spray some clearcoat and have the whole body curdle. Stripped it again. In the meantime, I was working on the red interior, and the floor/carpet refused to cover. By the time I finally had coverage, the paint was far too heavy and looked terrible. (keep in mind, these were paints I had used on multiple other kits and never had any of these issues) SO, I trashed the whole thing again and started over. During this, pieces went missing constantly, and all kinds of other problems kept coming up on this build. It's an AWESOME kit... you will really enjoy building it... I couldn't believe all of the problems that cropped up on such a great kit, but they had nothing to do with the overall model. In the end, the color that is on the finished build is a Duplicolor paint called Dark Toreador Red. Sorry for the rambling answer.
-
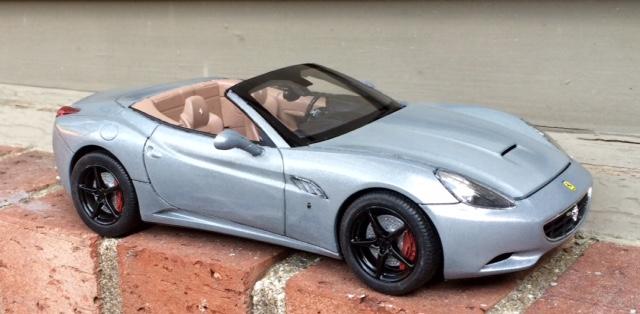
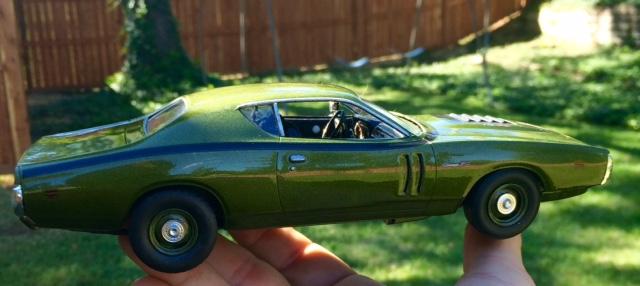
Well, it was one heck of a year... overall, I'm glad this one is over. A lot of great things are coming out of it, but it was a year of major change, which made it a rough one. The biggest and best change was our relocation. After 9 1/2 years in Birmingham, AL, we relocated back to our original home, St. Louis, MO. It's wonderful to be back... we had to live in two different temporary houses while the renovations in our new house were being completed and it ended up costing way more than planned, but it was completely worth it, especially to have the Holidays with family again. As for builds, it was a very productive and fun year, with a big gap from May - July. All in all, I got 14 kits done. Most were my usual classic muscle cars, but I also stepped into a few modern builds, building my first Fujimi kit and a couple of Revell Germany cars. I think I learned some good things and got some of my best work done. I thought I would have 1-2 more for the album, as I went into the Holidays with time off and 2 kits nearing completion, but they aren't quite done, so this is it. Hope you enjoy. Happy 2017... blessings to all in the new year!! 2016 started with my rendition of my wife's all-time favorite car, the Better Off Dead Camaro (I WANT MY TWO DOLLARS) Then I moved on to the Revell 72 Cutlass 442 Revell COPO Camaro Then back to the Revell 67 Camaro, this time my way: Tahoe turquoise, white interior, standard grill, bare rally wheels AMT 67 Shelby GT350 (I took the Goodyear decals off of the tires after this pic) Revell 69 Shelby GT 500 Convertible for a friend 67 GTX Hemi 68 Dart 440 MOVE TO MO... AMT 71 Charger Moebius 65 Belvedere Revell Ferrari California RoG Audi R8 AMT 69 Cougar (my first vinyl top) Revell 427 Cobra And finally, the Fujimi Ferrari F12
-
STANDING OVATION!!!! Amazing work and photography.
-
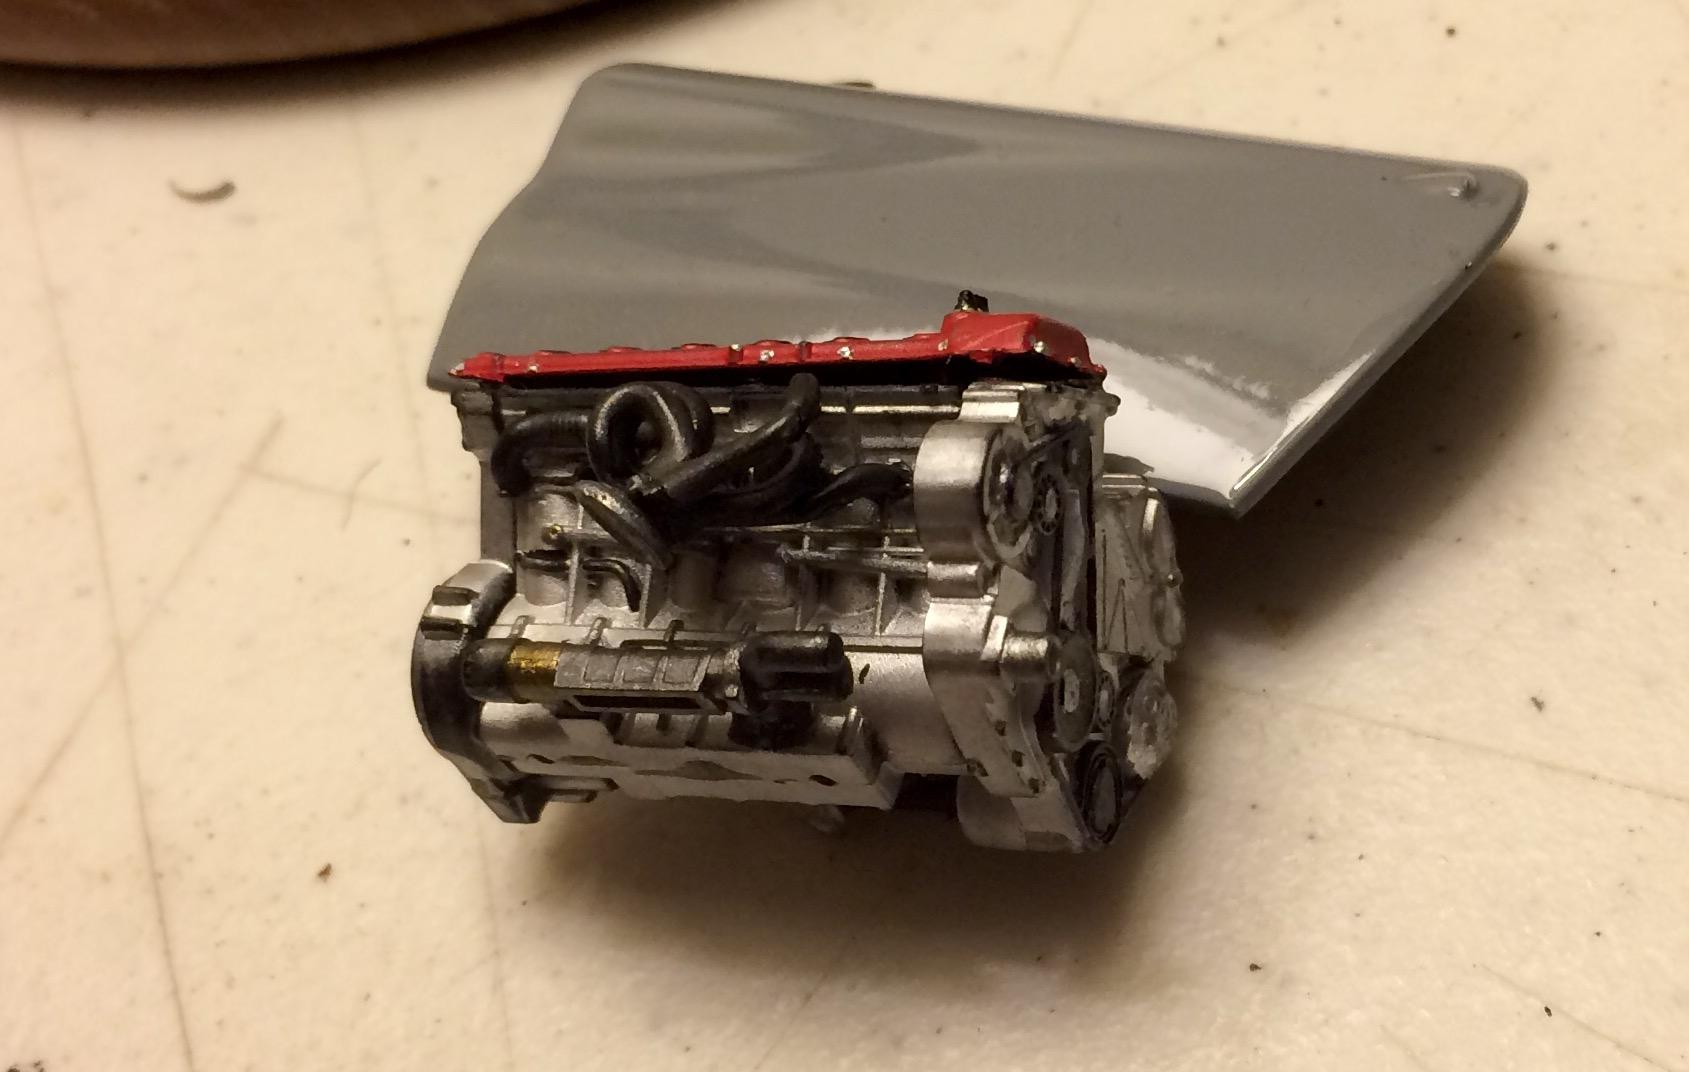
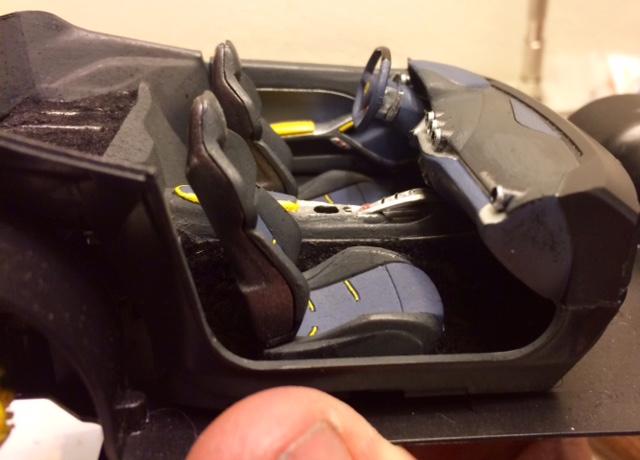
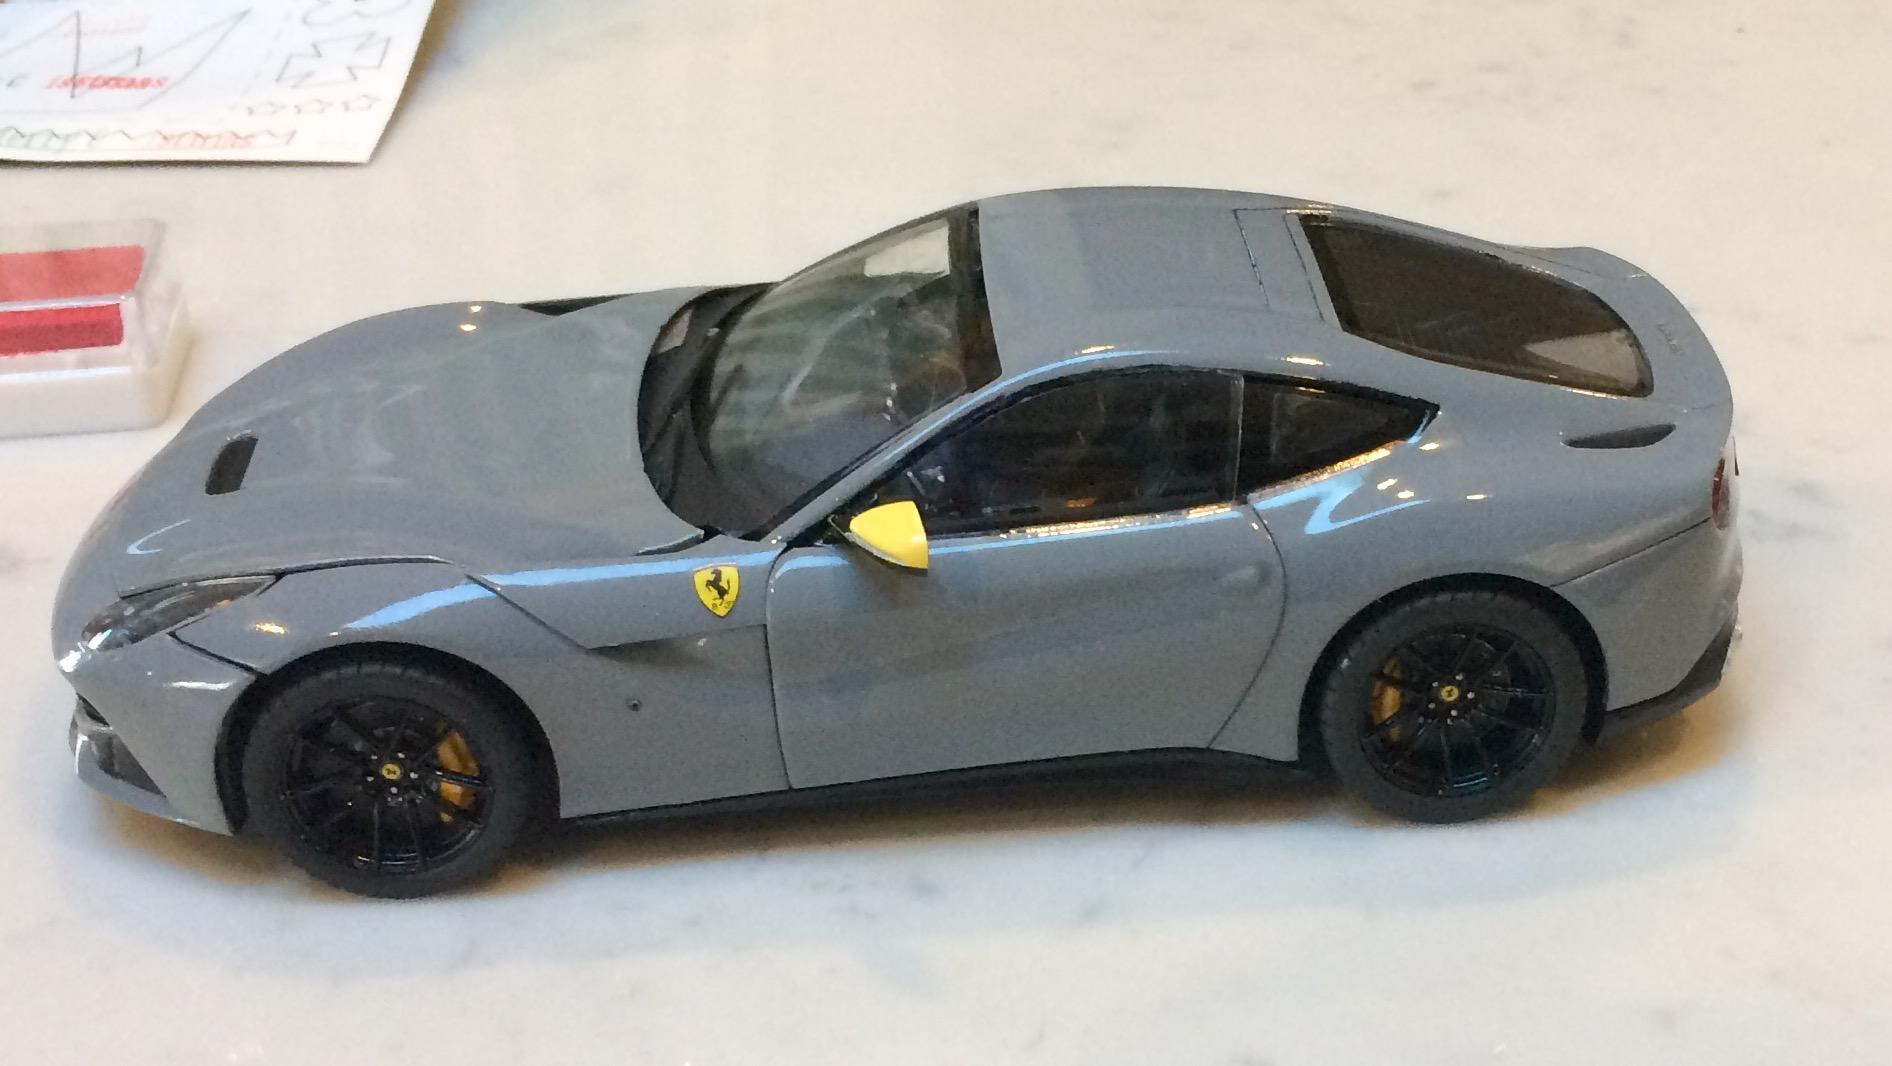
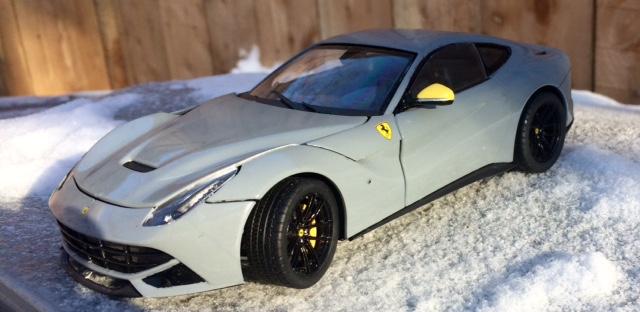
I bought the Fujimi Ferrari F12 this summer. Having seen some amazing builds of this kit, I couldn't wait to get started. I also couldn't wait because this was to be my first Fujimi kit ever, my first use of photo-etch, and it looked like a really fantastic model. So, what was I going to do with it? I wanted to do something out of the... a different color combination (no red allowed), and make it look like some special limited edition. I got an idea after a month or so of staring at the parts in the box. I used to like the old Saleen Mustangs back in the 80s and 90s... and one of my favorite parts of them were the interiors. My least favorite color is yellow... I can really like the right shade of yellow on a house, but when it comes to cars and clothing, yellow almost makes me angry. Maybe I'm part vampire. But, those Saleen Mustangs had a light gray interior with yellow accents here and there, and it just looked awesome to me. So, I thought "what about a whole car based on that scheme?" I wasn't too much of a fan of the wheels on the F12.. a bit too wide-spoked and flat for my taste, so I found a great set of Hobby Design wheels on ebay and bought them. Other than that, I left the kit alone. I used basic Testors Gray enamel, let it sit for a month and then used my automotive spray clear. On the interior, I mixed two gray colors with yellow accents; my homage to Saleen, I guess. I tried my best to flock the floor... not easy with the bottoms of the seats molded in. Everything fit together beautifully and is exquisitely molded, for the most part, but I did have some issues. The ride height isn't good... it was sitting far too high. I did the best i could to lower the front, especially, but all I could do is glue the wheels a little higher on the brake disc... not perfect, but helped some. Using the aftermarket wheels was a bit of a problem, too. But, my biggest problem, by far, were the doors. I glued the hinges into the doors, but those only worked to have the door standing open. The right door wasn't set right... the inner door piece sat too far forward, so if the door skin was attached properly, the door sat too far back. I ended up breaking off the attachment pegs and the right window, and just super gluing the doors in. It's far less perfect than I hoped, but it is a cool model. Hope you like it. Happy Holidays, everyone! The engine is really nice in this kit, even though you don't see any of this when finished: My interior: And, all done:
-
Gorgeous!!! Looks like it just rolled in from a hard day at the track
-
Standing ovation.... beautifully done!!
-
Fantastic looking Mustang and great additions to a weak kit to really make it something special. Love it!!
-
Gorgeous work!!! I can practically hear the music thumping on that CD player.. she looks ready to cruise
-
BRAVO!!!! I'm NOT a fan of pro-touring, I'm a "stock snob" I guess, but this is one of the coolest and best looking models I've ever seen. Absolutely beautiful in every way and a stunning recreation of this kit. Beautiful job!
-

FrankenGoat - making something DECENT out of the MPC 72 GTO
Kmb0319 replied to Kmb0319's topic in WIP: Model Cars
I've thought about it... my main concern is having the styrene remain aligned with the contour of the trunk. I have zero experience doing anything like that, and since I'm building this for someone else, I'm afraid of experimenting and having it fail. -
FrankenGoat - making something DECENT out of the MPC 72 GTO
Kmb0319 replied to Kmb0319's topic in WIP: Model Cars
Thanks so much for the pictorial evidence!! The bumper from that kit is a MUCH better fit. Looks like I'll be buying that one instead of the Reliable Resin body. I'm placing my order tonight for throttle springs, carb linkage, window crabs and other detail parts along with the Pontiac 421 kit. Looks like the parts are altered but the plan is back rolling! Thanks and Happy Thanksgiving everyone!! -
FrankenGoat - making something DECENT out of the MPC 72 GTO
Kmb0319 replied to Kmb0319's topic in WIP: Model Cars
I was told this version had a correct body/bumper fit. Anyone know for sure before I potentially waste $50? I thought since the Reliable Resin body was a corrected version of the MPC 1970 body, I would get that because it would be based from the "pre-narrowed" body for proper rear bumper fit and it also includes clear headlights and driving lights. The other potential was the kit above, as it was supposed to have the right body/bumper fit. Now it sounds like there is nothing out there other than an old 70 promo kit that would work. Nobody has just a correct bumper anymore since Modelhaus closed. I'm really nervous about trying to cut the bumper and end up with a good result, but it sounds like I may not have a choice. -
FrankenGoat - making something DECENT out of the MPC 72 GTO
Kmb0319 replied to Kmb0319's topic in WIP: Model Cars
Wow... really? Thanks for the heads up, but now I'm confused. I had started a thread in the aftermarket forum months ago and was told the body was narrowed when they made the 71 David Pearson NASCAR edition, but to get a 1970 version before that Pearson model was made would give you a body that was a correct width for the bumper. I was sent pics of the version to get, and found it a couple places that had it for about $40. But when I looked at the Reliable Resin body, it said it was cast from the 70 GTO, which would make the body the proper width for the bumper. In addition, it had the clear headlights and turn signal lamps, so I thought I'd try using it. Modelhaus used to make a bumper, but now that they are closed, I'm not sure what to do. I don't have the proper cutting tools and don't want to mess up the bumper, so I really need either an aftermarket body or bumper that's going to fit. Not sure where to turn now. -
FrankenGoat - making something DECENT out of the MPC 72 GTO
Kmb0319 replied to Kmb0319's topic in WIP: Model Cars
Thanks Ron!! Hopefully I'll get some work done on it over the Thanksgiving weekend and have more to post. -
WOW, that looks awesome!!! Can't wait to see this one unfold.
-
Love this!!! Look at the prices on those wheels!!! They'll set you back a whole $36-$38 per wheel!
-
FrankenGoat - making something DECENT out of the MPC 72 GTO
Kmb0319 replied to Kmb0319's topic in WIP: Model Cars
Thanks, Ace! I saw the Revell 421, and thought about it, bit I was worried that since it's an older engine from the SD Catalinas and such that it wouldn't look the same... kind of like the Chevy 409 looks very different from the 427s and 454s later in the decade. Plus it's a more significant difference in displacement. But if you think it's a better choice than a 454, it's certainly cheaper and easier to find. Thanks! -
Well, what have I gone and bitten off?? I was talking with my best friend, and he had commented on how much he liked my builds. I asked him what his favorite car was. He said the 70-72 GTOs, especially with the Judge package. I asked him about colors... pick anything that's your favorite... he went traditional: orange/black, but wanted to have the "cool metallic orange they came in." (I think Pontiac called it Copper, but it was metallic orange) I bought the kit, knowing all the horror stories about it. My first thought: sheesh, this is going to get expensive! The interior is terrible... classic bad AMT/MPC, with most of the door panel details just drawn/etched in. The engine, chassis and underhood compartments are worse. And, of course, there's the body that is too narrow for the rear bumper. I'm going to have to use a TON of aftermarket pieces and raid my parts box to make this into something good. Making a list, so far, this is what I'm going to need: Reliable Resin 1970 GTO body - Since this is molded from the 1970 kit, it should have the body wide enough so that the bumper will actually fit Pontiac Rally Rims - purchased from Model Roundup AMT 69 Olds 442 donor for chassis, suspension B N L Resins Chevy 454 engine - I need a well-detailed big block with the correct valve covers to add the vacuum hoses and correct position of the oil filler. (the biggest immediate problem with the Olds kit engine is the large oil filler tube up front behind the fan belt and the alternator is on the wrong side of the engine compared to the 1:1 GTO. The B N L engine has those elements correct, looks great, and I think I can add details to make a suitable GTO 455) Detail Master interior kit, with window cranks, door handles, etc DM carb linkage, throttle springs Battery cables, Morgan Automotive wired distributor AMT Goodyear Polyglas GTs, L-60 size lots of spare parts fom my parts box... steering box, pedals, firewall details, hose and wire, etc. I HAD a set of armrests from the Revell 67 Chevelle... now I can only find 1, of course, so I'm not sure what I'll do there. A dried out baby wipe that I will attempt to cut into shape and paint, using it as both a headliner and a package shelf. In other words, this will be a project. I have the Cutlass, the rims and tires, and of course, my parts box so far. While waiting for all the other stuff I'm ordering, I'll try to work on some of the things that I'm actually using from the kit and what's on hand. So far, I've painted the interior bucket and detailed some of the trim. The trim is so poorly molded, it's been a challenge, to say the least. I thought about attempting to foil, but it's molded so faintly, there's no way to find the edges. I thought about trying to epoxy some fishing line over the trim and paint or foil that, but it was a little too heavy. So, at this point, it's just paint. There will be further touch-ups. I've flocked the floor, painted the seats with the vinyl/textured inserts, the dash, and borrowed gauge decals from another kit. Here's where I am... just painting so far. The interior bucket was painted semi-gloss black, carpet was flocked, and then i painted the center seat sections with flat black. I don't think they're cloth in the 1:1, but they are a more textured vinyl giving them less of that vinyl shine, so I needed to have a contrast. Then I painted the chrome trim on the front seats and started with the easiest trim on the door panels. The headrests are awful... huge mold lines, and they just look like blobs. I'll sand them down and see if they get better. The pedals are from my parts box, and i tried to add in the silver edge trim the real car has: Before I install the front seats, I'll also have to get seatbelts in place front and rear. After trying a couple different methods mentioned above, i just went with a tiny detail brush and painted the rest of the door trim. Filled in the silver trim and the Pontiac logo on the steering wheel. (sorry it's so blurry) Then painted the dashboard. Throughout all of the interior, I see some touch-ups needed, but it's a solid start. I will also drop some clear glue into the gauges to make bezels. Hopefully, the photo-etch kit really brings the interior hardware to life. Now if I can only find that other armrest!!!!!! Next, I moved on to my resin wheels from Model Roundup. They are two-piece... the chrome trim ring and a white resin wheel. I painted them, and then held one against a rim inside my tires to get a look. These are pretty nice replicas!!! (again, I blow a picture up to be a close-up and see all the needed touch-ups) Lastly, I painted up the 69 Cutlass donor chassis, the suspension components and assembled them. Then I stuck the tires on, put the interior into the body I won't be using, and stuck them together to get an initial mock-up of stance. We'll see how it looks and what issues come up when I get the Reliable Resin GTO body. So far, so good. I'm sure I'll invent 40 new cuss words trying to get the exhaust under the glued-in rear suspension, and the replacement body and engine will cause a ton of heartburn, but hopefully it'll all be worth it. If I'm screwing something up or you have a better idea on fixing some of this mess, let me know.
-
This isn't actually a new build, I built this a year and a half ago. To me, it's proof that small adjustments can make a huge difference. My teenage son wanted to try building a model in the Spring of 2015. He chose the Revell 68 Firebird, but the only version available was the Foose version. I'm not really a pro-touring kind of builder... if I'm building a muscle car, I want it to be stock. If I have custom wheels, they will be period-correct... something an owner would have put on when they brought their new baby home. (I realize this is just my opinion... others may wholeheartedly disagree, and that's OK) Anyway, he painted a grand total of 3 parts before he quit, so I took over and built it. Further, among the Revell Foose kits, the wheels included in this version were my least favorite. The wide 5-spokes are not something I would ever choose. (The tires were a nice width, they just weren't "right" to me) I tried to throw some gold trim on them to see if that would help... it didn't, possibly because my effort was poor. SO... last week, I was cleaning my office up, and part of that included fixing several of the models that got broken in our relocation this summer and getting them onto a shelf. I washed this Firebird, put a little wax on it, reattached a few broken parts, and finally set out to replace the wheels/tires. I dug into my parts box.. thought I could possibly use the Pontiac Rallys from the MPC 72 GTO... WRONG... those are horrible, like the rest of the kit. What I ended up with was a set of the Cragars that were the custom wheels in the AMT 70 Camaro kit (molded in white) and a set of the AMT Firestone Wide Ovals. I had to find wheel backs that pushed them out a little considering the wheels that were on originally, but not too much. Here's the before: I painted the wheels to look like Torque Thrusts. After the change: Now, THIS is my vision of a 68 Firebird. Personally, I'm digging it... whatcha think?