Kmb0319
-
Posts
468 -
Joined
-
Last visited
Content Type
Profiles
Forums
Events
Gallery
Everything posted by Kmb0319
-
Looks like a great barn find! I'll second the tire question... were those in the kit?
-
WOW that’s NIce!!!! Outstanding work!
-
just spray paint and plaid insert decals... they’re in the kit.
-
That reminds me of a guy at my old office back in the late 90s. He was 6’2”, and.... this was straight from his mouth, not an exaggeration... 380 lbs. He made a string of deals that brought in a significant chunk of cash, so he bought his dream car... a brand new Corvette. About two weeks after he purchased it, he arrived at work one beautiful spring morning, and we were all outside enjoying the weather until we had to be inside. I was happy for him to have achieved a milestone and been able to get his dream car, but it was a sight to watch him struggle to get out of that car... it was noticeably leaning to the left, and as low as it was, he nearly rolled onto the ground. One of the older guys in the office, who always had a blunt way of putting things, said “I think that Corvette just gave birth.” ????.
-
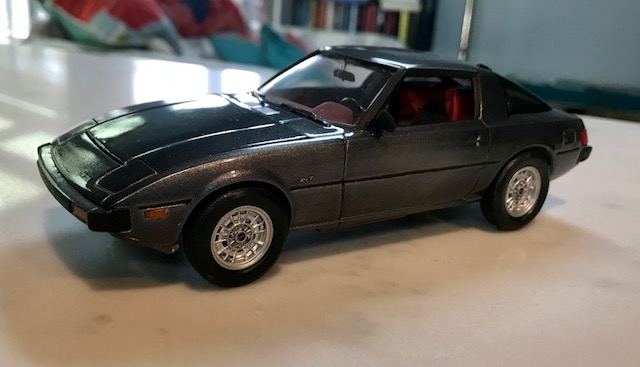
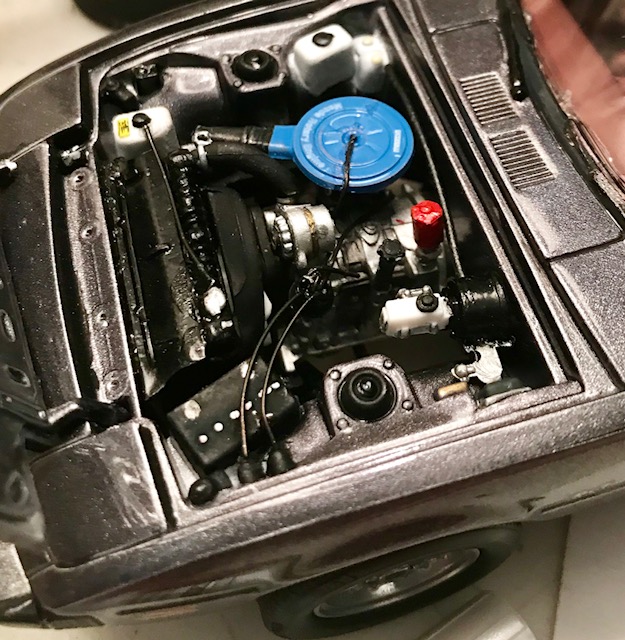
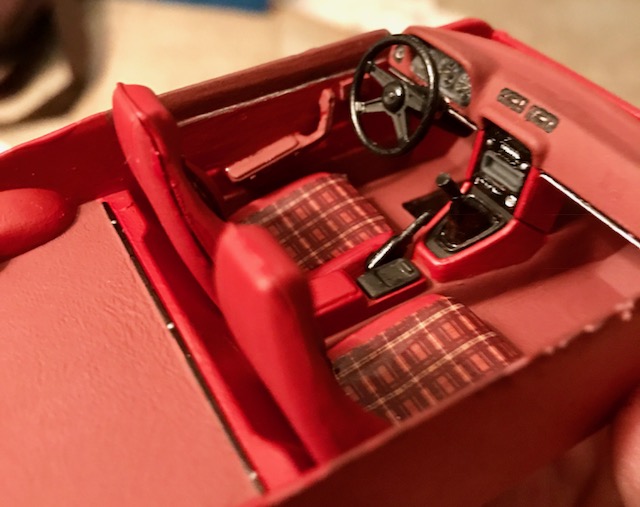
Well, I've been wanting to play with this kit. I owned two first-gen RX-7s as I graduated college and felt like I should have something other than a rumbling muscle car to go on job interviews. So, out went the 73 Road Runner, and I found a beautiful black '82 RX-7 with a red interior for $2995. Six weeks later, I was hit by a drunk driver... I escaped mostly intact, but the car was totaled. So, I got the insurance check, and replaced that RX with another one... a charcoal gray 84 with a burgundy interior. I loved those cars!!! This kit is a little different than mine since it's a '78, so I decided to use it as more of a tribute than a direct copy. I saw that the 1978 model offered a burgundy/red interior, and I replicated that, using Tamiya Gunmetal as my body color. (the two-tone doesn't show very well in my pics) I did fill in the body side molding with flat black, even though the molding itself isn't present. Other than that, it's mostly box stock. I added some wiring underhood, and used a little Tamiya Smoke to tint the rear window. The only other tiny detail I added was in the interior... the armrests are separate pieces, but they don't have the door handles molded in. So, I cut a part number tab from a sprue, cut it in half, glued it to the door and painted it. Not the most realistic solution, but at least there's something there. Hope you enjoy. Here's the engine: Interior: And all finished!

-
Just gorgeous!!!! Beautiful color, and flawless build. I've been waiting to start seeing a few of these built... Great work!!!
-

FrankenGoat - making something DECENT out of the MPC 72 GTO
Kmb0319 replied to Kmb0319's topic in WIP: Model Cars
Now she sits awaiting tires and decals. One other engine view...
-
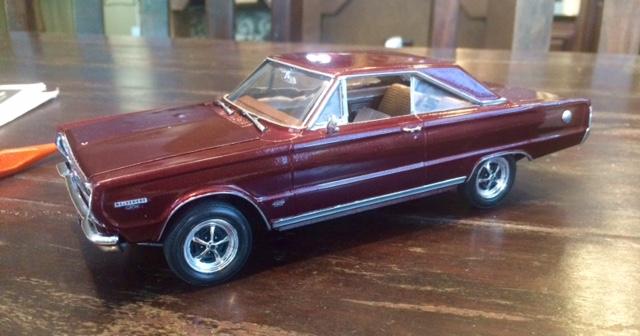
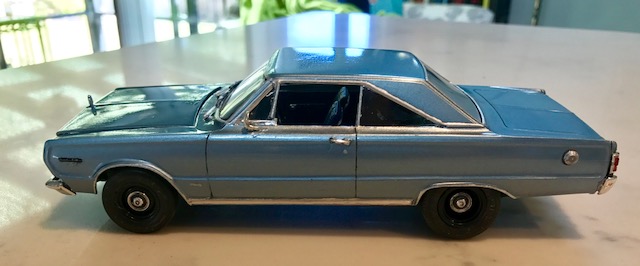
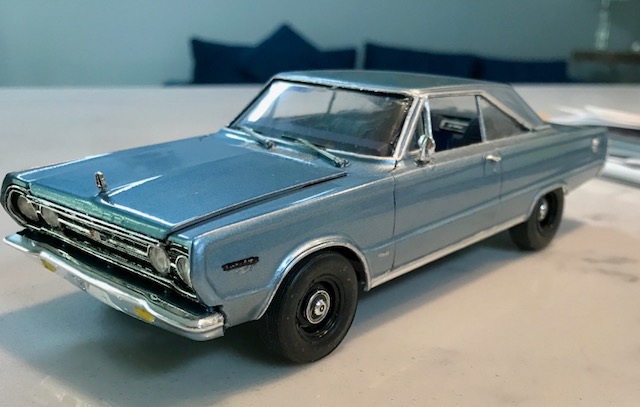
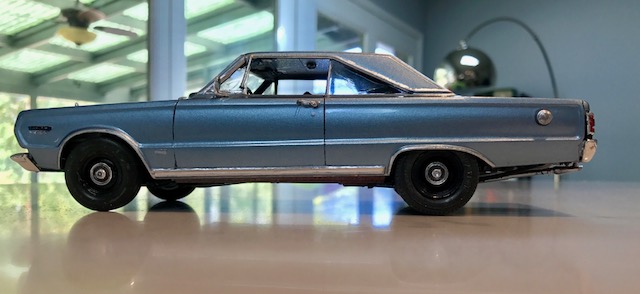
When I built my 67 GTX and posted it, I titled the post "the new Christine," as this kit was possessed. I had to strip and repaint it at least 5 times, parts went missing... overall, it was a total nightmare build of a great kit. In the end, I also wasn't really happy with the result. The color wasn't bad, but something about it just didn't "pop" with this model, and the interior was just wrong. I don't think they even made a tan interior, but my tan/brown two-tone really looked out of place. Also, the stance was off, as the interior/firewall connection into the body wasn't totally correct, and the front end sat too high. Then again, it didn't look BAD..... this was my first result: I didn't have a major issue with it, but I always looked at it and thought it could be better. Over the last year, I've changed wheels/tires on it a few times, thinking maybe that would make a difference... not so much. Without much on the bench or anything I'm really dying to build right now, I finally decided to bite the bullet and see if I could make this better. I didn't do much... took it apart, dropped the body in brake fluid and looked at pics to figure out a color combo I liked better. In the end, I went close to familiar: my mom had a 67 Belvedere that was baby blue with a dark blue interior. Instead of baby blue, I went with a very light blue metallic. I repainted the interior first, then repainted the body. Now, this thing was repainted so many times on the first build, I didn't have a great chance of getting it fully cleaned up and having a perfect finish, but it didn't come out too badly. For wheels/tires, I also made a change. I messed around with different options, but I liked the idea of dog dish caps on this thing, and decided rather than make the wheels match the body color as usual, I'd do them in black. I used a set of Nascar steelies for the rear to be a little deeper, and found slightly larger rear tires. The last thing was making sure during reassembly that i got the interior/firewall installation correct in order to bring that front end down and have it sit properly. In the end, it might be a tomato/tomahto thing, but I like the redo better. After so many repaints and removing pieces that left glue behind, the finish isn't totally up to par, but I'm much happier with the overall look. (engine pic is exactly the same.... nothing changed there) See which one you like better! I did lose all the body decals in the stripping process, so I just had to do the best I could with a sharpie. I was able to get the sides, but not the P-L-Y-M-O-U-T-H across the hood. I guess I can live with that.
-
FrankenGoat - making something DECENT out of the MPC 72 GTO
Kmb0319 replied to Kmb0319's topic in WIP: Model Cars
Finally.... YES!!! Thanks for following along. Progress was very slow, and this sat for a few months without the engine, as time and $ were tight. Unfortunately, I haven't been able to spring for the tires yet, but I got the Revell engine. It's interesting... the block, oil pan, water pump and cylinder heads are correct Pontiac pieces, but as this is a mid-60s 421, the carbs/intake setup is a tri-power, the valve covers aren't correct for this 455 and there is a bell housing but no transmission. Well, I called this build Frankengoat for a reason, and this engine is the epitome of the name. Here is what I used to try and get the right look according to my study of reference pictures: - aforementioned engine base: Revell Pontiac 421 kit - Valve covers, intake, carb and air cleaner: AMT 69 Chevelle SS 396 - Morgan Automotive pre-wired distributor - Fram oil filter from a Revell Hemi - Parts box starter, ignition coil and radiator hose - The fan belt assembly with alternator and a/c is from the Revell 65 Impala, as is the battery, a/c hoses/box and master cylinder - The AMT 69 442 that donated its chassis also donated its firewall, but it had to be trimmed to allow the body and chassis to fit together properly. In the end, it also donated its transmission... in the pic below, I had used the 4-speed from the Revell 72 Hurst Olds kit, but it was too large for the transmission tunnel, so the unit that went with the donor chassis replaced it. Lastly, I cut the front cover area of the engine compartment out of the Cutlass' body and glued it into the GTO. - The Radiator and shroud are from a Monogram NASCAR kit, with the race oil cooler cut off - The fan and exhaust headers are actually the ones from the GTO kit. The Revell 421 headers were too big and long... on one side, the exhaust pipe isn't long enough to reach the header, but I'll have to live with it. I also cut the feeder tube from the Cutlass that runs from the header up to the air cleaner and attached it. I added wires from the washer bottle to the wiper motor, battery cables, ran a brake line and a vacuum hose off of the master cylinder and matched other hoses to the reference pics. I also bent a piece of wire and made an oil dipstick. Imight add one more from the air cleaner snorkel to the carb, but other than that, my engine bay is done. It's not perfect, but far more passable than the complete lack of detail in this kit. I wanted to get carb linkage and other details, but I recently lost my job, so I'll just go with what I have for this one. I will look through my spare decals for an under hood marking or two as necessary. The only other thing I will definitely get along with the tires is the Keith Marks decal set, which includes the 455 decal for the air cleaner. Once I apply that, I'll hit the air cleaner with a gloss coat, as these weren't flat black. Once the engine bay was done, I got the body and chassis together and added the front valence. I have touch ups to the chrome, exhaust tips, an antenna, tires and decals, and this thing will be finished at last! Then I'll put it in a case and take it to my buddy. I'll have a couple more updates soon and then I'll get it Under Glass. Sorry it's taken so long... thanks for following along. Here is the engine before the transmission swap: And the full engine bay together: More to come... hopefully soon!
-
Just absolutely PHENOMENAL as usual! I would swear that is not a model. I know you did one for the magazine years ago, but I can't get into that back issue... we need (well, my sorry butt does) a painting tutorial from you, as time after time you produce the most perfect finishes I've ever seen!!!
-
I'm not sure what other superlatives I can add, but .... STANDING OVATION!!!!!!??
-
After finishing my holy grail Ferrari 250 GTO, I was looking around seeing if there was anything else that might be at the top of my list still to do. One of them is coming soon... I never got to build the Revell 69 Daytona, and I've always wanted to build a winged warrior, so I will grab that when it comes out again. But, what else?? I'm getting to the bottom of my holy grails... the Fujimi enthusiast kits are great, but either not "must" builds or getting too rare and expensive to be worth it. But.... while I don't think it was part of the enthusiast line, the 288 GTO was my favorite supercar back in high school, and the Fujimi kit of it is one I've wanted for 30 years. So, I started looking for one, and I goofed. I found the Testors 288 GTO at Spotlight Hobbies for $25, and jumped on it. Now, Testors reboxed the Fujimi Porsche 356, Ferrari Dino, Porsche 911, BMW 635, etc, so I made the mistake of thinking it was the same. However, when it arrived, I saw it was the Italeri kit that Testors boxed, not the Fujimi. It's not the Fujimi kit... far less parts, more simplified and out of proportion in areas, but the overall look of the finished model is pretty good. Since it was lacking details, I added some of my own... mostly wiring in the engine and borrowed decals. I've now built 5 Ferraris, and none of them are basic red. But, this one is in the neighborhood... I used Duplicolor Inferno red metallic. In the end, this ended up being a fun little build, and I'm OK with the result. Although, I am still thinking about that Fujimi kit. Anyway, I hope you like it! Here is the engine after adding details: interior done:
-
OUTSTANDING!!!! Love it... and it looks mean.
-
Thank you! I have 4 Ferraris in the collection and a 5th almost finished. The first 3, an F12, a California with the top down and a 458 Italia are all different shades of gray.. when I posted the last one, I titled the post 50 Shades of Gray with a picture of all 3 together. This one was going to be this blue from the second I bought it. Now I'm almost done with a 288 GTO, and it IS red, but a deep red metallic. I can't bring myself to paint a Ferrari basic Ferrari red... nothing against it, it just isn't different enough to be interesting.
-
BEAUTIFUL job.... this is highly inspirational for me, as I'm really excited about the re-release of this kit at the end of the year. Thanks for sharing
-
WOW, brother.... I've been waiting for you to finish this one, and you KILLED it!!!! That is awesome!!! Tiny touch, but I love the exhaust tips. Phenomenal job!!
-
It wasn't that... when I test-fitted the front end onto the body without the chassis, it fit so well that it stayed in place without any glue... I could pick the body up and the front end would stay in place if I didn't move it too quickly. But, when the whole car was together, the front end bumped into the frame and wouldn't align correctly or stay on. As for that Charger, BRING IT!!! I can't wait to see what you do with that kit. I'm now excited waiting for the re-release of the 69 Daytona. It had gone out of production when I got back into the hobby, so this will be first chance to build a winged car.
-
OUCH!!!! That sucks! The one thing i did find when I bought a kit that didn't have guage decals is that a white pencil will fill in the numbers and lines nicely without messing up anything. Then a toothpick with red or orange for the needles, and your guages look pretty good without the decals... of course, that's as long as they are engraved, and not completely reliant on the decal for detail.
-
Thanks! The rocker covers are weathered by my secret technique.... handle them after picking up a piece you've sprayed with metallizer ? That stuff gets all over your fingers, and smudges everything you touch!! Usually I'm getting wet paper towels to clean up whatever has been smudged l, but this time it worked to my advantage. Blind squirrel finds a nut once in a while, I guess.
-
Thank you!! Those are actually in the kit! They are black plastic, so you need paint them, but are 4 of the 250 pieces in this thing.
-
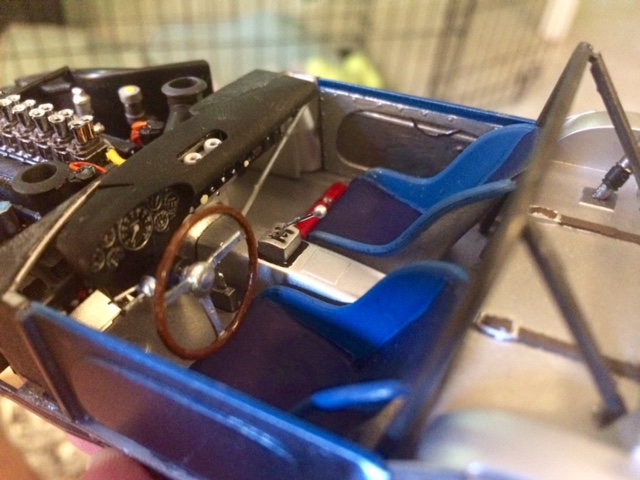
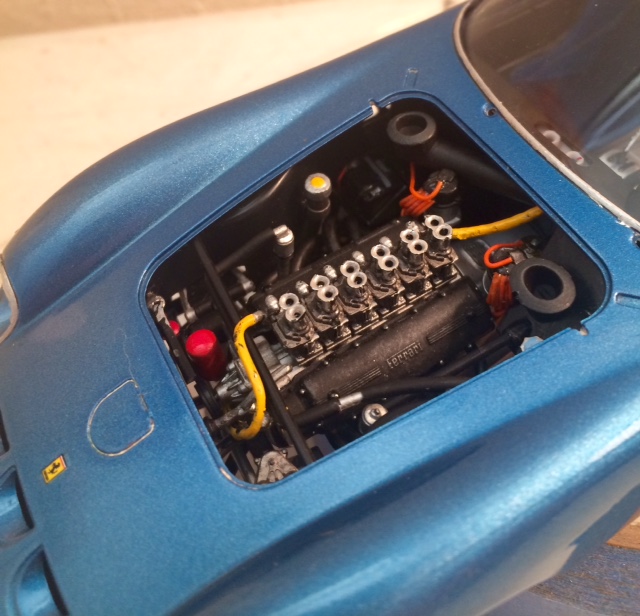
I bought this kit at the beginning of last summer, and couldn't wait to build it, but as one of my all-time holy grail kits, I waited. I had a pretty significant stash built up at the time, and took to other projects first. I started to really study this car and do a little work in Feb, and have taken my time. First of all, this is an AMAZING model. I started a thread about which 250 GTO kit was best, and I'm really glad I selected the Fujimi. With over 250 pieces, it's complex, but fits together wonderfully. I didn't build this to be an exact match to one of the 37 GTOs made. The blue is taken from the second one ever made, but rather than put the white stripe on it, I chose to build it as though it was "retired" and leave any semblance of racing behind. From there, I looked at reference pictures, and picked my favorite things I saw from different cars rather than match a chassis number. So, while the two-tone seats were part of this blue GTO, I did the interior in steel rather than try to create the black quilted look, and mixed/matched other tiny dash details according to what I liked from various cars. When it came to the engine, this one is beautiful, but has a few glaring details the kit lacks to make it look real: The first is the hose coming from the carb linkage... in the above photo, it's a dirty cream color, but in most complete restorations, it's yellow. The kit includes the rear portion, but not the front, so I recreated that with a piece of boot material that I painted yellow. The second part that this kit lacks is spark plug wires. In my research, I saw a few others wire this engine perfectly, but I don't consider myself to be that talented, and the wires all feed into a tube that is not hollow. I'm guessing other builders must have gotten a photo-etch tube in a detail-up kit or something, but that wasn't an option. But, if the two distributors were just sitting there with no wires, it would look terrible to me, so this was my low-level solution: I took six pieces of spark plug wire, pushed the ends of them together and dropped a tiny drop of super glue on them to fuse them. Then, I cut each wire's other end down to having a chunk of six wires that were each just about 1/4 inch long. Then, I bent them towards that "tube" on the engine and twisted them together. Once I had that shape, I glued the fused end to the distributor, and repeated for the other side. Finally, I super glued one more piece of wire to the top of the distributor, and ran it back to the starter(s). It's not perfect, but at least there is some kind of wiring in the engine. The final major engine detail above is the two hoses running from the firewall and along the left side of the engine compartment, but as I looked at reference pics, they were present in some but not in others, so I elected not to try and replicate that. I did add battery cables that no one will ever see! It's not perfect, but this is my engine: My Interior (steering wheel decal fell off... I have replacements) And with this project finally done, I took her outside to get a few pics: This is absolutely the coolest model kit I've ever built. It was an absolute joy, and I hope I did it justice. This one will actually go in a case. Hope you like it, thanks for looking.
-
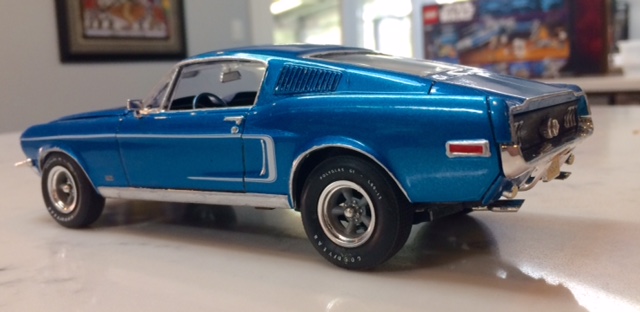
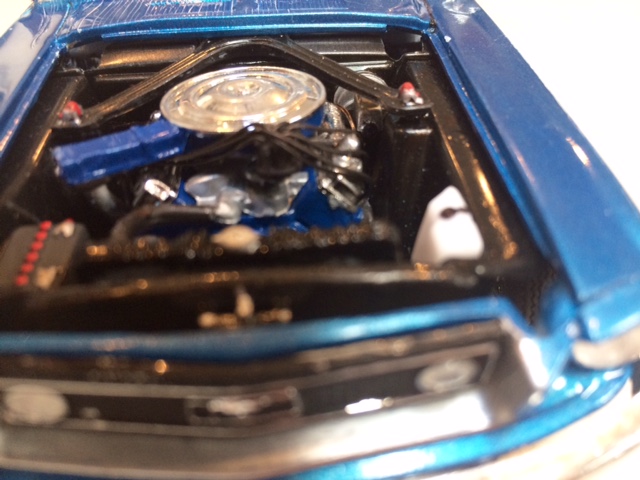
A couple months ago, I went to my LHS to buy the new Revell RX-7 kit, but I had been thinking about the fact that my collection was missing a "staple." While I did have a 67 Shelby GT350, I didn't have any classic "regular" Mustangs in my collection. So, only planning to buy 1 kit, I saw a single straggler of the Revell 68 Mustang GT, and decided to grab it instead. Everything started out well, but I was having trouble committing to a color. My first choice was Highland Green, but I was planning to use the kit's awesome torque thrust wheels, and that was pushing me far too close to Bullitt. After debating several, I went with another signature Mustang color, Acapulco blue. With that, I then chose to do the two-tone blue interior. It's nice, but I was a bit underwhelmed in the end... probably should have just gone with the green. But then, I had weird problems that came up: - When I painted the headliner/pillars as part of the interior, the paint bled through the tape in a few spots. Where that happened (mostly around the front windshield), the paint pooled under the tape and ate away some of the plastic, messing up my lines around the window. - The front end refused to properly attach to the body, even using super glue. It took 5-6 attempts to get it to stay, and all the bizarre holding/mashing to get it to hold in place ruined my clear coat on the top of the right front quarter panel. I'll touch it up, but still - The clear I used (Duplicolor, used it lots of times before) suddenly acted strangely. The shine was great, but it cracked in places that made no sense, and it refused to dry. Two weeks after I had cleared, it was still slightly sticky to the touch. I tried to get some wax on to protect it, and the wax left a haze... just stranget - I painted the taillight panel black. That was a 67 thing, not a 68, and wasn't my intention, but my chrome pen bled while doing the taillight trim, and that was the easiest way to clean it up - During the front end debacle, I was holding the front end in place in my lap, and when I brought the car up, a headlight had fallen out. No big deal... I've lost lots of TINY pieces during a build... sometimes it takes a few days, but I always end up finding them. This much larger piece disappeared. I found it a couple days ago after almost 3 weeks missing Anyway, this kit seems nice and fits together mostly very well, but it does show its roots as a diecast. In the end, I was underwhelmed, but that's probably just me. I wired the engine and raised the rear end so it didn't look droopy, and then used the AMT pad-printed Polyglas.. smaller in front, bigger in the rear. I wanted to look a little mean... don't think I got it, but at least I have a non-Shelby Mustang on the shelf. Anyway, on to a few pics: Interior: Engine Done:
-
Beautiful! Looks ready to hop in and drive!
-
Absolutely gorgeous!!!! Amazing job with this, and MAN, I love the 71-72 Road Runners. Getting started on my Revell 71 now. This is a great inspiration!
-
I'm totally digging that red... what paint did you use?