Kmb0319
-
Posts
468 -
Joined
-
Last visited
Content Type
Profiles
Forums
Events
Gallery
Everything posted by Kmb0319
-
Great work so far, Mike!!! I don't want to steal your thread, but other than wheels, we had the same idea... Tamiya TS-54. Good luck with yours... I'll be watching this one for sure!

-
Well, I, for one am really excited about the re-release of the Daytona, as they are getting rarer and more expensive, and were already out of production when I got back into the hobby. The only winged car available when I last built kits was the old Monogram Superbird, and this is a far better kit and my preference for subject. However, from here I would like to see some new stuff. Complete new tool kits are exciting, but just as the Daytona could become a 500 with minimal new parts, they could really up their muscle car game adjusting some of the excellent stuff they have, just like the upcoming 85 442. A few thoughts: 67 Camaro convertible (use the rally wheels from the 67 Chevelle kit) 70 AAR 'Cuda (supposedly coming, but shouldn't take this long) 70-71 Challenger R/T (already have a good 440, just body parts to mold) 67 Foose Coronet can be updated to a 68, with lots of 68 Charger parts 72 442 coupe (preferably non-fastback) 68 or 69 Mustang notchback (kit of each, take your pick) And my ultimate Revell muscle car fantasy: utilize some of the Cuda and 68 - 70 Charger tooling to develop a new, full detail 71 Road Runner/GTX The other thing I've been waiting on SOMEONE to do (Revell, Tamiya, Fujimi) a GOOD, 1/24 scale full detail kit of a Jaguar XK-E (why is that so impossible??) and a BMW 3.0 CS. Tell me those wouldn't sell!!
-

AMT 1971 Dodge Charger R/T Dirty Donny
Kmb0319 replied to Tye Brown's topic in Car Kit News & Reviews
Here's mine... this IS the Dirty Donny kit. -
Just GORGEOUS!!!! Really beautiful work, and I love it without the bumpers and with the Ridge wheels!!
-
JUST BEAUTIFUL!!!!! Really fantastic work and a perfect replica!
-
Ferrari 250 GTO - Fujimi or Revell Germany?
Kmb0319 replied to Kmb0319's topic in Car Kit News & Reviews
So I have started on my Fujimi kit. Working it very slowly and trying to get everything right as well as figure out where I can add details. So far, this Fujimi kit is amazing. Here are a couple pics. Engine Body painted: -
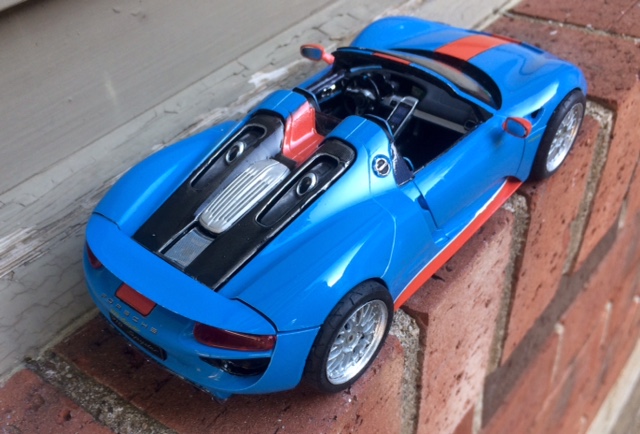
Well, this was a fun project. I like the Porsche 918 a lot, and from what I've seen of builds, it's a really nice kit, but I hadn't been compelled to purchase one. Then, last month, I wanted to get something to build with minimal investment. So, no special paint, and no wired distributor or special tires, etc. KIT ONLY! Without purchasing a distributor to wire it up, it pretty much ruled out a muscle car, but I wanted to have something that would build up into a nice model. The Revell Porsche 918 was sitting on the HL shelf, and certainly had a parts count that would make it a fun project. Besides, I had a beautiful set of Tamiya 20" BBS wheels and tires that I bought for a previous Ferrari kit and ended up not using... the biggest weakness of most of these Revell Germany sports car kits are the wheels and tires are too small, so I had a better option if needed. Once I bought it, I had to figure out what to do with it... using paints I already had. As I researched, I found a couple pictures of a 1:1 918 done up in Gulf Livery... while I kept looking, that one stood out. I had a can of Tamiya French Blue I'd never used, and I had Testors Hemi Orange... they aren't a perfect match, but close enough. I didn't have any Gulf decals, so I decided to do my own version. I used the aformentioned paints for the body, and had a bottle of Testors flat light blue that I could add some edging to the interior trim with. The rest of the interior is a combination of flat black and a Vallejo color called black/grey, and Testors graphite here and there for carbon fiber. I sprayed the chassis with Tamiya gunmetal instead of black to simulate the same, but the front diffuser is graphite. The one detail that was confounding me was the outline for the stripes once I had masked and painted them. I fixed that two ways. For the stripe over the top of the body, I found a set of Chevy SS stripes unused from my 70 Monte Carlo... I carefully measured and snipped segments of the outer SS pin stripe to create the outline. I didn't have enough for the sides, so I found some leftover white pinstriping from the decal sheet for my 1/16 Petty Charger kit. Actually, the colors come off a little more Petty than Gulf... but it was a fun project. Overall, great kit... but these were the worst Revell decals I've ever gotten. Lots of tiny decals on this sheet, but they were awful to work with. Usually Revell decals are great... these wouldn't come off the sheet, and then would stick to the hobby knife, your finger, anything but the surface they were meant for. Even if I got them into their place, as I fiddled with them to get them lined up correctly, they dried up quickly and fluttered off. The dash gauge decals go onto perfectly flat circles.. should have been easy, but refused to lay flat or stick... I had to eventually glue them down. I'm sure I just got a bad sheet, but if you're working with this one, just be aware. Hope you like it... comments always welcome. Interior before installation: And, done:
-
FrankenGoat - making something DECENT out of the MPC 72 GTO
Kmb0319 replied to Kmb0319's topic in WIP: Model Cars
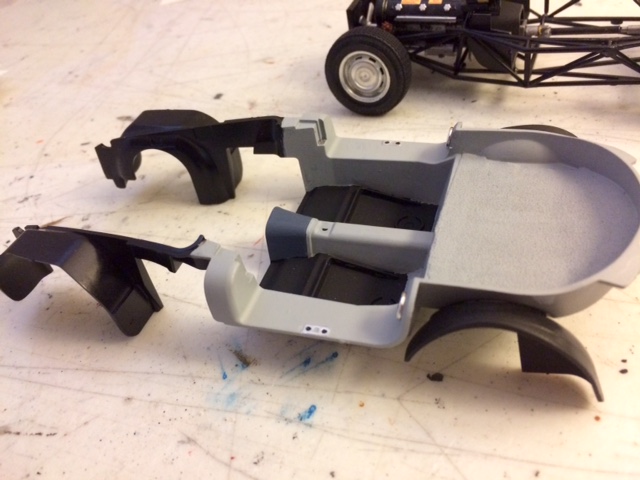
Not much new progress... but a few pics. I've completed the interior, except for maybe a detail here and there. I cut little pieces of screen and glued them on to make the vent on the top of the dash and speaker grills... not perfect, but something. The only thing I might do is paint in the gaps with flat black to give a little more contrast. I see the thread of the left "speaker" popping up... I'll get that glued down. I still have to purchase that Revell 421 engine and the Fireball BFG tires, so I'm at a bit of a standstill, but I did do the same mock-up to see how the trunk gaps and the overall bumper placement look. It's not 100% even... the right side sticks out slightly, while the left is almost totally flush, but I'm actually really happy with the overall fitment. Obviously, the trunk gaps are a little glaring, but outside of spending $70 or more on an older version of a crappy kit so the bumper fits, this isn't too bad. I think if I can really get the engine detailed up, I'll be really happy with it in the end.
-
FrankenGoat - making something DECENT out of the MPC 72 GTO
Kmb0319 replied to Kmb0319's topic in WIP: Model Cars
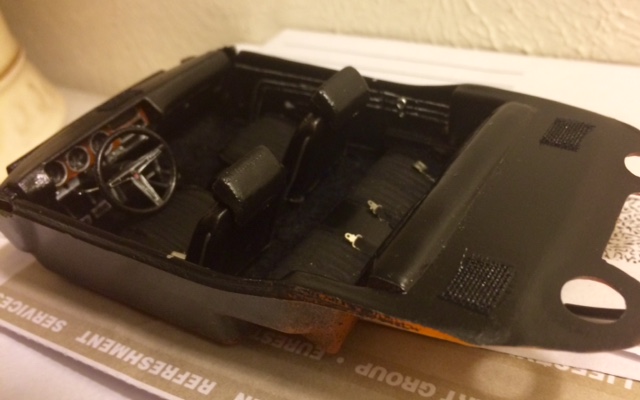
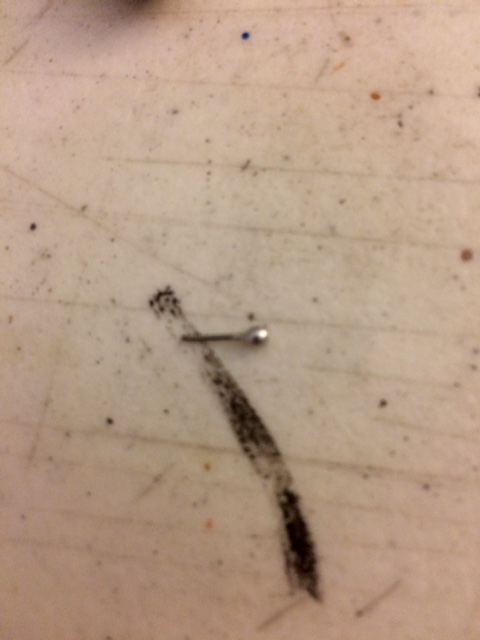
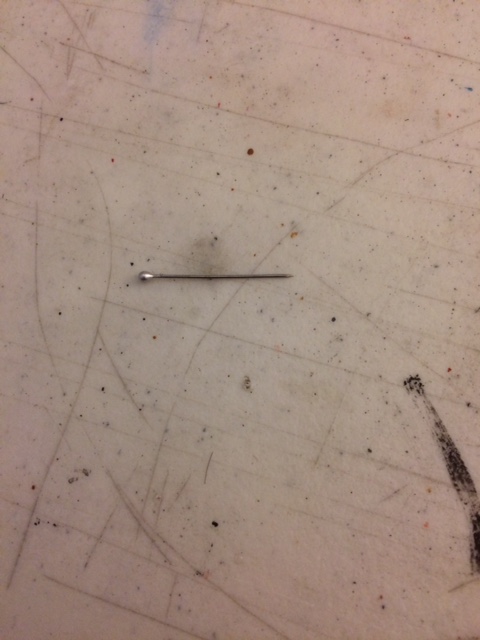
Well, I was travelling for work from Sun-Friday of this past week, so I didn't have a chance to do much, but when I got home, I took on a couple more tasks, including the "make or break" of this build. First, I got my seatbelts painted and installed the headrests on my front seats, and found a better shifter in my parts box to install. I was going to get the whole interior together, but then looked at my steering wheel, and wanted to add a critical detail that this kit doesn't include; the turn signal stalk. It wasn't the greatest fix, but when I looked at reference pics, the 72 GTO had a fatter handle at the end of the stalk... it almost looked like a shift knob. The night before I left town, I bought a dress shirt on sale... which, of course, was filled with pins. So, I took one of the pins and chopped it down... And viola! Instant turn signal stalk! I painted it after I took the picture. Then, I finally decided to try the rear bumper. I glued the right side of the bumper in first, and let that dry. Then I stretched the left side out and glued it. I still need to run a little glue across the trunk so that it stays in contact with the bumper and solidifies the whole assembly. The gaps are a little scary looking, but it won't be too terrible when the body and frame are joined and there's darkness in those spaces. It's a little uneven, but it looks better and it didn't cost me $65 or more to fix it. Unfortunately, I did end up getting a glop of glue on my trunk, and more ran out of the left side of the bumper onto the rear fender. I wiped it away on the fender, leaving a dull spot that I can get some more clear over, but didn't see the trunk, so I think I'm just stuck with the blemish. I will get the interior together and post that. Then I've got to order the Revell Pontiac engine and probably some of the BFG Radial T/As from Fireball Modelworks. When I used those once before, the opening in the center of the tire was slightly larger... I wanted to use them on my Revell 72 442, but the wheels just fell through the opening, so I had to use the AMT Goodyear Polyglas GTs that are on this. But on this kit, my aftermarket Pontiac wheels are a little bigger than the wheel opening, so the lip doesn't "set" down into the tire. I think the Radial T/As would allow the wheel to sit more flush and look better. More to come.
-
FrankenGoat - making something DECENT out of the MPC 72 GTO
Kmb0319 replied to Kmb0319's topic in WIP: Model Cars
Here is the cement I'm using:
-
BEAUTIFUL job, Randy!! All of your work is top notch, but you've outdone yourself here. It's just perfect!
-
FrankenGoat - making something DECENT out of the MPC 72 GTO
Kmb0319 replied to Kmb0319's topic in WIP: Model Cars
just Testors clear cement... I use it on glass, body trim, and to make gauges and headlights on those AMT/MPC kits that just have them molded in... like this one, actually. ? -
FrankenGoat - making something DECENT out of the MPC 72 GTO
Kmb0319 replied to Kmb0319's topic in WIP: Model Cars
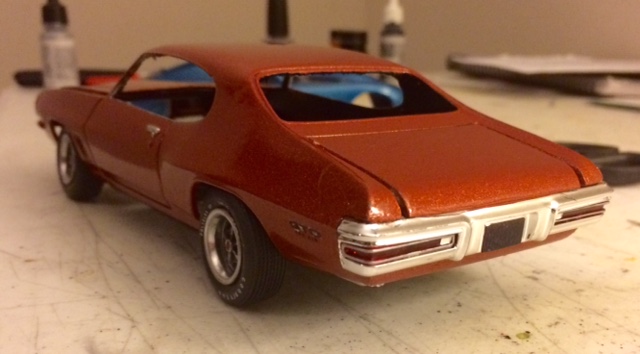
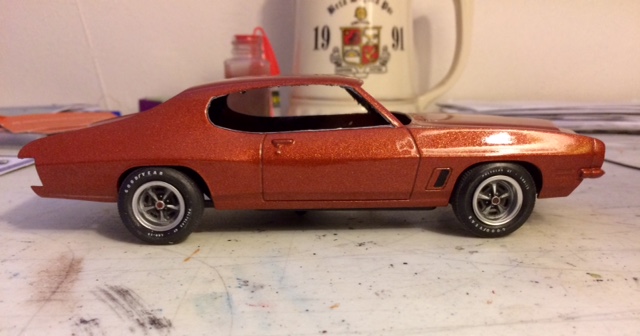
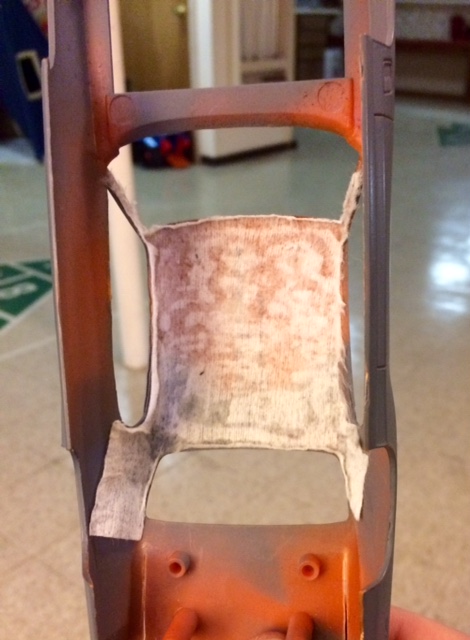
Well, this has been sitting for a few months, but I got back on it last week and accomplished a little. I still have to purchase one of the Revell parts pack engines and probably some photo-etched interior details, but I got a few key things accomplished: This is a total experiment, but I thought I'd try. I glued a baby wipe into the roof to make a headliner, then trimmed around the edges: It's not perfectly clean, but my blade isn't sharp enough. For the bumper, I decided to try to the cut-the-trunk method. It will look a little wonky in the end, but the 70 GTO kits are getting really hard to find, and the cheapest I've seen is $65. So, I'll try this: Got the tailight trim painted and the lights installed, just need to paint the license plate frame and I can try to make it fit. Next, seatbelts. Rather than use the fabric belts, which are too wide for the openings in the photo-etched buckles, I cut some masking tape down, so I can run them through and fold over to actually have the buckles/clasps properly attached. Then I glue them down and paint the tape. Attached: And painted: Finally, I needed get paint on. I used Testors Fiery Orange Metallic one-coat lacquer... 3 coats. After wet sanding and compounding, I used the Mr. Hobby clear glaze... 3 coats again. I like the finish: Then I painted in the side vents and did the wash in the panel lines. This is the easiest kit I've ever done those on, as the lines are quite promient Finally, stuck the chassis and interior bucket into the body and put two of my wheels on to get a test stance: Lots more to do, but I'm glad to have finally made a little more progress.
-
Wow, that's nice.... awesome work!!!
-
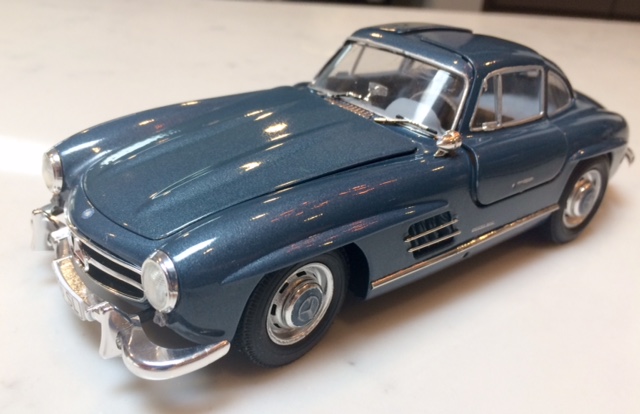
Tamiya Mercedes 300SL Gullwing - B396 Blue - A Holy Grail build
Kmb0319 posted a topic in Model Cars
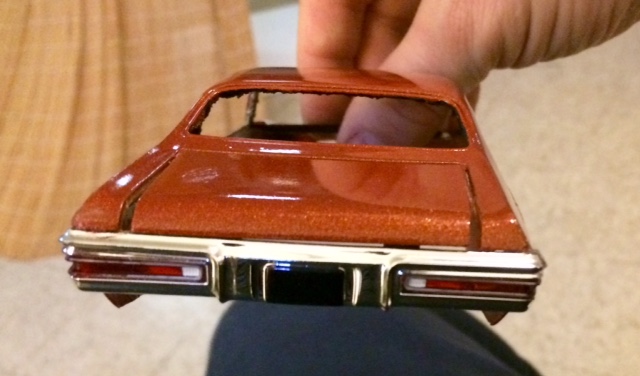
So, I had this kit sitting on my shelf for 7 months, and actually bought it two months before that, but a relocation left me without a shelf to put it on. I painted and cleared the body back in July, but then it sat there until late in February, when I couldn't wait any longer. This is one of my Holy Grail kits that I've always wanted to build, so I was excited to get started. Unfortunately, I had a big issue right off the bat... I had set the body back in the box after finishing my paint job, and hadn't done anything with it since, but when I opened the box to start on it, the right A-pillar was broken, and had apparently twisted somehow as it broke out. I got it back in place, but it wasn't straight, which caused an issue with the right door fitting properly. This is a fantastic kit... I built it mostly box stock, but added a couple little details here and there: Wired the distributor... sort of. The spark plug wires go right into an intake tube, and the kit part isn't hollow and has the wires molded coming out of the bottom. The only space is a very short spot between the tube and the top of the distributor where the wires come together into the tube. I took six pieces of spark plug wire, twisted them together and put a drop of super glue on them. Once dry, I cut them off to make a 1/8 inch bundle. I glued the bundled end to the intake tube, and pulled the other ends apart and moved them toward the distributor. They don't even touch it, but the intake tube is highly visible, and looks empty with no wires, so it was a simple fix Ran a wire from the starter into the other end of the intake tube Created a radio from a part number tab from a sprue, two little part tabs, some paint and a decal. To give the area behind the front seats a little more realism, I cut a piece of sandpaper to shape and glued it in, then painted over it The car I patterned mine after had a beautiful light gray interior with navy piping. I just hand painted an edge on the seats to replicate that That's pretty much it... just a few little touches. I did have one other odd issue. My hood won't close all the way. I cut one of the "hinge" tabs off to try and relieve the pressure, and it improved, but still not sitting flush. Between that and my wonky door from the A-pillar, it's less perfect than hoped, but still a great model. The paint, BTW, is from Automotive Touchup, and is an actual factory color on this car... B396 Blue. On to the pics. First, the space frame/chassis... really cool! Interior completed: And all together: I was hoping for sun... it's been raining for a week straight. Bright cloudy was the best outside pic I could get:
-
Tamiya Mercedes 300SL Gullwing - B396 Blue - A Holy Grail build
Kmb0319 replied to Kmb0319's topic in WIP: Model Cars
Thanks, Ron!! I can't wait to see what you do with yours!!! -
Tamiya Mercedes 300SL Gullwing - B396 Blue - A Holy Grail build
Kmb0319 replied to Kmb0319's topic in WIP: Model Cars
Hey Skip! It's actually finished! I had been waiting for some better weather... today was still cloudy, but at least it was brighter and not actually raining so I could get a few pics. I'll get it posted either tonight or tomorrow morning... if it's sunny, I might get a couple more pics. -
Tamiya Mercedes 300SL Gullwing - B396 Blue - A Holy Grail build
Kmb0319 replied to Kmb0319's topic in WIP: Model Cars
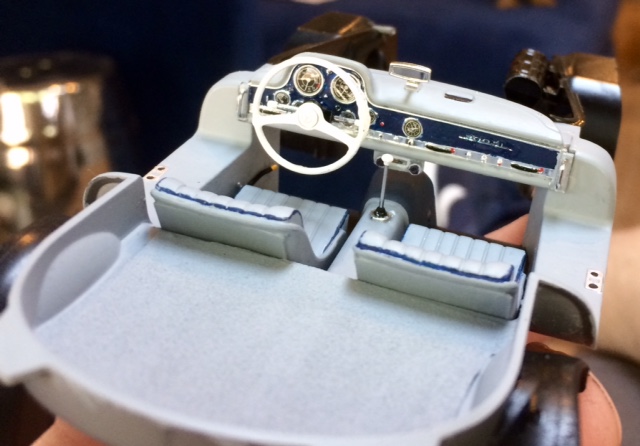
Well, I was out of town over the weekend, but got a few more things done before I left. Most of them were small details, but she's getting into final assembly. I'm going to look into the luggage set this week and see what I end up doing, but this is the latest. I got the metal transfer stickers and applied them. They are GORGEOUS, but a little fiddly. It's tough to get them completely straight.. they have a backing that you remove and they are stuck to a clear top layer... you press them into their place, and peel the top clear layer back. You have to really press them in to keep them from sticking to and peeling off with the top layer. For the most part, it was successful, but the 300SL emblem for the dash would NOT stick to the dash at all. I finally peeled it off of the clear plastic top, and tried to apply some clear glue with a toothpick, but the glue caused the paint on the dash to liquidize in that area, and the edges of the metal transfer scraped it up as i tried to apply. I touched it up as best I could, but some of the blue spilled onto the transfer. It was probably just my sheet... the corner that the dash emblem was on was peeled up when I took it out of the bag, so the adhesive was probably dried out. When you do get them in place correctly, they look fantastic: And, despite the emblem issues, the interior looks great... just would've been better if the emblem was clean: Then, I had a few final parts/details on the chassis. I added the final pieces to the engine, and created two myself. One was the ignition wire running from the starter, and the other was this: I'm not sure what that hose is between the silver caps, but it wasn't in the kit... felt it was prominent enough to be replicated. I just grabbed a spare piece of hose and another little tab from a part. It's a little too big, but at least it's there. So my chassis and interior are done... moving into final assemby.
-
Tamiya Mercedes 300SL Gullwing - B396 Blue - A Holy Grail build
Kmb0319 replied to Kmb0319's topic in WIP: Model Cars
For how good this kit is, the injection tubes, radio and the luggage were big mistakes to me. Everything about this kit is beautifully designed and executed... it wouldn't have taken much to include them. Heading out of town for the weekend, but got my interior completed yesterday. I'll post pics when I get home -
Tamiya Mercedes 300SL Gullwing - B396 Blue - A Holy Grail build
Kmb0319 replied to Kmb0319's topic in WIP: Model Cars
WOW, that's beautiful... but they all are. Thanks for the tip! I think the luggage set is worth investing in... especially if it has the rails. SO, I made some progress today on some of the issues. Keep in mind, I wouldn't call my solutions great, but more like low-budget, low effort work-arounds. First, seat backs. This one was quick and easy. I had a business card of a potential client who didn't call me back sitting on my desk, so I cut his business card up and stuck the pieces across the back of the seat: Then painted... one sitting in place: Hubcaps: I've been stressed about these since I bought the thing. How am I going to mask the outer ring and spray B396 blue??? Well, I didn't... I sprayed B396 blue into the lid of the 396 blue can, grabbed a detail brush, and did my best to hand paint in a circle. Then I put a quick clearcoat on them, added the center symbol decals and a shot of decal bonder spray. I might add another clear coat in a few days, but it wasn't terribly painful to do! And, finally, the radio dilemma. I wanted something to fix this omission in the kit, but as simply as possible. This isn't very correct looking, but it's something. I cut off a part number tab from a sprue as my radio. Then, on the clear sprue, I cut a couple of the little tabs off the windows: I glued the part number tab to the bottom of the dash and made a silver rectangle (or a facsimile thereof) in the middle. I glued the little tabs on either side, as these are my dials. Finally, I took a small decal of a dash screen from a Ferrari, cut it down to size, and placed it in the center to be the radio face. It's as amateurish and incorrect looking as can be, but it's better than having speakers and no radio: I will look at the luggage set... that may be in order for this. Maybe I'll build this one with the luggage set, and then build a second one with the Rudge wheels as more of a sports racer... that would be my justification to build this incredible kit again!!!
-
Tamiya Mercedes 300SL Gullwing - B396 Blue - A Holy Grail build
Kmb0319 replied to Kmb0319's topic in WIP: Model Cars
I agree with the lack of seat backs... a very odd omission for such a great kit. I don't have any sheet styrene, but I'll look and see if I have something to fit them or I suppose I could putty the tops of them to the package shelf level. The radio is also a strange omission, said the lack of luggage for the rear. I know there are a couple resin versions out there, but I haven't found where they are available. If it's reasonable, I might purchase them if I can find them. -
I posted last summer about finding the paint I wanted for this build, then found it on AutomotiveTouchup.com and posted my painted body. I bought the kit back in May, and couldn't wait to get started, especially once the color was on. But, as one of my Holy Grail kits, I've been saving it. The body was painted in July, and it's been sitting ever since. Last week I finally got going with it. WHAT A KIT!!!!! Just superb. I haven't added a thing, although I some wires in the engine might be necessary. The instructions begin with assembling the space frame. I didn't paint it, as the black plastic has the right finish to me, but found little areas to paint in detail. I then took my painted body, and filled in all the black edging around the door frames and hood. I did have a tragedy that is fixed, but not very well... the right A-Pillar broke, and in doing so, was twisted, apparently. I was able to glue it back in, but it's not straight. I went ahead and detailed my front windshield trim and installed the glass to support the broken piece. It left a less-than-ideal fit with a big gap, but there wasn't much I could do, and needed to have the clearance for the gullwing door. Very unfortunate, as I really wanted to make this one as perfect as possible. Test fitting the frame into the painted body: Then added the wheels The space frame fits together beautifully, but be careful... I put one crossmember in backwards, and because I used super glue to strengthen these fragile little pieces, I couldn't separate them. I had to heat and bend all the bars back in the proper direction and attach to the upper frame rails. Then I moved to the engine, which again is a very nice piece right out of the box: The lack of spark plug wires bothers me, but the tube they insert into is not actually a tube. I might take six pieces of wire and twist them together, then glue one twisted end to the intake tube piece and try to separate the other end enough to get close to the distributor points, but the distance is so small, I don't know if it will work. I also see a couple touch-up spots. Touched up, and got the engine in the chassis... still working on my wire idea. for the interior and engine compartment, I painted everything. I was possibly going to flock the interior, but the carpet in the 1:1 reference pics seemed too fine to use the fuzz. In the end, I left the floor as painted plastic, but cut a piece of sandpaper and glued it into the hatch area and painted it to give a little texture to that space. I wish my cut had been a little sharper, but it's an improvement overall. Next, the instructions take you to the firewall/interior bulkhead, which I painted, decaled and installed, along with the radiator and sway bar. With that, I only have a few pieces to have the chassis complete. I'm now working on my interior. The car I chose from my reference pics had piping on the seats. I did my best to hand paint some in... still need to do a little more touch-up, but it's getting close: Then moved to my dashboard, and chickened out a little. I didn't have a good way to use the body color on the dash, but figured I could use the darker blue that I used for the seat piping on the front panel, then installed decals. I'll use some clear glue to seal the gauges and still need to add the chrome emblem sticker and touch some color to some of the dash buttons and knobs, but it's looking good so far. Lots more to do, but this kit looks great and just falls together beautifully. The A-pillar will bother me when it's done, though... maybe I have to do another. More to come.
-
Bogger, that is just gorgeous!!! I'm waiting for Revell to re-release this kit, as I want to build one. This is another reason I can't wait to see what you do with the 68 Charger! Great work!
-
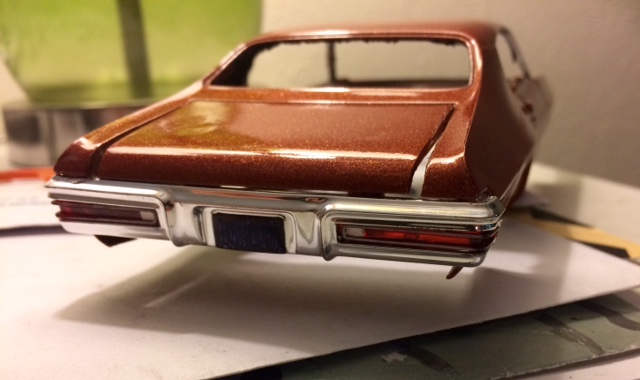
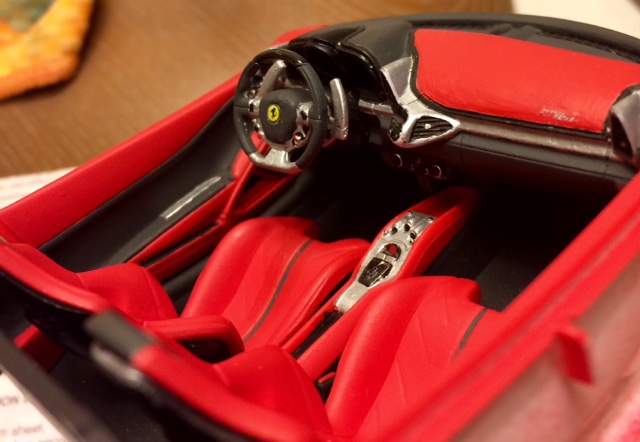
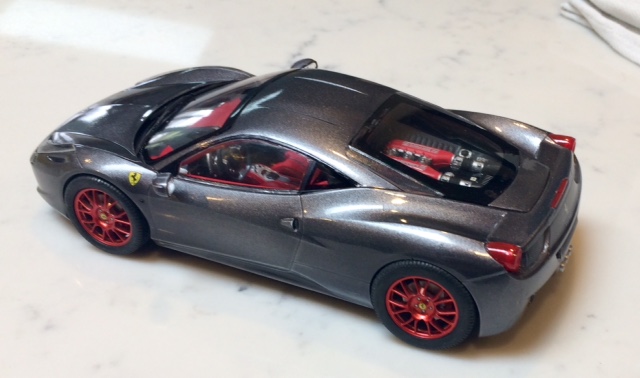
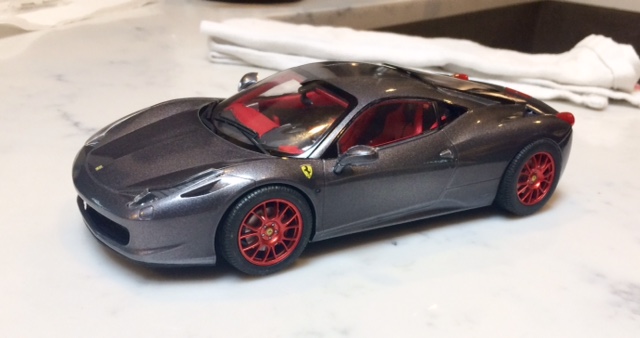
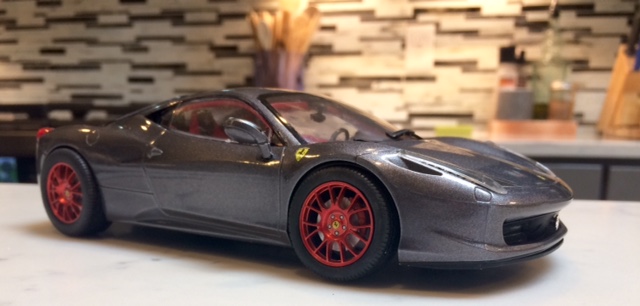
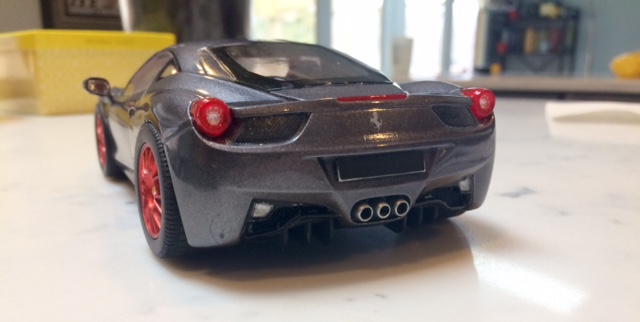
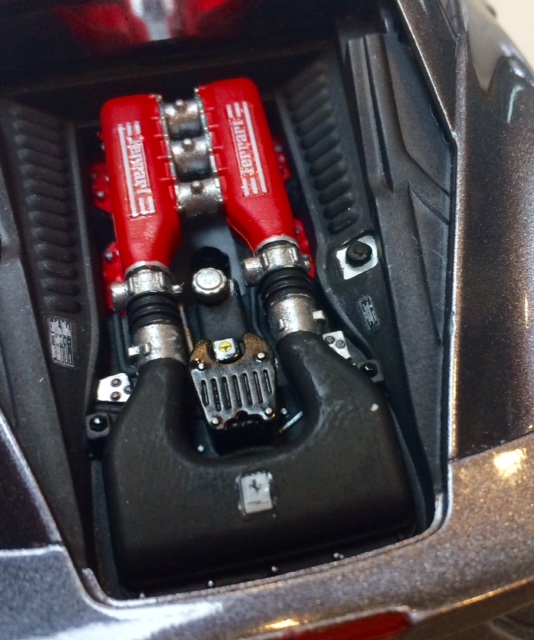
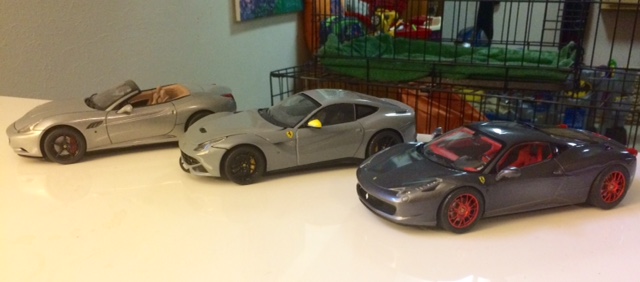
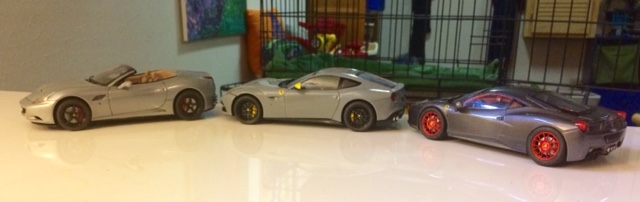
When we got moved into the house this past summer and I was able to get building again, I thought this would be one of the first ones I completed. I did a lot of research and had my exterior/wheels and engine painting sorted out, just needed to get a plan on my interior. I painted, cleared and polished the body, and did some of the basic metal and flat black component spray painting, but then I got into other projects and completely forgot about this one. At one point, I literally forgot it was in my stash, as it was in a separate place from the rest of the kits. So, after finishing my two sets of doubles, I pulled this out and decided to throw it together. The only variation from the kit parts were wheels and brakes. The Fujimi 19" BBS wheels were not going to work with the Revell brake/wheel mounts, so I found some brakes in the parts box that had an open center that would fit around the wheel shaft, then just superglued the wheel to the mounting pin. Not perfect, especially since those brakes are too small, but at least there's something in there. Other than that, it's box stock. I used Tamiya Gunmetal for the body and Duplicolor Anodized Red on the wheels. Inside, the base is Testors flat red with a mix of flat black, gray/black, steel and semi gloss black. Once I got my idea of what I wanted the interior to look like, it was a quick build. This is my third ROG modern supercar, having completed the Ferrari California and Audi R8. The simplified chassis on these Revell Germany kits is a little boring, but the engines, while hidden, are nicely molded, and the interiors are great. They make nice models when completed. With this build, I also completed a theme I had when I started this stash. There were 3 modern Ferrari kits in the group, and I wanted to have a cohesiveness to the builds. I'm not a big fan of red cars anyway, but especially when they are "supposed" to be red. As I researched, while different colors stood out on each car, the color that consistently was in my favorite pics of each model was gray. So that became my theme... use different versions of gray as the exterior for each. So, I guess I've got 50 Shades of Gray, just a much cleaner version. This build. Interior: Engine (what you see) Done Still have to decide on a license plate: And the Gang Gray:
-
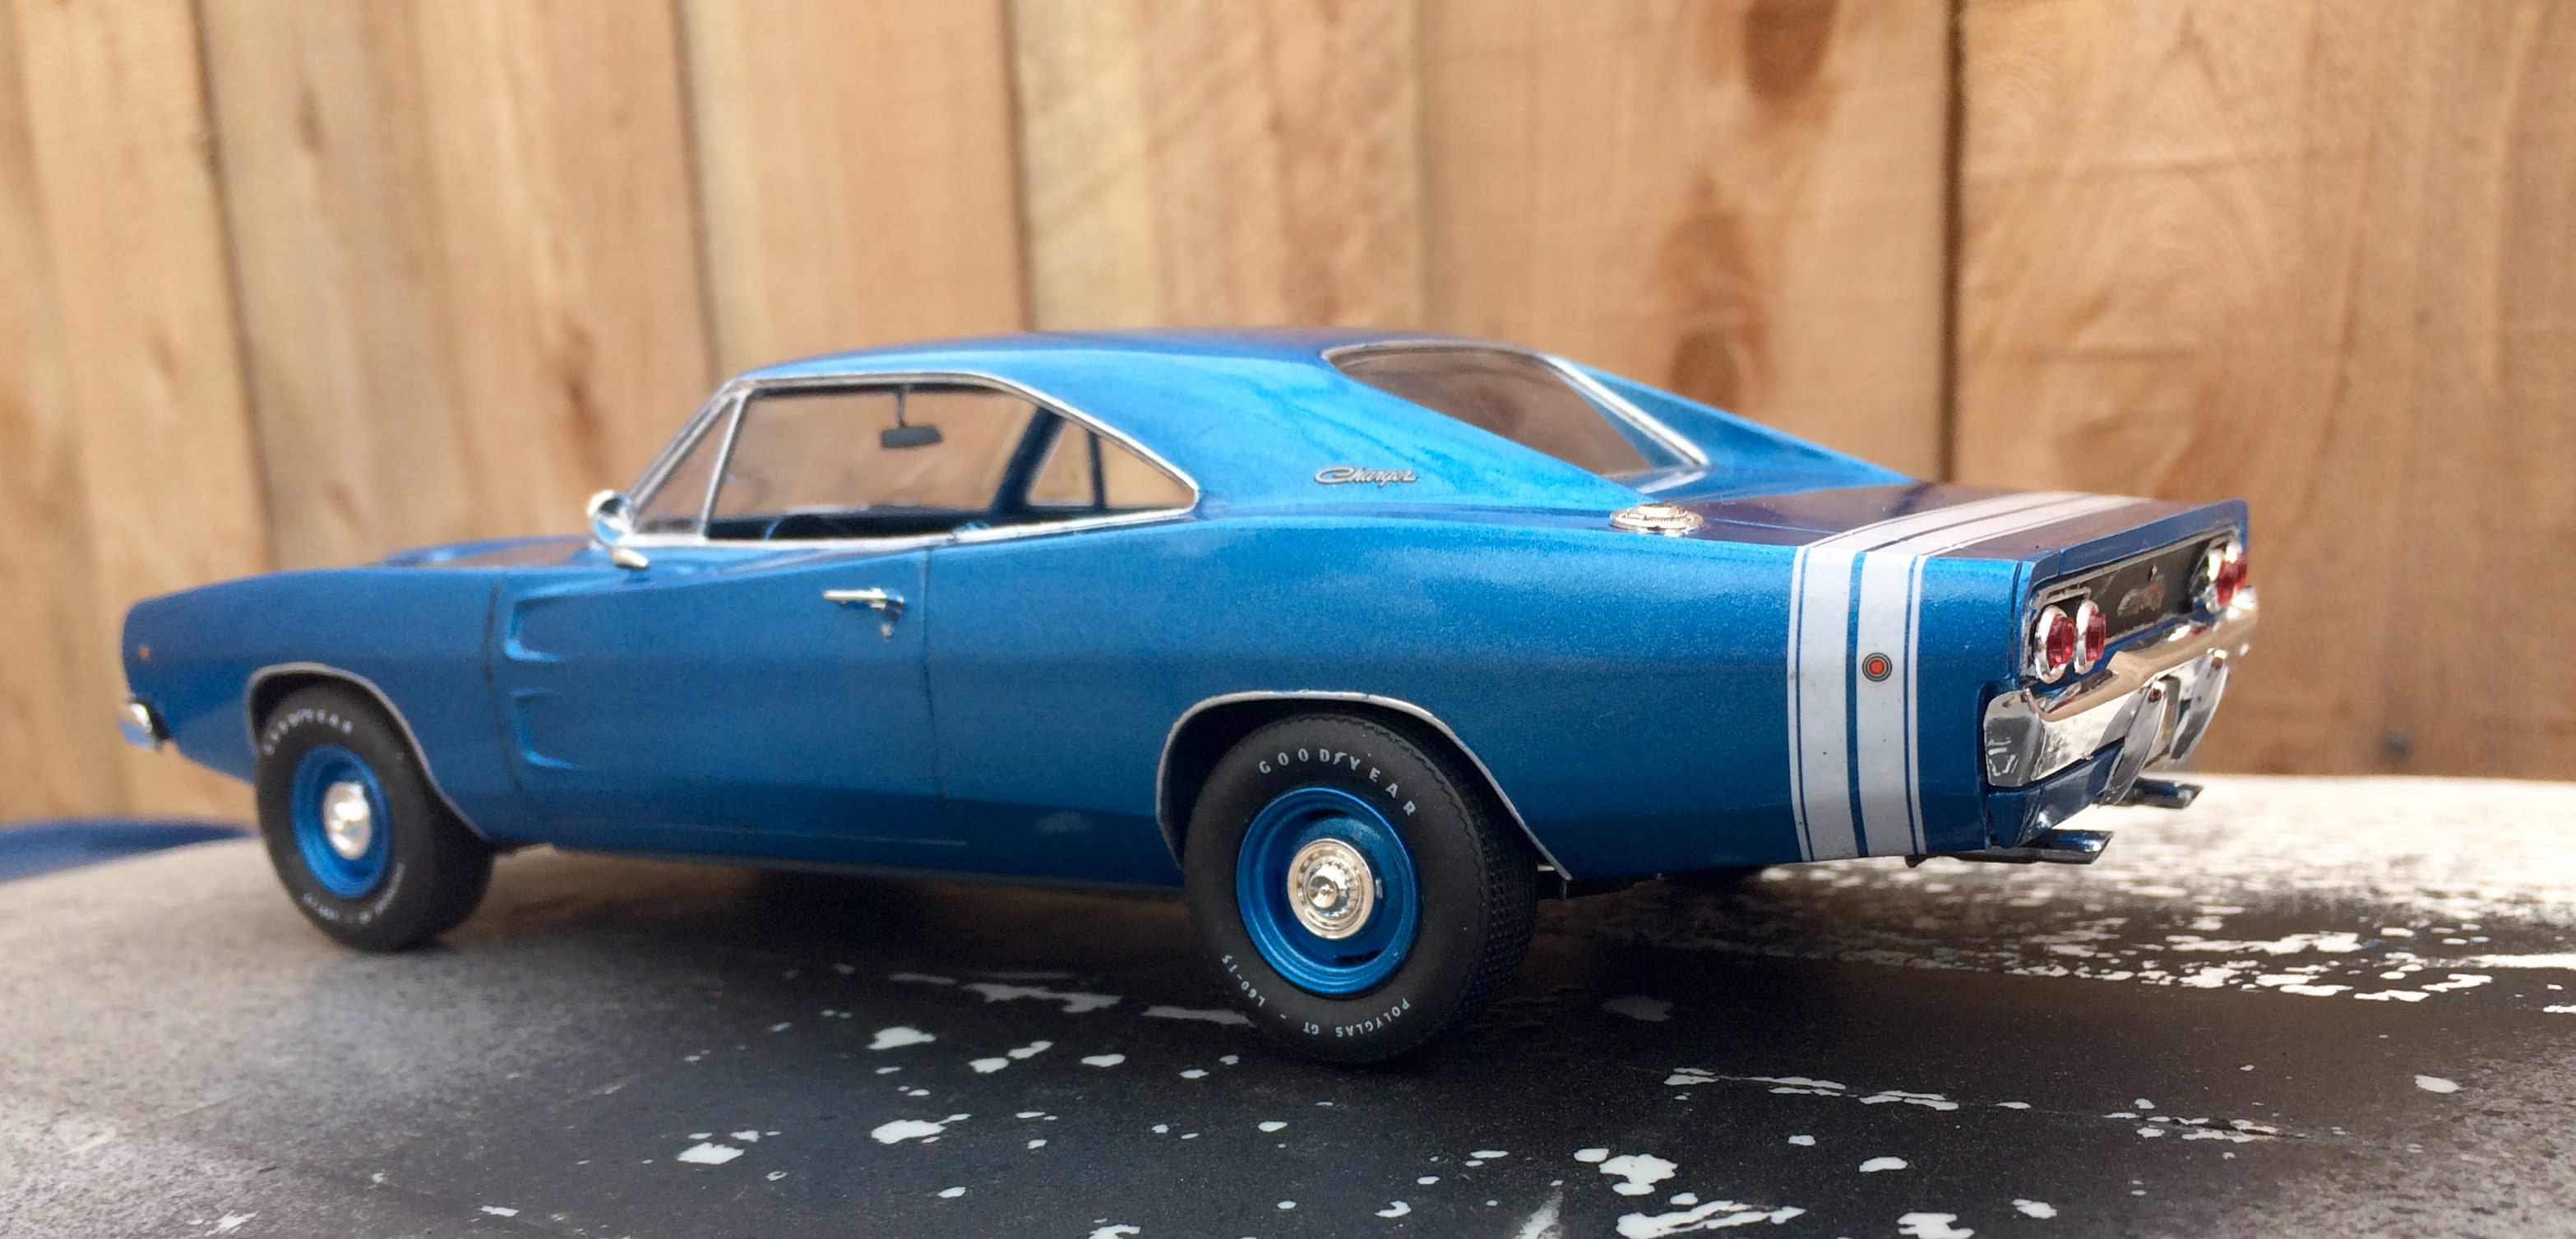
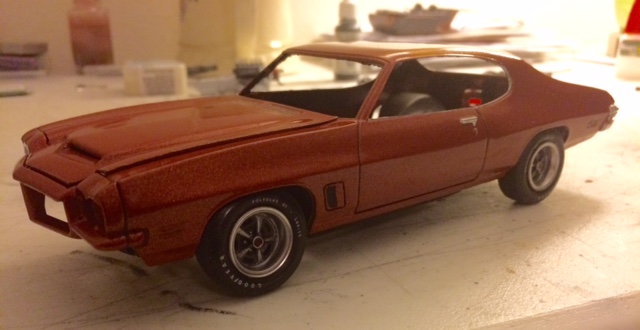
Dual 68 Chargers - new/rebuild - the adventures of Bronzie and Bluebell
Kmb0319 replied to Kmb0319's topic in Model Cars
Thank you! The bronze car was lowered when I built it originally. On the redo, I didn't really touch the chassis other than replacing the engine. When I started the blue one, I built the front suspension first. I test-fitted the body to the chassis, and my stance was great IF the frame touched the inner fender when it was done. That has been a problem... getting the body and frame to end up touching after have everything assembled. This time, finally, I got them to meet, so no lowering was required.