Ferbz
-
Posts
508 -
Joined
-
Last visited
Content Type
Profiles
Forums
Events
Gallery
Everything posted by Ferbz
-
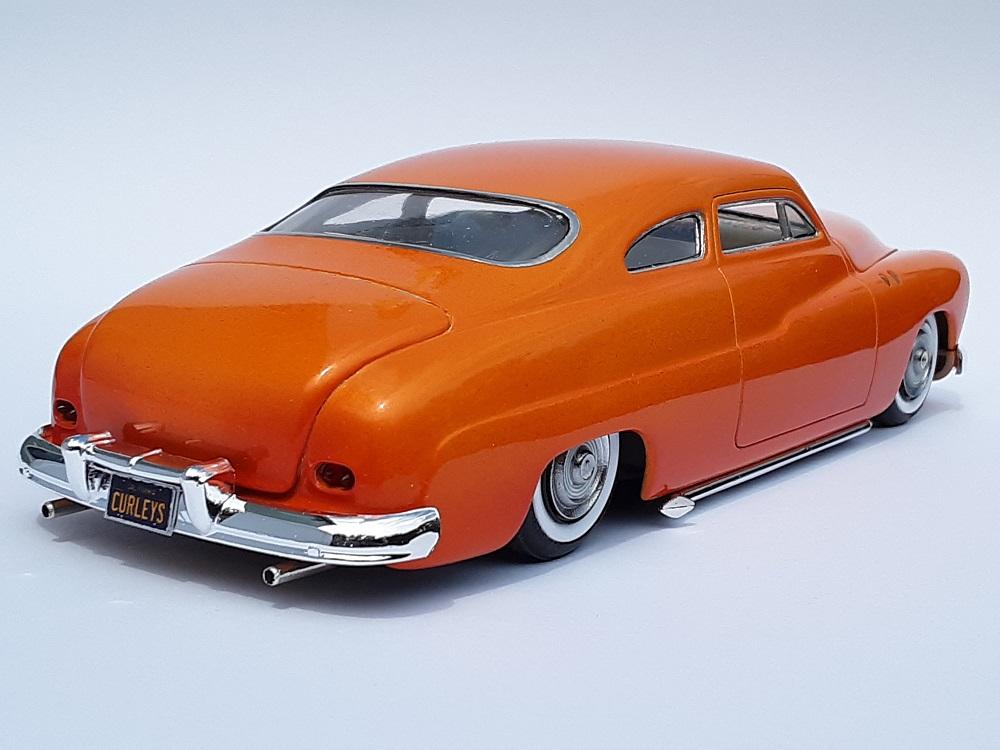
Thanks! Yeah, the real car had one of the most beautiful Candy Tangerine paint jobs I've ever seen ?
-
Thanks man! I learned alot doing this build, particularly the fact that scale tribute copies are tough to do! There's alot of pressure to get the details as accurate as possible lol I did this build solely for myself though, so I only needed to get it as 'right' as I could for my personal satisfaction. It's not entirely accurate, but it's close enough ?
-
lol Thanks man!
-
Thanks so much! Kustoms are king!
-
Thank you very much!
-
Thanks! It doesn't quite 'glow' like the real one did, but it still stands out I think ?
-
We have an older inkjet Pixma MX472 but it worked out fine. I used Micro-Mark clear decal sheet which came with instructions. One step I learned from the instructions was to absolutely spray the printed decal with some kind of clear (I used artist Spray Fixative) to protect it before setting it in water to apply it. If you dont, the print will dissolve and disappear in the water! One tip I'll add is to make sure you work in the right scale in photoshop (or whatever graphic program you'll be using) and make sure your file resolution is set high (300dpi). Print out test(s) using regular paper first to double check size and color before you print using a decal sheet. Do some research then give it a try!
-
Guys, I've officially finished this build! Here's a link to where I've posted some pics of the results:
-
Thanks! It's my first time printing out my own decal which is something I've always wanted to try ?
-
Thanks! The 50 Merc dash from Replicas and Miniatures is such a great piece! It even came with the knobs and a print out of the instrument panel ?
-
Thanks! It's something I dont usually do....but I decided on it this time lol
-
After working on this thing off and on for 5+yrs, this scale copy of Curley's old Merc is finally done! It's been a rocky road with a botched paintjob strip and bodywork redo along the way, but overall I'm glad to have it wrapped up ? Here's the link to the progress page where I've described how I started with an AMT 49 Merc kit and proceeded to cut it up, and another link to a WIP page where I show how I did some of the custom work as well as some detail tricks I learned along the way: With all of it's imperfections and hiccups, this build is my best effort at making a model of one of my favorite all time 1:1 custom Mercs......I hope y'all like it!

- 40 replies
-
- 15
-

-
Nice line up! Q: At what point do you use the Meguier's ScratchX? After the Novus No.2?
-
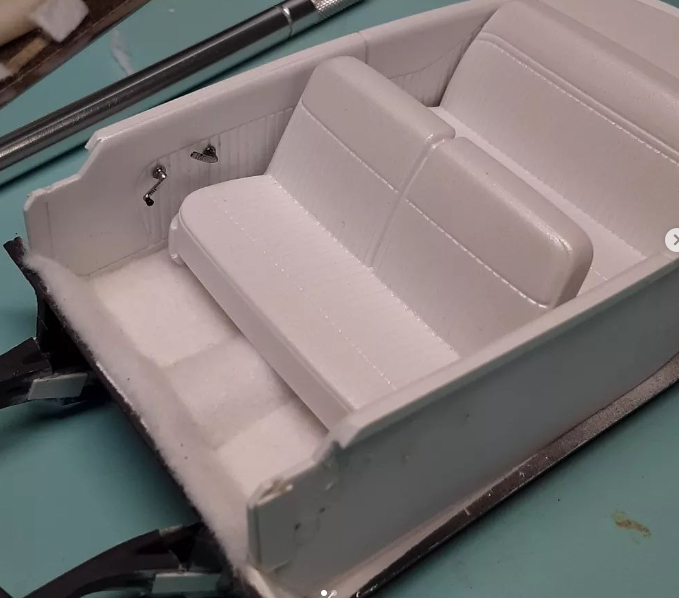
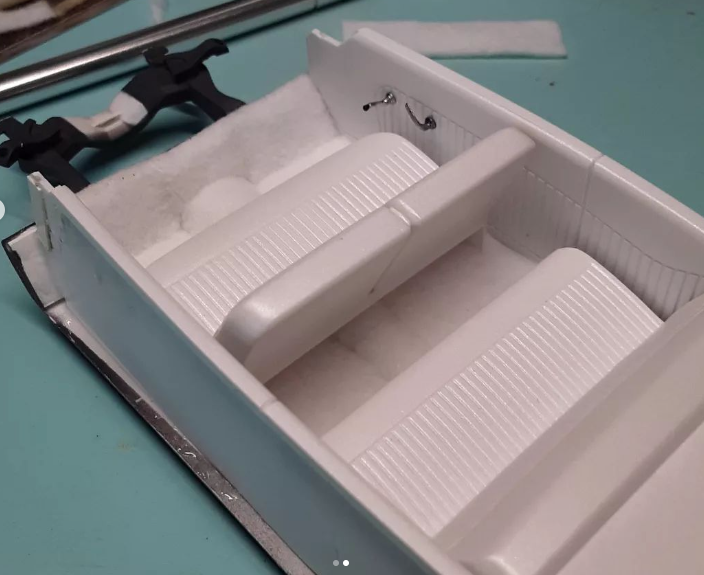
Some progress shots of the interior work: R & M's resin 50 Merc dash was paint detailed using white pearl and Alclad chrome, and some of the same candy tangerine used on the body of the car. I replicated Rod Powell's trippy airbrush work in Photoshop(it's not exact but it gives the right impression!) and printed out a decal of it and applied it to the top surface of the dash then cleared it. The steering wheel is a parts box item that I modified to make it a 50 Merc wheel. The bullet in the center is a drop of 2 part epoxy that was detailed with a Molotow chrome pen. The horn ring is a length of metal wire that I shaped and also applied Molotow Chrome to it. I made the instrument panel window by cutting/shaping a piece of thin clear plastic. It's the same clear sheet plastic that I use for all the flat glass windows. Much of this is tough to see once it gets installed in the car so I thought I'd share pics of it before it went in! I decided to use the Revell tuck and roll interior for this build, but it required some problem solving to get it to work. The Revell 49 Merc kit is VERY different from the AMT 49 Merc kit in many respects, but I did like how the interior panels are angled out down to the sides(which is more realistic) as opposed to the door panel sides in the AMT kit's interior tub. Those angle inward at the bottom. I cut away everything except the floor of the AMT kit, glued it to the chassis, and added some sheet styrene to the sides of the floor widening it so that I could properly glue down the door panels at their respective angles. I had to add some sheet styrene to the front of the kick panel areas so they meet the AMT firewall. Curley's 1:1 car had thick white carpet which I replicated using felt material. The seats and door panels were painted the same white pearl as the dash/steering wheel but coated with a satin clear. The 50 Merc door handles and window cranks are resin pieces from Steve Boutte (thanks again, Steve!) which add a nice touch of realism. After these pics were taken, (and before I assembled the interior/chassis with the body) I scratch built the floor shifter and boot and glued in place on the top of the driveshaft tunnel in front of the front seat. I'll try and get a decent pic of that if I can:
-
Thanks! It's been a long road getting this build to the finish line, but it's finally getting close! I'll post a couple more progress pics here and then try to take some nice pics and post them in the completed channel ?
-
Thanks man! I'm glad it brings back memories like that for you! It has been one of my all time favorite cars ever since I first saw it in the early 80s(I have a cool story about that actually!). Yeah man, feel free to grab and post what you like. Just be sure to tag me when you do! ?
-
Thanks! Sounds like you were around back when customs were king! The real car (built back in the late 70s) in my mind helped bring the popularity of chopped mercs back in car culture ?
-
Thank you! I'm getting close to finally wrapping up this build. It's been a long 5+yrs since I've started lol
-
Thanks man! The real car has been one of my all time favorite Mercs ?
-
Thank you! It's not exact, but it's my best effort at copying as many of the details from the real car as possible. I'll be posting the progress as I approach the finish line.....it's getting close! ?
-
Thanks! Yeah I'd like to think and hope he would be ? I'm in touch with Rod Powell and he's helped me along the way with paint info and various details I dont recall when i saw the car in person back in the day. He's appreciating the progress of this project which is a huge compliment to me ?
-
Thank you! I'm discovering over the years that my model building skills jump ahead quite a bit when I'm merely able to solve 'weird' problems with 'weird' solutions lol
-
Chopped/channeled 50 Ford Custom Pickup
Ferbz replied to Ferbz's topic in Model Trucks: Pickups, Vans, SUVs, Light Commercial
Thanks! Yeah, in my eyes this truck's factory design was a custom challenge begging to go 'under the knife'. It was a great design exercise for me ? -
Chopped/channeled 50 Ford Custom Pickup
Ferbz replied to Ferbz's topic in Model Trucks: Pickups, Vans, SUVs, Light Commercial
Thanks! This is a 'curbside' build which has no engine or chassis detail. I imagine it would have an updated and dressed up period correct OHV motor, like an early cadillac or Buick nailhead ? I dont have any good interior pics. I may try to take some and if i do, I'll post them here and try to tag you ? -
Another update for the front end is the grill area: I made the background from railroad brass mesh spray painted flat black and backed up behind it with a sheet of styrene painted dark gray. The original 1:1 car used a 63-64 Buick grill bar and bottom valance piece. I could have built the grill bar from scratch with dicey results...lol but instead I wracked my brain for a bit trying to think of something to at least start with. I finally recalled that the Chrysler grill piece from the old AMT parts pack had a center bar and central cylinder in it that looked very similar to the Buick piece I needed. I cut it out what I needed from it and drilled out the center cylinder. I found a suitable bullet that was a clear red tail light and glued it into place. Some prepping and gloss black paint followed by Alclad chrome finished up the grill bar. The bottom valance piece was scratch built from sheet styrene sheet cut to shape and grooved thin aluminum sheet also cut to shape and then glued onto the styrene piece. The complete unit was then covered in BMF. Everything was mounted and glued into place. It's not exact, but it's close enough in my eyes to give the right impression!