
Brendan
-
Posts
1,058 -
Joined
-
Last visited
Content Type
Profiles
Forums
Events
Gallery
Everything posted by Brendan
-
Thanks for the comments. Definitely would build this kit again if there were some after market decals and P/E for it.
-
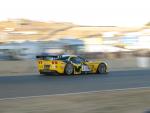
This is an old Scale Productions kit of one of my favorite modern GT1 cars. If I could find a long nose version of this car, I would do the Visteon version. I used to watch this car race at Laguna Seca. The car had two nicknames...The Batmobile and Rolling Thunder since the car would shake the ground as it went by. Paints used were Tamiya's TS-29 and TS-26 for the body and TS-49 for the wing end plates(airbrushed). For the rims I used Alclad Polished Aluminum with TS-38 for the wheel nuts and a Future Clear coat. To touch up the decals, I used TS-30, TS-44, TS-35 and TS-49. The decals were very old and very brittle. Added interior boxes and wiring. Also added an air inlet restrictor as well as an antenna. Everything else was from the kit. Very nice kit overall, though some window fit issues. Feel free to comment.
-
Outstanding job. Love the engine detail you did. I've done two of these kits and mine don't even come close to yours.
-
Thanks for everyone's comments. Yeh, these cars are so aero-dependent that during the race if they get damaged, they lose a lot of downforce and drop off the pace of the rest of the cars. I did have some fit issues with the little winglets inside the back wheel arches. If I did this kit again, I would put them together before I painted them.
-
Next time you see this kit, it should be in the Underglass section. Had some small issues with the window decal as it completely disintegrated in the water. Need to look through my spare decals to find a suitable replacement. Not much left to do except for getting on the tires, rear diffuser and side skirts as well as attaching the wing. Got the windows in as well as the heat shielding for the exhaust and the side pipes. If you notice, in the middle scoop I put in two air restrictors. Probably no one will notice except for me when it's on display. Also got in the vent screens for the front intakes and the radiator intakes. Thanks for following along. I enjoyed everyone's comments. Now if we can get a manufacturer to make a long nose version on this car, it would be great.
-
Looking good.
-
This is the new Revell of Germany kit of the Audi DTM. Very nice kit. Same as the Mercedes, the quality is up there with Tamiya. Decals are very nice, though I wish they would have made the side striping into a 5-part decal instead of 3. I ended up having to have the body completely together before putting them on...and then had to cut the decals at the seams. Same issues as with the Mercedes...I did not like the chrome. For the Audi rings and the side mirrors, I used Alclad Chrome. For the rims, the front grill border and the rear wing end plates, I used Alclad Polished Aluminum. Body was painted with Tamiya's TS-14, TS-29 and TS-17 (airbrushed). For the decal touchup, I used TS-8 and TS-17. Feel free to comment.
-
This the Revell of Germany new Mercedes DTM kit. Very nice kit. Quality up there with Tamiya. Did have some small decal issues though. The decals were either oversized or undersized, especially on the larger decals. They could have done a better job on the interior. The Audi interior is much nicer. Paints used were Tamiya's TS-14 and TS-29 (airbrushed). I did not like the chrome parts so I stripped them. The main grill was painted with Alclad Chrome and the rims were painted with polished aluminum. Feel free to comment.
-
I'm with Harry. It's a lot easier in the long run if you're running long lines that have to go around corners and such.
-
The product I use is called Scale Coat II. It doesn't harm the resin unless you leave it in there for several hours. Usually takes about 15 to 20 minutes for it to work. A warning about Castrol Super Clean is that it will easily destroy resin. It will usually make the resin very soft and rubbery.
-
Took me all day but I finally got on all the decals. Talk about your "pain in the butt"... The decals did not like the water at all. Figured out that if the water was really really hot that the decals liked it better and didn't seem to crack as much. Used a lot of Micro Sol and Micro Set to get the decals to lay down. Very brittle and you can see on one of the decals where a big hunk went missing. But I think it turned out okay. Ended up using Tamiya's TS-49 for the red, TS-44 for the blue and TS-35 for the green. This was to touch up the decals. Also used TS-30 silver to do the fine line border trim around the decal. This is after clear coat and touchup of the decals with the paint. Fixed the big hole in the blue decal.
-
Got some painting done. Painted the dive planes and front diffuser with Tamiya's TS-29 (airbrushed). Got the side mirrors together with the mirror insert. Wing end plates painted with TS-49 (airbrushed).
-
The kit is Fujimi.
-
I've had bad reactions with lacquers going over Alclad products. If you're using Duplicolor, just pick up a can of their lacquer gloss black.
-
Thanks for everyone's comments. Most of the black lines are the kit's decals but some of the lines I had to pinstripe in since the decals were falling apart. I just cut them off the orange decal. Most of them were short by quite a bit. The black around the headlights are from the kit decals that I cut up into sections to make it look more like tape. Then I put a semi gloss over the decals on the headlights.
-
The scale is in between a 1/24 and 1/25. I believe it was originally copied from a slot car body and reworked to make it more correct.
-
A friend of mine asked me to build this for him. The kit is the Fujimi. The paints were Scale Finishes Gulf Blue and Orange (awesome paints, by the way). Had some minor decal issues where the decals were cracking in water. Also small issue with the chassis being warped which was easily fixed. I would highly recommend this kit. This is the sixth one I've done of the 917's. Ended up painting on the orange since I did not like the decals.
-
Nice job! Really liked the engine bay.
-
Very nicely done. Always liked the 320 Touring cars. A friend of mine did a Transkit to convert this over to an M3 that raced here in the U. S.
-
Well after several weeks of paint issues, like having to strip it at least 3 times. It was having some fish eying problems. Was able to get the primer down and several coats of Tamiya Gloss While down. I've had issues in the past with older resin being extremely oily even after washing it. Took me quite a while to fill in all the pin holes. I didn't mix my two part filler properly so it took a long time for it to cure. Body primed with Duplicolor White Primer Several coats of Tamiya Gloss White (TS-26; airbrushed)
-
I use Duplicolor Primer exclusively. The only time I use their sandable primer is if I know that I'm going to be doing a lot of sanding. What I usually use is Duplicolor Primer Sealer which is the same thing as their primer but thinner. Goes on more like Tamiya's Gray Primer. Might want to give it a try.
-
I would go with what Bluesman Mark said. Most Bugattis were painted French Blue.
-
Thanks for everyone's comments. I would have replied sooner but I was out of town for several days and had no access to a computer. So I haven't touched the kit for a while.
-
I've run into some small issues with the body, but there's a lot of them. Mainly a lot more pinholes than I thought. I found that out when I primed. There's also a fit issue with the body and chassis that has popped up which is due to a small warping in the body. I did get the chassis and wheels done. Wheels painted with Alclad Polished Aluminum and dulled with Future Acrylic Floor Polish. Brakes are fitted into the wheels as well. Chassis completed; added electonic boxes and wiring. Small fit issue with the dashboard so I had to remount it due to body and glass issues.
-
 Absolutely beautiful! Love all the fine detail work you've done on the model.