Chariots of Fire
-
Posts
2,782 -
Joined
-
Last visited
.thumb.png.e64ca4fead948adbdf6a111229b6cf2f.png)


Recent Profile Visitors


Chariots of Fire's Achievements
MCM Ohana (6/6)
-

Maxim F model
Chariots of Fire replied to Firebuilder's topic in WIP: Model Trucks: Big Rigs and Heavy Equipment
I agree. The change is good! Taper the edges just a bit more to get the slightest rounding in the middle of the strip. When you foil the strips the results will really stand out. -
Maxim F model
Chariots of Fire replied to Firebuilder's topic in WIP: Model Trucks: Big Rigs and Heavy Equipment
Yes, I do! There was nothing official about that either!!😆 -
Maxim F model
Chariots of Fire replied to Firebuilder's topic in WIP: Model Trucks: Big Rigs and Heavy Equipment
Hi, Dom. If you don't use the kit trim look for some Evergreen half round of 0.030" . That should be close enough to a good size. The other thing is that the trim pieces are not round but flat with rounded edges. So if a piece of flat strip plastic is used glue it in place and then sand it with a foam sanding block. That might take the excess off the corners and give the pieces a rounded look. Try it on a piece of scrap first and see how the results look. Obviously the half round could be sanded as well, taking off most of the rounded surface. -
Maxim F model
Chariots of Fire replied to Firebuilder's topic in WIP: Model Trucks: Big Rigs and Heavy Equipment
Got one of those cabs too. Have not made up my mind as to what it will be used for since there are so many Maxim choices out there. I remember Maxim building an airport crash rig with that type of cab. That would be one choice. The casting work on all of the parts is pretty good, although I think I would make the trim pieces on the cab face separate. The ones that are molded in seem to me to be too big. The real truck trim pieces were only about an inch across, perhaps 1-1/8" tops which means no more than 1.2 mm in scale to be correct. -
Software to create decals
Chariots of Fire replied to Mike 1017's topic in Model Building Questions and Answers
Got an old Micro Graphx program that is vector based and works great. Probably takes a step or two more to do some of the creating but I can create all of the decals I have ever needed with. M-G was taken over by Corel Draw. -
Driveshaft for an easier installation
Chariots of Fire replied to bobss396's topic in Tips, Tricks, and Tutorials
I do exactly the same thing but with 3D printed U-joints and brass tubing. Looks like we are just about on the same page!👍😎 -
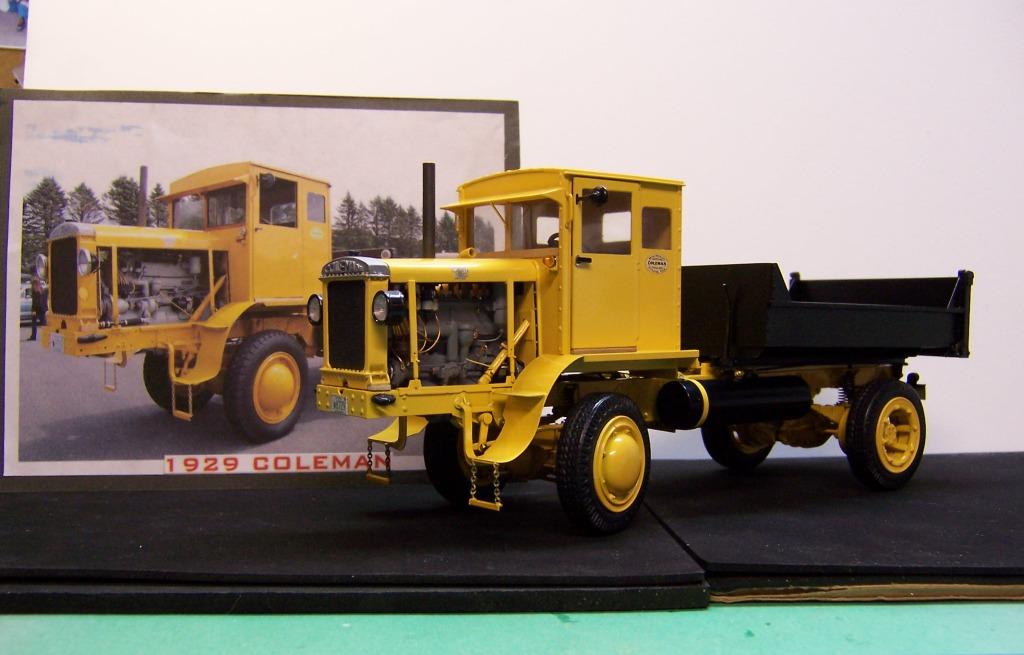
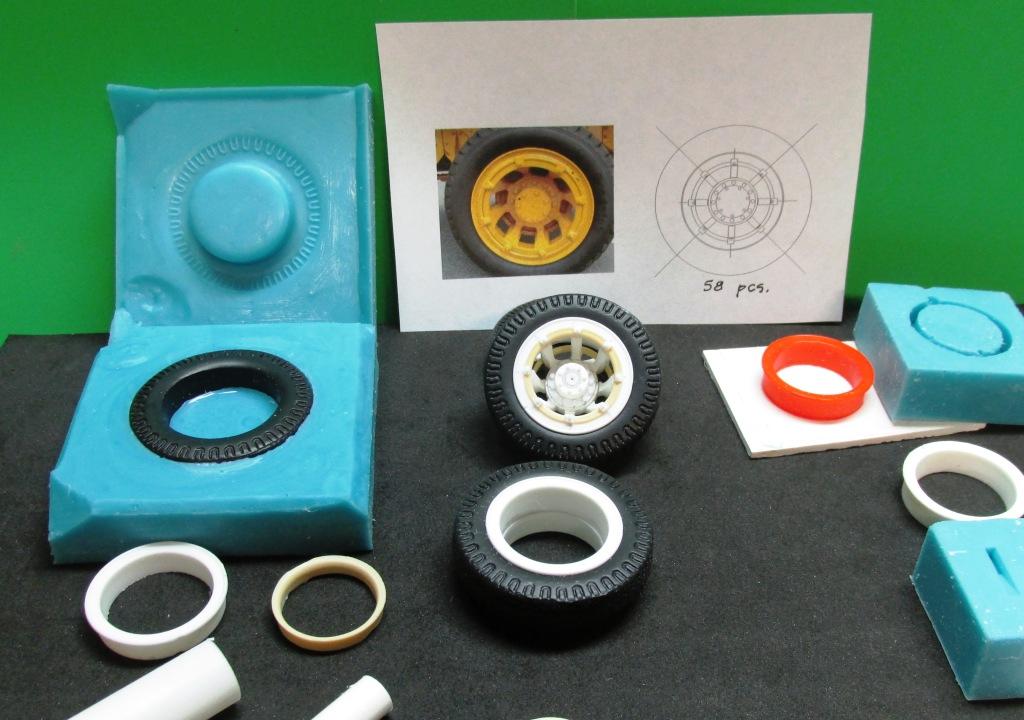
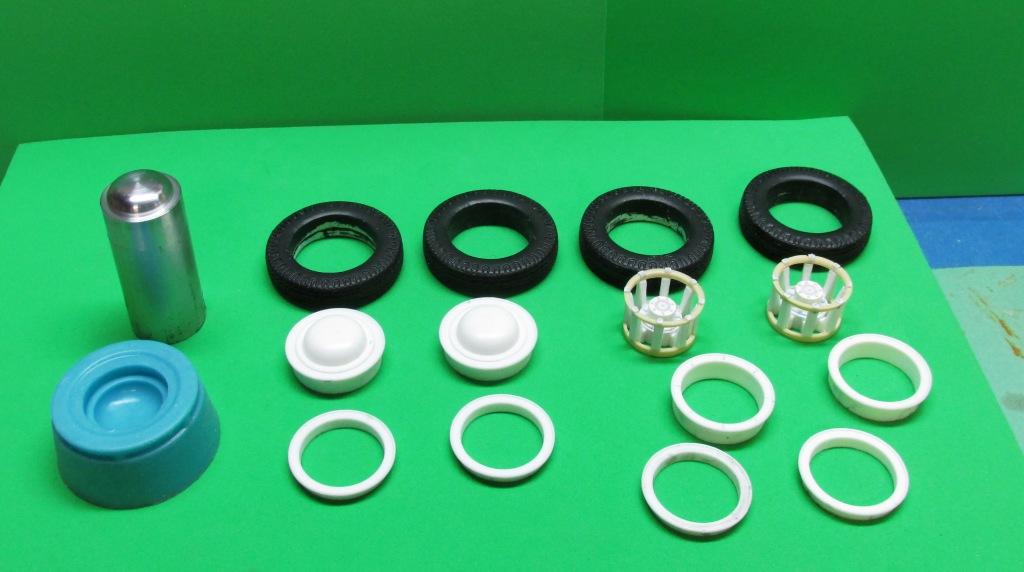
Dominick inquired as to how I make tires for my models. Below is one mold that was done for the tires used on the 1929 Coleman. The description of how to do it is below the photo. In this case front and rear tires are identical so only one mold was necessary. The tire mold is in the left side of the above photo. I use mold rubber that is sold by MicroMark. It is opaque and has excellent molding qualities and picks up all details nicely. 1. Start with building a box to contain the mold rubber. I use craft board but any stiff card will do. Leave enough room completely around the tire. Glue up 4 sides and the bottom of the mold box. It needs to be high enough that will be mold rubber under the tire as well as above it. A glue gun makes quick work of building up the box and it does not need to be perfect. 2. Mix up the two part mold rubber and pour it into the bottom of the mold box about 1/3 of the height of the box and let it cure. 3. Mix up another batch of rubber and pour a very small amount over the surface of the previously cured rubber. Cover the face down side of the tire with a small amount of rubber so that it completely covers the bottom sidewall and all of the detail of the tire surface. Place the tire in the mold and gently swish it around to make sure there are no air bubbles under it. Use a weight to hold the tire in place. You don't want it to float up after the next step. 4. Pour the rest of the second batch of rubber around the tire and let it cover the entire area of the box. Continue to carefully pour the rubber around the tire until you reach the upper surface of the sidewall. Do not let the mold rubber get on the sidewall. Walk away from everything at this point and let the second pour cure completely. If it has cured completely, it will not feel sticky when you touch it. Note that there is no mold rubber inside the tire other than the thin veneer that was put there in step 3. 5. With a sharp Xacto knife cut notches in the corners of the mold box and remove a small section of cured rubber. The photo above shows where I cut away to corners and along one side. 6. This next step is important. Spray the entire interior of the mold box and the surface of the tire with mold release. You can use petroleum jelly or a spray, which is what I prefer. IF you forget to do this you won't be able to separate the two mold halves. 7. Mix the final batch of mold rubber and pour it into the mold making sure to cover all exposed surfaces of the tire. Make sure there are no air bubbles. Continue to pour until you have completely covered the tire and bring the rubber to the top of the mold box. Let it cure completely. 8. After the rubber is cured, break away the sides of the mold box and remove them. Do the same for the bottom. Then separate the two parts of the mold. Remove the tire master and you will be ready to pour two part resin into the mold and make a tire. Note that I did not include an air release for the resin to escape. 9. Fill both sections of the mold with resin and check for air pockets. Make sure the resin is all around the face of the mold so that the tire tread is covered. Let the two sections of the mold with the resin gel just a little and quickly flip one half of the mold onto the other. Square it up using the notches as a guide. After the resin is cured, break the mold apart and remove the new casting. There should be more than enough resin so that the excess squishes out the sides of the mold. Below are the tires made from the mold for the Coleman. They were white when they were removed from the mold. Flat black was used to paint them. Hope this helps in how to make tires!😎

- 6 replies
-
- 11
-

-

-
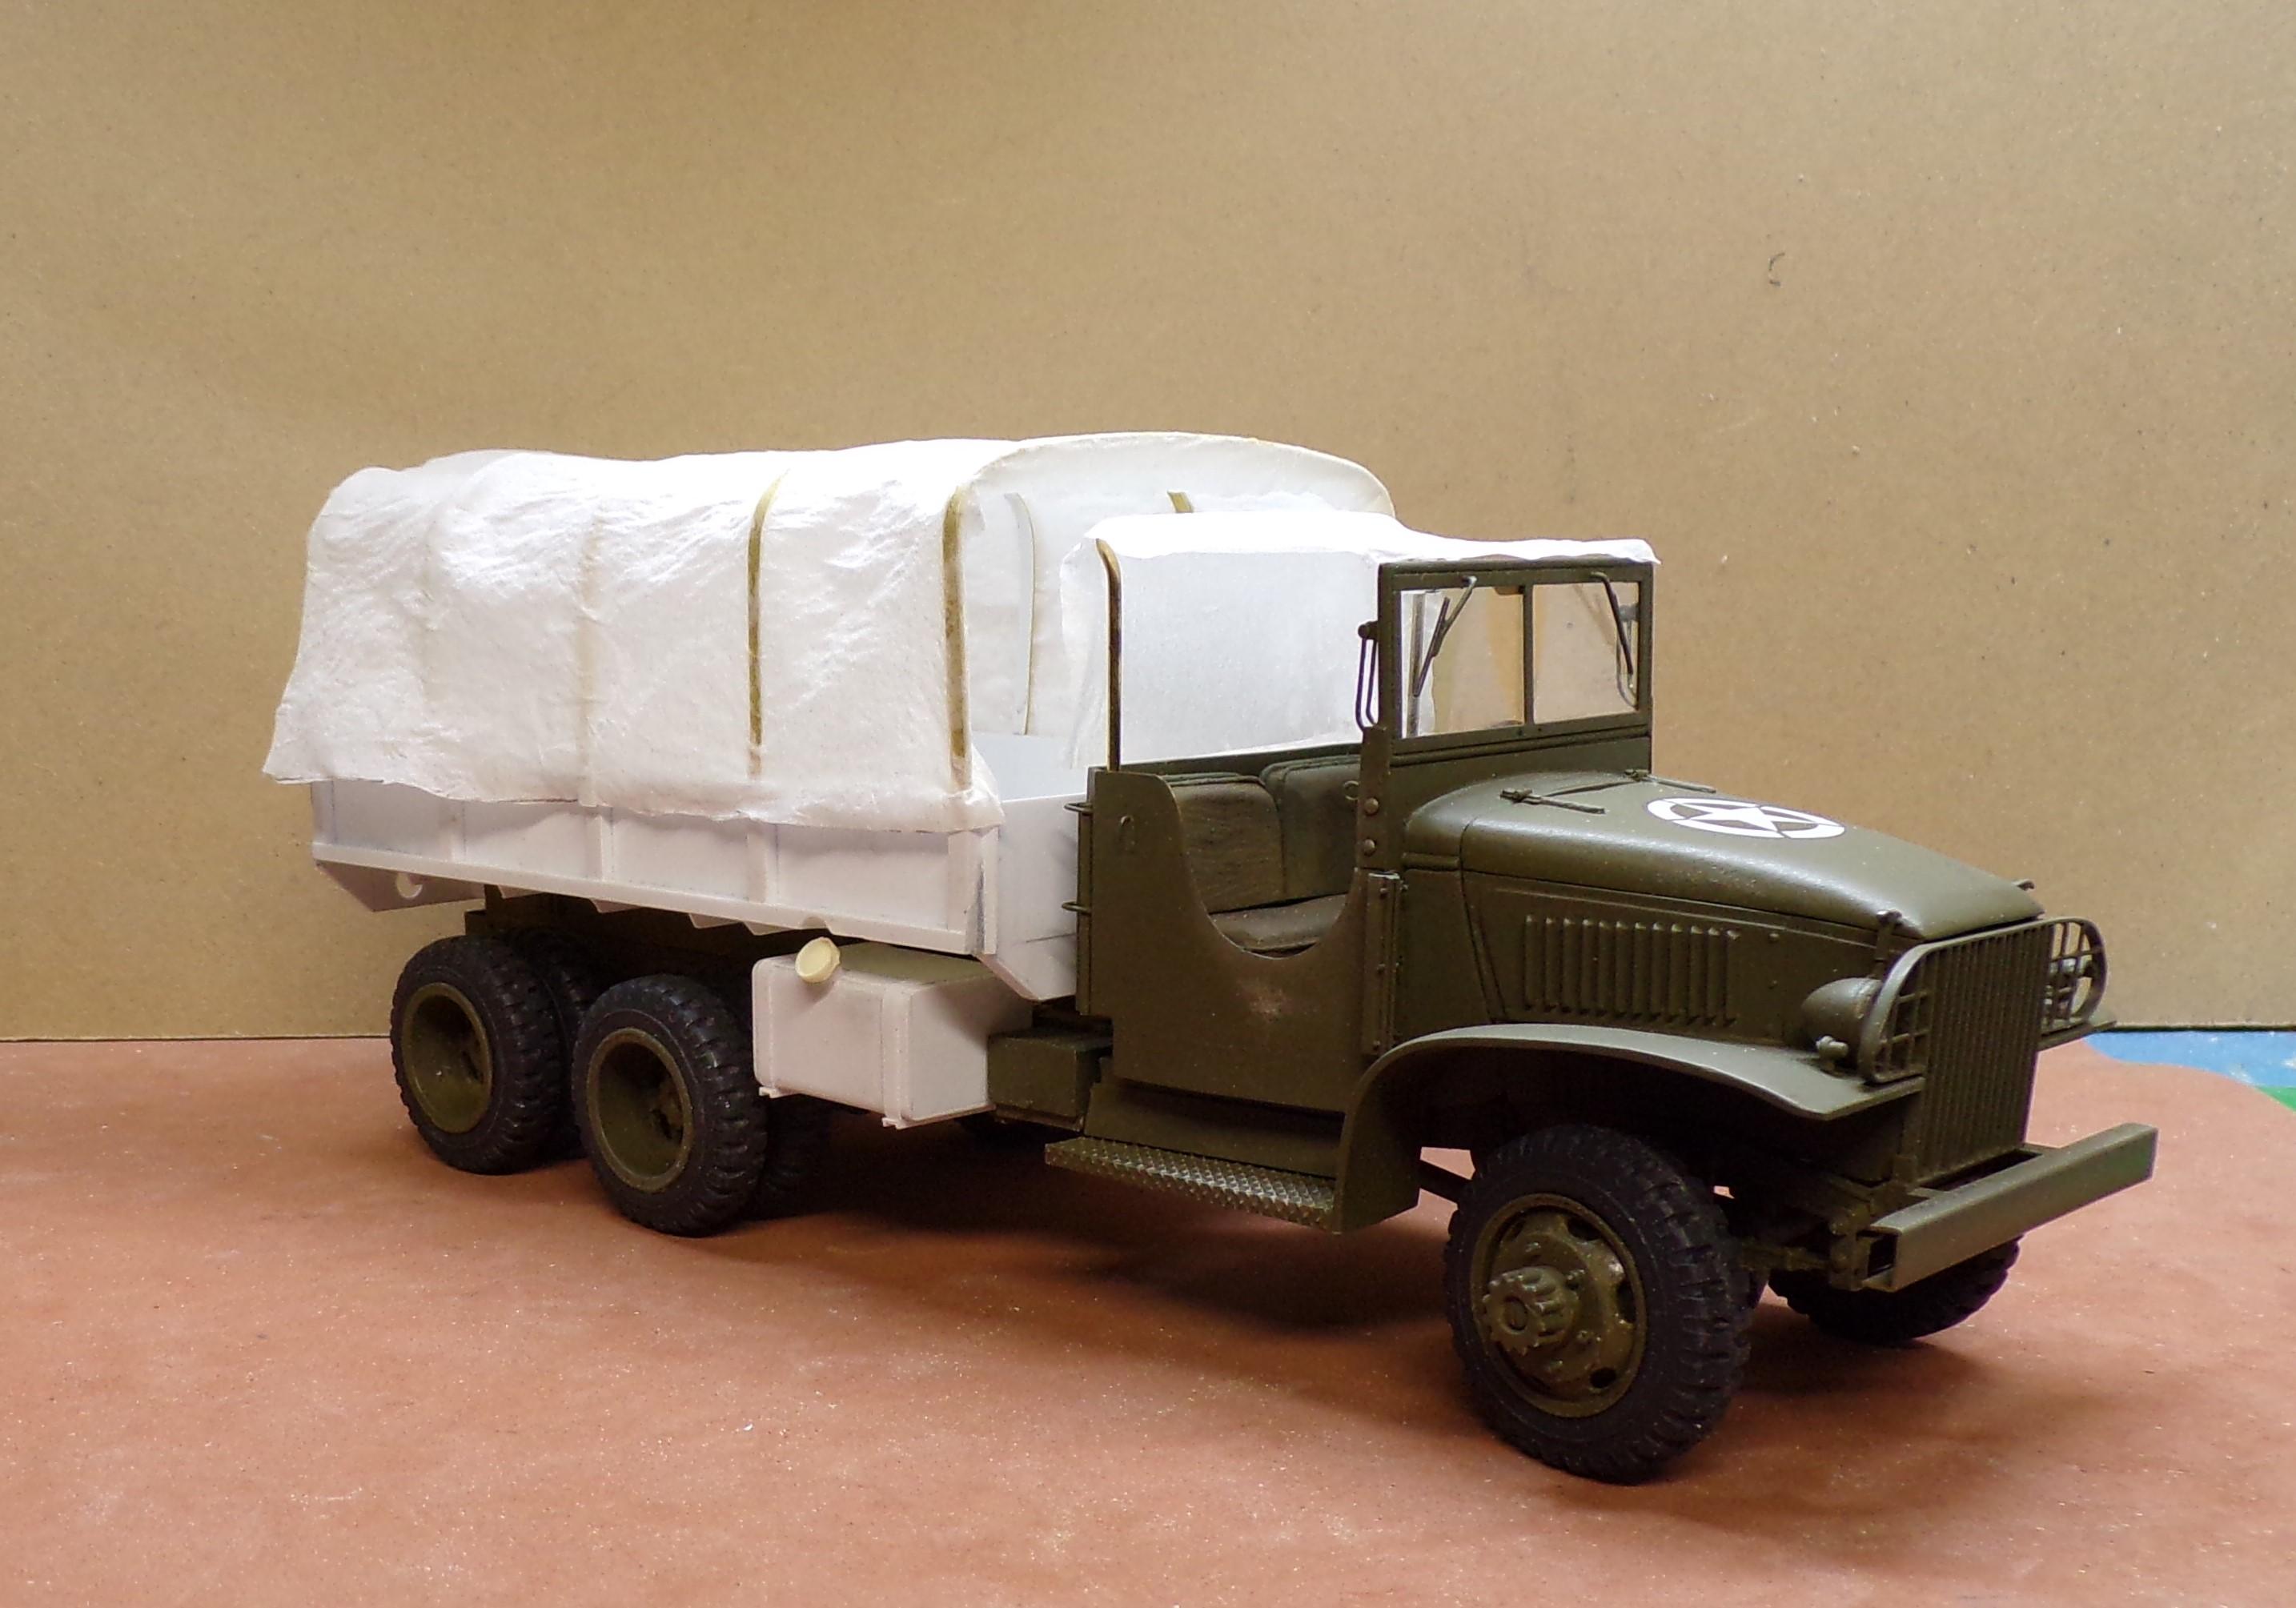
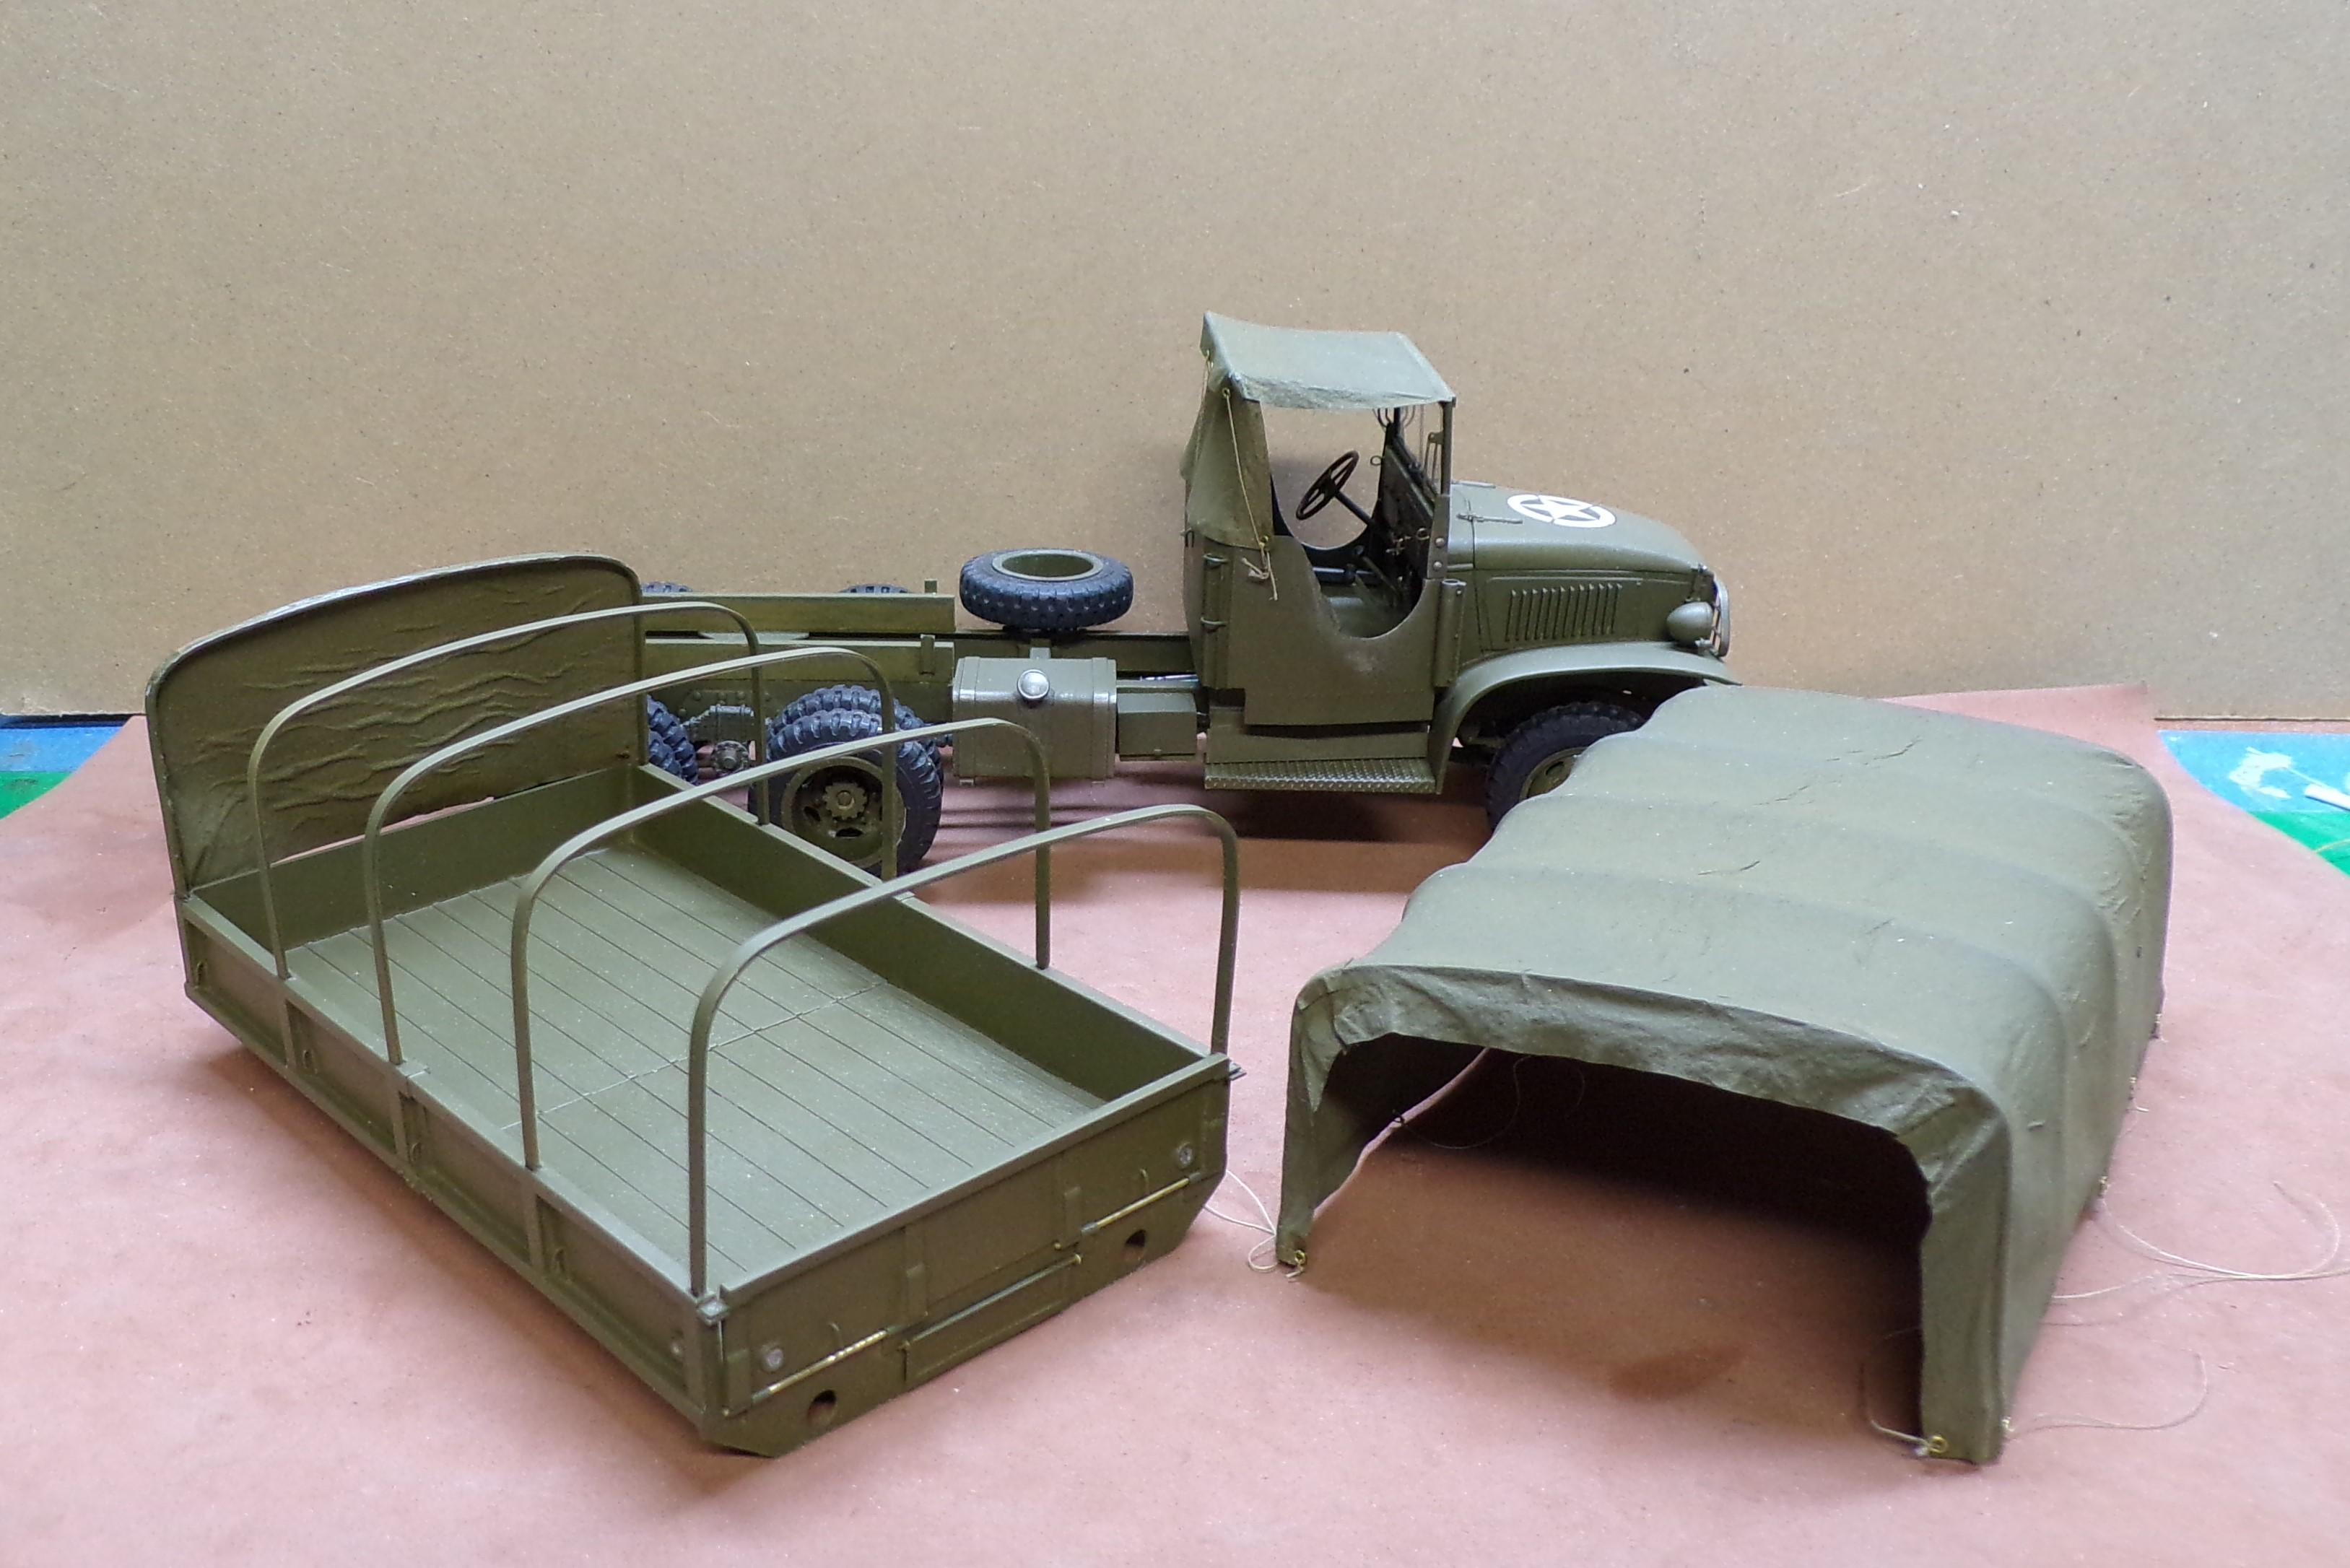
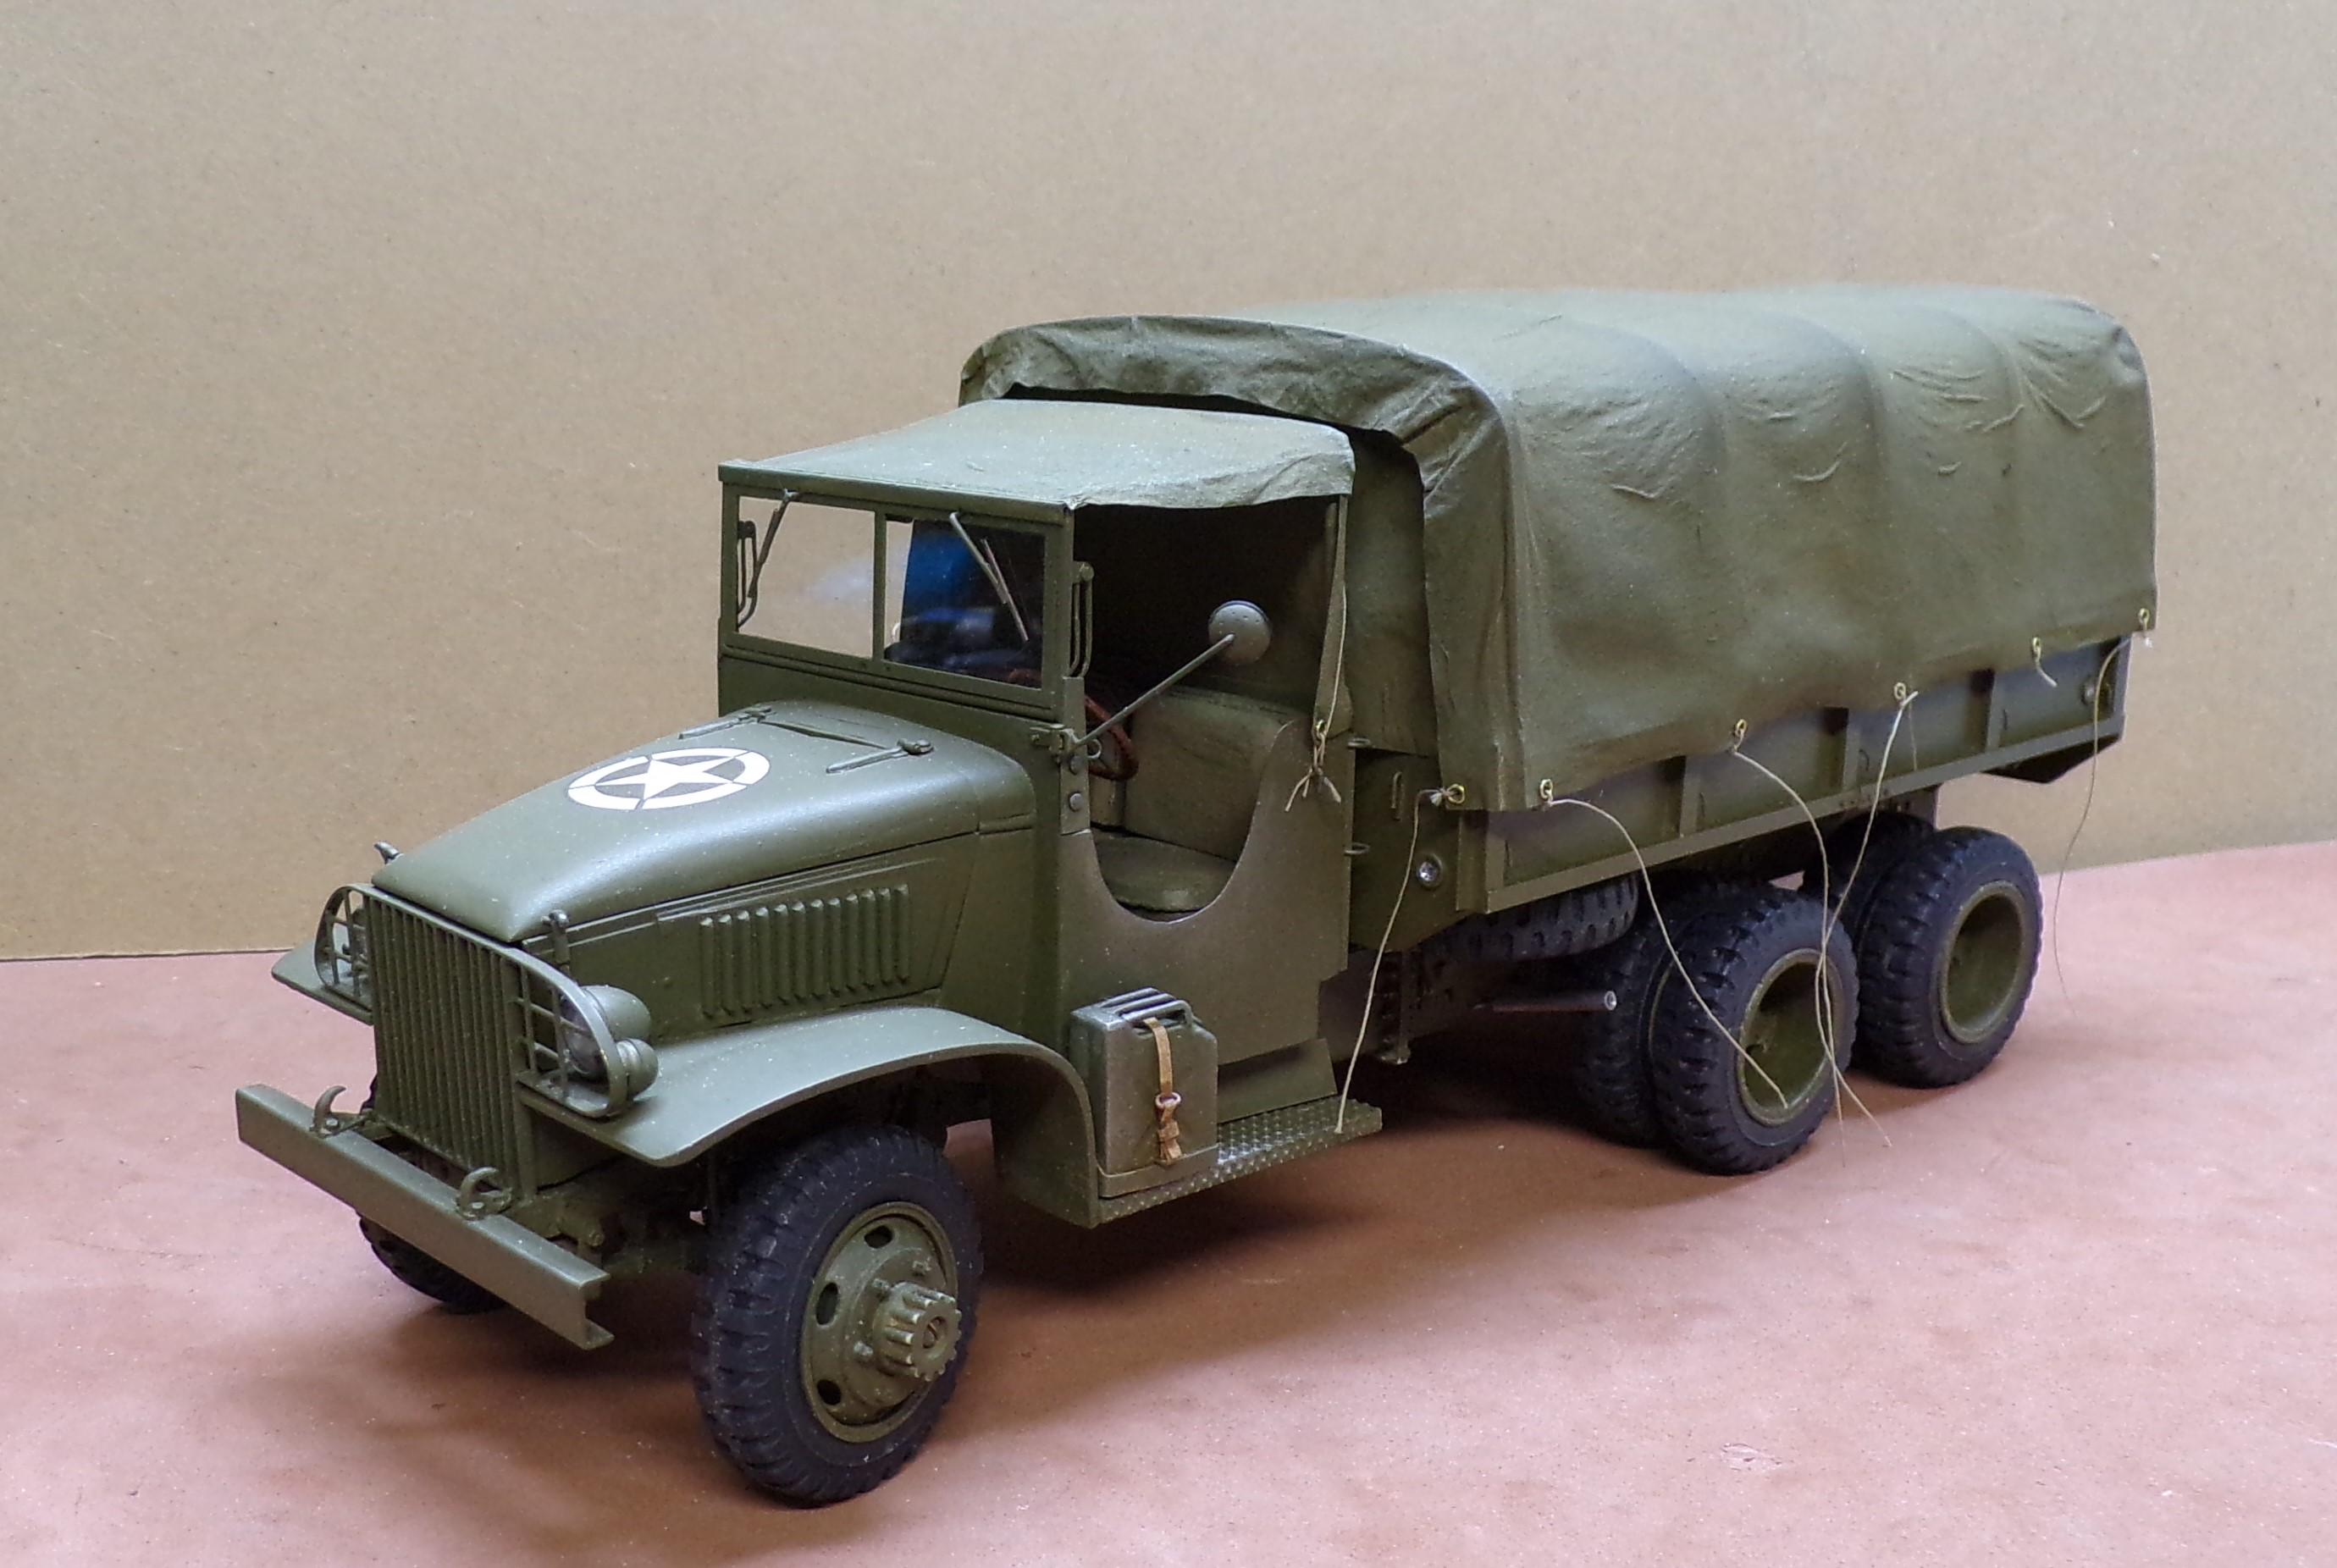
Getting back to tarps,,AHEM!! I made several canvas tops for my militay builds using regular two ply plain facial tissue. I cut to rough shape, drape them over whatever form I'm using and paint the whole surface with a 50/50 mixture of white glue and water. Let it dry. When it dries it is stiff but still could be folded. It has a tendency to shrink a bit when over a form but that is what you want with canvas. Here are the results, painted, both sides with Testors olive drab paint.
-
I've used Sunnyscopa clear decal paper for laser printers for a number of years. Really good stuff. Thin so the edges don't show when put over gloss paint and then with a clear overcoat. 8x10 sheets in a pack of 10 or 20.
-
359 Peterbilt Revell
Chariots of Fire replied to grodudulle77's topic in Model Trucks: Big Rigs and Heavy Equipment
Clean and neat! Very nicely done! Colors are great! -
Mack B-61 Dump Body
Chariots of Fire replied to Scott Eriksen's topic in WIP: Model Trucks: Big Rigs and Heavy Equipment
Now I hear that AMT may be bringing out a B-65 next year. Could it be?? Oh, the joy!! -
glue for resin to styrene
Chariots of Fire replied to gary jackson's topic in Model Building Questions and Answers
Similar to that is Bob Smith Industries two part epoxy. Quick cure as well and good stuff. -
Printing Removal
Chariots of Fire replied to Chariots of Fire's topic in Model Building Questions and Answers
The "decals" were unbelievably hard to remove. I finally did bite the bullet and sanded them off but it cut through the white paint of the door. So I smoothed it out, primed it with Duplicolor light gray and repainted with Tamiya bright white. So far so good! -
glue for resin to styrene
Chariots of Fire replied to gary jackson's topic in Model Building Questions and Answers
Locktite for me also. Solid bond for resin to plastic. Make sure there are no solvents on the resin, though. Use the CA sparingly so it does not ooze out of the joint. You can't really clean it off a painted surface. If the plastic is unpainted you can wipe off the excess and then sand lightly to get rid of the residue. I've done this many times with good results. I've even bonded plastic to white metal with CA. Solid as a rock. -
Printing Removal
Chariots of Fire replied to Chariots of Fire's topic in Model Building Questions and Answers
I even tried a very fine sand paper and that won't cut it either without ruining the white paint underneath. I had some success, though limited, using Novus 3 but it takes a lot even with that. It may come to a repaint of the white!😬