Anglia105E
-
Posts
3,487 -
Joined
-
Last visited
Content Type
Profiles
Forums
Events
Gallery
Everything posted by Anglia105E
-
Two carburettors I do understand . . . but why two ignition coils ? . . . Would it be 2 x 6 volts ? David
-

1962 Rolls Royce Silver Cloud II by Minicraft Models: WIP
Anglia105E replied to David G.'s topic in WIP: Model Cars
Looks like you got a really good result on the driver's side / offside / right hand side ( if you building this car as a RHD ), but if this is going to be a LHD car then we are talking passenger side / nearside / left hand side . . . I am really surprised to see super glue used in that way, but you clearly know what you are doing because that process has worked brilliantly ! I could not help but smile at Pierre's comment regarding the removal of the door handles and windshield wipers . . . He has a good point of course, but are you brave enough to go down that route? Those door handles do need improvement I must agree, and I did grind off the wipers on my most recent Silver Cloud build . . . I then fitted two wiper arms and blades from the Tamiya Jaguar MK 2 kit, which look great on the Rolls-Royce, but now if I want to build the Jaguar there are no wiper arms and blades in the kit box ! David W.
-
The Molotow Liquid Chrome for the light sockets is very effective, and the dry-brushed mesh covers works well too . . . David W.
-
1962 Rolls Royce Silver Cloud II by Minicraft Models: WIP
Anglia105E replied to David G.'s topic in WIP: Model Cars
You are welcome David . . . Having built and painted eight Silver Clouds, also exhibited them at the annual Rolls-Royce show, and sold one of them, I feel that I have accumulated a vast amount of knowledge regarding this model car. My computer holds a huge amount of research material, in the form of photographs and documents, and I have a box file of many printed documents. Over the years, since 2017, my collection of Silver Clouds in styrene, resin and diecast has grown steadily . . . The very first kit was ordered from the USA, directly from Minicraft I seem to remember as I didn't realise that I could source the Revell version of the kit made in Germany and available in Europe. I still have the two part silicone mould that I produced, so in theory I could produce further resin cast body shells and chassis for this Silver Cloud, but I do worry about the chemicals involved in the moulding and casting process. When you read about the care and expertise that went into producing the real Silver Cloud, all hand made, and when you consider they used something like 14 coats of high quality paint and carefully selected pieces of burr walnut wood for the interior fittings . . . it becomes mind boggling. Once you progress from examining the body and chassis of this motor car, and turn your attention to the engine . . . that is truly incredible. By all means, ask me anything you need to know on this subject and while I do not consider myself to be an expert exactly, I will try to provide the answers. David W. -
1962 Rolls Royce Silver Cloud II by Minicraft Models: WIP
Anglia105E replied to David G.'s topic in WIP: Model Cars
The fold up picnic tables on the back of the front seats are burr walnut, and you have produced even better ones than I have done ! Like you, I tried various different methods of reproducing the authentic burr walnut finish, but having said that, these picnic tables are not easily visible on the completed model car. Only when you take close up photos through the windows would you see them more clearly. I reckon you have done the best job possible on the various body issues, including the petrol filler flap (fuel door), the edges of the boot / trunk lid and the front wing / fender area near to the windscreen / windshield . . . I really do admire your work on this Rolls-Royce Silver Cloud, which as you are aware, is my absolute favourite motor car in the World . . . ever ! David W. -
I like the work that you have done to get the black vinyl roof right, and especially the seams . . . This is a nice shade of orange for the paint finish. How long do you leave the painted bodywork to cure? Myself I tend to leave it for around 5 days . . . These big American cars of the '70's always get my attention, and usually I favour Pontiac, Ford and Chevrolet in particular, but more recently I have shown interest in Plymouth, Lincoln, Buick and Cadillac . . . The Hudsons are of course early 1950's. David W.
-
Yes David, I shall certainly have a good look at those two threads of yours, the Silver Cloud and the Superbird, as I do most days. My comments will follow in due course ! David W.
-
Well, I sent out 6 email messages to local people, and only my brother could guess the subtle aspect of the subject matter, so you are the second person to identify the 1961 Lincoln Continental Presidential Limousine . . . What about the man in the grey suit, and what is that on the ground at his feet ? I must think of a suitable prize ! Well done . . . David
-
Well spotted David G. . . . That is precisely what it is. Remember, I mentioned the surprise just around the corner? David W.
-
Thank you Chaz . . . Glad you like it . . . David
-
Here is a link to my YouTube video that shows this work in progress diorama, at the current stage of the project . . . https://www.youtube.com/watch?v=7MVDTbgHmyA Thanks for looking guys ! ( Best viewed full screen ) David
-
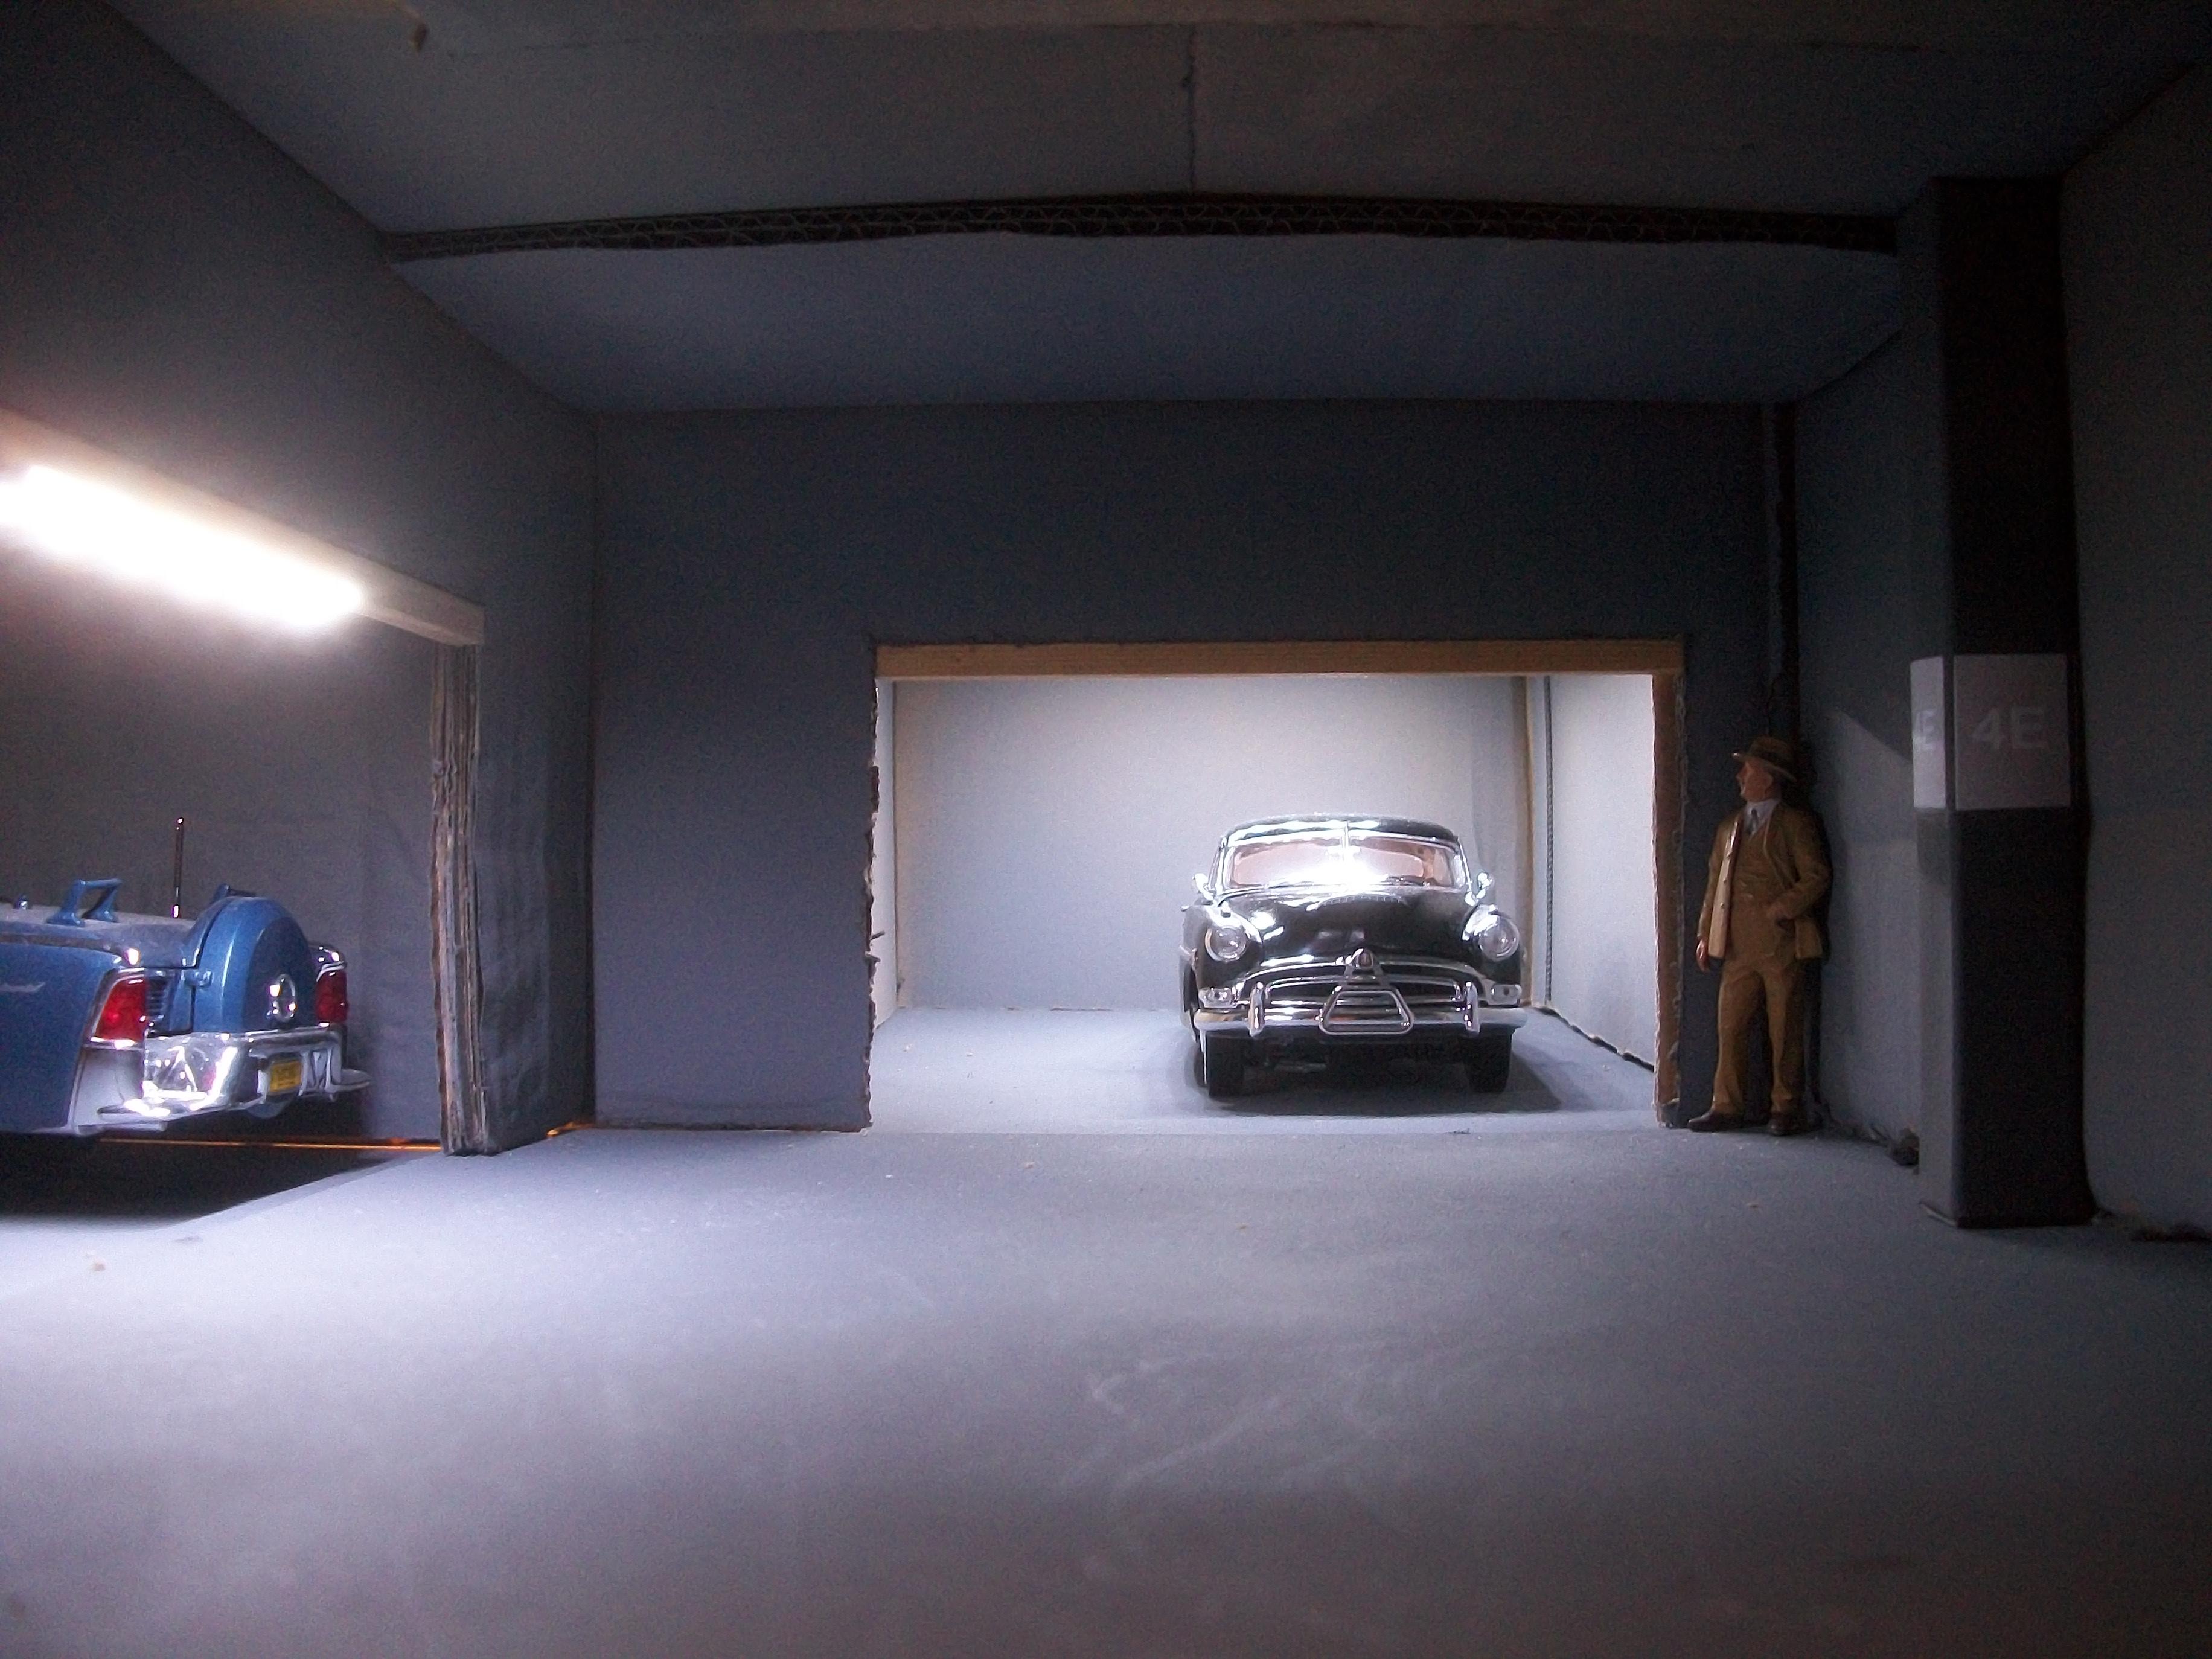
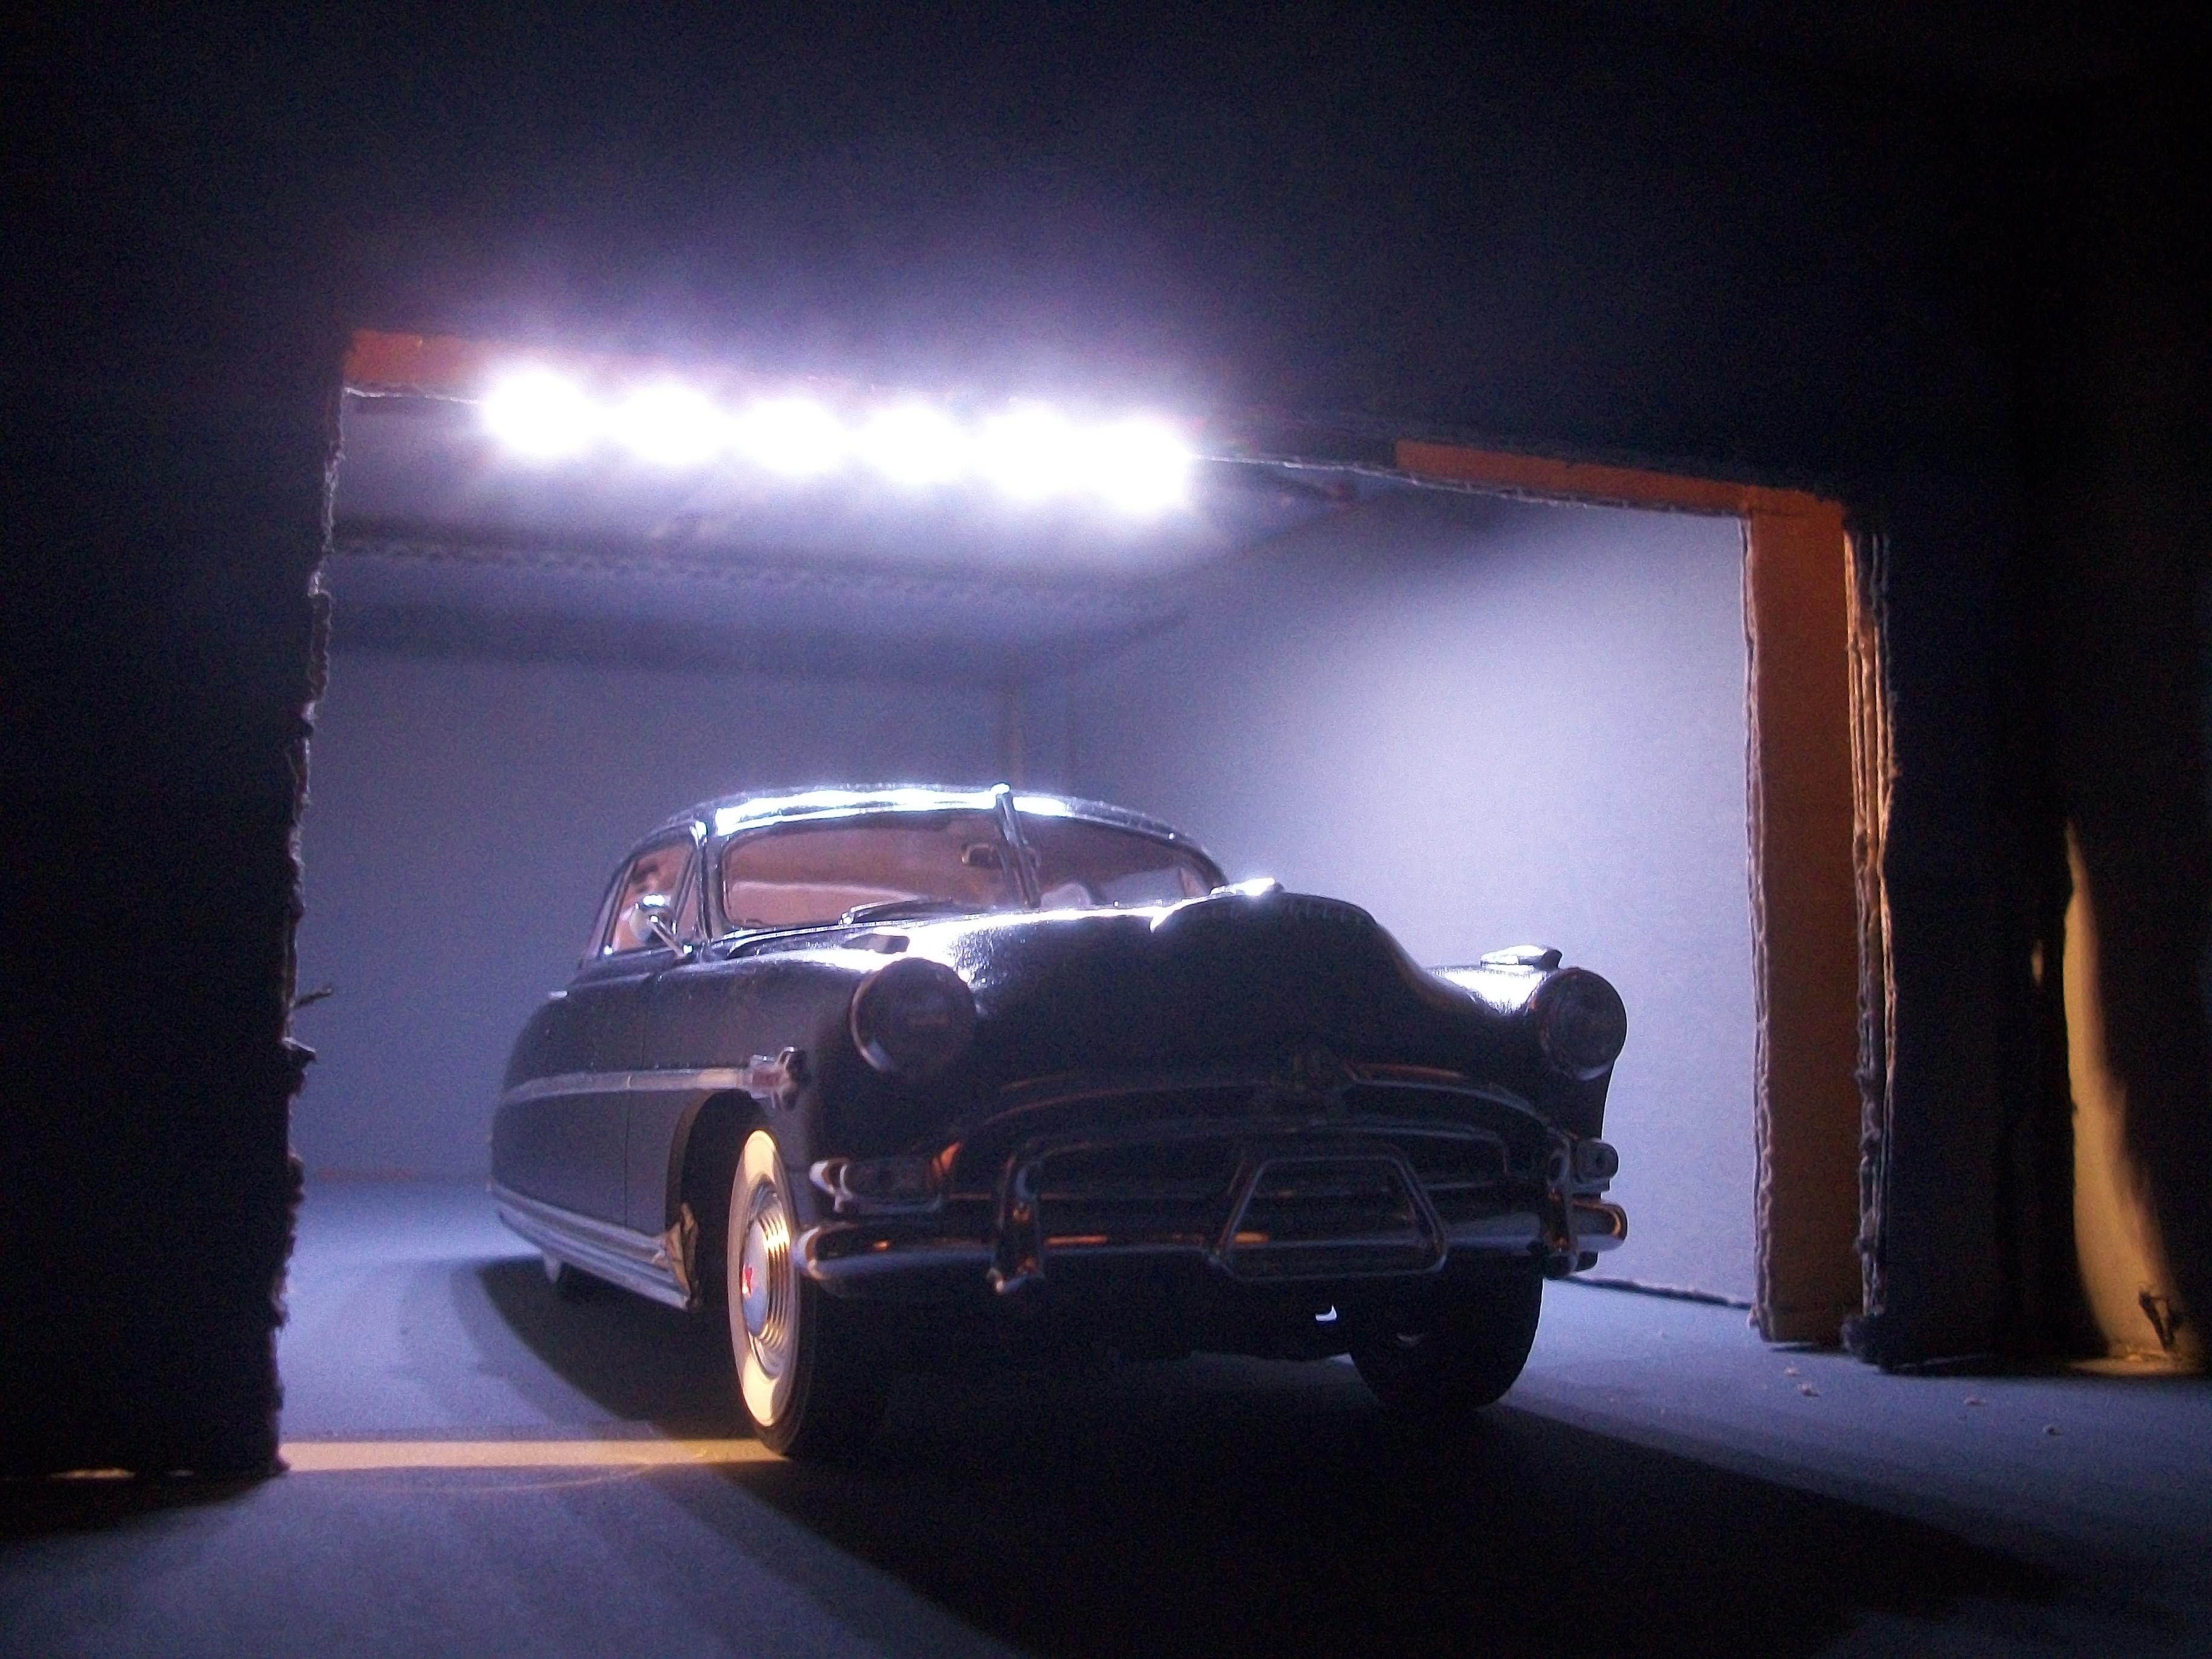
Today a third LED strip light has been fitted between the two front bays, and also there are now several wooden beams that have been added to the roof sections of each entrance, between the bays . . . The vertical pillar on the right hand side has been given a coat of grey emulsion paint, and I have added some sign boards that have ' 4E ' on them in white lettering. The lighting seems to be more balanced following the addition of the third strip light . . . David
-
Your pole barn idea is an interesting new project Tony . . . The Moebius kits are just the absolute best in my opinion. David W.
-
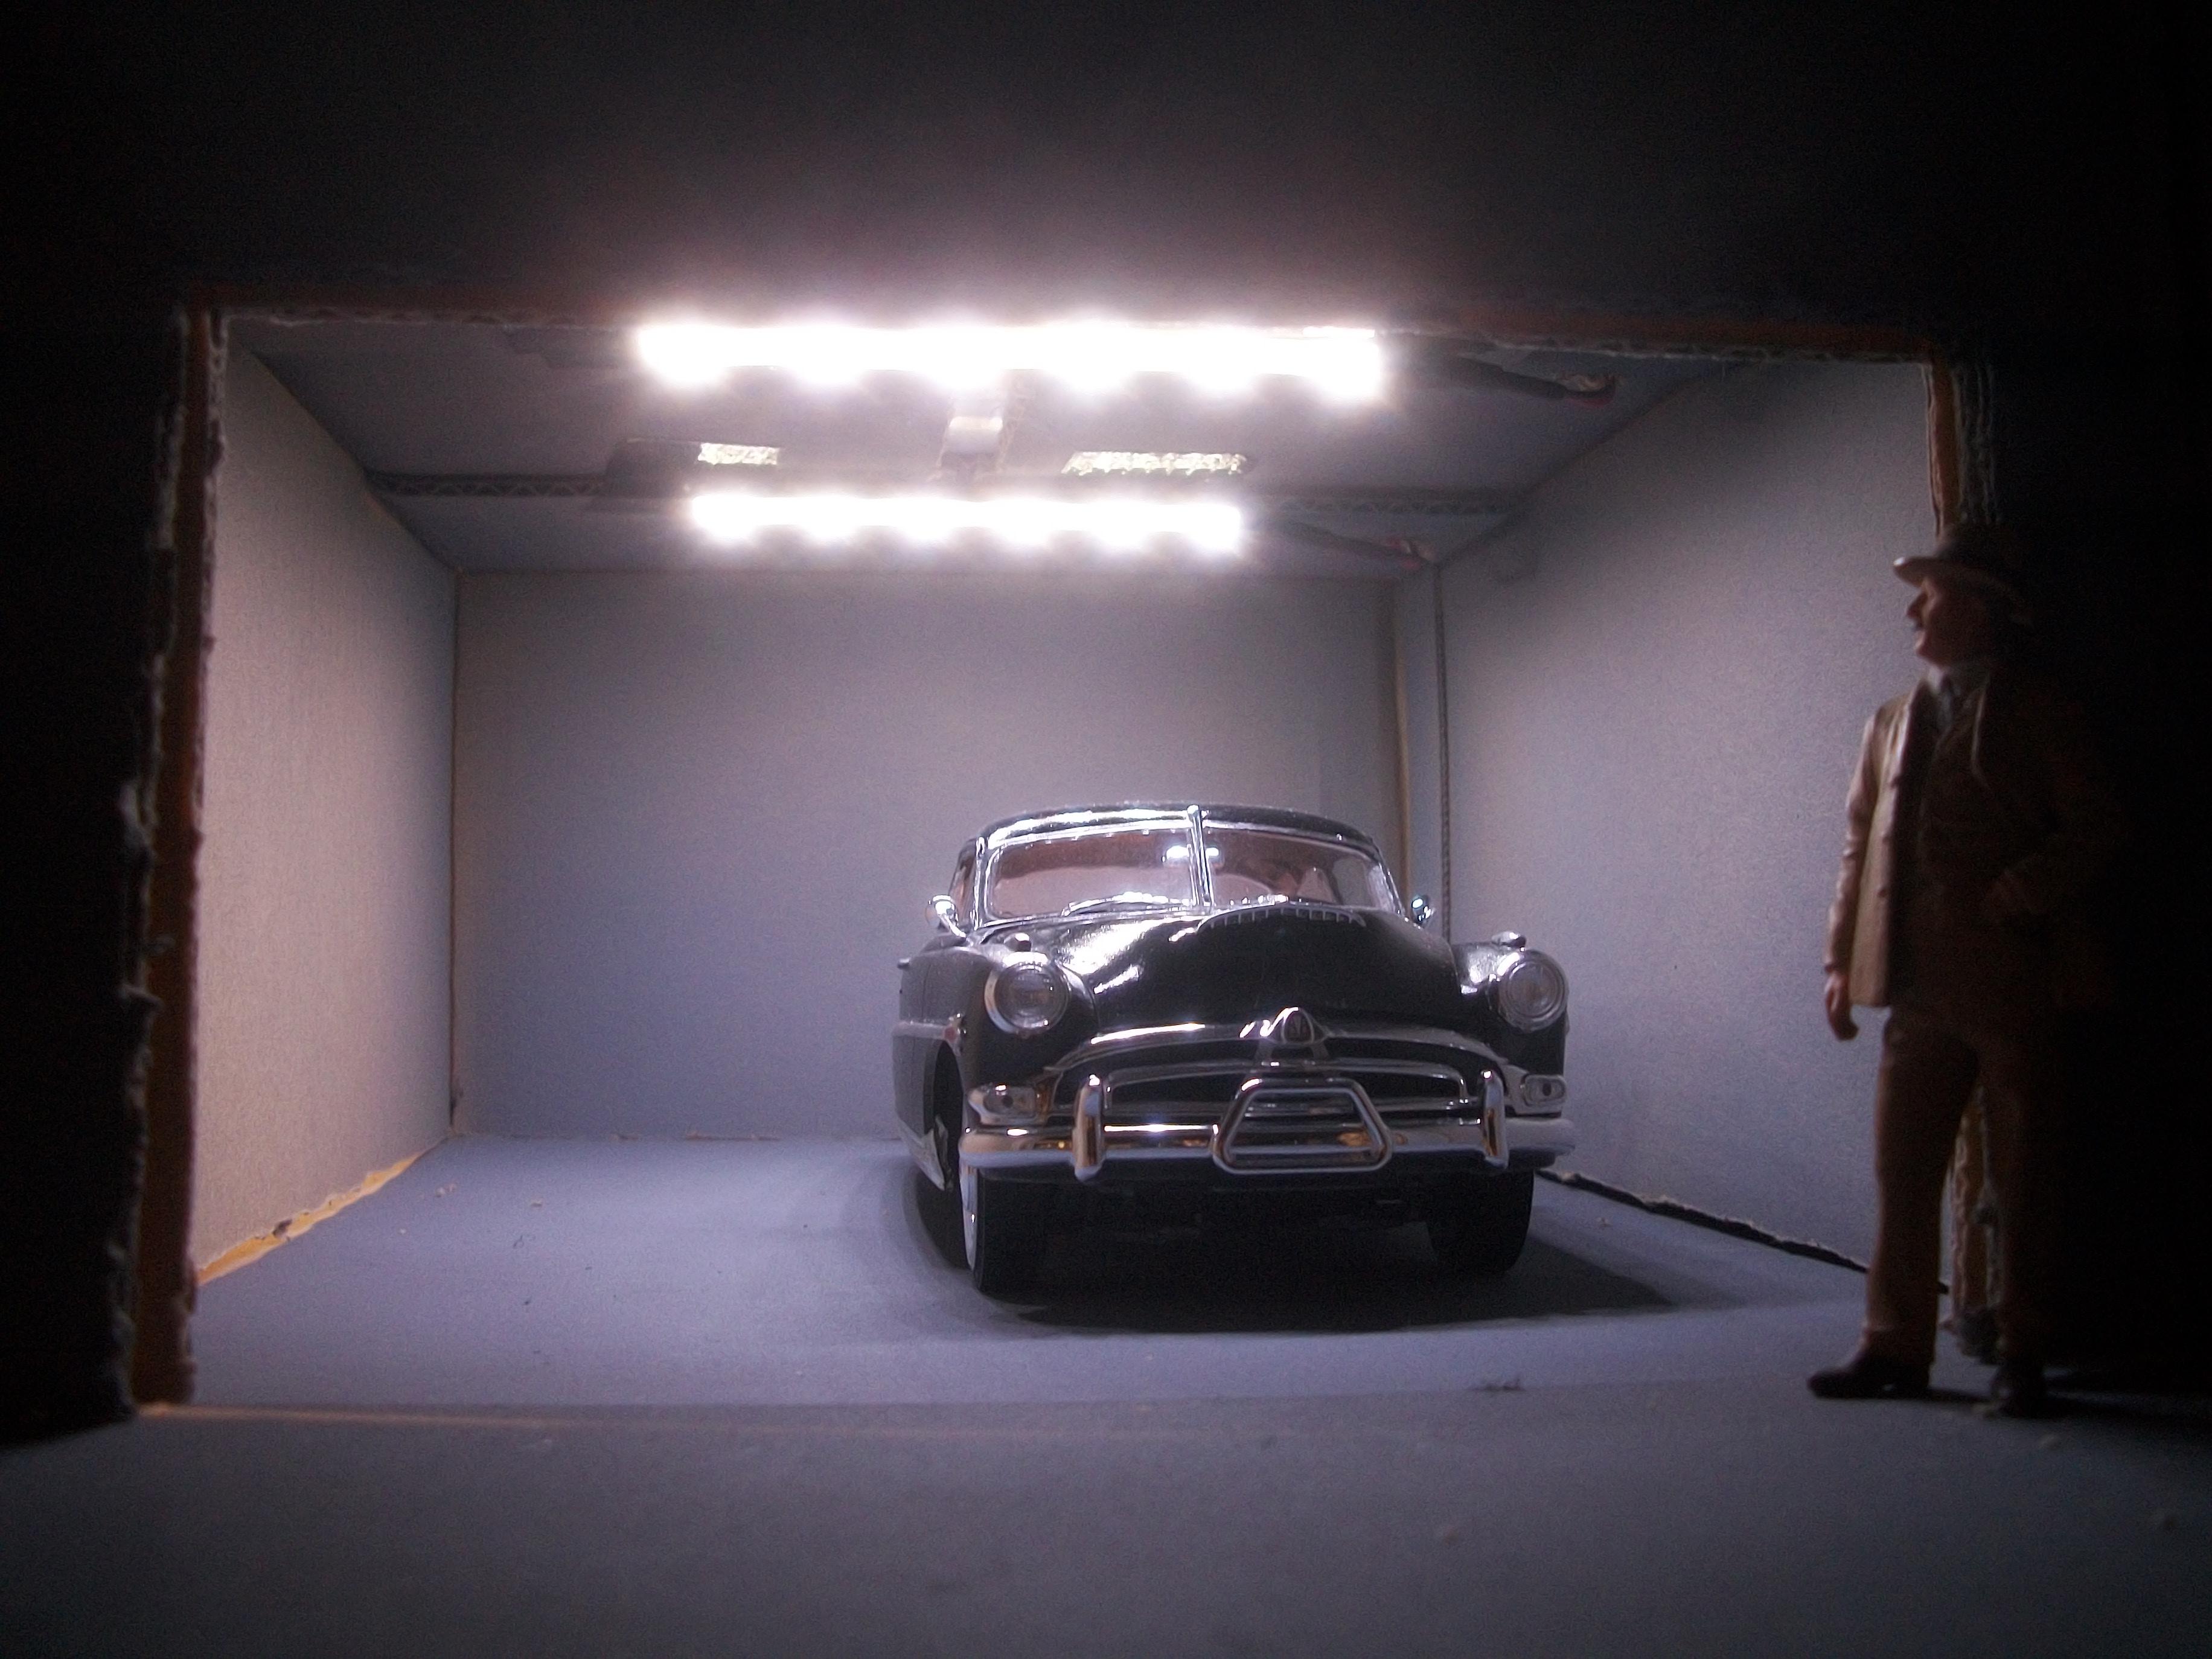
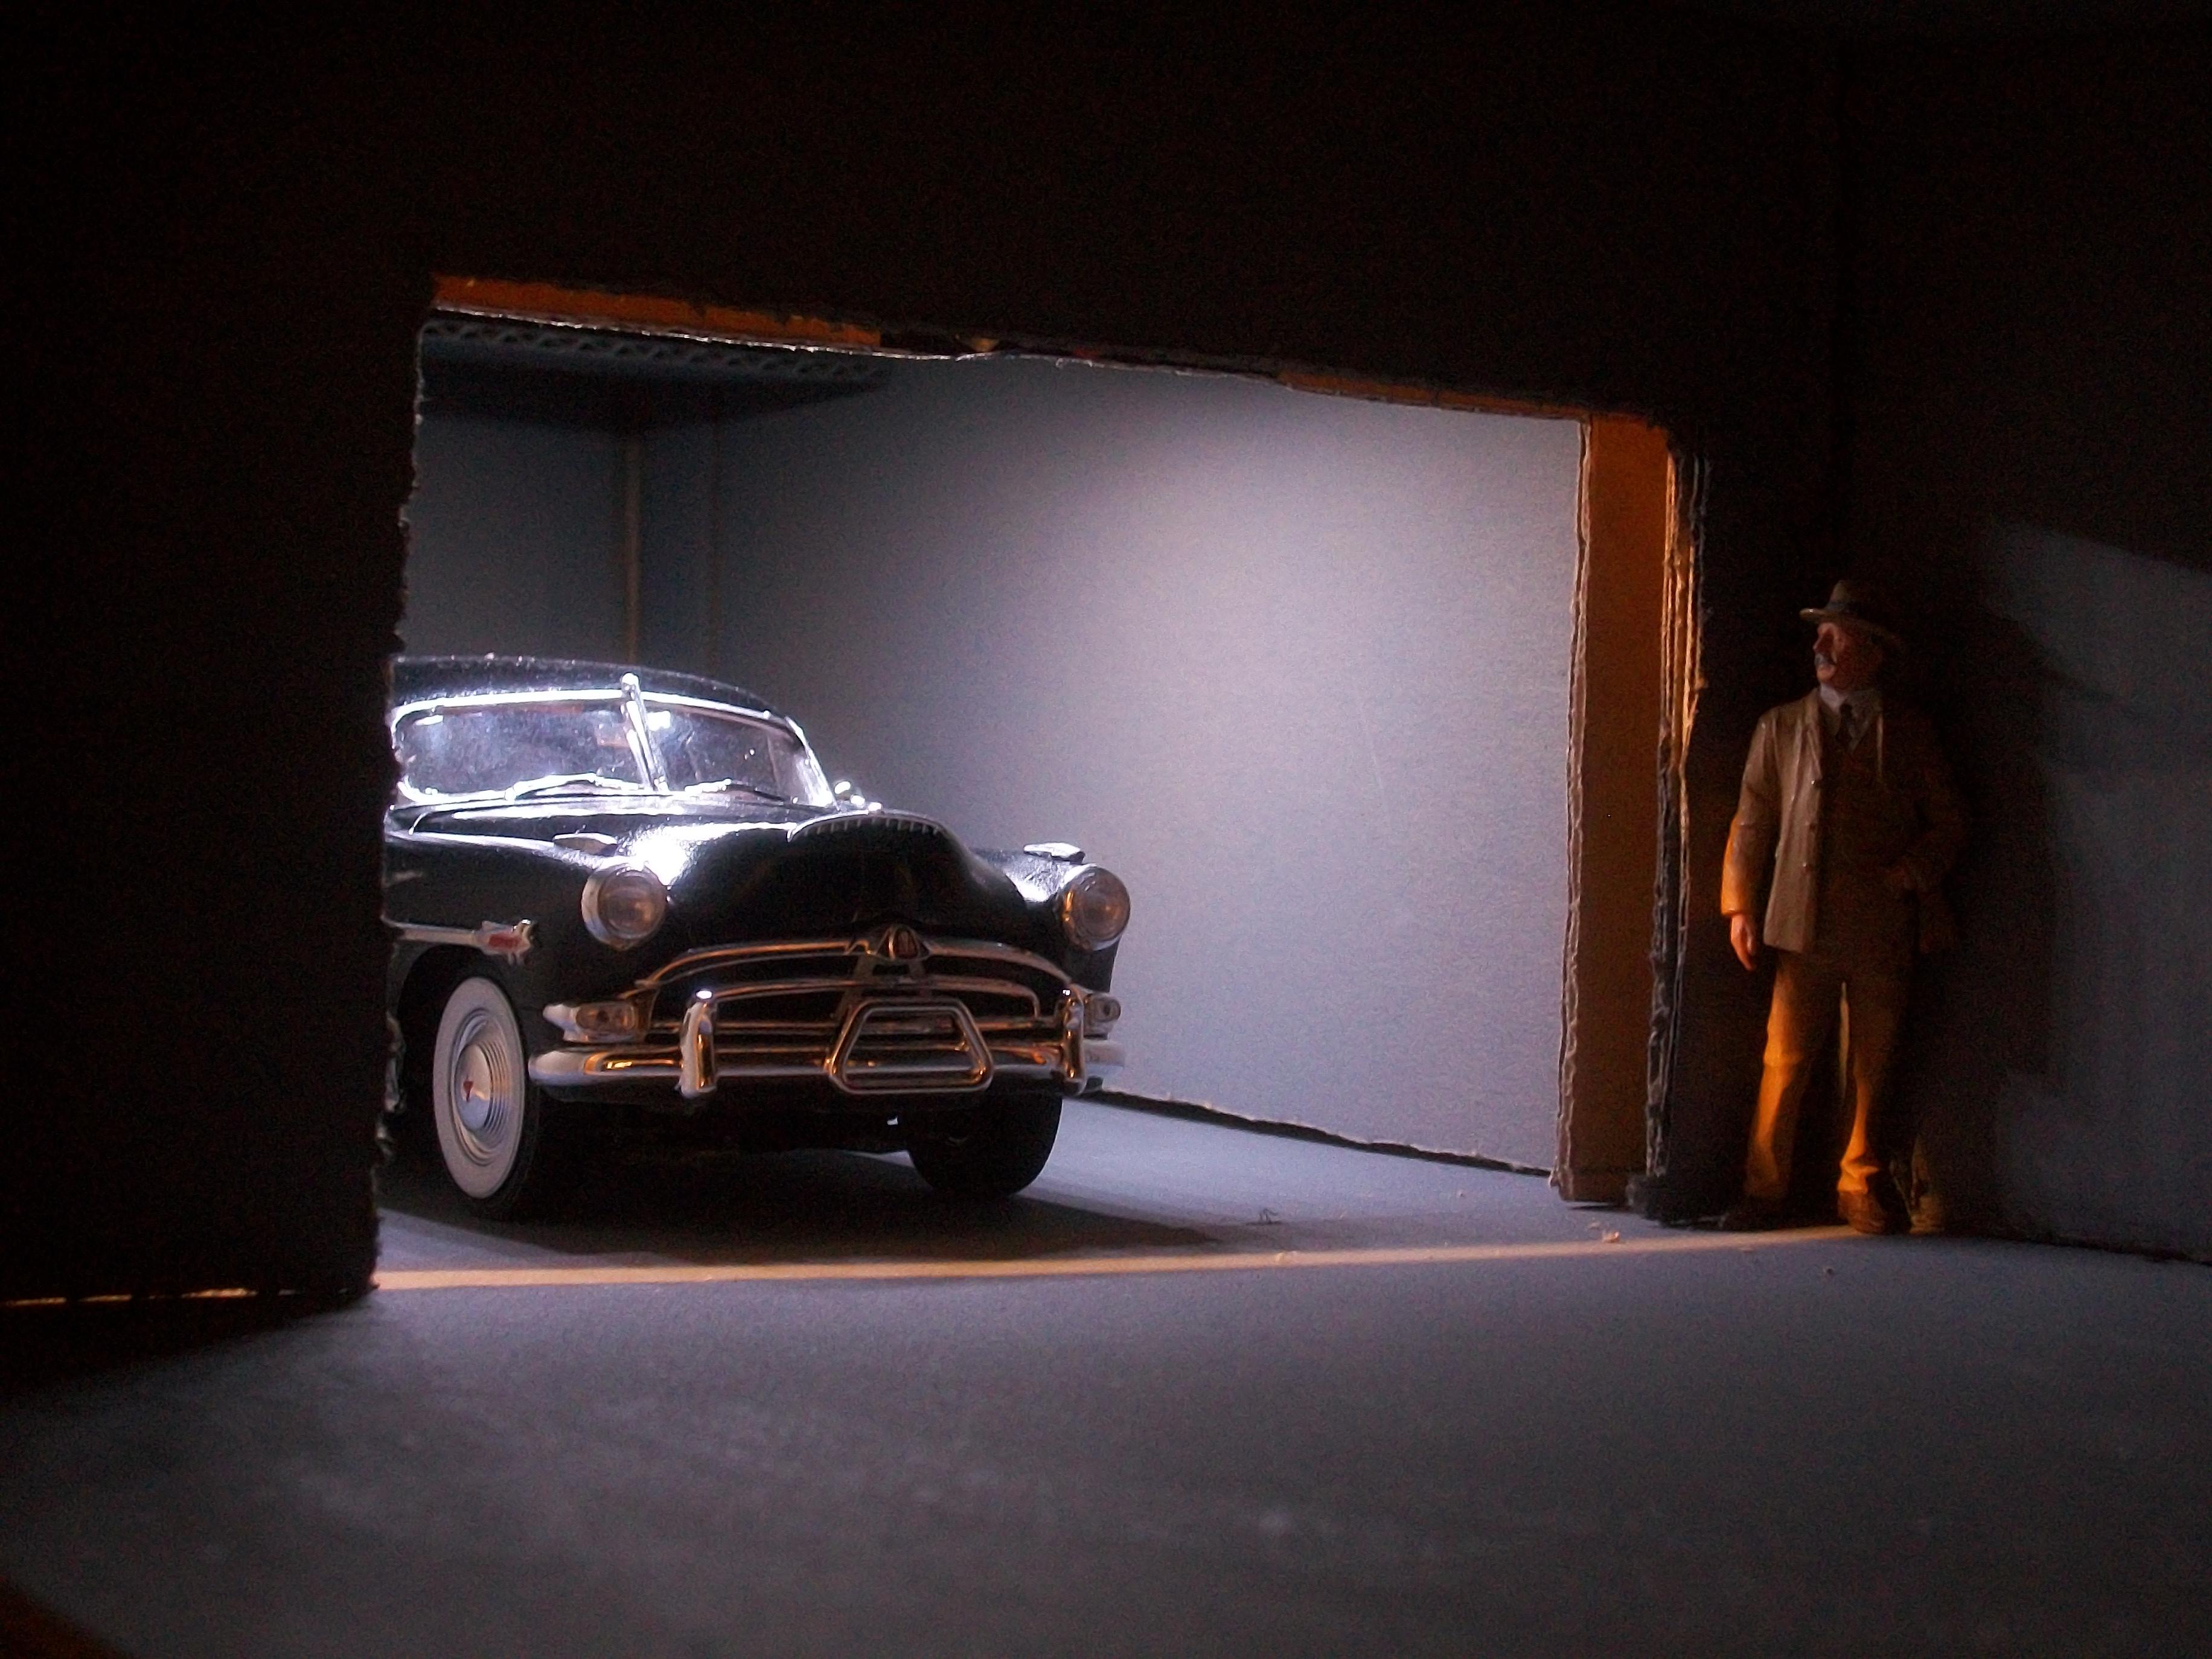
Thank you David G. . . . This diorama has a surprise just around the corner . . . David W.
-
Thanks Doyle . . . I just love these Moebius kits . . . David
-
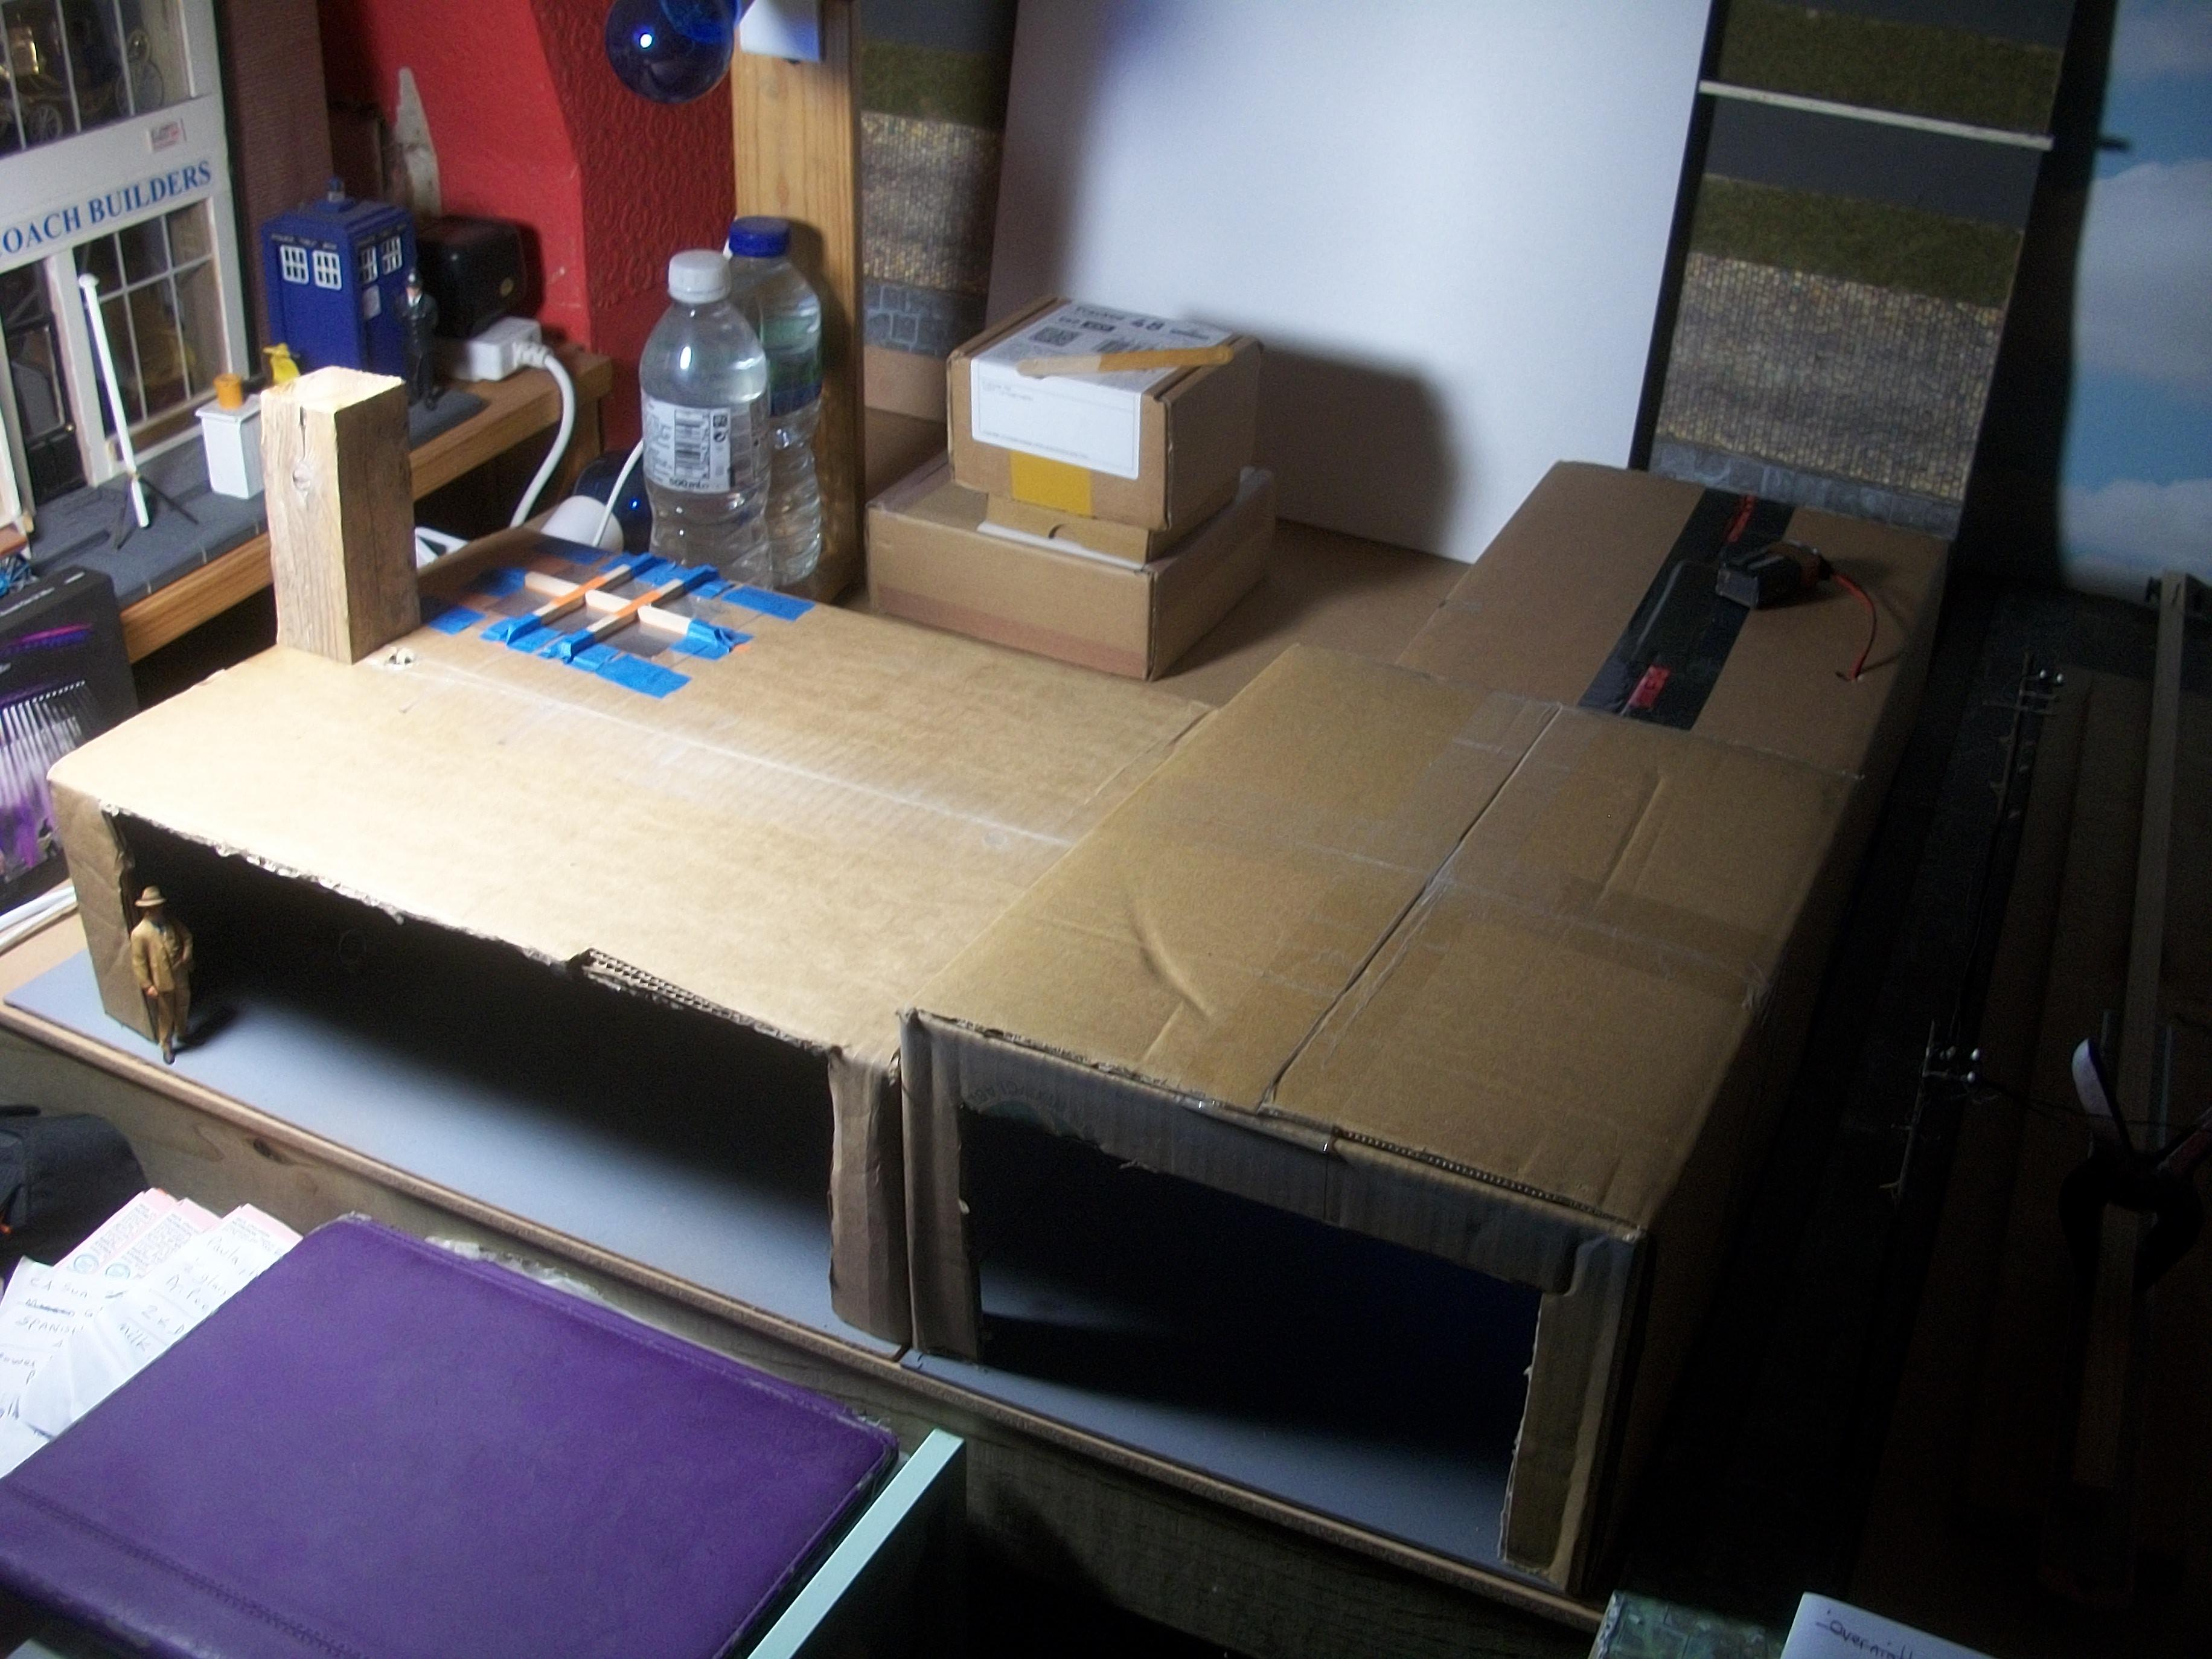
This 1:24 scale diorama of a basement parking lot is being constructed from three upturned cardboard boxes . . . So far, the ' box ' structure to the rear of the underground parking lot, over to the right, has two LED strip lights mounted onto the ceiling. The wires for these lights pass through holes in the ceiling and connect to 9 volt Duracell batteries on the roof . . . Inside the bays and below the strip lights, there is a black 1953 Hudson Hornet. and a suspicious looking guy seems to have an interest in this particular car, peering round the corner while concealed within the shadows . . . More will be revealed as the build progresses . . . David
-
1962 Rolls Royce Silver Cloud II by Minicraft Models: WIP
Anglia105E replied to David G.'s topic in WIP: Model Cars
The Rolls-Royce Silver Cloud I was produced from 1955 to 1959 with the straight-6 engine and single headlamps, then from 1959 to 1962 the Silver Cloud II had the same body including single headlamps, but the engine was a V8, and from 1962 to 1966 there was the Silver Cloud III which had the same body apart from double twin headlamps, and V8 engine. You are correct . . . The Minicraft / Revell kit of this iconic motor car is the only one available in 1:24 scale, and you will also see Entex, Masterkit and Hubley versions of the same kit, all from the same moulds. Hubley kits were moulded in blue plastic, Masterkit were produced in South America, and while kits were produced in grey plastic, some were in white plastic and the most common in black plastic. I cannot understand why such an important motor car on the world stage has not been made available in kit form by more manufacturers. David -
Louis . . . I agree with Misha, your engine bay is very realistic, so well done. Seeing this build of yours makes me want to build one of these myself ! David
-
1962 Rolls Royce Silver Cloud II by Minicraft Models: WIP
Anglia105E replied to David G.'s topic in WIP: Model Cars
Hello David G., . . . That area of the body between the windshield A-pillar, the bonnet / hood, front wing and the front door is so difficult to get right. I can see that you are dealing with this challenge and having some success too. It is a real shame that Minicraft / Revell didn't pay more attention to this area of the body, which is otherwise pretty good. The paint colour is just right for this Rolls-Royce. David W. -
Thank you Ken . . . I need to photograph this Hudson Hornet outdoors and post a topic in the ' Under Glass ' section, but we have rain most days. David
-
How about this? According to Autolist, Michigan is one of 21 states that does not require your vehicle to have a front license plate. It would have been 20, but Ohio decided to change things up and only require the rear license plate back in 2020. The above quote was taken from this website : https://witl.com/does-michigan-require-front-license-plate/ David
-
Okay, thanks David E. and I will do some research myself in the meantime. David W.
-
Just a thought, regarding the license plates for this Hudson . . . I noticed a fellow member commented on Steven Guthmiller's thread, that in the state of Florida there is no requirement to display a front license plate, so only a rear plate. Someone mentioned that in some other states the laws on the display of license plates differs quite often. The plate that is included in the Moebius kit seems to be a Michigan plate, so as a British model builder I was wondering if perhaps they don't display front license plates in the state of Michigan, which would explain why there isn't a front plate in the Moebius kit box ? David
-
1964 Pontiac Bonneville Convertible.
Anglia105E replied to StevenGuthmiller's topic in WIP: Model Cars
Well Steve . . . Everything about this build is truly outstanding. When I look at the soft top raised, the insulation under the hood, the chrome work, the engine, the interior, the paint finish on the body and the fine details around the light lenses . . . and then I have to look again, because I am sure that I missed something. I am a particular fan of Pontiacs anyway, and this one of yours is absolutely top notch in every respect. This is the benchmark at which all serious model car builders should be aiming . . . . Thank you for posting this detailed topic Sir. David -
At this final phase of the build I remain undecided about the rear license plate . . . Having considered fitting the plate and applying the kit decal, I shall probably leave the plate off. The plate doesn't seem to fit well, and also there is no front plate supplied with the kit, so maybe go with no plates? David