Oldmopars
-
Posts
2,058 -
Joined
-
Last visited
Content Type
Profiles
Forums
Events
Gallery
Everything posted by Oldmopars
-
AMT Ford Louisville Snow Plow kit
Oldmopars replied to hct728(Bob)'s topic in WIP: Model Trucks: Big Rigs and Heavy Equipment
I have that kit new in the box, if you have any questions, let me know. I can take pictures and show you what things are supposed to look like. I may even be able to cast you a missing part if its small. -
I like it, great job on the scratch building. That thing looks the part. I have had a few Mobile homes over the years ad so I have seen these things in action. The extra details really make it. I love to see scratch building, and thins is a great job.
-
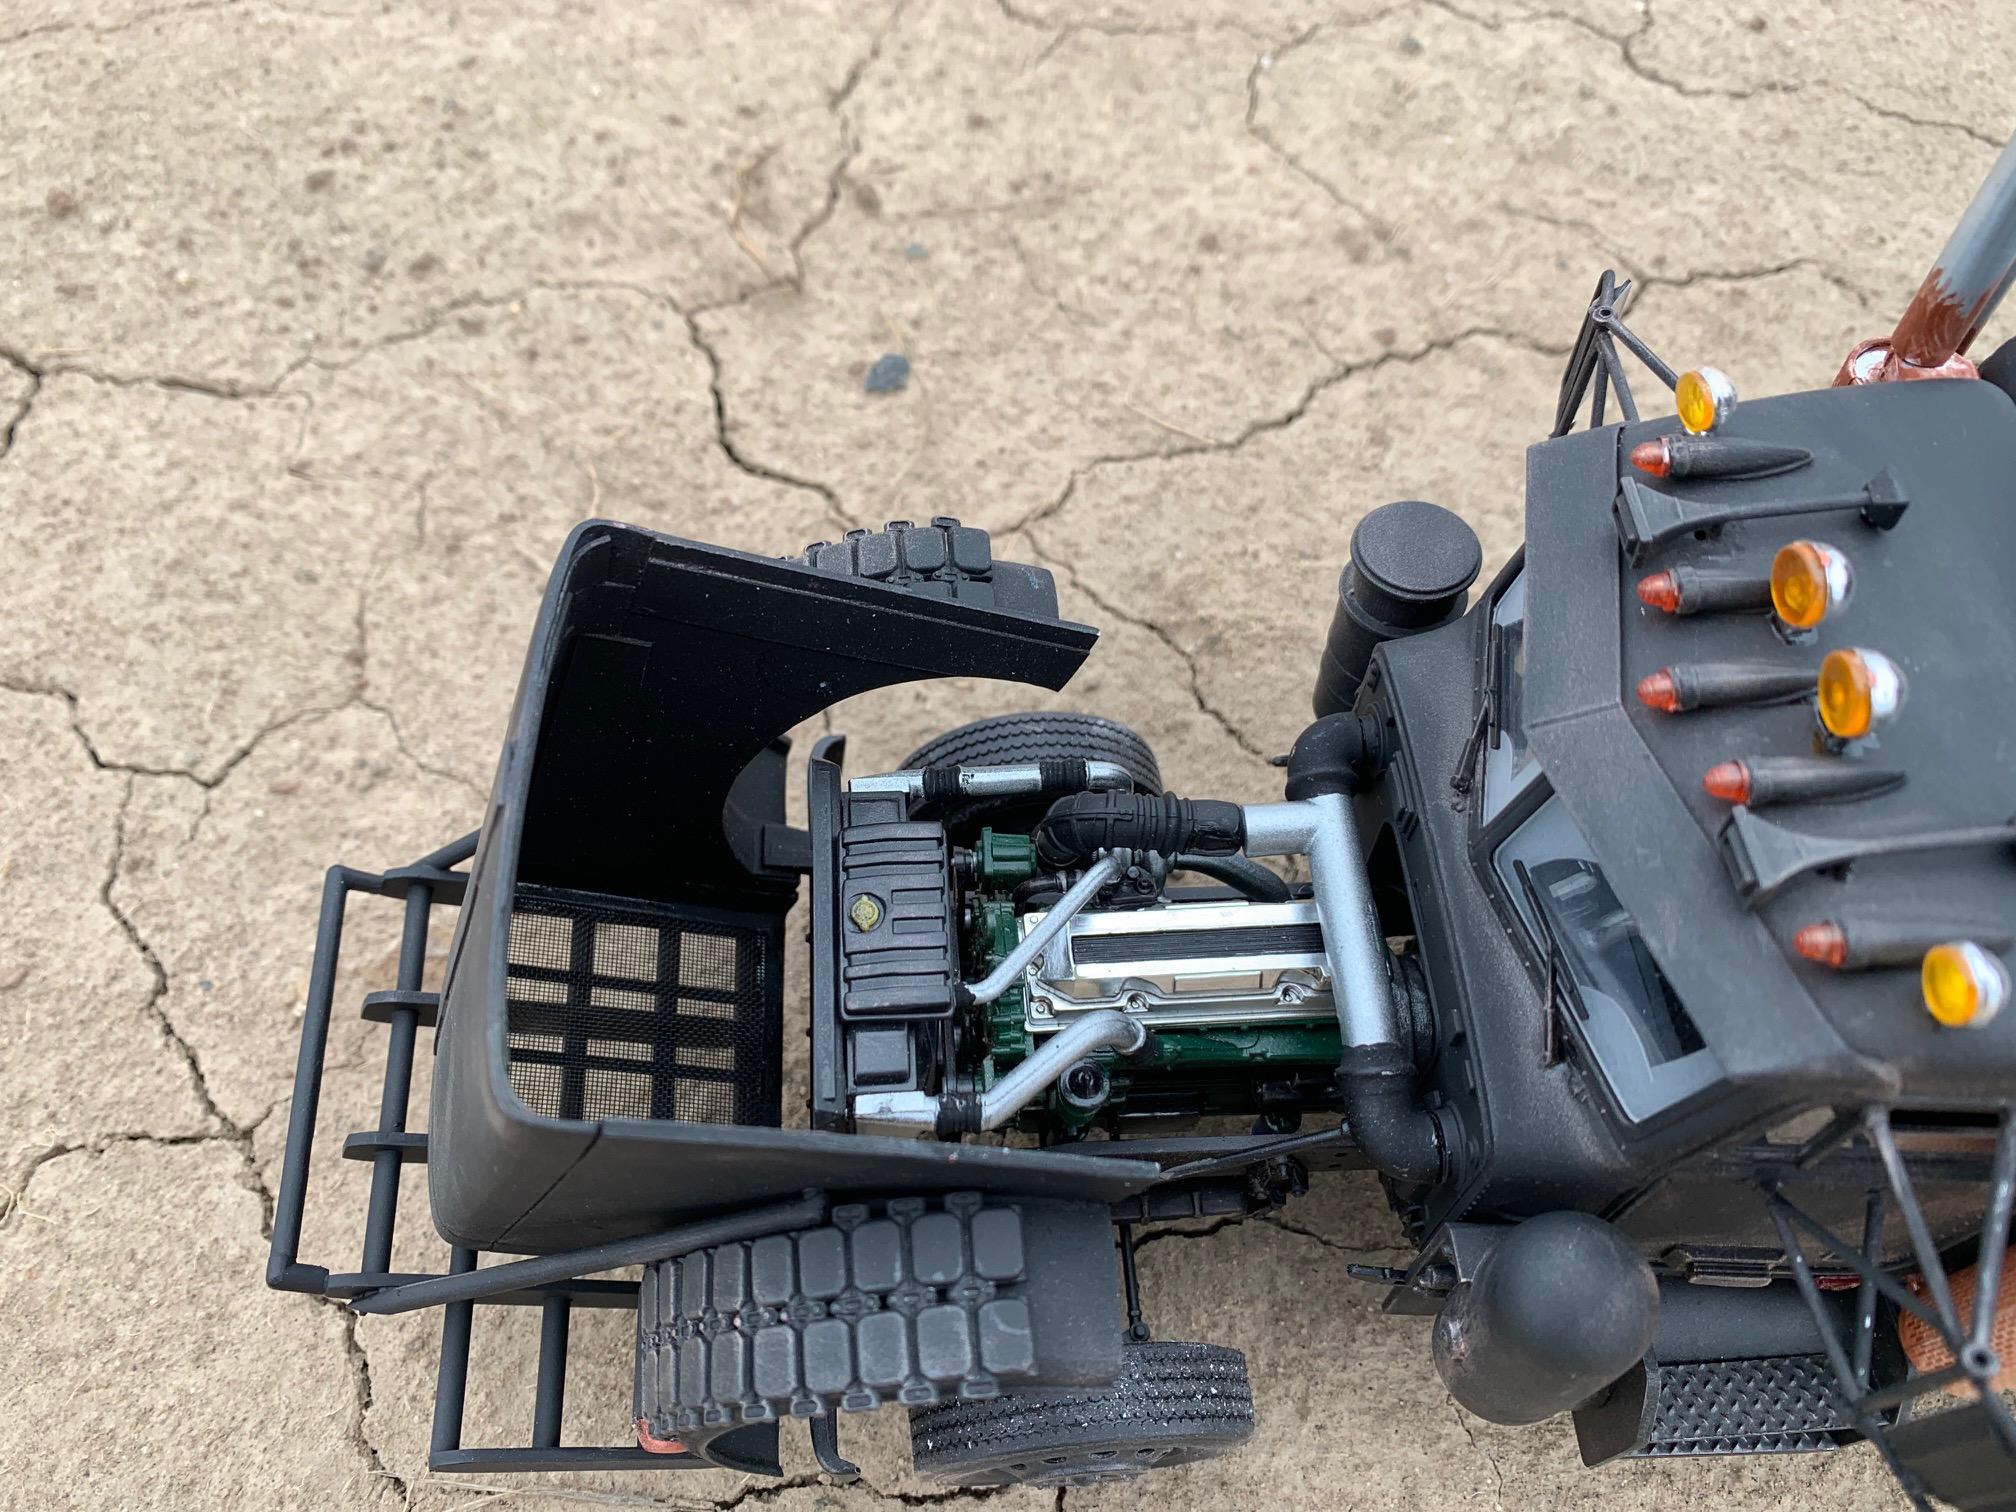
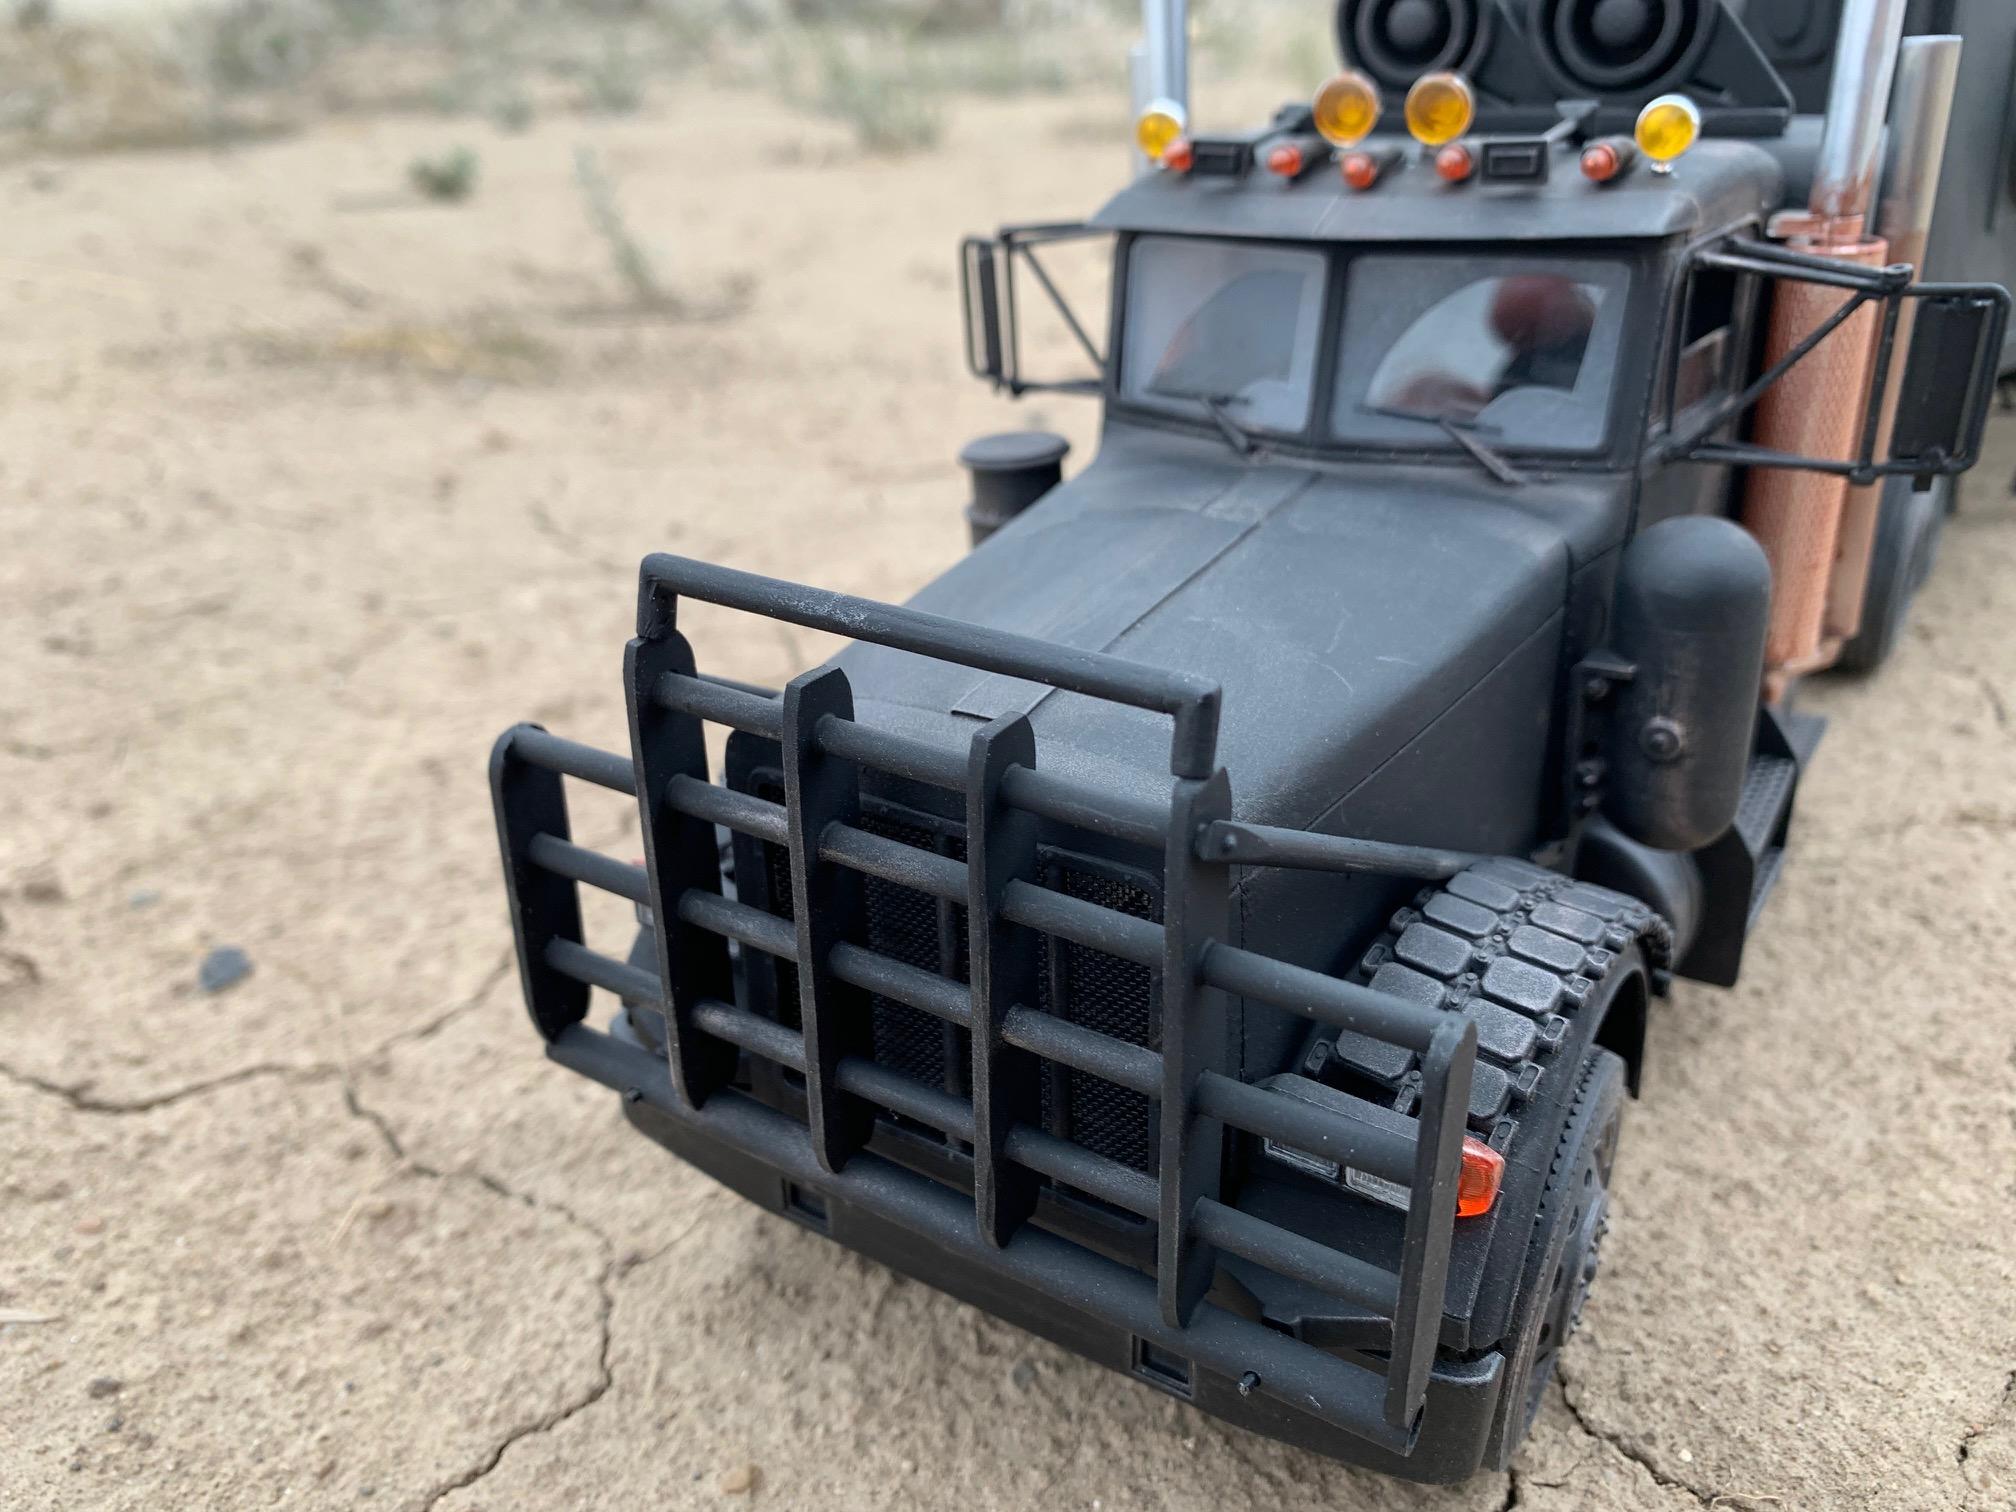
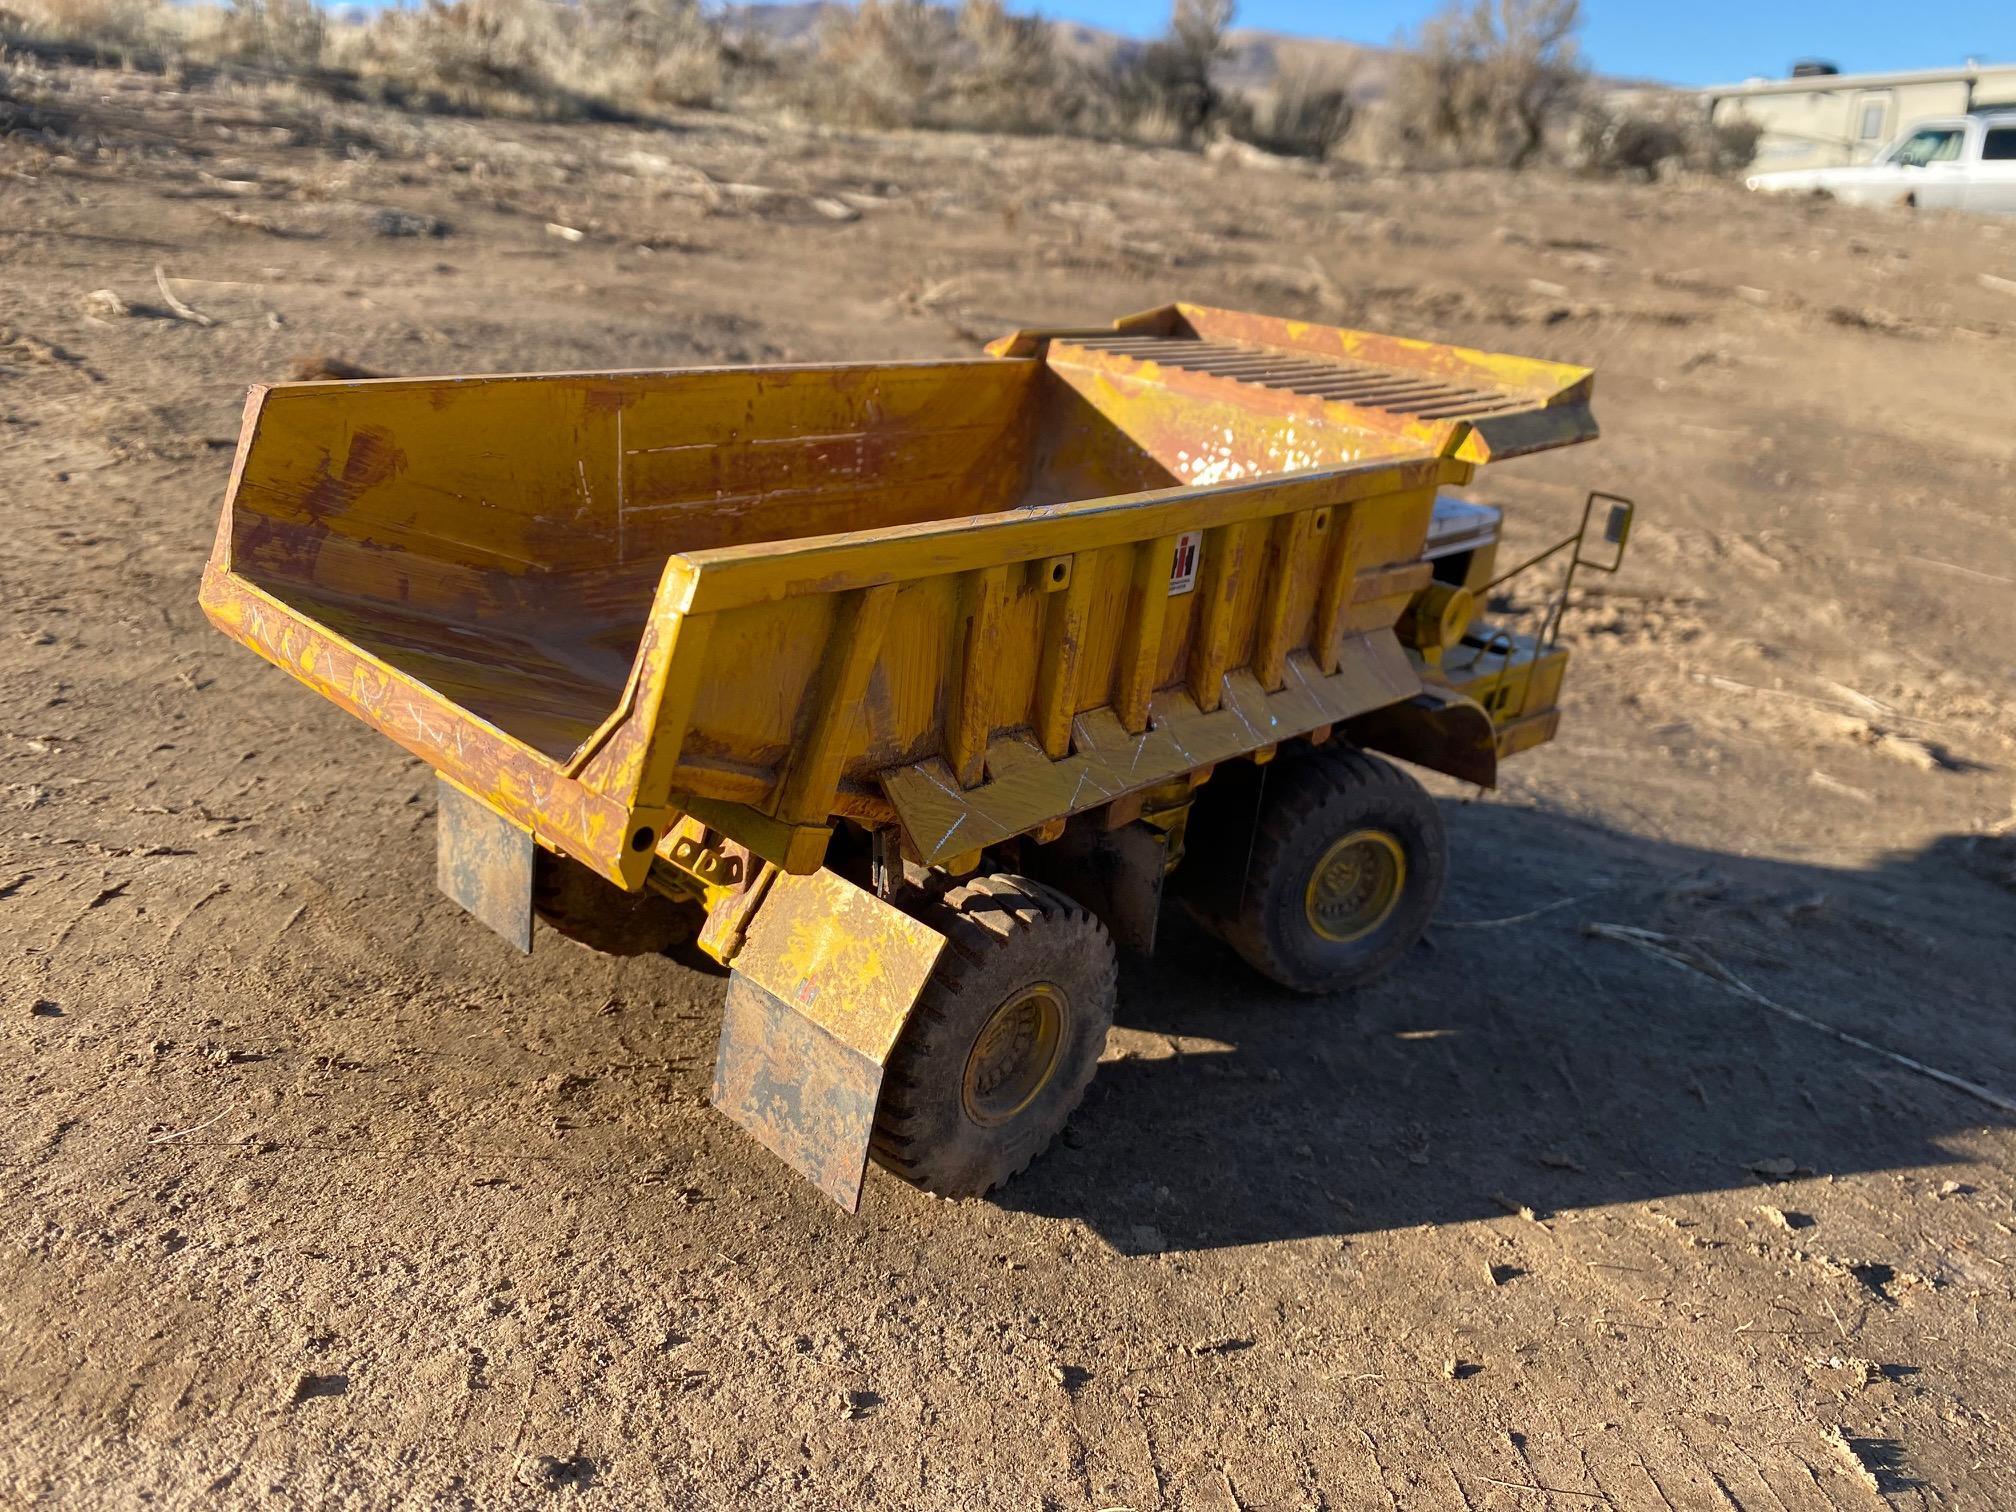
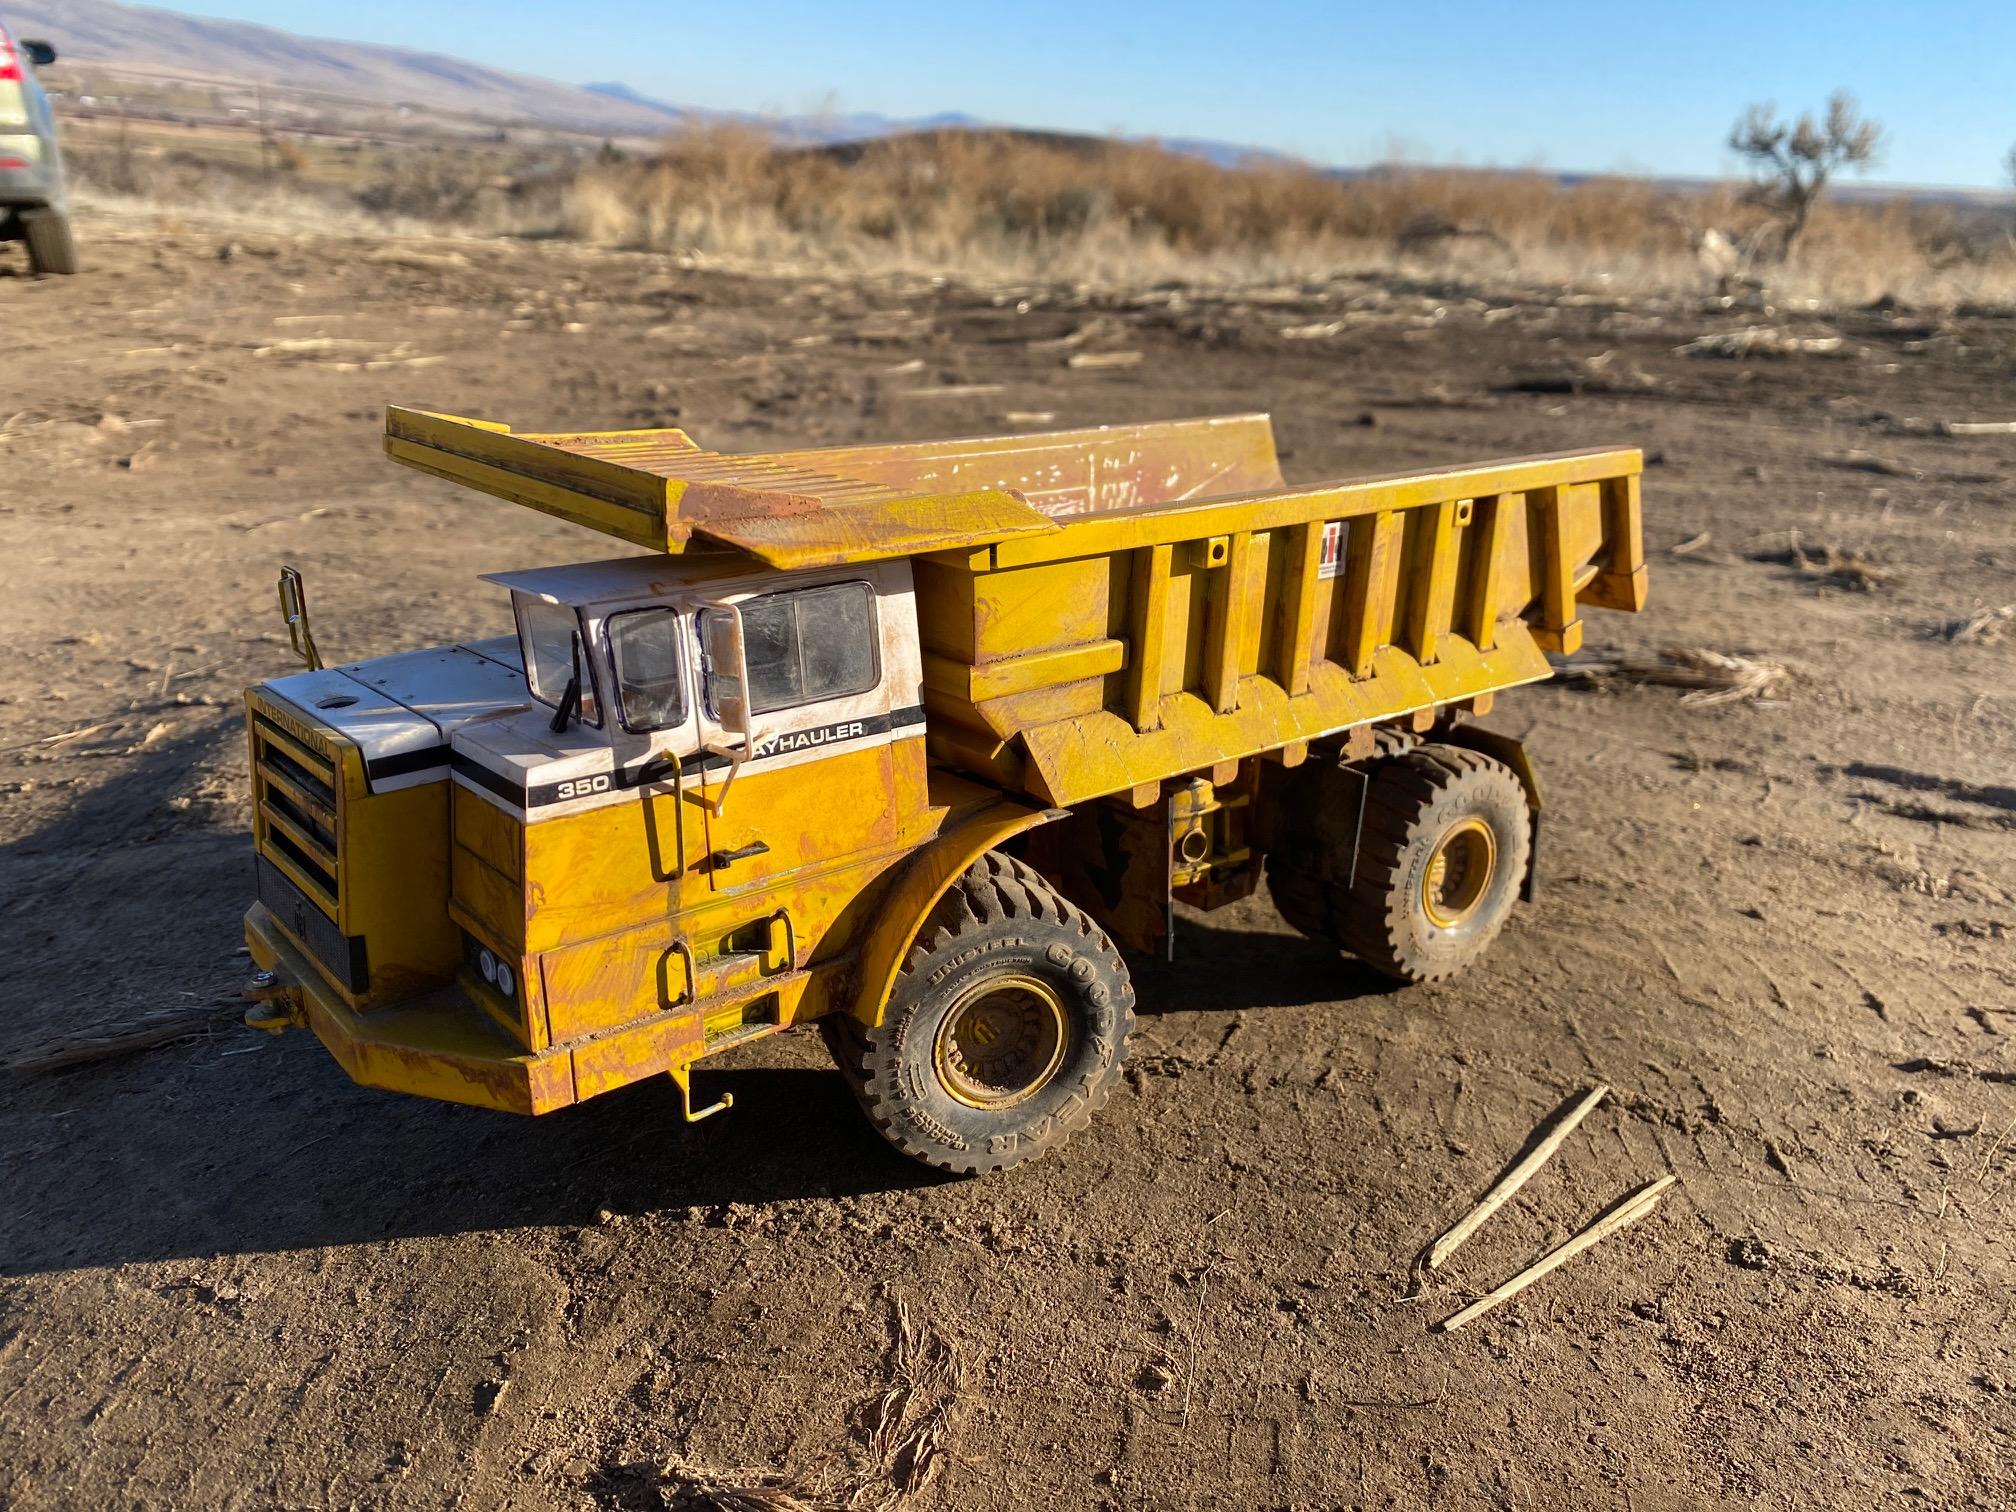
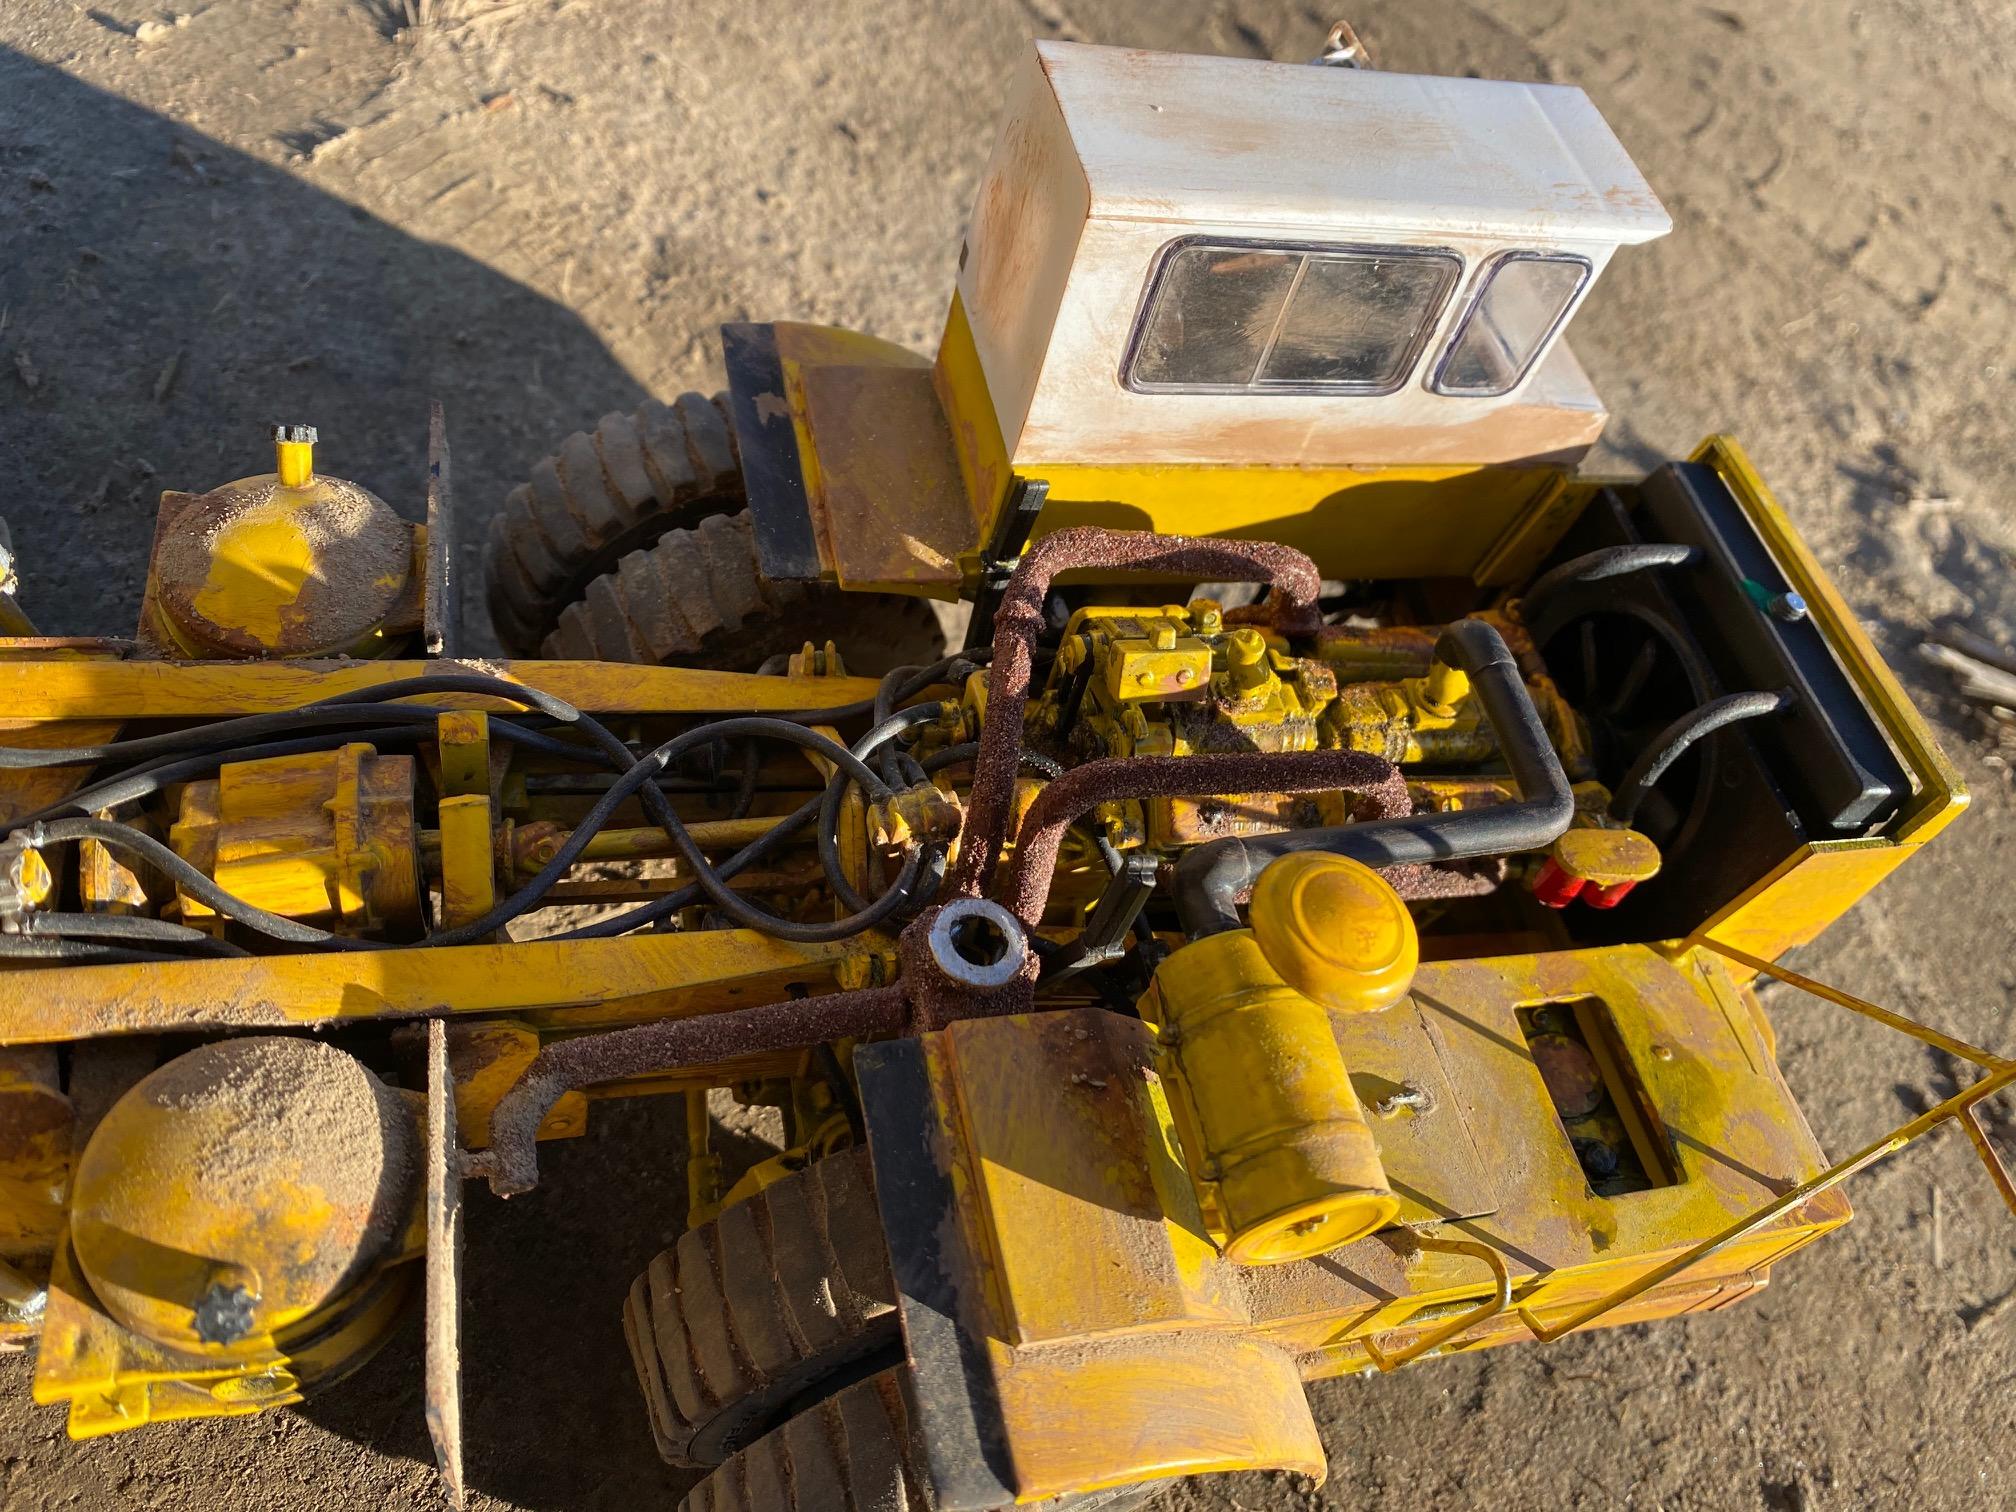
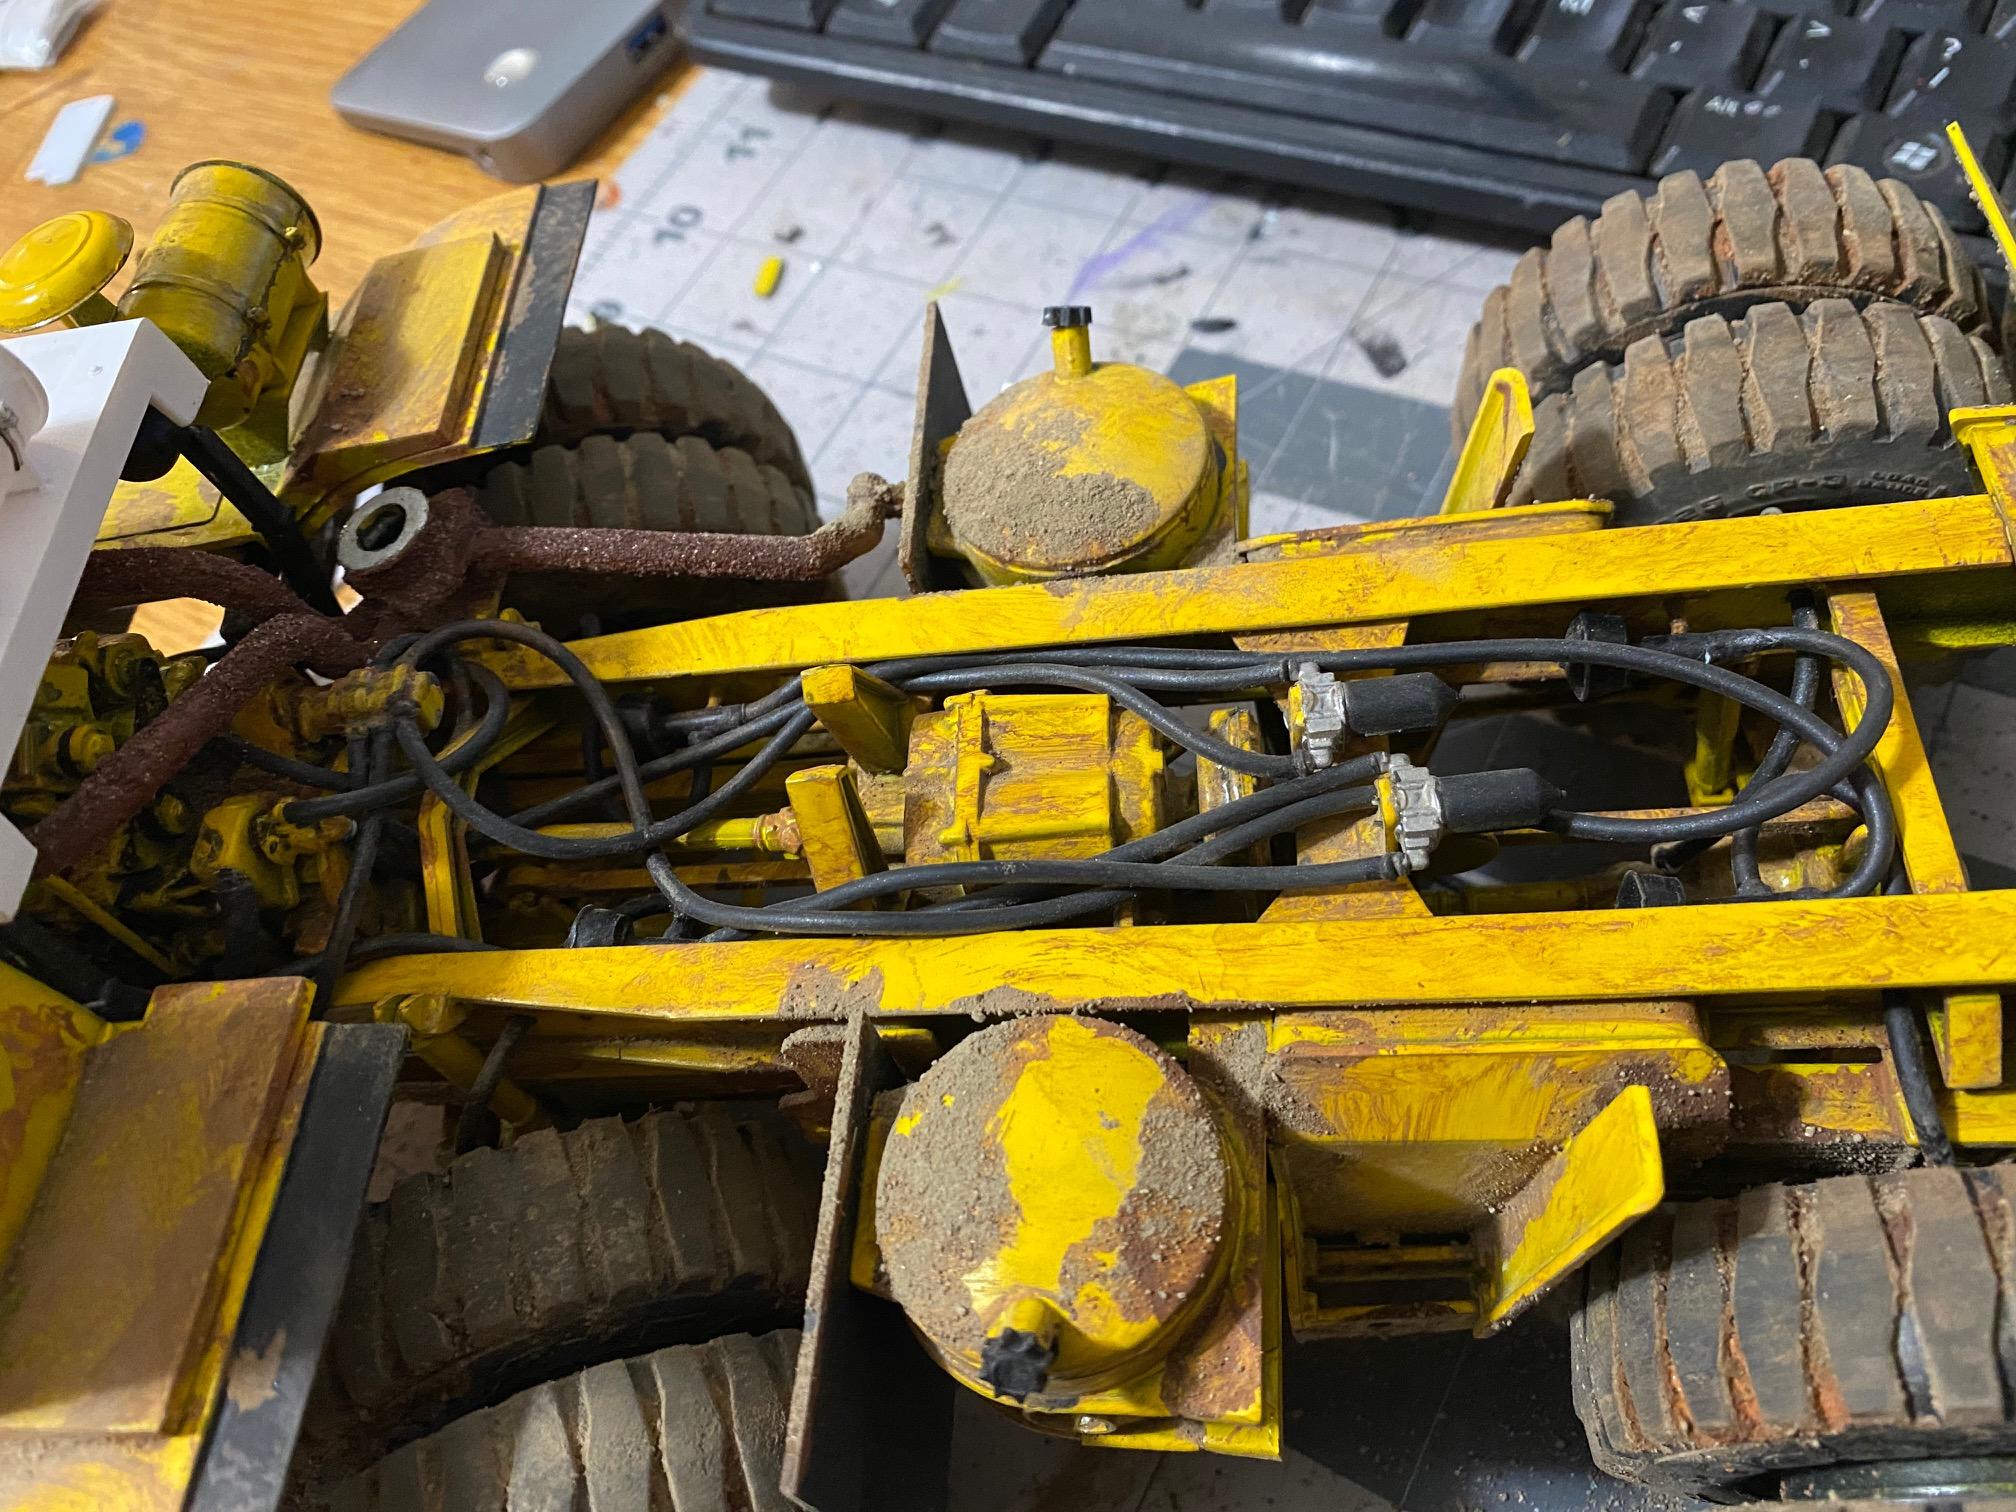
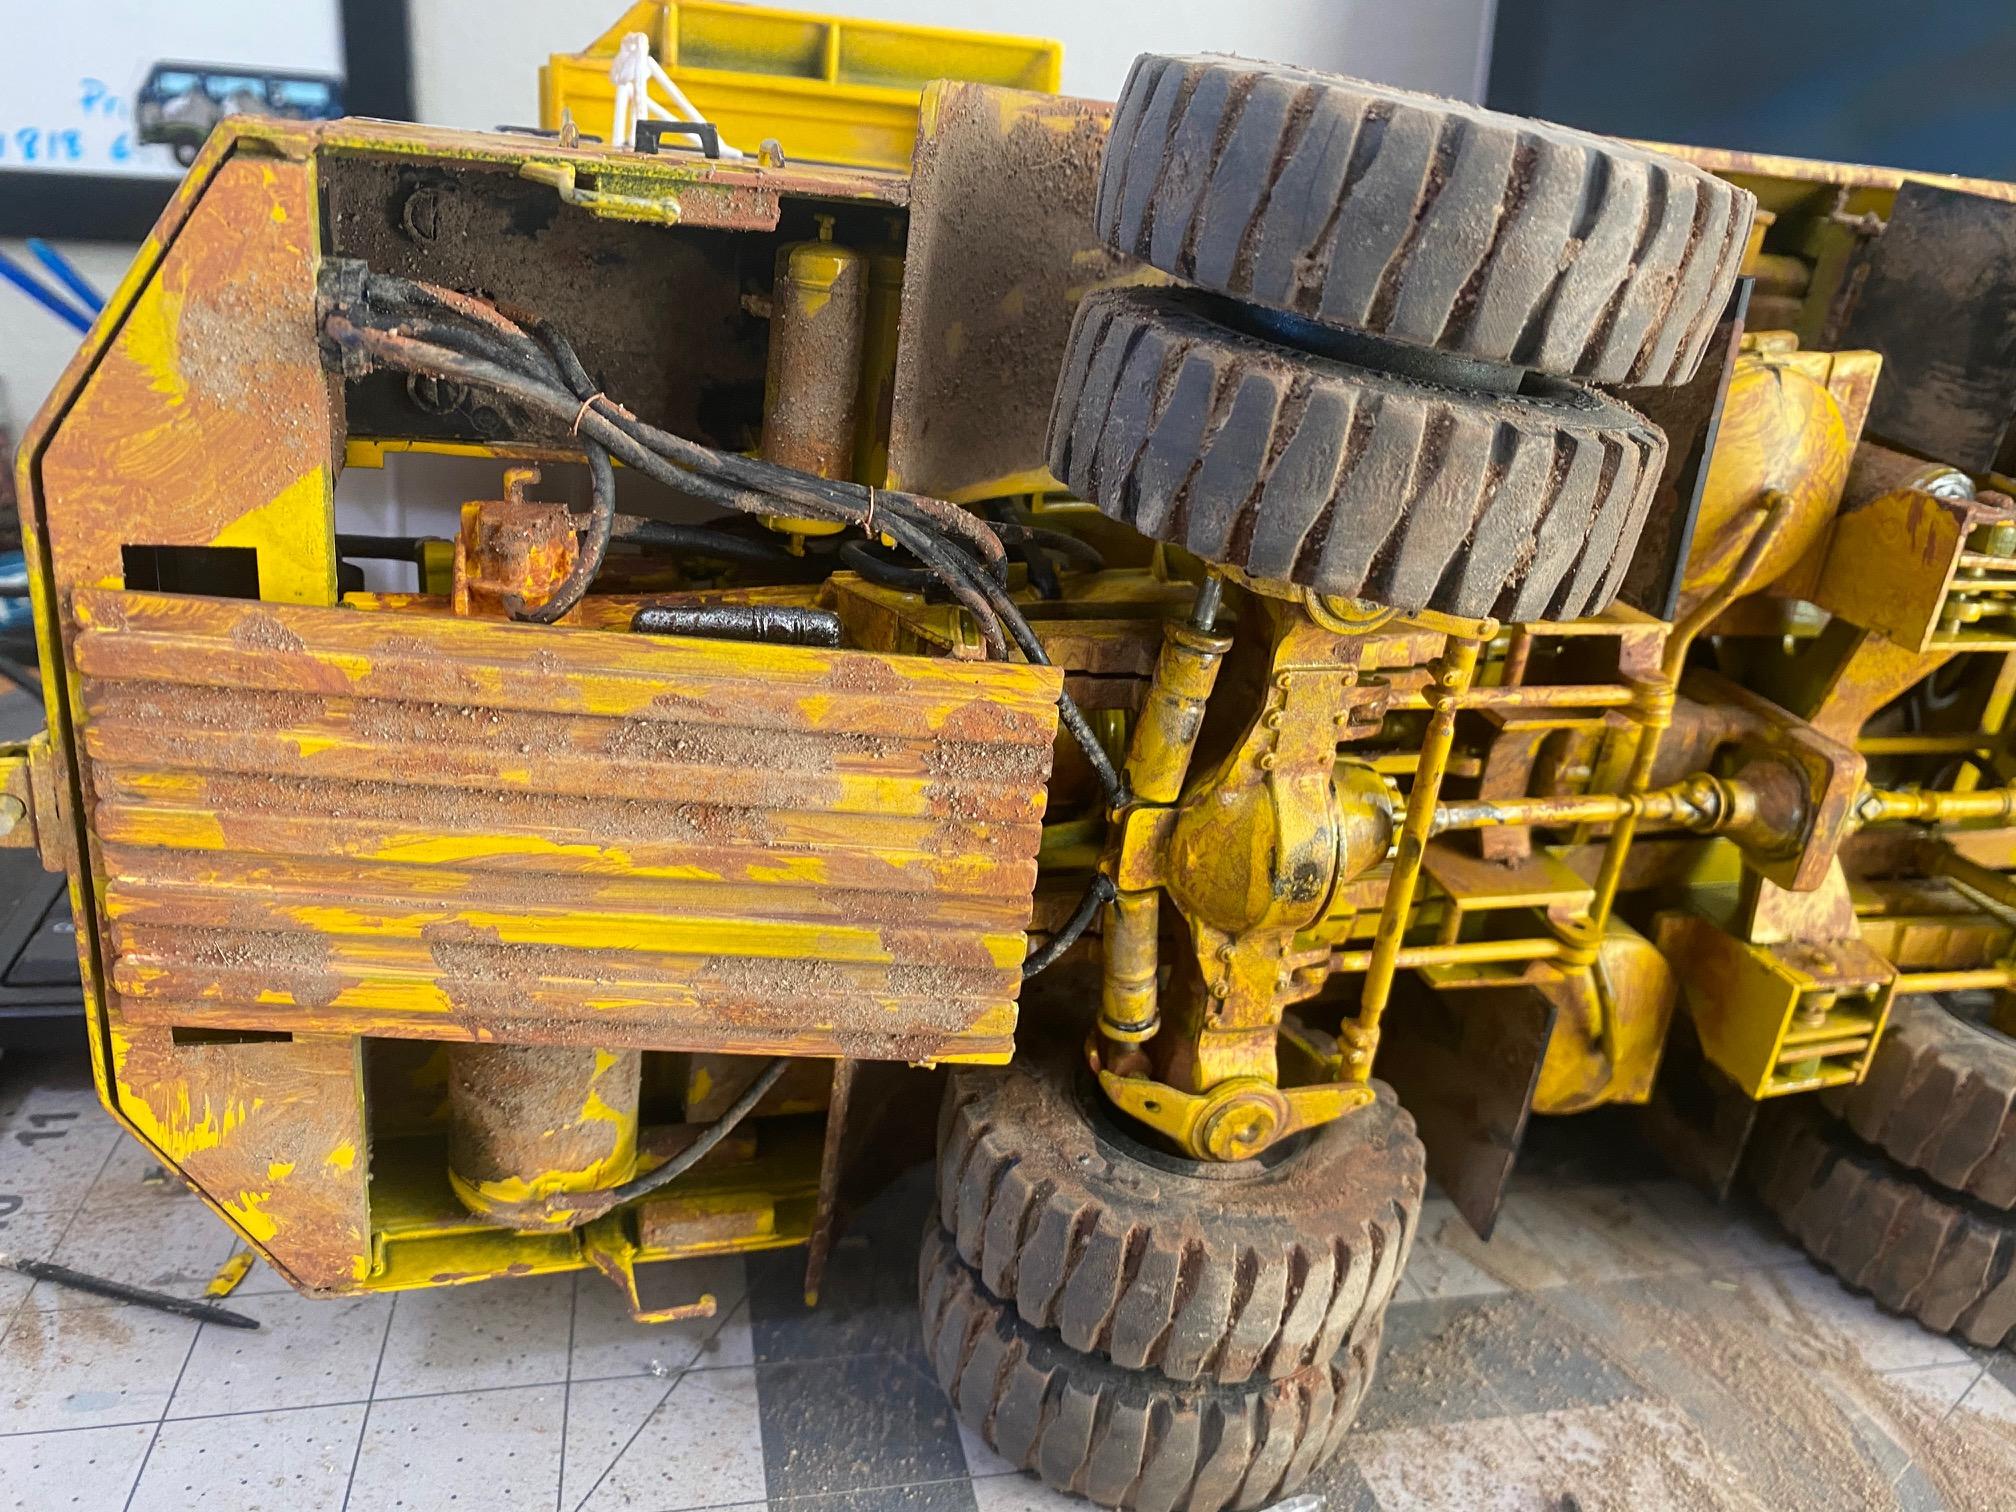
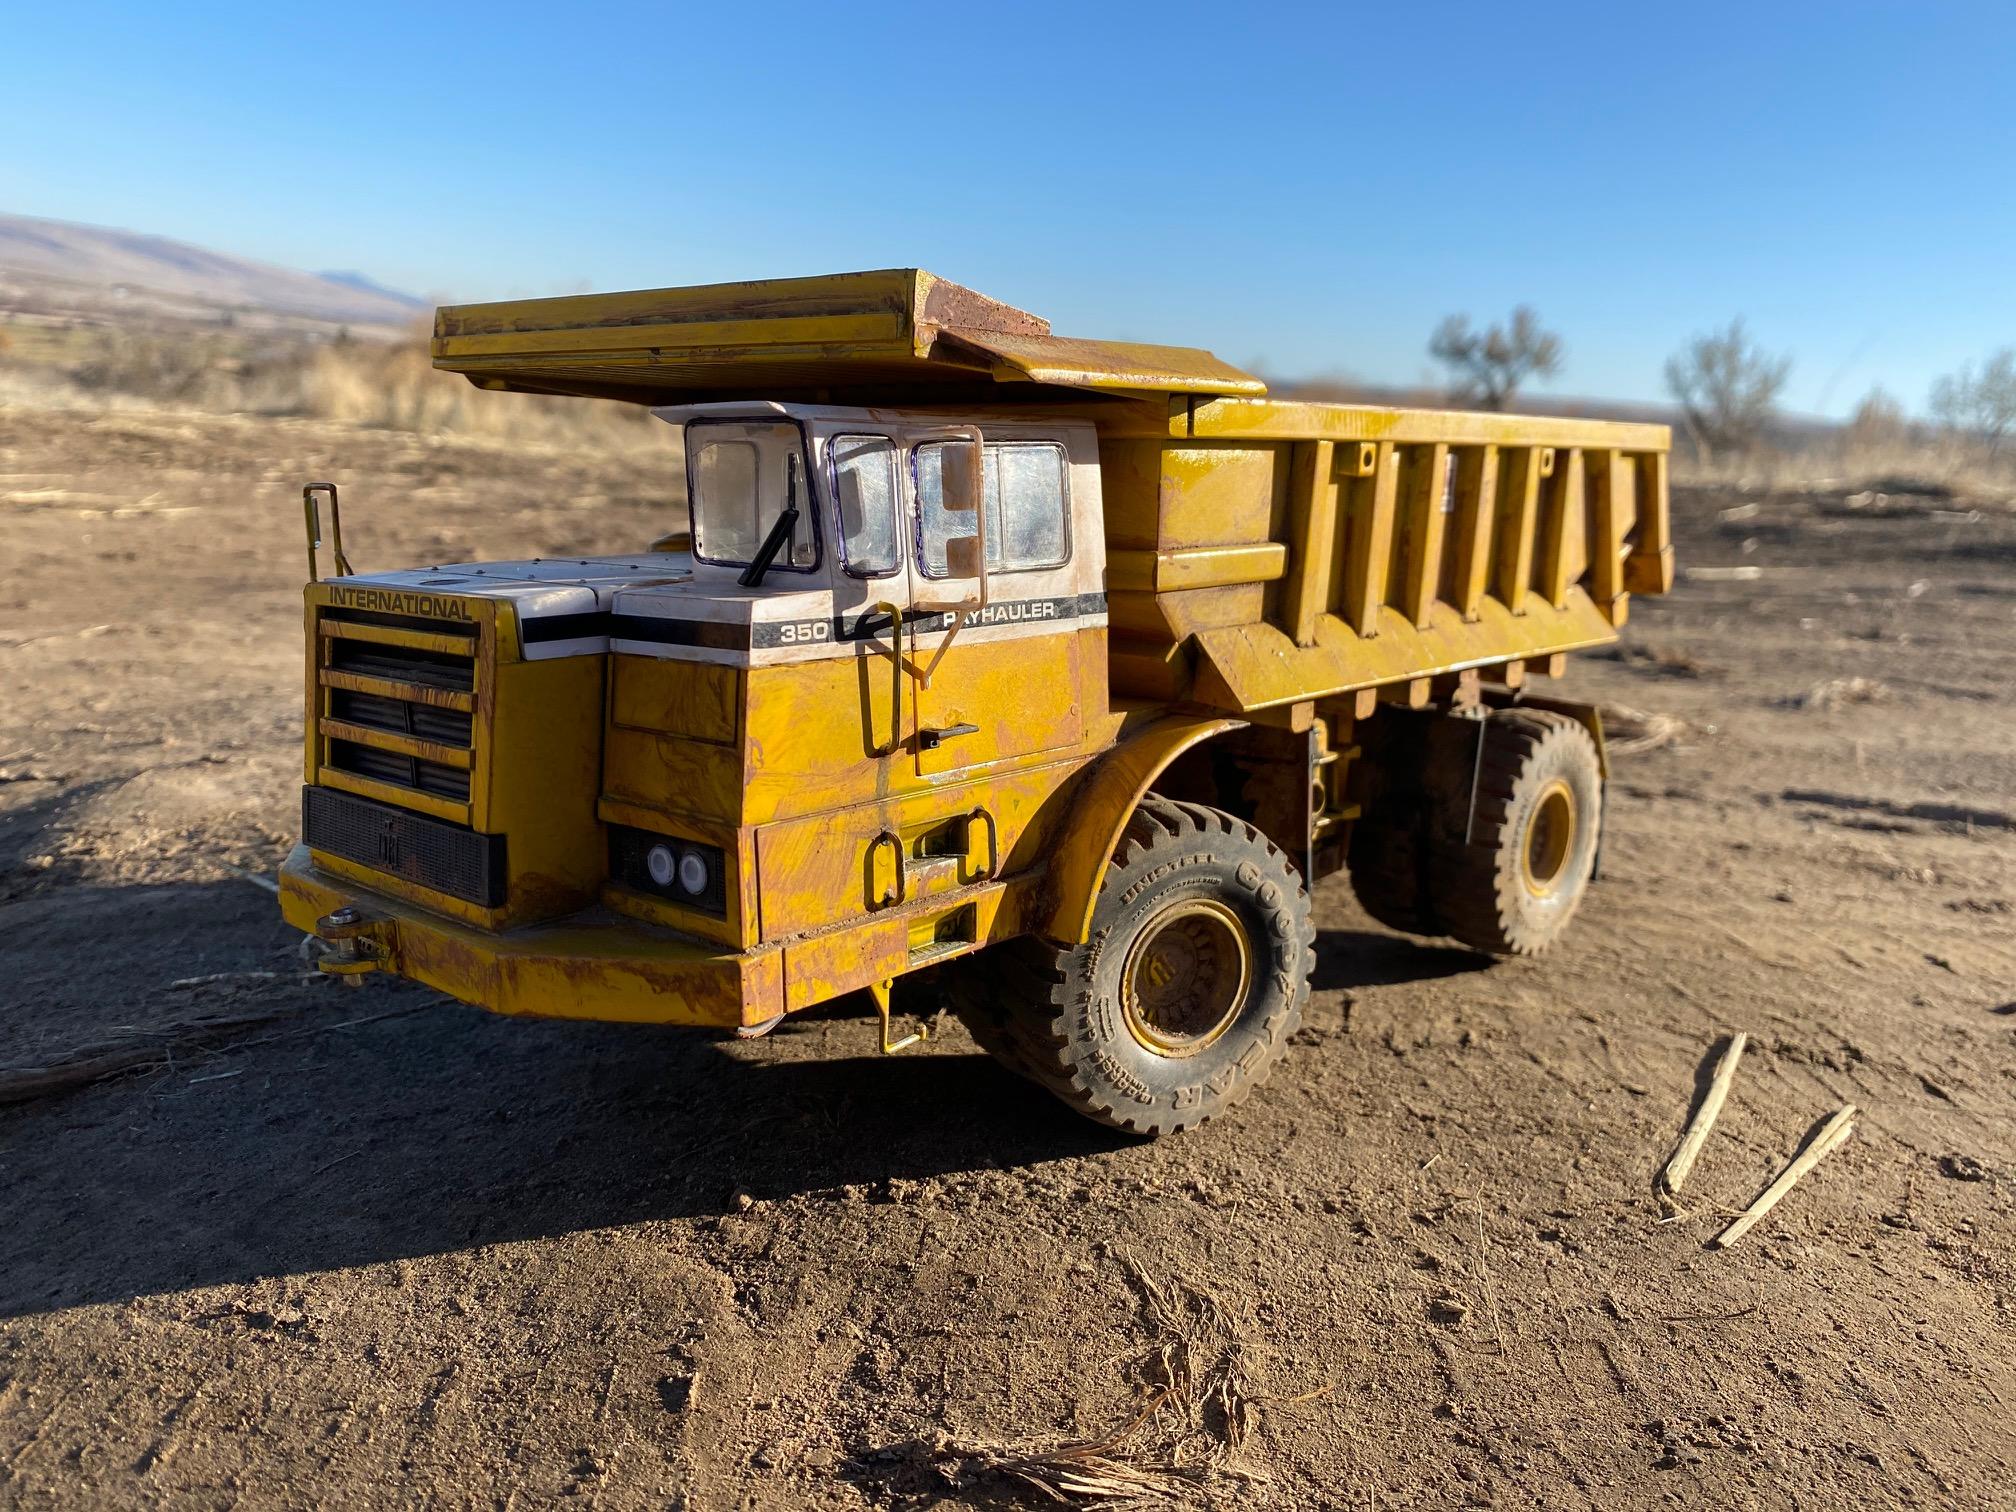
So, you may have seen that I am working on a Payhauler 350, lowboy trailer and International 4300 to haul it. The truck is done and now the 350 is finished. I only have the trailer to go. First off I love this kit. ERTL makes some great kits and R2 did a great job of bringing it back. Even if you build it box stock, it is a big build, 425 parts. So, I built it mostly OBB, but added a ton of hoses and weathering. I want this to look like a used, maybe 5-6 years old, not trashed, but they are getting their money out of it. So, not rusted out or dented up yet. I used all Rustoleum paints for the base layers, and Anita's (By Rustoleum) craft paints for the weathering. Hobby Lobby provided the tubing for all the hoses as well as the radiator hose that is actually leather. The dirt used is from my acreage, it is a super fine silt like powder I sift and use on my models. It is the right scale, about the same or finer than the stuff from AK. Please excuse the look of the headlights, the Micro Kristal Klear is still wet and it gives the headlights a white ring, it will dry clear soon, but I guess I got in a rush to get the pictures. Anyway, here it is:

-
Great job, turned out great. I am working on the very same kit as I view this. Its a great kit and it takes a ton of time. I like it and am inspired to keep going on mine
-
Don't get your hopes up, it is about the same as the MPC TA. Not to say that its a bad kit, but I have both and I can't say one is any better than the other.
-
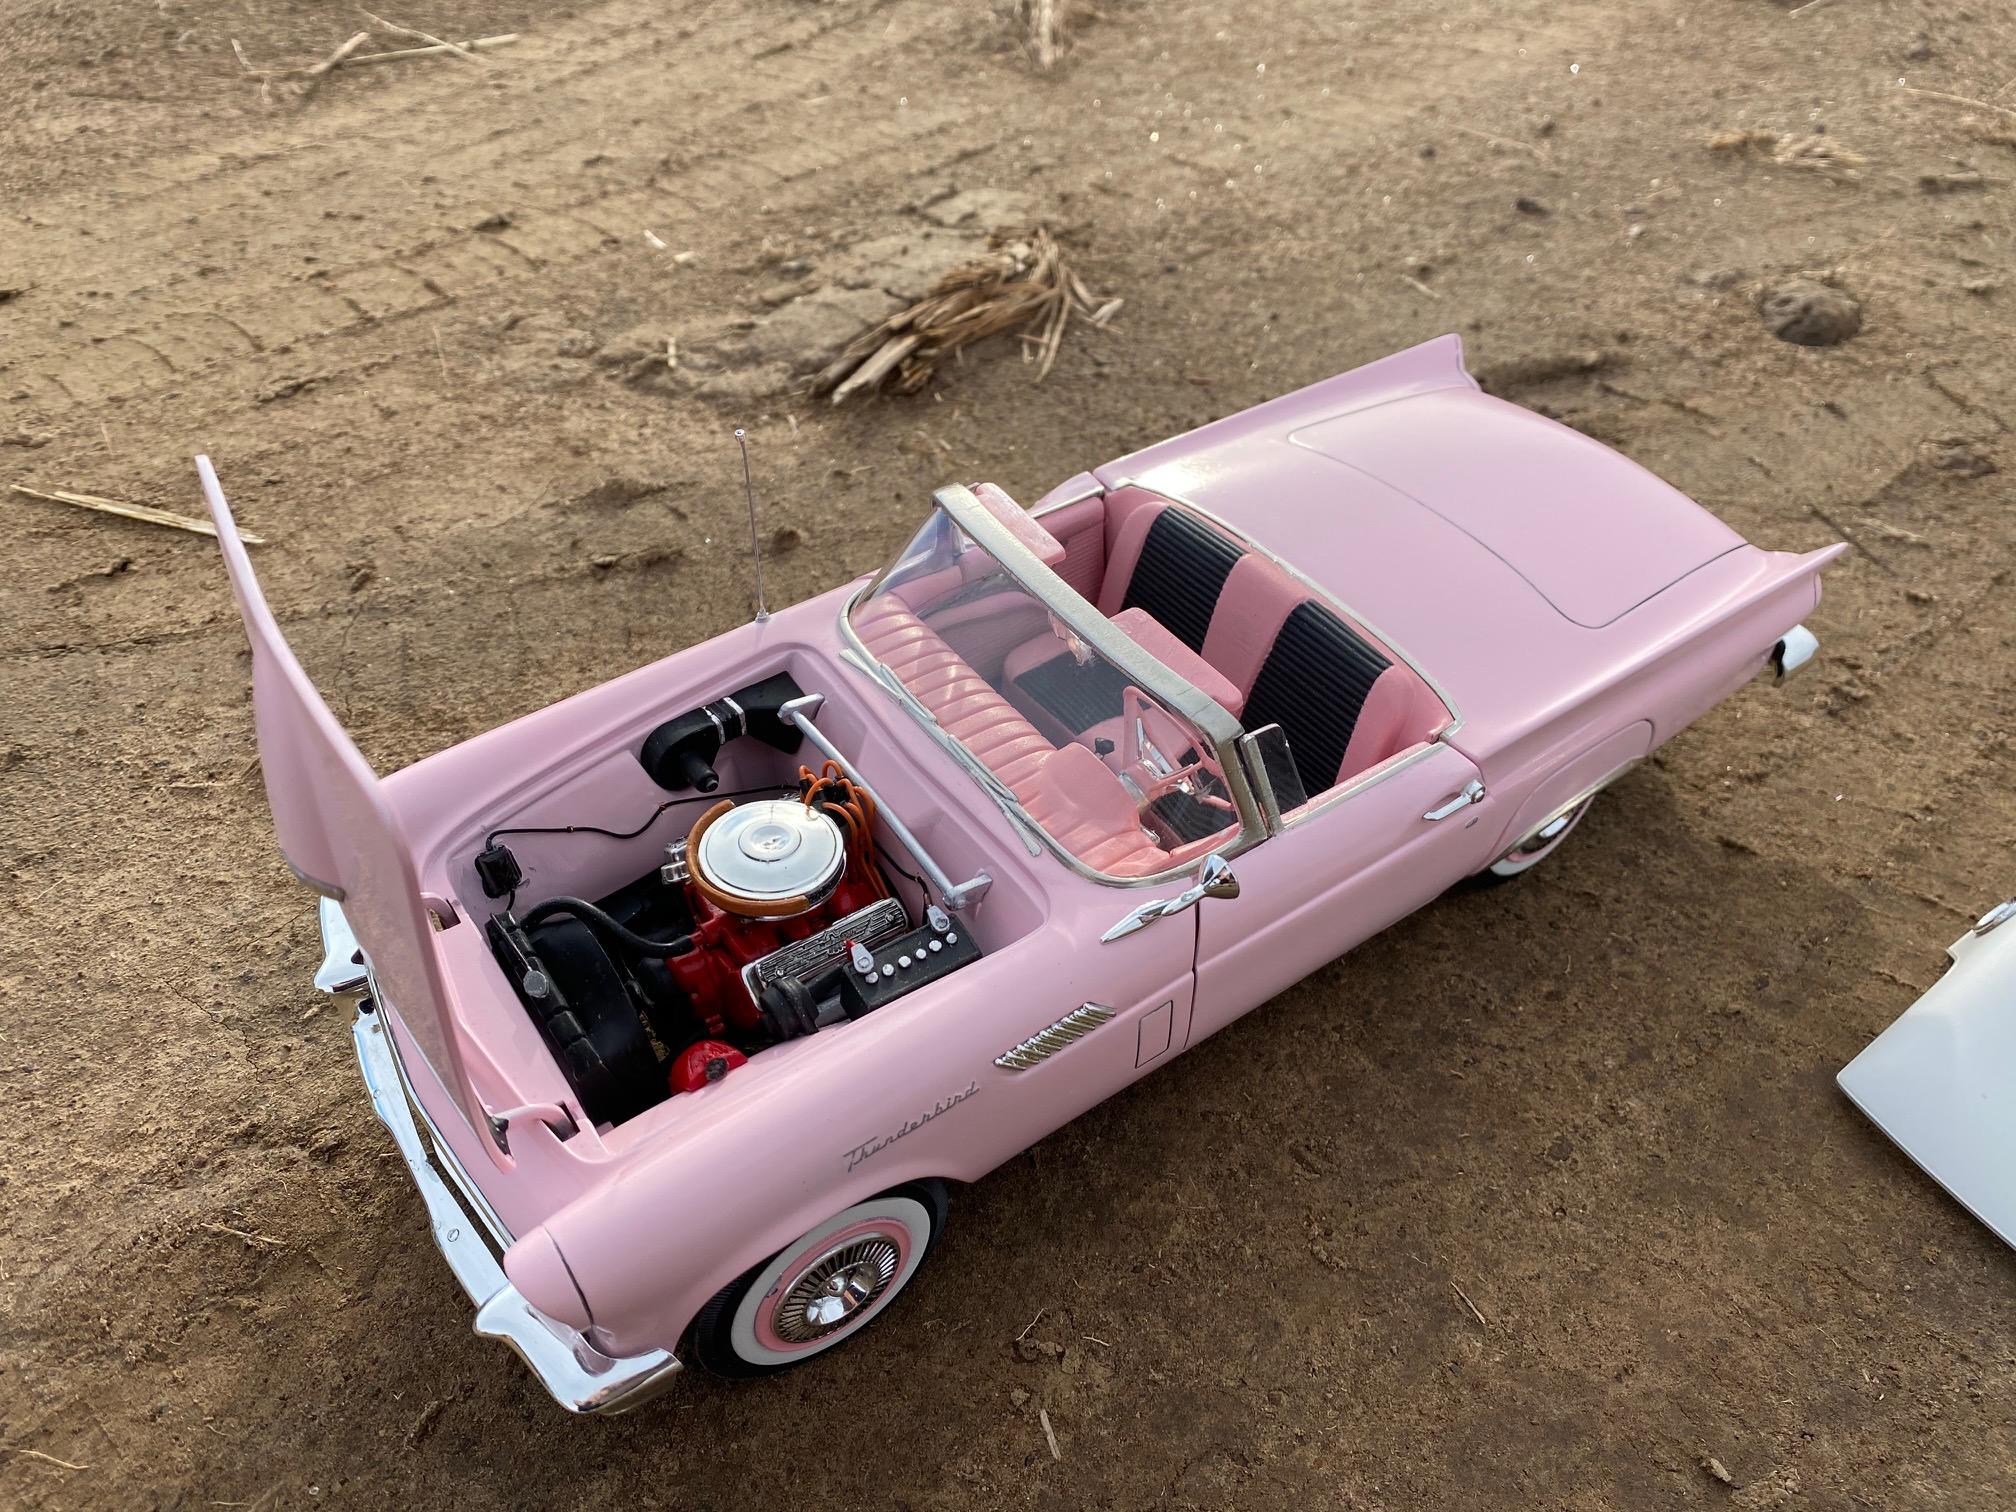
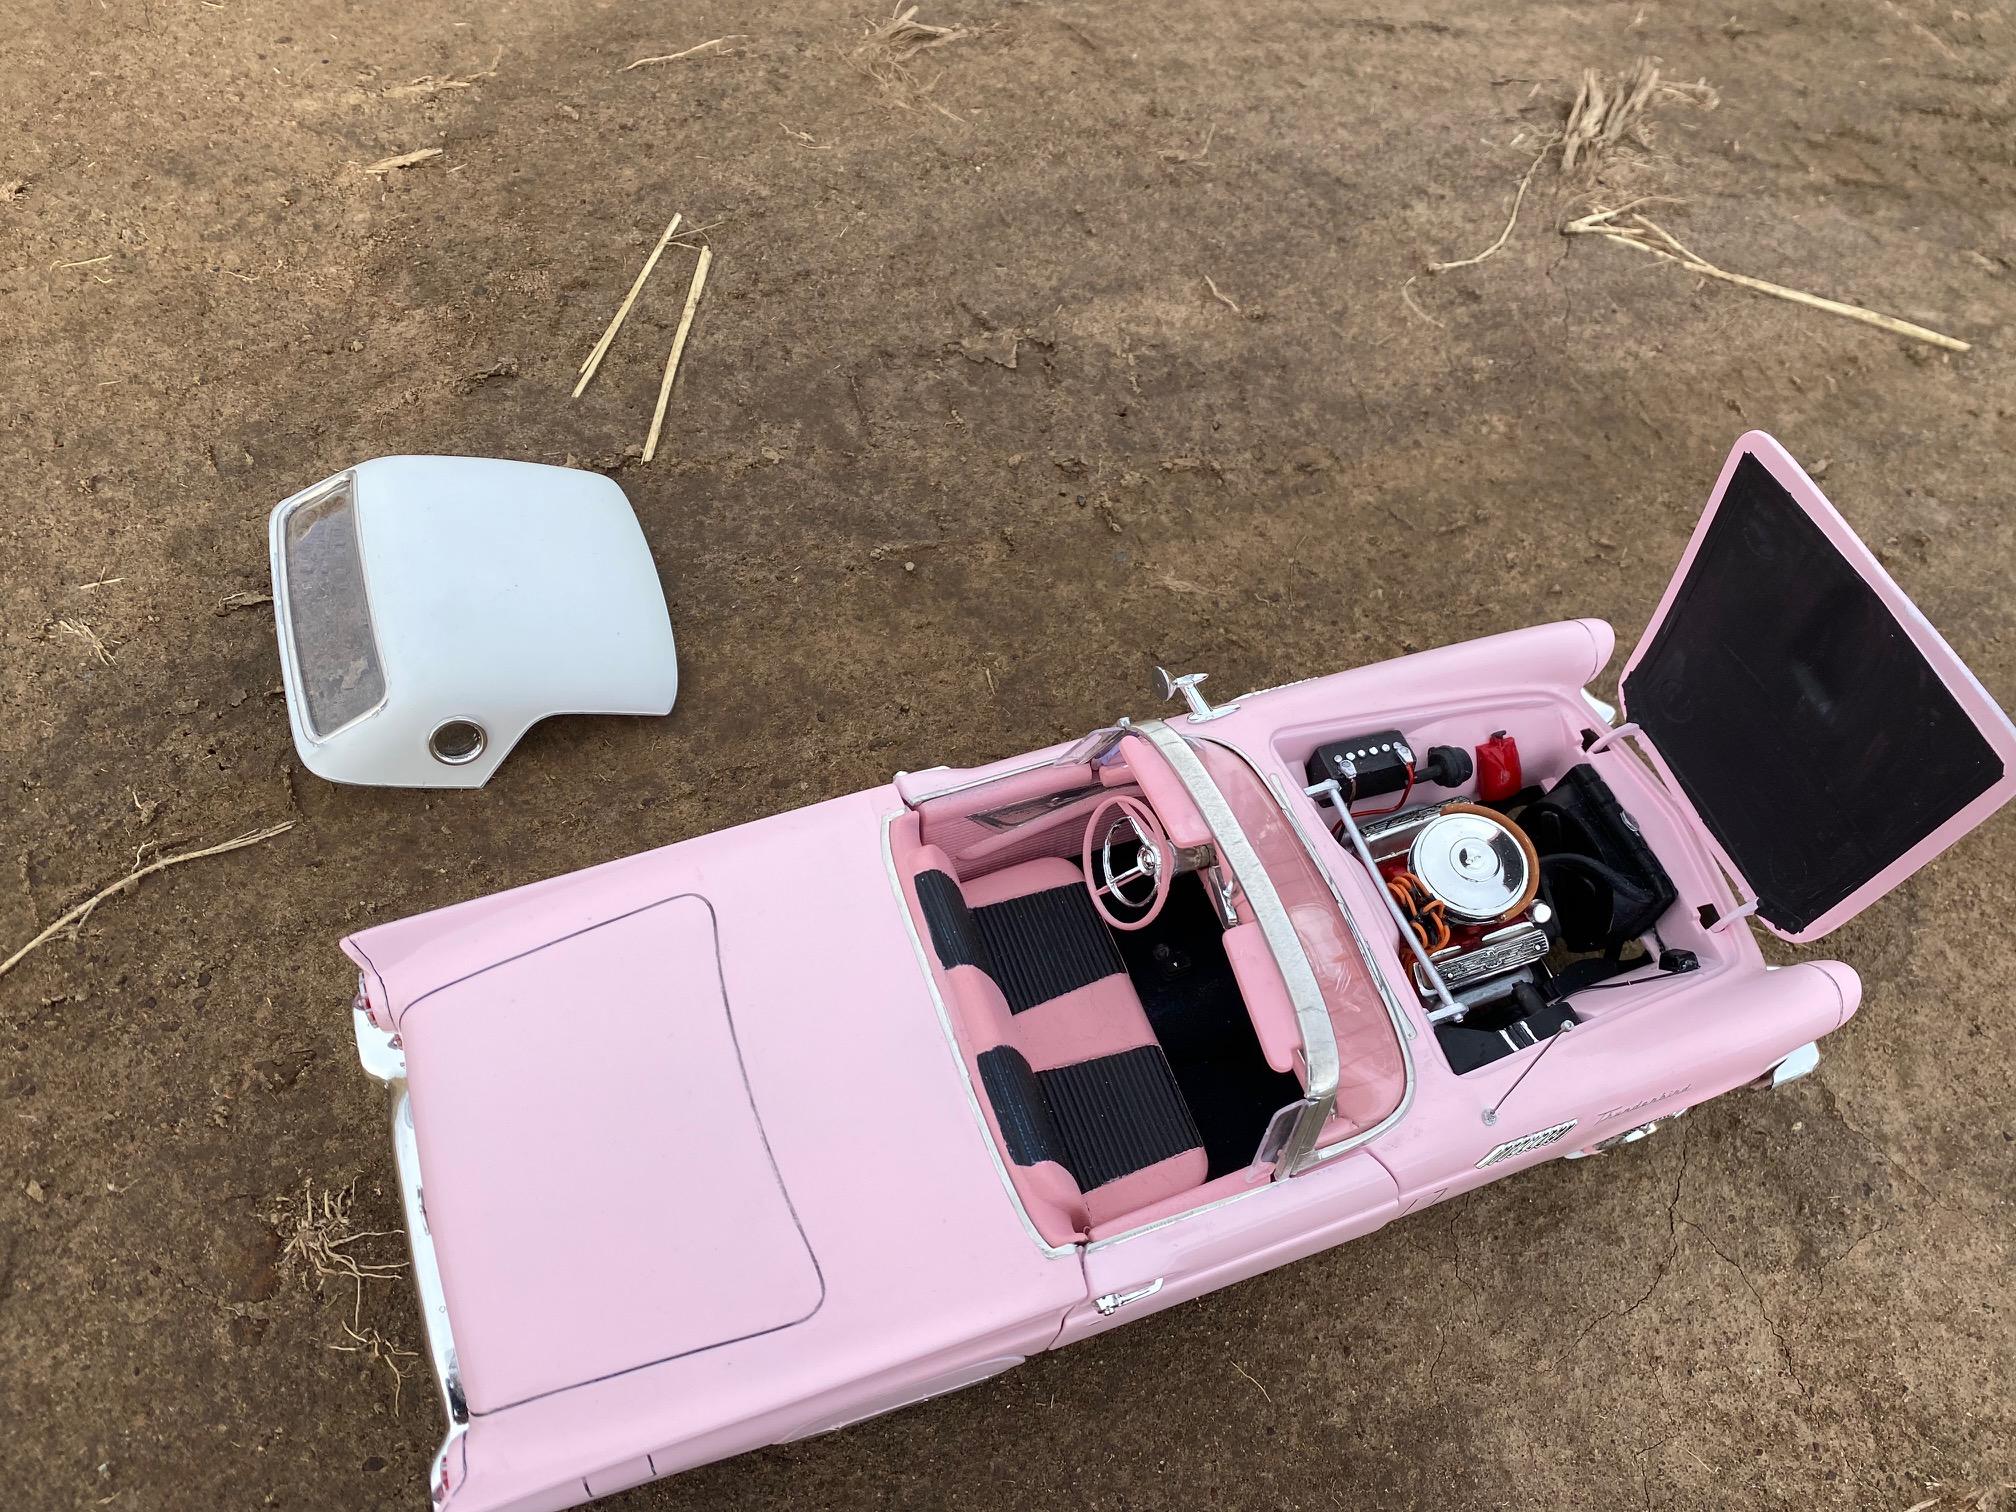
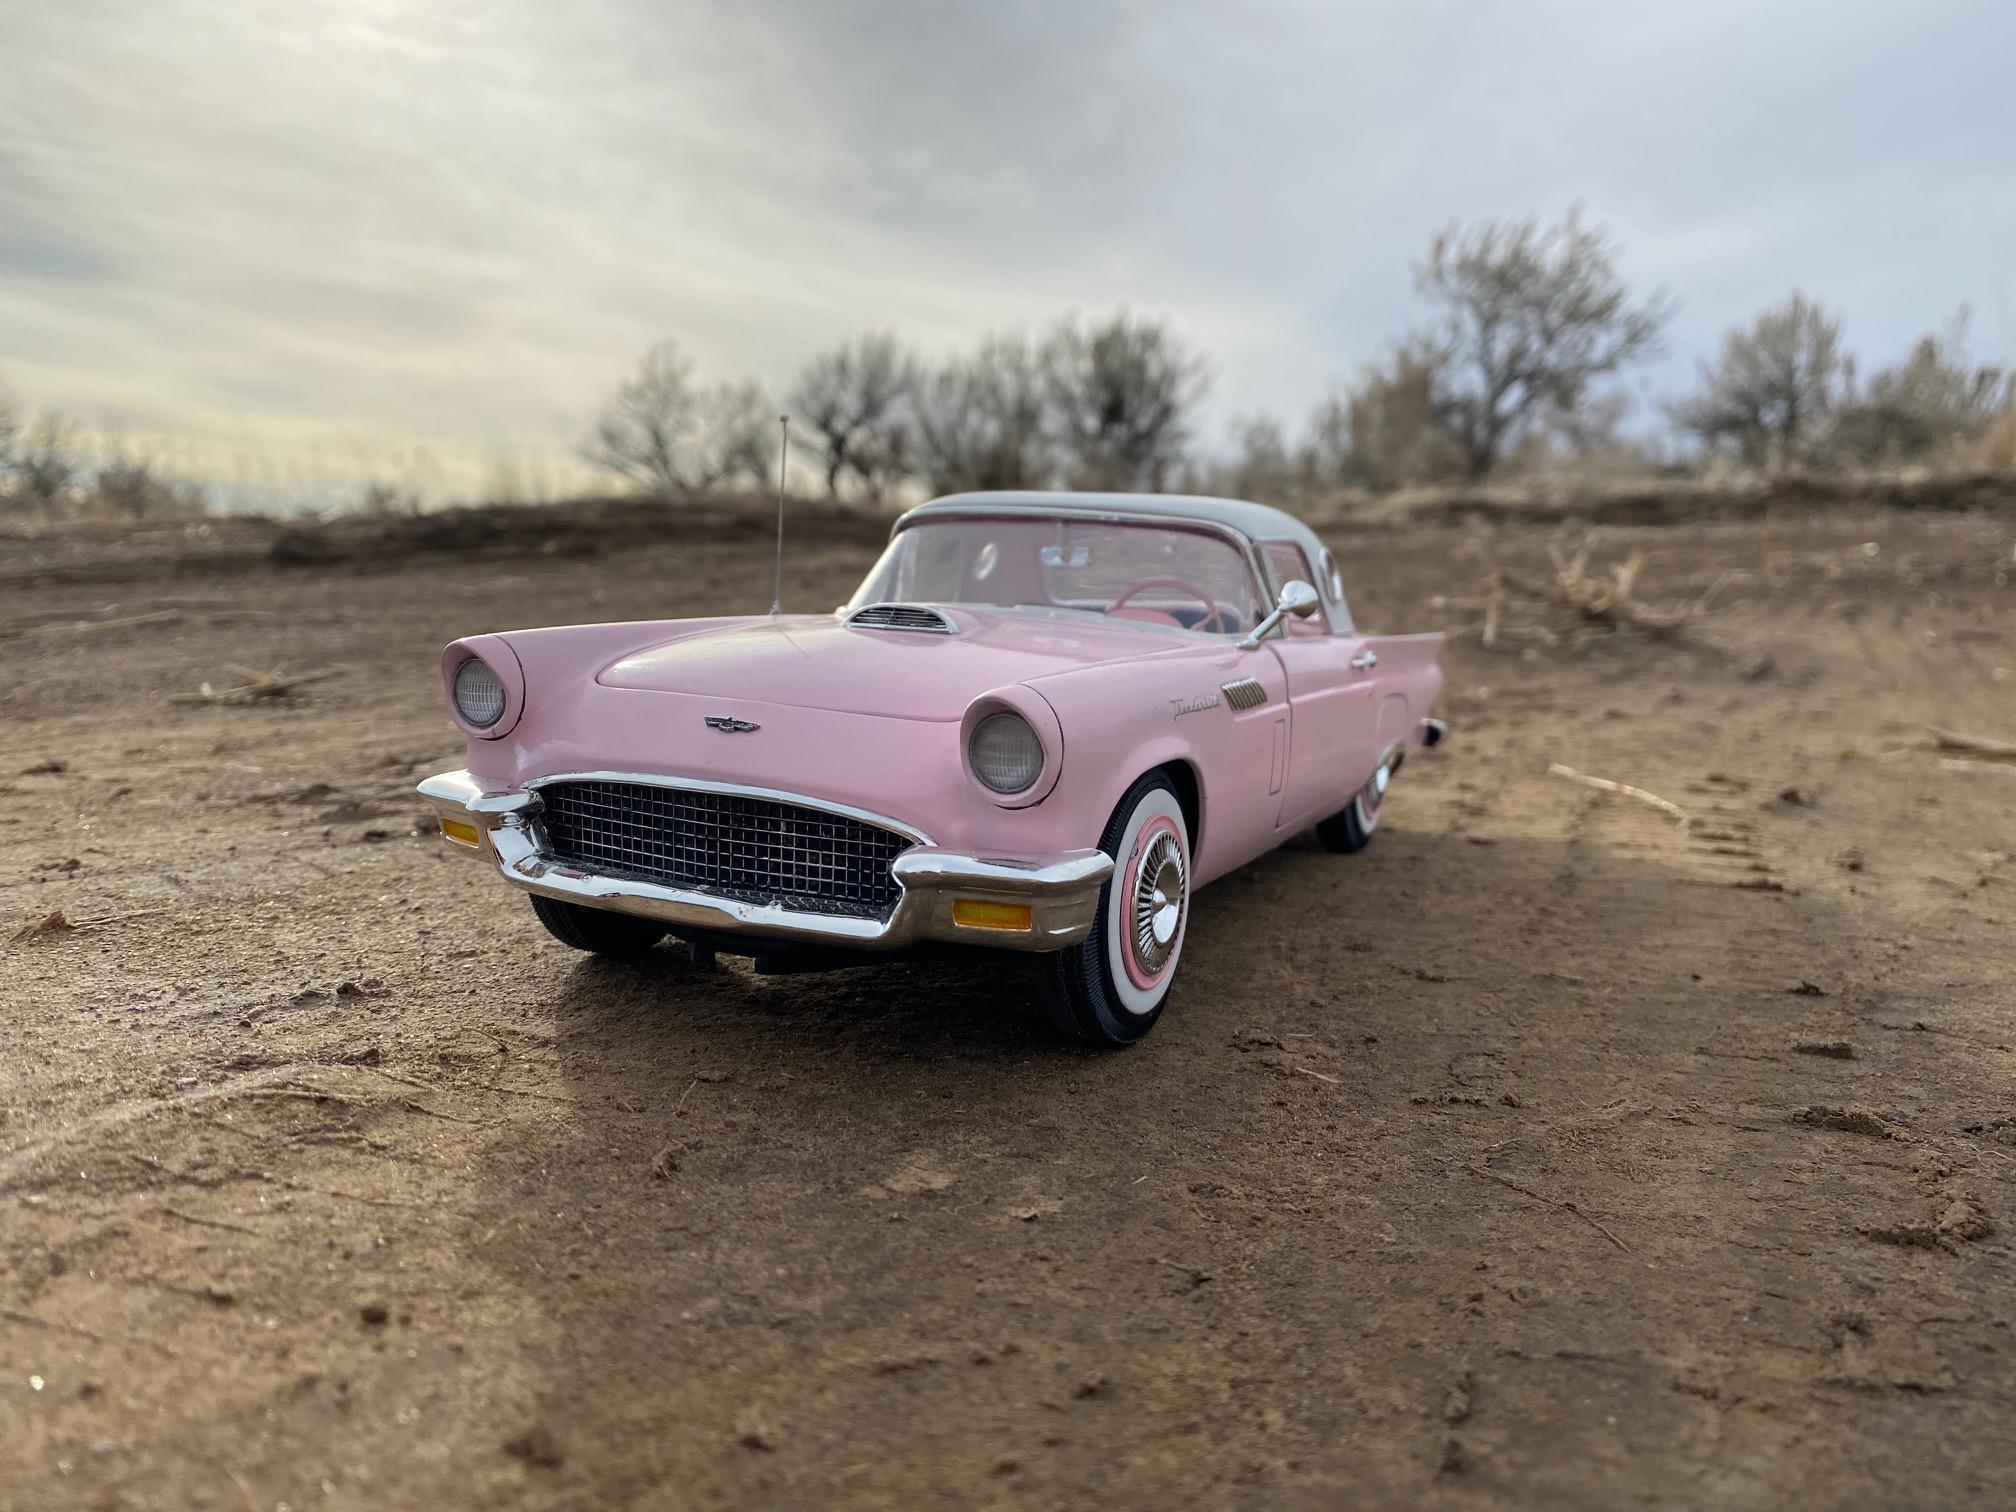
I got the new issue of the 57 T-Bird and when I was figuring out the color, only one color seemed to be right for this build. I also built it for my wife to put on the piano. I added some details to it, but not a lot. I shaved all the details off the engine compartment and added them back myself. I added the wires, and a scratch built washer fluid bag. Wired it with orange wire and not the kit supplied stuff. I added carpet flocking and lots of BMF all over this build. Other than that it is mostly OOB. It was fun and got me into a 1/16th scale kit. I also have the Trans Am and a Lindberg Serpent Show Rod, with a Bull Horn on the way.
-
I too will be watching this build. I have been working on this same kit off and on for about a month. The kit has a lot of short-comings and can use some added details. I am not sure you can even call the kit carburetor a "Holley" it is a lump of undefined plastic that has a minor resemblance to a carb. I have spent some time searching for a proper Rochester Q-Jet and there are none being made in 1:16 scale. Even though it is wrong, I may get a 3D printed Holley just because it has more detail and looks correct. Anyway, great job so far, I look forward to what you do with it.
-
I wish I could do some of these 1/8th scale Eaglemoss and the like. Just too much money for me. I am also impatient and waiting for a year or more to get all the parts would drive me crazy. However I do have 3 1/8th scale Monogram kits, 2 Corvettes and an IROC. These things are huge and take up a lot of shelf space. As of now I have no idea where I am going to store/display them. Your kit is looking great, very nice kit. Do you plan to add more details? It looks like you could or just display it as sent. In the end I am sure it will be beautiful.
-
I am glad you said that, as this is my plan and I am doing it because it will be more challenging. The body I have planned was never used as a "Stock Car" and so I will have to heavily modify the chassis to fit it under the body I chose. As it worked out, I have 2 kits that I just have not had any real inspiration on. Then this was suggested and I pulled them both out to see if it was possible, and it will be. 1 kit I got at Goodwill for $6 and the other I got at an Antique store for $7. So, I have room to add and make it fun.
-
That would be fantastic, PM me and we can work out the details.
-
Not that it can’t be done, but it would take a very skilled builder to even change the Courier into a Mazda Rotary truck. Almost every panel, grill and tailgate were different. I love those trucks and if there was a kit I would get it.
-
1/24 Working hinges ?
Oldmopars replied to PierreR89's topic in Model Building Questions and Answers
-
Any chance you would be willing to 3D print that Distributor cap in 1:16 scale? I would be willing to buy a few. Let me know.
-
1/24 Working hinges ?
Oldmopars replied to PierreR89's topic in Model Building Questions and Answers
Do a search here, there are several tutorials on hinges. -
1/16 distributor and carburetor?
Oldmopars replied to JollySipper's topic in Model Building Questions and Answers
I like to add details, but in 1:25 it is really hard. 1:16 and 1:8 makes it a lot easier for my bad hands -
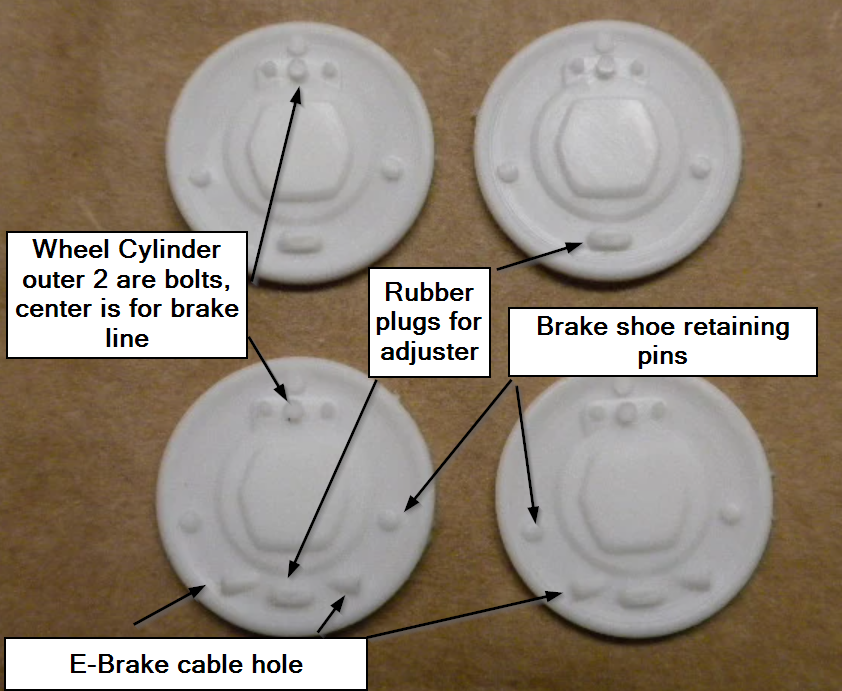
For all interested. This should help clear up what all the bumps and details are. Also included are the real thing
-
1/16 distributor and carburetor?
Oldmopars replied to JollySipper's topic in Model Building Questions and Answers
I just found these: https://www.shapeways.com/product/6AZK5PZ7H/1-16-carter-4-bbl-carburetors?optionId=41095056&li=marketplace Now, I know they are not the Q-Jet, but they are very close. For these kits it may be close enough for me. The kit carb is bad, these are not perfect, but a huge improvement. -
1/16 distributor and carburetor?
Oldmopars replied to JollySipper's topic in Model Building Questions and Answers
I feel your pain on this one. I have this very kit and it is lacking in details. I guess for $40 what do you expect? I also looked at Shapeways and found the tree of 5 carbs, but no Q-Jet. I may just order them and use the Holley. I am going to work on the distributor, scratch build one. If it turns out OK, I will let you know and make you one. I will just cast them. I have wondered if you were to contract someone that sells 1:24/1:25 stuff on Shapeways, if they could scale it up and re-list it. With the issues I have with my hands, I have purchased several 1:16 and 1:8 scale kits. It would be nice to have some detail parts to go with them. Let me know if you find any other 1:16 scale part to help these R2 kits we now have. -
Well, looks like I am in. The plan is still real fuzzy, but I at least have one kit to get the ball rolling. Maybe over this next month before the start, things will gel a bit more.
-
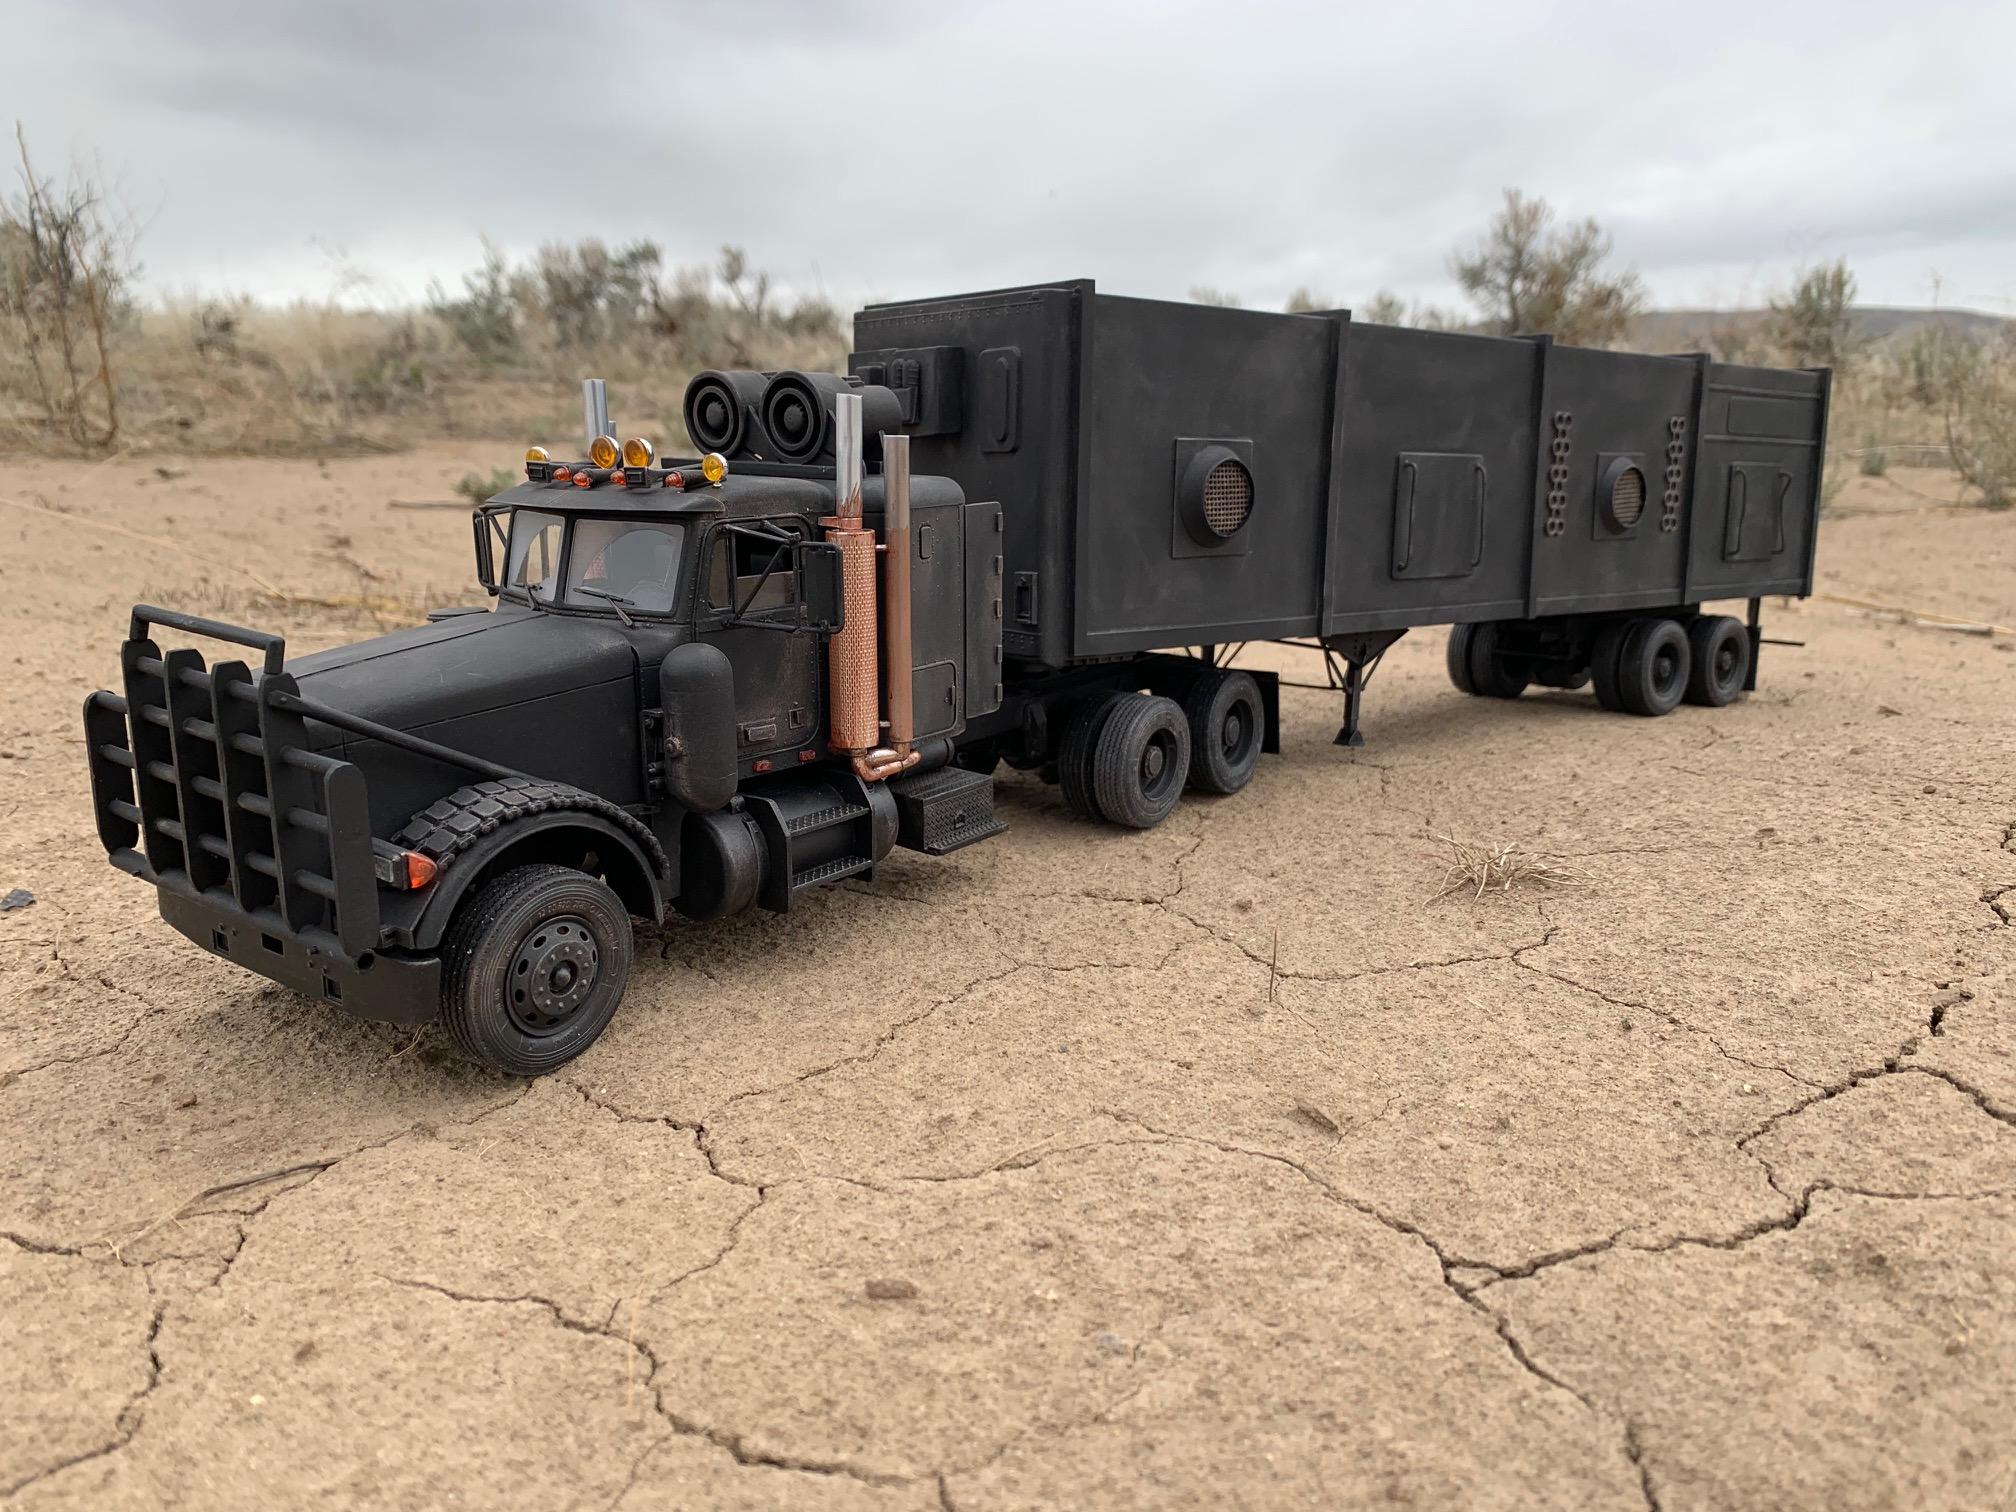
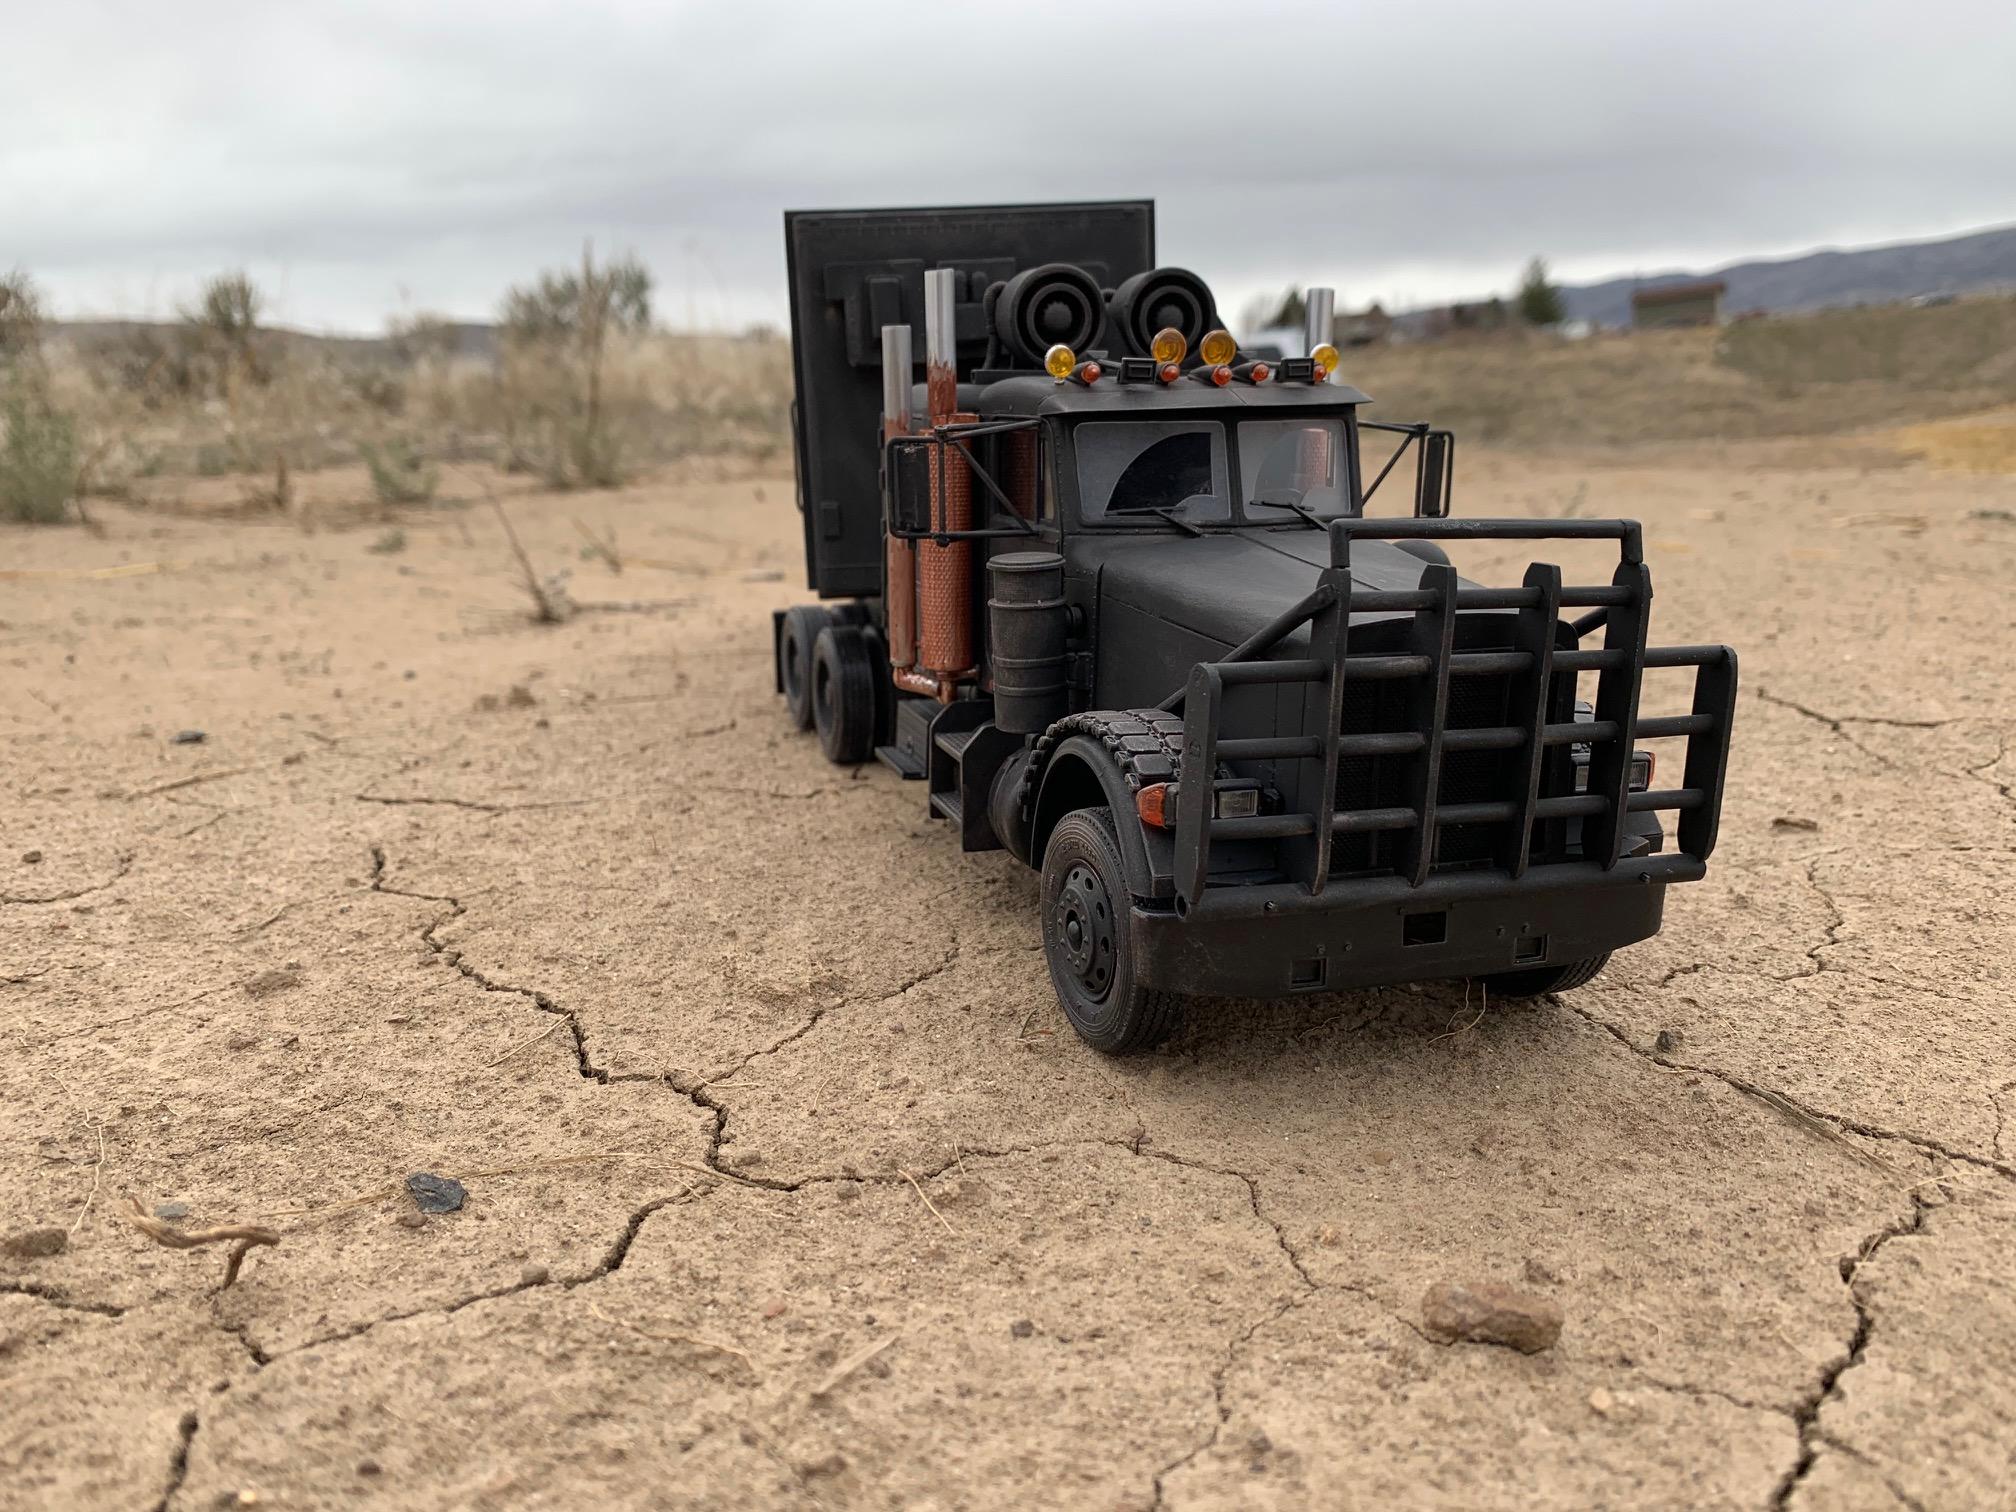
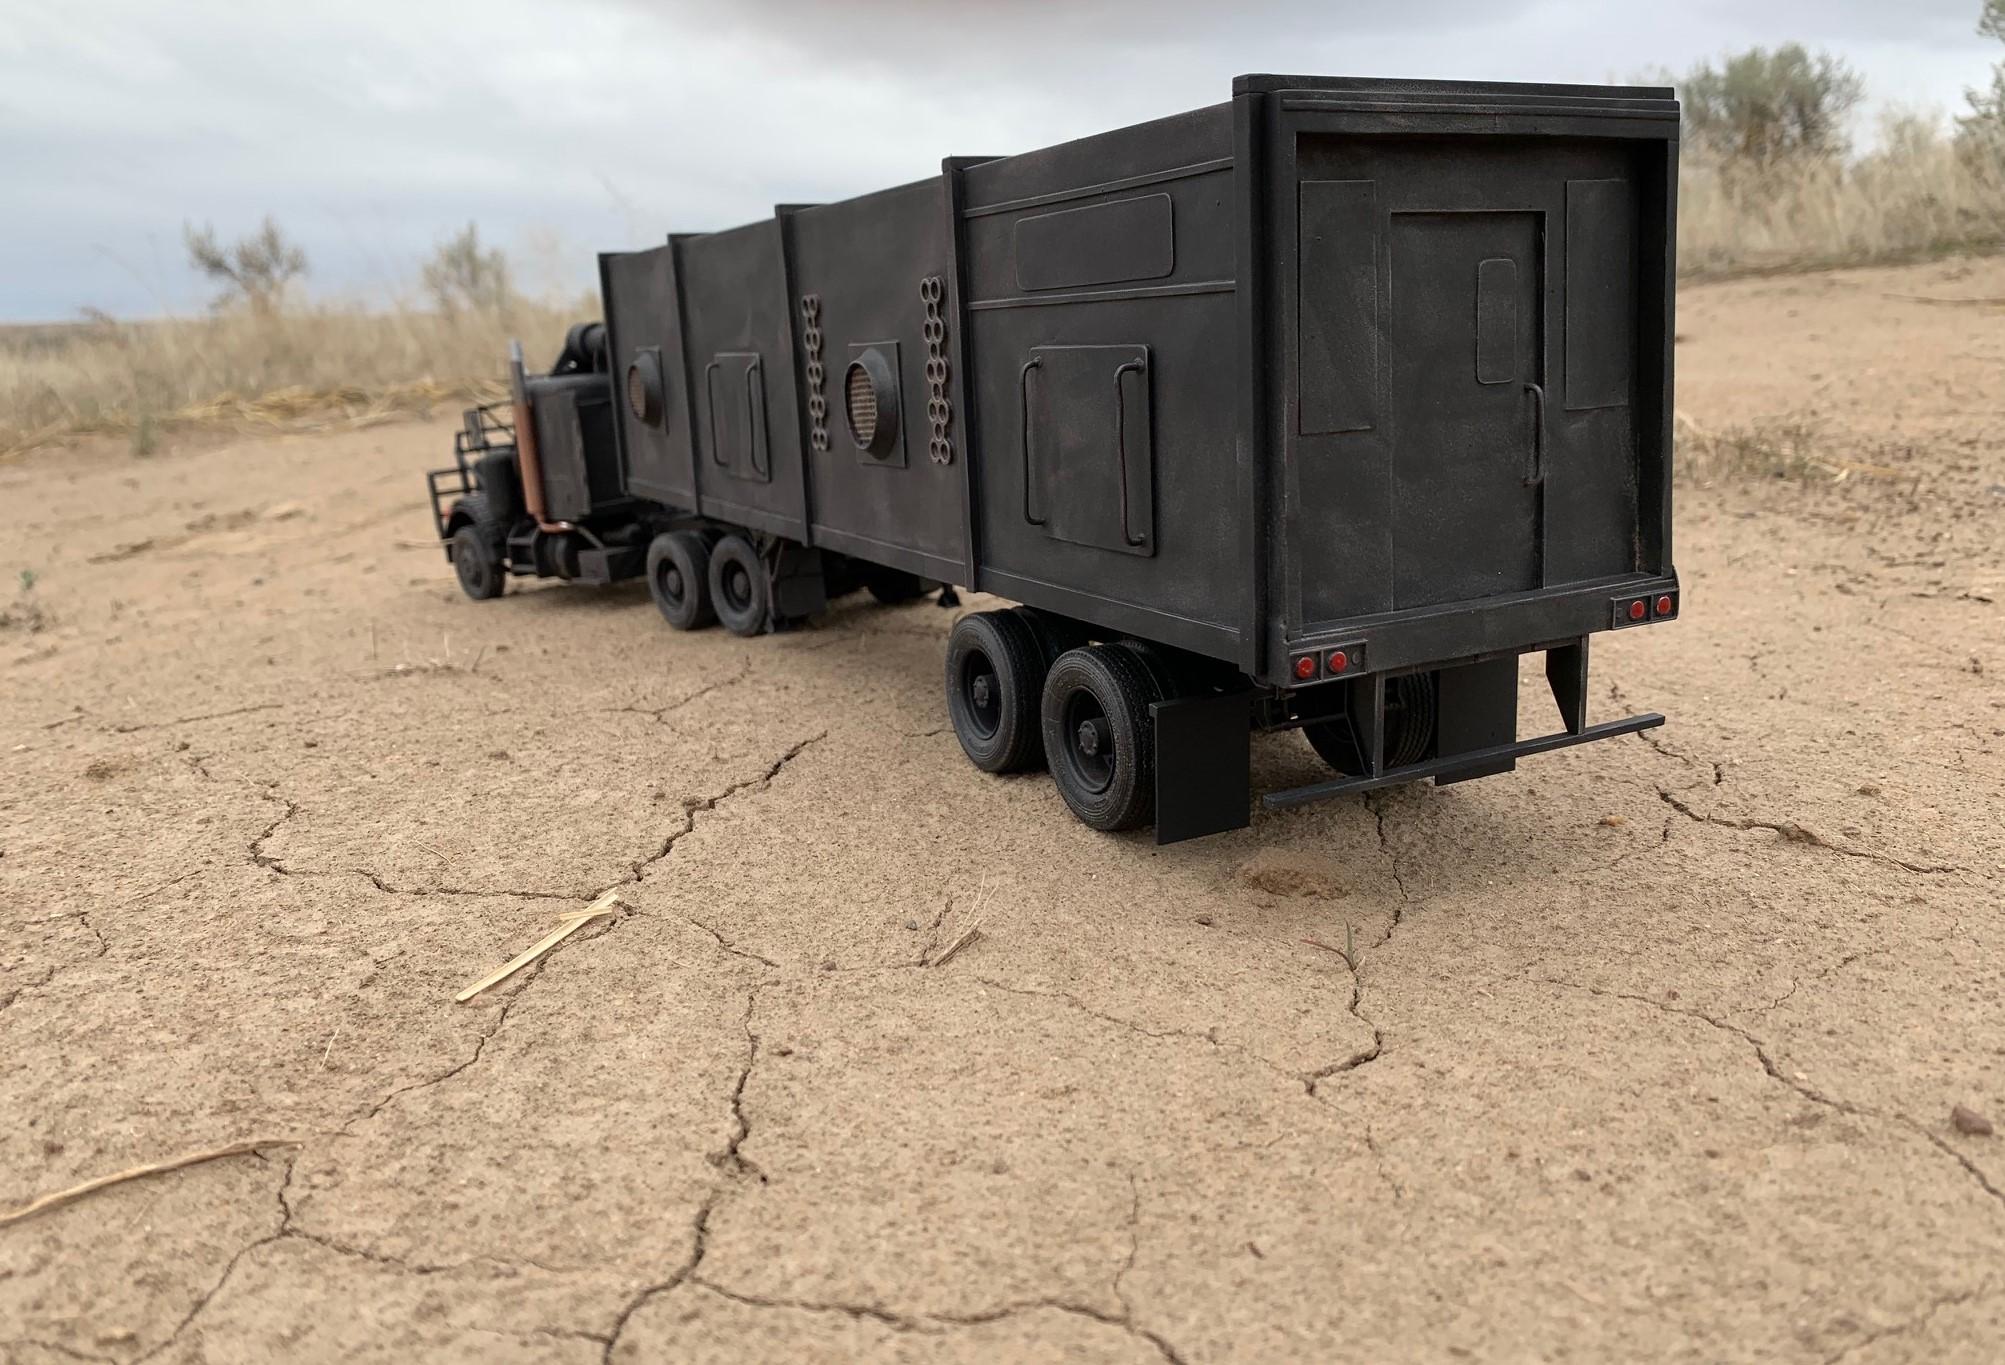
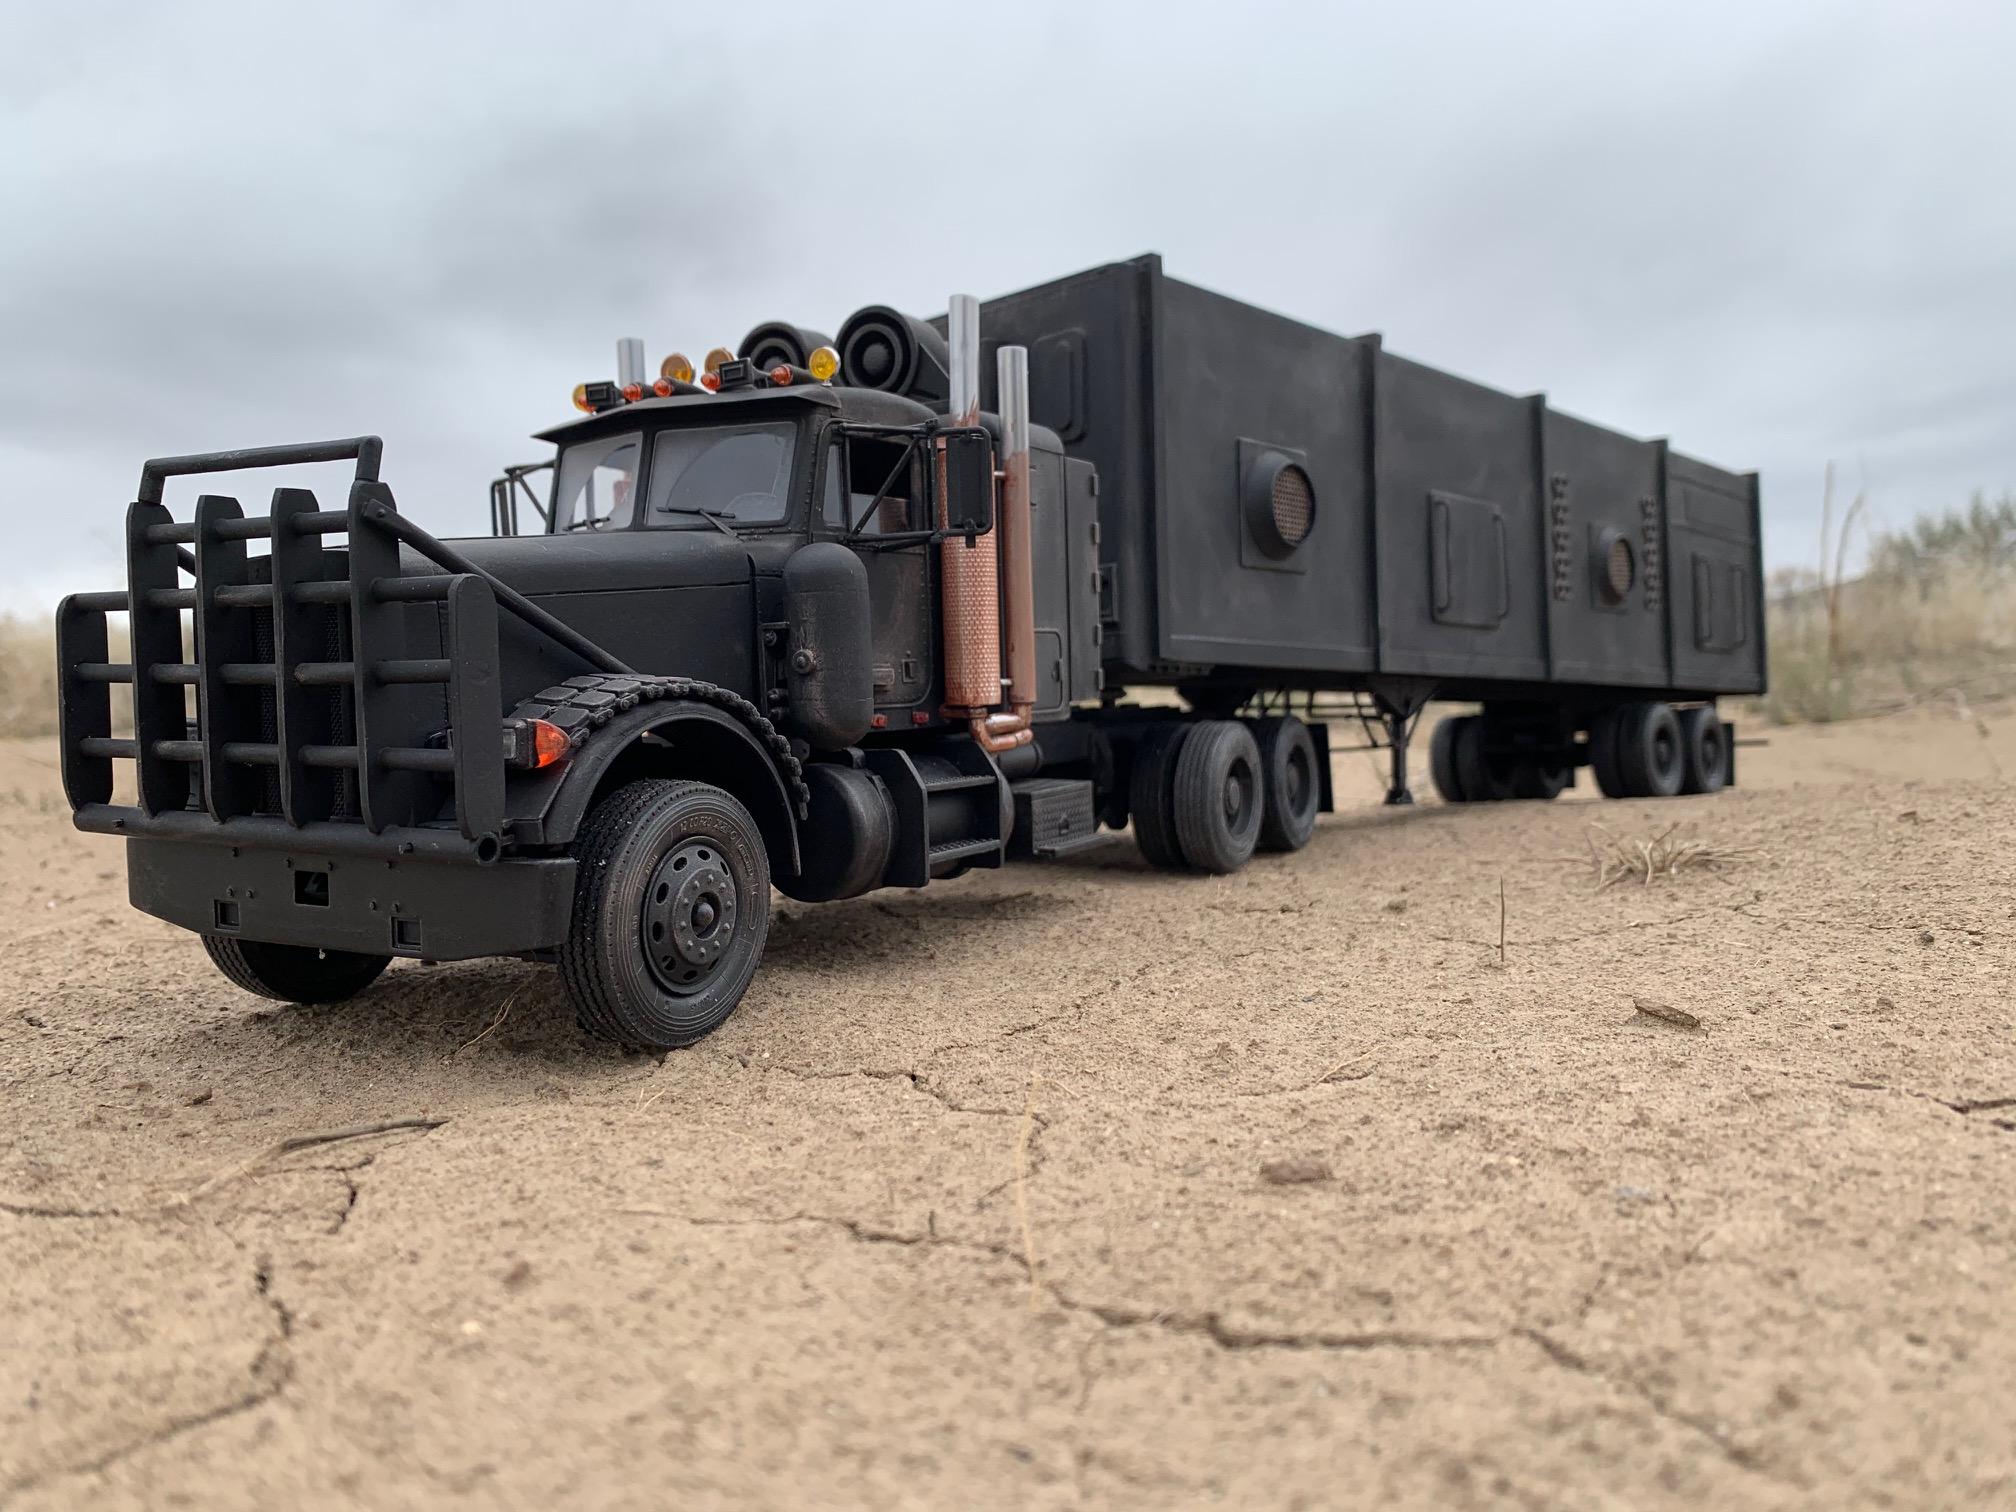
I season 6 of Marvel's Agents of S.H.E.I.L.D Clark Gregg returns as "Sarge" and he is driving a 379 Peterbilt from another dimension. The truck is heavily modified and has a one-off trailer. The truck is a large part of the 6th season and I figured this would be the subject of my build. I started with the Italeri 378 and extended the hood and moved the cab back to created the 379. I had to find an old issue of the kit as I needed the flat top sleeper and not the high top. I custom built the front bull bar, side tank on the cab, fender details and all other details to match the TV truck. Nearly all of the trailer was scratch built. with an Italeri trailer donating parts to get the base. The details on the sides were cut on a waterjet to get the correct size, shape and details. Solder hand rails and other details created the look from the show. Lots of scratch built parts and parts bin parts went into this build. Enjoy
-
1971 Ford F100 Ranger Pickup
Oldmopars replied to mrmike's topic in WIP: Model Trucks: Pickups, Vans, SUVs, Light Commercial
So, a little story about those Ford fuel pumps. Growing up my father had a 68 Ford F350 4 door truck that he stretched the frame to add an 8 foot bed. We then hauled our camper shell and a 26ft trailer with it. In 1986 Canada was home to the Worlds Fair, Expo 86. We lived in Oregon so it was close and we took this truck. Somewhere over the boarder we stopped for gas. My dad looked under the truck and gas was leaking everywhere. There was a rust hole in the hanging filter on the fuel pump, just like the one in the kit. (390 FE) He went into the station store and bought 4 packs of bubble gum and had us all chew it. He then cleaned the filter bowl and packed it full of all the chewed gum and added duct tape just to be sure. We then drove the remaining 50+ miles to the campground we had booked for the night. A visit to a local wrecking yard the next day got us a new bowl. Bubble gum saved the day. Those fuel pump bowls collected water and then rusted out. It was a fun trip in that old Ford, and that was only one of the problems we had that trip, good times. -
I vote for Tan also. It will give more visual appeal. The contrast will show off the interior and also be lighter so more details can be seen. To me, the black would just be a dark hole in an nice car.
-
Heat works, but you need more than boiling water. ABS pipe is used where in place of PVC where hot water will be used. PVC gets soft at about 140, but ABS stay rigide to a higher temp. A good heat gun should work just fine. Also, ABS Cement to glue pipe also works on any other ABS plastic. I have fixed motorcycle plastics (ABS) this way.
-
I am sure in the standard Camero it was the 200-R-4, however in the IROC Z28 it was the heavier 700-R-4. I am really detailing it, but the bottom really won't be seen I guess.
-
So, I have both the 1/8th scale 1985 Corvette and IROC Z28. Both cars should have the 700R4 4 speed Auto trans and they come with the THM350. To change this would require a bit of work to the trans pan and adding some stuff to the side. Is this something I should make the effort to change, or should I just leave it?


MarvelsAgentsofS.H.I.E.L.D.(S06E08)_Sarge(Coulson)putbombinTrucka.jpg.d65b67c06f58823d31b6a3634498680d.jpg)