spencer1984
-
Posts
3,322 -
Joined
-
Last visited
Content Type
Profiles
Forums
Events
Gallery
Everything posted by spencer1984
-
Thanks, guys!
-
Thanks, guys!
-
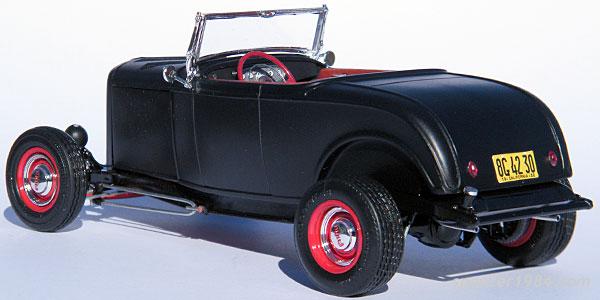
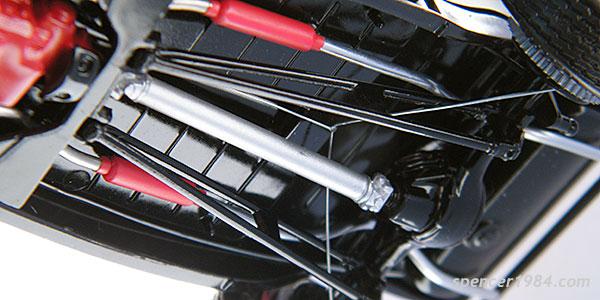
My model of the eponymous hot rod from Faith Granger's Deuce of Spades. I started with Revell's '32 Ford Highboy, and reworked it to match the 1950s-era version of the car. Changes to the kit include smoothed hood sides; louvered hood top; filled door handles; custom taillights & parking lights; custom front badge & rear license plate; mirrors and master cylinder from Revell's '40 Ford; parts box front axle; scratch built front suspension; scratch built exhausts; wheels from Replicas & Miniatures; brakes from Scenes Unlimited; parts box tires; hubcaps & dashboard from Monogram's '32 Ford; steering wheel from AMT's '55 Corvette; scratch built horn button/ring, steering column, shifter, and handbrake lever; flocked carpet; and a small block Chevy from AMT's '55 Chevy with a custom tri-carb intake and parts box Powerglide. As always, any comments/criticisms are welcome!

-
That's pretty awesome looking, nice work!
-
Are These Wheels Available in 1/25?
spencer1984 replied to spencer1984's topic in Model Building Questions and Answers
Aha! I didn't even think about Chevelles, I was concentrating on Camaros...Welly has a 1/18 Chevelle with similar wheels, so I can use those as a starting point. Thanks! -
Any ideas? Kit, aftermarket, diecast, etc.? Any help would be appreciated!
-
This is some seriously excellent work! I've built variations of this kit a couple of times now, and have yet to do one anywhere near as clean and nice looking as what she's done here. That chassis fits better than any I've ever seen!
-
Thanks, guys! Bruce, that is the rear suspension straight out of the box - they have the rear axle on a pair of pillars to get the height there, and you can cut them shorter for a more stock look.
-
Thanks, guys - glad it was helpful! I used Tamiya TS-8 over white primer, then clearcoated.
-
Here are the finished pics of my S&H Torino. Overall I thought it was a really nice kit - not perfect, but it's fun to build, goes together easily, and looks good when assembled. The biggest shortcoming with it was the instructions, which were riddled with errors. I've already seen one modeler fall victim to them, so in the interest of getting some better information out there I made a scan of the booklet, corrected the drawings, parts callouts, and decal order of operations, and posted it as a PDF at http://spencer1984.com/85-4023.pdf Feel free to share, repost, copy, etc. with whoever may find it useful. I also have a full writeup/review of the kit here. As always, any comments/criticisms are welcome.
-
Awesome work, that looks great!
-
Thanks, guys! You're welcome. I had to laugh, though - that response reads much different next to Clint's angry mug
-
I've seen the transkit for sale, nice to see one built. Beautiful job on this!
-
Thanks guys! Not sure why, but I always liked the look of Ford's sedans from this period over their coupes or convertibles. It is, though the comic is on hiatus while its creator is busy with other work...labors of love need to take a back seat to paying the bills sometimes. The character is a WWII-era superheroine who uses disguises and concealed gadgets to fight crime (sort of a cross between Batman & James Bond), so her car needed to look fairly standard at a glance but in reality it hides all manner of props and weaponry. The guns in the engine bay are supposed to rise through a pair of doors in the top of the hood. The 1:1 prop car had them on a longitudinal rack, but could get away with using all of the overhead space because it had a late model small block Chevy installed. Since I tried to use period-correct (or at least "period plausible") equipment, my engine was too tall for that and I went with a crosswise scissor lift behind the supercharger instead.
-
That looks great, the Countach wheels are a nice touch!
-
Beautiful work! I had one of these kits years ago, and never could quite get it to look right...so hats off to you for getting such great results from a very tough kit. What color did you use for the silver?
-
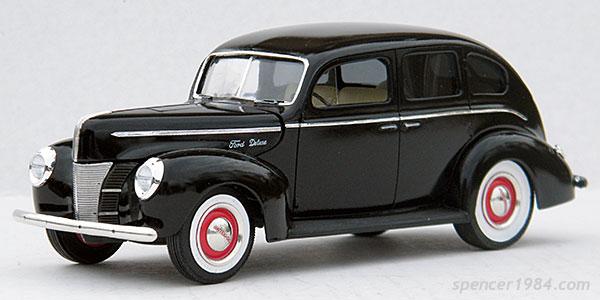
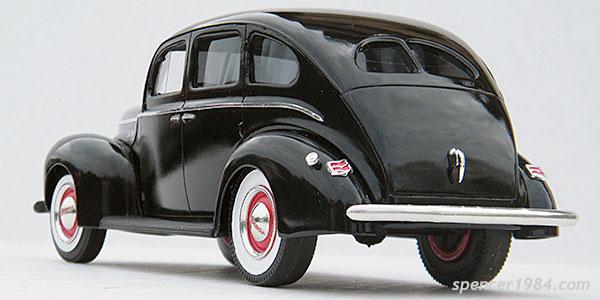
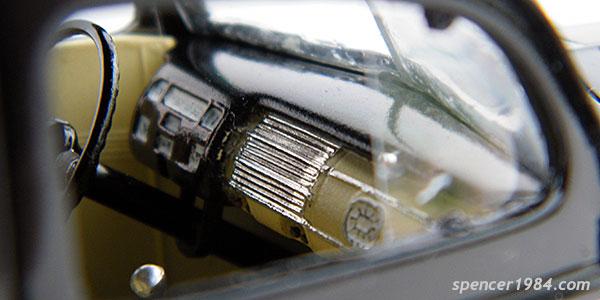
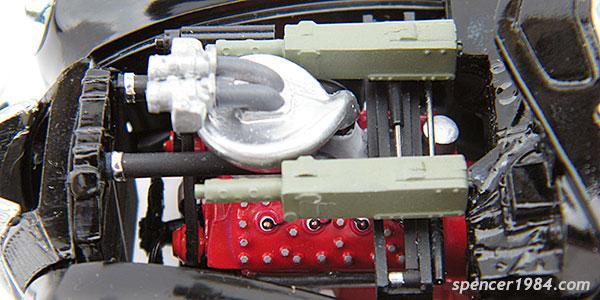
I got to see Ken Lashley's Silver Spectrum Ford when it was at New York Comic Con 2013, and as a combination of a comic book car, sleeper, and fat-fendered Ford it was an absolute must-build for me. I used an R&R Resin body on the AMT kit, with lights, fuel fill, trunk latch, and steering wheel from the Revell kit. The bumperettes were removed, and the bumpers, grille, hubcaps, beauty rings, and trim were redone in BMF. The engine is my own idea, since the story is set in the '40s but the 1:1 had an LT1 engine for driveability. The supercharger is from The Parts Box, carbs are from Replicas & Miniatures of Maryland, and the guns are modified from AMT's Batmobile. Everything else was scratch built, in an attempt to be "period possible" rather than truly "period correct.". As always, all comments/criticisms are welcome!
-
I'm agreeing with the others, I think you did some really good work here, especially considering that it's a first try at weathering for you. Use some of the tips that Mike suggested, and you'll be a regular at this!
-
Very cool, that looks great!
-
Very nicely done, that looks great!
-
Very cool, I like the black and green together!
-
Awesome work, I love the "sleeper" aspect! What color did you use?
-
Fantastic work! Are those Aoshima wheels?
-
Starsky & Hutch Torino - Interior finished 10/14
spencer1984 replied to spencer1984's topic in WIP: Model Cars
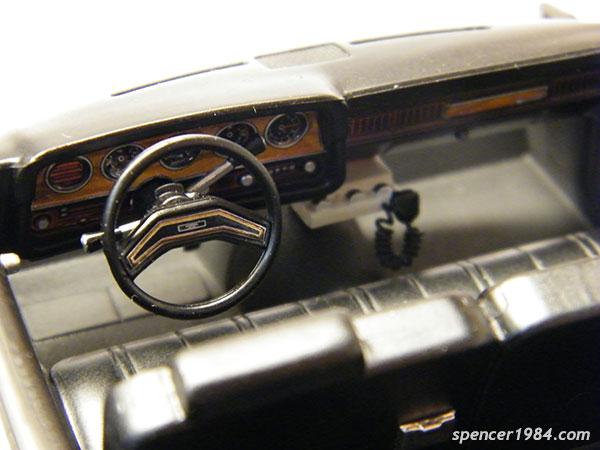
Back to work! Interior is now finished, the only mod I made was replacing the radio cord with a section of coiled wire. Everything went together with no drama, even the dash decals
-
Starsky & Hutch Torino - Interior finished 10/14
spencer1984 replied to spencer1984's topic in WIP: Model Cars
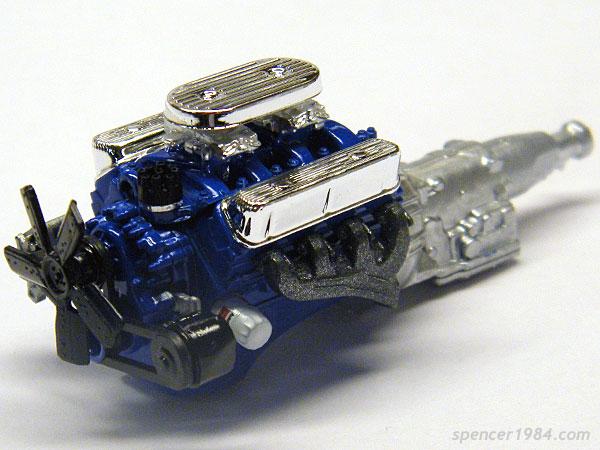
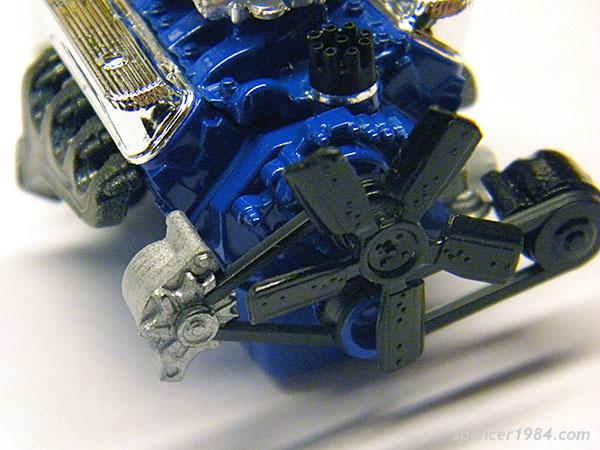
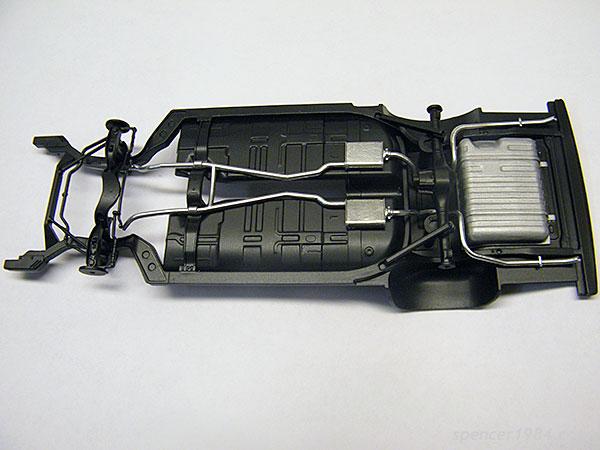
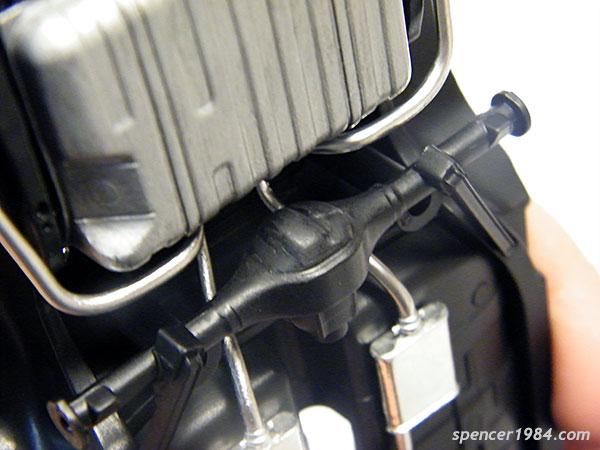
Engine is now finished aside from the ignition wires and breathers. Overall the fit continues to be excellent - the pulley shafts lined up perfectly with the holes on the front of the engine, the headers practically snapped into the heads, etc. The distributor still doesn't bother me all that much, but I don't care for the way they did the alternator. The belt is molded so that it goes into the side of the fan and the pulley sticks out past that, plus the back is hollow. The power steering pump is better, but overall the belt assembly is pretty weak. The valve covers are identical, but the way they're attached to the sprue you can put the attachment points towards the back on both sides; nice touch. The carburetors are also nicely detailed, and I like that Revell gave us a decal for the oil filter. Work continues on the chassis. Like the engine, the overall fit is pretty spot-on. There was a tiny twist to the exhaust system, but nothing that didn't straighten out as soon as it was glued in place. Revell provided dimpled ends in the exhausts for anyone who wants to drill them out. I think they could have done a better job getting the rear axle halves to fit together, the joint here is ugly and could use some spots of filler to clean it up. Other than this, though, no complains on the assembly here.