MarcelT4
-
Posts
231 -
Joined
-
Last visited
Content Type
Profiles
Forums
Events
Gallery
Everything posted by MarcelT4
-
Here is another picture where you can see the pearl effect a little better.

- 56 replies
-
- 3
-

-
- lamborghini
- countach
- (and 1 more)
-
Hello, short update. Finished painting, decals and clearcoat on and everything loosely put together.
- 56 replies
-
- 3
-
-
- lamborghini
- countach
- (and 1 more)
-
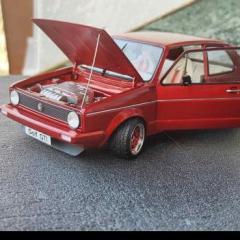
Evening everyone. Things have now moved on here too. I have completely installed the turbo system. I gave the interior a printed shift gate including the gear knob and new pedals. You already know the printed seats. The dashboard is now also finished. The spare wheel flew out of the trunk. The body has been painted. Still without clear coat. Once again in detail. That's it again for now. Not much, but at least something.
- 56 replies
-
- 4
-
-
- lamborghini
- countach
- (and 1 more)
-
Just another small update. I have created and printed spring struts. Installed here. The drive shafts are now also in place. Front too. The intercoolers. And a first rear view. As I can't find a solution for the folding headlights, I'm going to make a compromise and no longer install the lighting.
- 56 replies
-
- 4
-
-
- lamborghini
- countach
- (and 1 more)
-
Hello, I'm going to ask you a question here. I want to light up the model, but I'm not really getting anywhere with the flip-up headlights. I've already racked my brains, but can't find a good solution as to how I could make the mechanism so that they fold up when the light is switched on. I've had ideas with push and pull solenoids, linear servo ....... Maybe someone has an idea that I haven't thought of yet. I look forward to your ideas.
-
Here is the chassis with half of the interior. The engine got cooling water pipes, which I once again realized by 3D printing. (These are not included in the kit) Here are the rear wheels and brakes. And the body primed white. I did this in preparation for the white paint. It will be a white with pearl effect. I continue until the weekend.
- 56 replies
-
- 6
-
-
- lamborghini
- countach
- (and 1 more)
-
Small update. Seats Rear wheels. Maybe there'll be more tomorrow.
- 56 replies
-
- 6
-
-
- lamborghini
- countach
- (and 1 more)
-
Thank you. I have chosen pearl white as the color. The wheels will be black.
- 56 replies
-
- 1
-
-
- lamborghini
- countach
- (and 1 more)
-
Hello everyone, a little update. Unfortunately, I don't have much time, so it will probably take a while again. It's "only" a fitting test, but things are progressing.
- 56 replies
-
- 5
-
-
- lamborghini
- countach
- (and 1 more)
-
No, I created it myself in 3D based on blueprints. Then everything was scaled to the appropriate scale of the kit and adjusted to the dimensions if necessary.
- 56 replies
-
- 2
-
-

-
- lamborghini
- countach
- (and 1 more)
-
Just a few little things again today. Once again, the side air intakes don't fit at all, so they were separated in the middle, a piece of Evergreen inserted and sanded into shape. Then the Countach was fitted with a door lock and hood release. And the interior was painted. Unfortunately, that was it again.
- 56 replies
-
- 6
-
-
- lamborghini
- countach
- (and 1 more)
-
We continue with small steps. The interior was primed. The printed drive shafts were given their first color. None are included in the kit, only a steel axle is provided at the rear. The exhaust also got a coat of paint. The door with the new upholstery. And here is the seat with the console.
- 56 replies
-
- 5
-
-
- lamborghini
- countach
- (and 1 more)
-
As announced, there's a little update today. It doesn't really look like much, but it was very time-consuming. First I made the frame for the front hood. Then I removed the front inserts for the parking lights and indicators. New printed ones were then inserted here. One original and one copy. Why the whole thing? Well, I want to illuminate the model, so I put separate lights in there, which are also illuminated individually. Then I built a console for the seat and gave the interior a floor. Here's the test.
- 56 replies
-
- 6
-
-
- lamborghini
- countach
- (and 1 more)
-
Today I had some time to continue work here. I created and printed new mirrors, as well as the covers for the folding headlights. This is what the covers will look like on the model. There are also new seats (in Liberty Walk style). Tomorrow there will be more work.
- 56 replies
-
- 6
-
-
- lamborghini
- countach
- (and 1 more)
-
I had been thinking about what to do with the toy-like brakes. The solution was to replace everything. The brakes now consist of 3 parts. In the middle is the attachment to the suspension, where the brake disk is put on, then comes the spacer with the wheel nuts, on which the rim is put. This is how the 3 parts look on top of each other on the suspension. There's also something new for the interior.
- 56 replies
-
- 3
-
-
- lamborghini
- countach
- (and 1 more)
-
Hello, today I have another small update. I've tried to increase the degree of reality. Here is the trunk. My hinges will be added to the front, with the hood dipping behind the bumper when opened. I continued with the door hinges. These will also increase the degree of realism. (I got this idea from the Dann Tier. I hope he's not angry about it.) And here they are inserted. In the picture, the hinge that can be seen in the 2nd picture with the door has already been inserted. Here, too, the doors will then dip behind the fenders when opened, as on the original. I hope I have been able to inspire you a little with this.
- 56 replies
-
- 6
-
-
- lamborghini
- countach
- (and 1 more)
-
Hello, I've continued designing on the PC. Namely the exhaust system. Here are the printed parts. On the left in the picture the intercooler with the hoses to the turbo. In the bottom center are the connections for the exhaust pipes from the manifold and on the right is the actual exhaust system with the turbo connections. This is how it is installed in the rear. And here it is put together. Still without turbos. This model will probably be the first one I will put in the display case with the back facing forward. 😀
- 56 replies
-
- 10
-
-

-
- lamborghini
- countach
- (and 1 more)
-
Just a small update today. I have widened the interior tub by 1.2 mm on the right and left. It's hard to see the white Evergreen stripes in the rear corners. The side panels were also lowered by the required 1mm. This was necessary because otherwise the center and then also the rear window had 1mm clearance to the roof. This also had to be filled. Here I cut away the plastic in the middle. This came from the wheel arch and went around to the rear. It's needed to hang the body with the underbody. At the back you can still see a small part in the frame. I don't need this plastic, as I had to remove the piece to attach the body. You'll find out why later. I need the Evergreen construction for my solution to connect the underbody with the body.
- 56 replies
-
- 3
-
-
- lamborghini
- countach
- (and 1 more)
-
Evening, it goes on here of course. But unfortunately not a single part of this kit fits. A lot of adjustment work is necessary and really holds up. Nevertheless, here is a sample for you. There were already a few cables. Then I printed 3 versions of the turbos. Which version do you like best? My favorite at the moment is the top one. You can also see the lettering clearly.
- 56 replies
-
- 4
-
-
- lamborghini
- countach
- (and 1 more)
-
It is scale 1/24
-
The body kit is similar to the one available from Liberty Walk. The bi-turbo is a fantasy version as I build it. I saw it on a picture of John Sibal on the internet.
- 56 replies
-
- 2
-
-
-
- lamborghini
- countach
- (and 1 more)
-
Scale is 1/16
- 56 replies
-
- 2
-
-
- lamborghini
- countach
- (and 1 more)
-
Hello everyone. Now I'll start with the building report. First the box . Unfortunately, my partner got the wrong model. I had actually intended to rebuild my Bi-Turbo Countach, which I had already built in 1:24, on a larger scale. As a reminder. Well, I'm also quite good at 3D modeling, so I got started. Body kit created and printed This will certainly involve a major material battle, as I have to remove the molded-on extensions. There will also be changes to the interior. First parts printed. Again with macro. I don't yet know which version of the dashboard insert I'm going to use. That's why I printed 2 options. After an hour of sawing, there was no turning back. Then some sanding and minor adjustments were made. Now a fitting test. Then I went back to the instruments and gave them a little more depth. A few more parts. And more bodywork. And more parts. That's it for now, but it's still going to be exciting.
- 56 replies
-
- 16
-
-
- lamborghini
- countach
- (and 1 more)
-
Hello, I present here my McLaren 570s with bodykit. I created and printed all parts of the bodykit myself in 3D. The paint job wasn't that easy either, but I think I did it well. See for yourself. The driver's door is fitted with a self-printed hinge, so I can open and close it true to the original.
-
I spent a total of 2 years designing it. But with breaks. There were always new ideas or improvements, and I also had some problems getting the model printable, creating connections, etc.