MarcelT4
-
Posts
231 -
Joined
-
Last visited
Content Type
Profiles
Forums
Events
Gallery
Everything posted by MarcelT4
-
Hello, I have now completed the prototype model. Even if it hasn't turned out perfectly, I think it's pretty good.

- 42 replies
-
- 7
-

-
- vw
- volkswagen
- (and 2 more)
-
Small update
- 42 replies
-
- 7
-
-
- vw
- volkswagen
- (and 2 more)
-
Hi, nothing has happened here for a long time. Today I had some time and put something together. As you can see, there are only a few parts left. And also all the small parts, such as door handles, windshield wipers, etc.
- 42 replies
-
- 5
-
-
- vw
- volkswagen
- (and 2 more)
-
Hello, as the rear windows on my Scirocco were tinted, I did the same on the model. Here are the results. The rear window has already been inserted.
- 42 replies
-
- 3
-
-
- vw
- volkswagen
- (and 2 more)
-
Hello everyone, today I just did a fitting test.
- 42 replies
-
- 5
-
-
- vw
- volkswagen
- (and 2 more)
-
Good morning, the Scirocco was also sold in the USA. It just had different headlights and bumpers
-
Had a day off today. Of course I got something done. The Dashboard. Then I redesigned and printed the blinker lenses. I had to do a fitting test right away. Just like with the rear lights. I tried to make the stripes with Edding, they look quite good, but in macro they are a horror. Now write something.
- 42 replies
-
- 3
-
-
- vw
- volkswagen
- (and 2 more)
-
As soon as everything goes well with the files for 3D printing, I will offer them for sale.
-
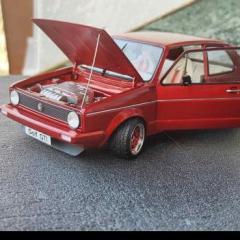
Hello everyone, it's been a long time since anything happened here. First holidays and then high season with us. But something has always been done in between. Painted the body and rims... ...other parts too. The interior. The lights. And now the engine. What do you think?
- 42 replies
-
- 2
-
-
- vw
- volkswagen
- (and 2 more)
-
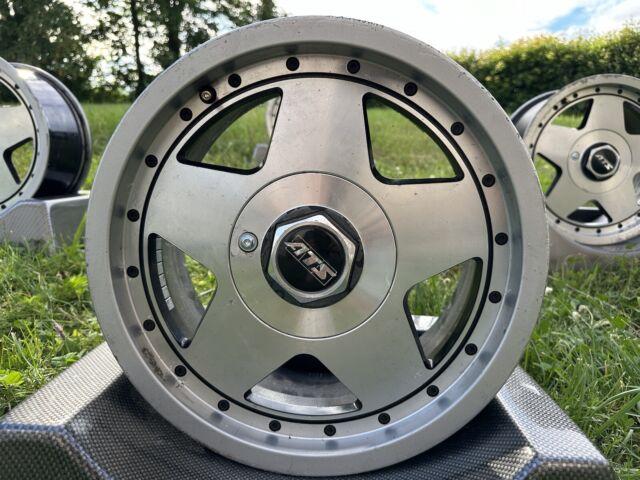
These are ATS rims. These here:
-
Today we continued with a few fitting tests. Unfortunately, some parts still don't really fit without major adjustments.
- 42 replies
-
- 4
-
-
- vw
- volkswagen
- (and 2 more)
-
I quickly put the parts together loosely.
-
Today I had a go at the clear parts. It wasn't so easy to create them in such a way that the structures are visible after printing. But it seems to have been successful. Then the rear axle had to be changed again because the 16V has disc brakes there. Last but not least, my rims.
- 42 replies
-
- 6
-
-
- vw
- volkswagen
- (and 2 more)
-
This time I will probably also offer the files for sale.
- 42 replies
-
- 2
-
-

-
- vw
- volkswagen
- (and 2 more)
-
Hello everyone, after a long time I present you my latest kit from my 3D forge. The whole development took almost 2 years because I kept coming up with new things here and there. All the parts were then redesigned and so on. But here are a few pictures of the parts printed so far. I have to change some parts again and have them reprinted. I hope I can inspire some of you with them. PS: If you're wondering why there's an audio extension for the interior, it's because I want to recreate my Scirocco as I drove it for a long time and had a lot of fun.
- 42 replies
-
- 10
-
-
- vw
- volkswagen
- (and 2 more)
-
Hoonitruck Ford F150
MarcelT4 replied to MarcelT4's topic in WIP: Model Trucks: Pickups, Vans, SUVs, Light Commercial
No, these 2 cars are the best. I like them very much. The Audi would still appeal to me, but I haven't found a model of it yet. -
Hoonitruck Ford F150
MarcelT4 replied to MarcelT4's topic in WIP: Model Trucks: Pickups, Vans, SUVs, Light Commercial
Thank you very much. I'm glad I was able to help you build your short bed. Feel free to leave the picture here. -
Hoonitruck Ford F150
MarcelT4 replied to MarcelT4's topic in WIP: Model Trucks: Pickups, Vans, SUVs, Light Commercial
The display case arrived today. There's now room for both vehicles and the master. I think it fits really well on the shelf.
- 67 replies
-
- 2
-
-
- hoonigan
- hoonitruck
- (and 2 more)
-
Hoonitruck Ford F150
MarcelT4 replied to MarcelT4's topic in WIP: Model Trucks: Pickups, Vans, SUVs, Light Commercial
Yes, the trailer hitch is actually fitted to this car. This was specifically requested by Ken Block. -
Hoonitruck Ford F150
MarcelT4 replied to MarcelT4's topic in WIP: Model Trucks: Pickups, Vans, SUVs, Light Commercial
Hello, the time has come. The Hoonitruck is finished after 3 months of construction. Here are the pictures. Now I need a new project. Unfortunately I have no idea what else I could do.
-
Hoonitruck Ford F150
MarcelT4 replied to MarcelT4's topic in WIP: Model Trucks: Pickups, Vans, SUVs, Light Commercial
Hi, I use both. White and clear. The paint pattern is printed on clear decal paper in lighter gray. The sponsors are printed on white decal paper with a black border.- 67 replies
-
- 1
-
-
- hoonigan
- hoonitruck
- (and 2 more)
-
Hoonitruck Ford F150
MarcelT4 replied to MarcelT4's topic in WIP: Model Trucks: Pickups, Vans, SUVs, Light Commercial
First of all, many thanks to you all. I make the decals with Corel Draw. I search the web for good images and then have them converted into detailed logos. Then they are post-processed and printed on decal paper. I use a laser printer for this. However, some people say that they should be better with an inkjet printer. -
Hoonitruck Ford F150
MarcelT4 replied to MarcelT4's topic in WIP: Model Trucks: Pickups, Vans, SUVs, Light Commercial
I had forgotten that the front blinker, headlight and rear light lenses are castings from the original kit. But all the lenses are molded on, so there were no clear parts. I simply ran clear UV resin from my printer over them and hardened them. Carefully removed and then painted with Tamiya clear paints. -
Hoonitruck Ford F150
MarcelT4 replied to MarcelT4's topic in WIP: Model Trucks: Pickups, Vans, SUVs, Light Commercial
Hello everyone, The parts are slowly coming together. I think it already looks pretty good.
-
Hoonitruck Ford F150
MarcelT4 replied to MarcelT4's topic in WIP: Model Trucks: Pickups, Vans, SUVs, Light Commercial
Here's the current status today. I glued the headlights into the grille. Then put the rear together and made a trial fit. The rear section and the spoiler are only loosely attached.
- 67 replies
-
- 2
-
-
- hoonigan
- hoonitruck
- (and 2 more)