PHPaul
-
Posts
491 -
Joined
-
Last visited
Content Type
Profiles
Forums
Events
Gallery
Everything posted by PHPaul
-
 Thank you. I'll let everyone know what I start out with. May, or may not do a WIP depending on how it goes. Pretty intimidating competition here! ?
 -
This is an idea in it's formative stages. I've been surfing the Big Rig boards here and have the itch to build something. I'm what you might call a middlin' decent builder. Well past the glue-bomb stage, but nowhere near some of the amazing skills displayed here. I'm thinking older - 60's ish, and big brawny and uncultured. IH Paystar, Autocar, B-model Mack - that sort of thing. Definitely a working truck - logging truck, heavy wrecker, oilfield truck - something like that. Frame, suspension and cab would be mostly out-of-the-box with some added detail, especially on the engine and wheels/tires. Working part, whatever it turns out to be, probably scratch built or kit-bashed. What I need more data on is sources and ideas for detail parts, be they resin, photoetch or whatever. Suggestions for a starting-point kit would be appreciated as well. Thanks in advance for any input.
-
Looks like Alfred Hitchcock is waiting to board...?
-
Completed my collection of haying equipment with this John Deere 24T baler. An internet acquaintance was kind enough to send me a 1:16 scale toy of the same baler which I used to get measurements from to design the 1:64 version in TinkerCAD. The picture is of the prototype. Printing and assembling it pointed out some areas that could be improved so I tweaked the design and printed out a second copy for the owner of the 1:16 version. I wound up with 7 print files as the optimum balance of accuracy, easy of printing and ease of assembly.

-
I needed to put some fairly precise bends in some .06 Plastruct round stock. I've used various sources of heat including heat guns, soldering guns and even open flame, but avoiding distortion and scorching while getting accurate bends was always a challenge and I usually have to bend several pieces before I get one that's suitable. Hot water works, but keeping it hot enough in my basement hobby area is a pain. As I was laying it out it occurred to me that a drop of hot glue at the apex of the bend might put enough heat in the plastic to allow it to bend without stretching or distorting. At least for the small stuff, it worked great! Just the right amount of heat, lasts long enough to work the plastic and peels right off after it cools. If you need to adjust the bend, another drop will do the trick.
-
David, I use a variety of things for the foliage. Probably the very best is this stuff which has either come down considerably in price since I last bought some, or they're packaging smaller amounts. For loose foliage, Noch makes a number of sizes and colors which should be available from the same source. I also gather up actual dead dry leaves and chop them up in a blender and mix some of those in, as well as scattering them on the ground under the tree. I usually attach the first layer with tacky glue and when it has set up and forms a solid base, I'll hit it with some spray adhesive and sprinkle smaller material over it to fill in gaps and build up some body.
-
Addition to farm now has a corn field and a hay field. I can spend the rest of the Winter adding details. Do need to find something for that open area to the left of the corn field. Generally, I let things like that simmer in the back of my mind and sooner or later an idea forms. Details include things like the hay bales (3D printed blocks covered in ground foam) the hay wagon and the old horse-drawn sickle mower. Initially, I did a mounted mower appropriate for the early 60's then thought it'd be neat to have a rusty old horse mower parked under the tree. Been experimenting with ways to make trees, think I've stumbled onto something. I've been using wire armatures made from multi-strand copper wire, twisted and bent to shape and then soldered to hold things in place. Had been giving the armatures multiple dips in latex paint for "bark" which works pretty well, but "discovered" Sculpy clay which can be formed much like playdough and then hardened by heating in a toaster oven. I still use the wire armature, but I coat it with the Sculpy which lets me taper and detail the trunk and lower limbs much more realistically. The tree in the picture is my first attempt.
-
I decided to go ahead and add another 20 acres to the farm. As long as I don't gain any (more...) weight, it'll be fine. The wooded area at the top left of the original section was extended into the new area. The new section of "forest" is about 90% done, just needs details like stumps, ground clutter and some undergrowth. The "skipjack" (local term for a beat up junker of a truck used in the woods) is mostly 3D printed with a few details out of my junk box. The load of wood and the pile of logs are actual twigs from the maple tree in my back yard. Need to work on the "road" the skipjack uses to get in and out of the woods. This helps justify the sawmill in the farm yard. I added a derelict fence to help disguise the transition between sections. I'll detail that with brush, vines, rock and bits of junk that always collect around such fences, and add a bent-up disused gate. I'm working on a corn field to justify the silo-filling scene in the farm yard. After initially looking at commercially available corn plants and literally gasping at the price, I started to make my own corn plants. I quickly realized that I would die of old age or go insane before I made enough. After some more searching I found some fairly reasonably priced stuff. A package of 400 plants, arranged in 20 strips of 20 plants was around $12 which was less than a quarter of the price of some I saw. Not horribly realistic close up, but with a little massaging and planting them densely, it looks okay. What's in the picture is 6 of the 20 strips. I have to plant a pair of strips for a row and then let the glue set up before planting the next row so as not to knock things over. They're on 5/8th inch centers with is 36 inch rows in 1:64 scale. REAL farmers are planting on 20 inch rows! Some of the remaining area in the new section will be a hay field to support the haying operation in the farm yard.
-
Very nicely done! Prettiest Mustang ever built. Brother had a 1:1 '69 Mach I in burgundy and gold with a black interior.
-
I'm pleased with how that came out. That thing sitting on the shelf with no tracks has been bugging me for months.
-
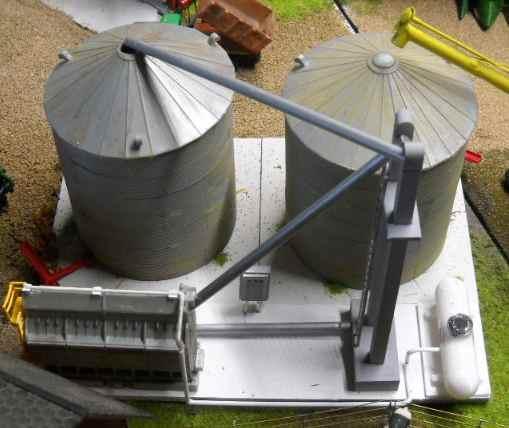
Grain handling facility mostly done. Waiting on paint to dry on the motors for the elevators. For the non-farmer types that may be interested: When selling grain, moisture content affects prices. Also, it needs to be below a certain percentage to store well. It's often necessary to harvest before the grain has dried down to the ideal level, so grain drying facilities are common on larger farms. In this case, the freshly harvested high moisture grain goes in the bin on the right. It is transferred via the inner vertical (bucket) elevator to the propane fired dryer on the left. After reaching the target moisture content (which varies depending on the type of grain) it's transferred via the outer elevator to the dry grain tank on the left. In the center is the motor control panel for the elevators, bin unloaders and bin blowers.
-
One side complete. Other set printing now. The print time for a full set is right at 3 hours...
-
You just know some swamp-dwelling redneck (and I say that with nothing but love...) is gonna build a 1:1 version of that!
-
As I mentioned in my introduction post (nearly 2 years ago!) in addition to my 1/64 Farm diorama, I have a handful of 1/16 farm toys that have been modified in some way and various attachments for them built from scratch in brass. One of them was this John Deere 420C crawler. It was a child's toy originally and suffered the usual loss of small parts (steering levers, throttle, air cleaner, muffler) and the rubber tracks were destroyed. I stripped it, fashioned all the little details, build an inside frame dozer blade for it (didn't have one originally) and repainted and decaled it. I never did find a suitable replacement for the rubber tracks and a couple of attempts at building my own from rubber were unsatisfactory, so it went back into hibernation on the shelf. It occurred to me this morning that I might be able to make suitable track pads with my 3D printer. I googled around to get some basic dimensions of the 1:1 version and then I designed and printed 5 versions with minor tweaks between each until I came up with a version I liked. They're set up in pairs with "inside" and "outside" track chain links. Not true to the 1:1 design but the only practical solution I could come up with at that scale. They'll be pinned together with .035 brass wire. The sample pair articulates very nicely. Now all I need to do is print and assemble 32 pairs...
-
I love it! Great job on weathering the car, especially the engine.
-
Got utility power run to the service entrance on the shop.
-
Well, that explains something I've been wondering about. I've had a flock of Canadas hanging out around here for years. Sometimes as many as 50 in my pastures. Even had a mated pair raise their goslings in my lower pasture the last two years. This year, I've seen something I've never seen before. I have two old, wild apple trees in my back yard. I don't bother with pruning or spraying so the apples are usually wormy and scabby, but the deer don't seem to mind. This year, the GEESE are cleaning them all up! I've also had two pairs of twin fawns hanging out here all Summer and I've watched the geese chase them off so they can eat the apples! After a good breeze, there'll be a carpet of windfall apples under those trees in the morning. By sundown, they're usually all gone. They even "bob for apples" in the little drainage ditch that runs by the trees. I was wondering how they were "chewing" the apples, but that close-up of their maw certainly explains it! They don't bother the garden or anything else, other than producing goose poop all out of proportion to their size, so I just let them be.
-
I also finally finished (been most of a year in the process) a fairly accurate scale model of a Gehl self-propelled chopper. A feller that hangs out on one of the 1:1 tractor boards I frequent suggested it and was kind enough to provide pictures and measurements. Some other life-changes have resulted in quite a lot less clutter in my basement hobby area, and I'm thinking of adding some more acreage to the diorama. I can sneak in a piece 16" wide and 4 feet long which I think I'll use mostly for actual farm fields. Still mulling that one over.
-
The rumors of my passing are premature...? Busy Summer, converted a 20x24 toolshed into a heated shop. Hung a ceiling, insulated ceiling and walls with as much as I could fit in, covered everything with sheetrock, wired it, plumbed the air drops, installed a hot air furnace and moved all my 1:1 toys down there. A LOT of work and put a heck of a dent in my toy fund, but I was tired of working in an unheated garage. Now that it's late Fall, it's time to get back to modeling and working on the diorama. Still adding details here and there as they occur (or are suggested) to me. One suggestion was to add power lines. I had considered it earlier but was wary of the delicate nature of scale overhead wires. I finally settled on one 3 phase line and service drop to the shop and we'll assume everything else is fed via underground cables. I have the poles "planted" on the layout and am working on stringing the lines. More pix when it's finished. Someone mentioned that with all the tractors on the diorama, the occasional flat tire would be inevitable and adding a guy working on a tire would be appropriate. I found a suitable figure on a 3D printing website and resized to fit. Several suggestions were made about my grain handling options and some are under construction. A dump truck with a grain body on it was one, so I whipped the box and up on TinkerCAD and printed it out. The cylinder is just telescoping bits of Plastruct tubing. Also realized I needed a gas pump for all the farm vehicles, so designed and printed a 50's-style globe top pump. I've designed and printed out several items for a "grain leg". Basically, this is a conveyor/auger system for moving grain from bins to the dryer and back to storage bins, as well as unloading bins when grain is marketed. I'll post some pictures when that part of the project is a little further along.
-
1940 Ford Moonshine Operation 'Moonshine Number Two'
PHPaul replied to SawgrassRaven's topic in Dioramas
Stunning work! -
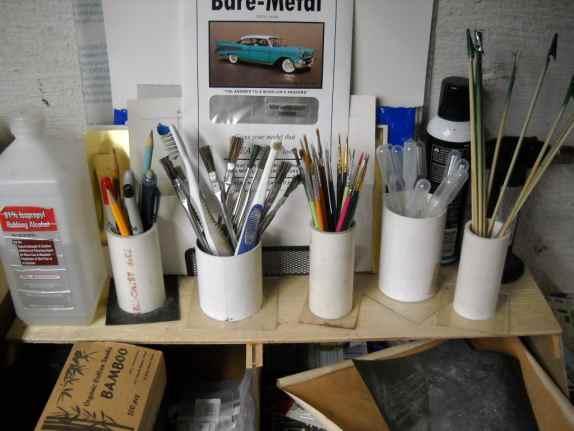
My approach to organization sort of evolves as my stash grows. At the moment, this set of cubby holes handles my plastic and brass shapes and the stand on top handles most of my paint. . I find that some PVC pipe glued to a square of plastic works well for storing brushes, pens, pipettes and such. I also made a couple to hold my glue bottles upside down so they're ready when I am.
-
Thank you, Roy. As/If/When I add more details and scenes, I'll update this post.
-
Nice! Major flashback for me, I had a 1:1 '69 Nova SS, 350/350. Green with a black interior. The green was a couple of shades darker than that, but it's close. Only "performance" car I've ever owned, wish I had it back!
-
Thanks, David. I know what you mean but for me it's not 'work' , it's therapy! I
-
Thank you!
.jpg.1211a71aaea6f84e3d79e22e9a42f7a0.jpg)