PHPaul
-
Posts
491 -
Joined
-
Last visited
Content Type
Profiles
Forums
Events
Gallery
Everything posted by PHPaul
-

Logging Truck Project
PHPaul replied to PHPaul's topic in WIP: Model Trucks: Big Rigs and Heavy Equipment
Thanks, Dennis! Waiting on a couple of glue joints to cure before I post some pictures of the mods. -
Logging Truck Project
PHPaul replied to PHPaul's topic in WIP: Model Trucks: Big Rigs and Heavy Equipment
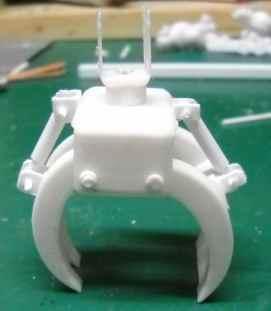
I spent the day redoing the grapple head at 75% of the original. Looks MUCH better. Also redoing the main hydraulic cylinders with larger barrels. Don't have that back together yet, but thinking that's an improvement as well. Also got the stabilizer legs roughed out. As soon as I get everything mocked up with the modifications, I'll post a couple of pictures. -
Logging Truck Project
PHPaul replied to PHPaul's topic in WIP: Model Trucks: Big Rigs and Heavy Equipment
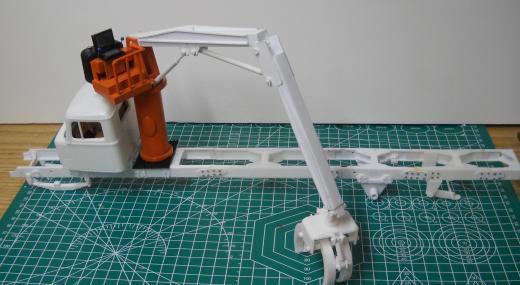
Here's what I have so far. I'll be adding hydraulic hard lines and hoses. And stabilizer legs of course. Looking at it (compared to Gary's most excellent example) I think the grapple is quite a bit out of scale. Thinking I'll re-do that.
-
Scratchbuilt flatbed
PHPaul replied to Rockford's topic in WIP: Model Trucks: Big Rigs and Heavy Equipment
Very nice! Like the suspension set up. -
Logging Truck Project
PHPaul replied to PHPaul's topic in WIP: Model Trucks: Big Rigs and Heavy Equipment
Wow! That's outstanding, Gary! That'll be a big help and also confirms some assumptions I had to make on mine. Thanks! -
Logging Truck Project
PHPaul replied to PHPaul's topic in WIP: Model Trucks: Big Rigs and Heavy Equipment
A little more progress. Working on the loader boom and figuring out the geometry. Also working on the operator's position atop the boom tower. The pins for hydraulic levers looked good originally, but in the pic they look a little out of scale. I'll probably sand the ball ends down a little if I can, or replace them if not.
-
Well, time to do another one...
PHPaul replied to throttlejockey's topic in WIP: Model Trucks: Big Rigs and Heavy Equipment
Nice! I have that kit that I'm using as the basis for a logging truck. I might steal a couple of ideas from your build. If that Detroit option was ever done in 1:1, I bet it was a miserable potlicker to work on! -
Logging Truck Project
PHPaul replied to PHPaul's topic in WIP: Model Trucks: Big Rigs and Heavy Equipment
Thanks! I did a test run of the technique on some scrap using baking soda hoping for a little less drastic effect. Results were what I was looking for scale-wise but I used spray enamel and let it dry so it was quite a job to get down to the "rust". I'll do another test with acrylic paint, I suspect that will work better. -
Logging Truck Project
PHPaul replied to PHPaul's topic in WIP: Model Trucks: Big Rigs and Heavy Equipment
I use TinkerCAD. Freeware, does pretty much everything I need at my level. I tried Fusion360 but it was WAY too much for what I do and I couldn't be bothered to climb the learning curve. -
Logging Truck Project
PHPaul replied to PHPaul's topic in WIP: Model Trucks: Big Rigs and Heavy Equipment
Several cold and rainy days this month so getting an little bonus bench time in. Working on the log loader. Mast, rear boom mount, hydraulic tank and seat 3D printed, the rest being scratch built from plastic shapes. Finished loader will articulate and swivel.
-
Logging Truck Project
PHPaul replied to PHPaul's topic in WIP: Model Trucks: Big Rigs and Heavy Equipment
Grapple head assembled. A little fine tuning needed on the pins once the glue has cured. The loader I'm modeling has a rotator on the grapple head in addition to the jaw hydraulics.
-
Logging Truck Project
PHPaul replied to PHPaul's topic in WIP: Model Trucks: Big Rigs and Heavy Equipment
There are indeed some excellent ideas (and photos!) from your build. Thanks for that link! -
Logging Truck Project
PHPaul replied to PHPaul's topic in WIP: Model Trucks: Big Rigs and Heavy Equipment
Thanks! Haven't decided yet, beyond the fact that it will be lightly-to-moderately weathered. The idea is that it's used hard but well cared for. I'm going to try the "salt" method on the frame with a base coat of rust and a finish coat of black. Haven't decided whether flat or gloss, I'll have to experiment with that and see what I like. Loader will be orange base and outriggers with a black boom. No idea yet on the cab and fenders. I have a couple of colors on hand and a couple of other models waiting on warmer/dryer weather to paint so perhaps that'll give me some choices. Nothing too wild, definitely a single color. -
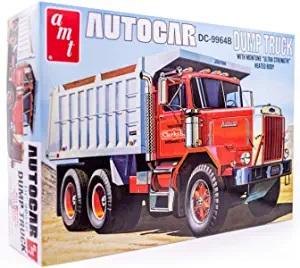
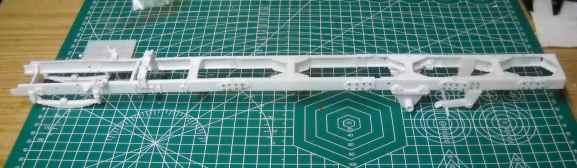
After some searching, I settled on this kit as a basis for a logging truck. In my part of Maine, a straight truck with a stretched frame, tag axle and a grapple loader is a common sight. The picture is a pretty standard example and the basis for my model. So far I've stretched the frame a total of 6 inches - 4 in front of the rear axles, 2 after the rear axles. I designed and 3D printed the frame inserts and added fish plates with bolt castings at the joints. I also designed and 3D printed two extra frame crossmembers and a tag axle assembly. (It's flopped over in the wrong direction in the picture.) I do wish I'd added the fish plates with the frame oriented differently so I got them all square with the frame, but it's a little late now... I 3D printed the log bunks rather than build them up from components. 3 hours per print times 6 bunks! Nice thing is, I hit "print" and then go do something else. 3D printer to the rescue again as I assemble the grapple head for the log loader. Comments/Suggestions/Constructive Criticism invited, as long as you bear in mind that (A) I have limited resources so resin castings are probably not going to happen, (B) Even tho I'm 70-mumble I'm just getting started building semi-custom stuff rather than "shake-the-box" and (C) with Summer coming on, this is going to be a VERY slow build.
-
AMT Autocar Dumptruck kit questions
PHPaul replied to PHPaul's topic in Model Building Questions and Answers
Raining this afternoon, so I did some measuring. I'm going to have to add 4" between the back of the cab and the front tandem on the rear, and 2.5" between the rear tandem and the back of the frame. Woof! Can't find any C Channel of the appropriate dimensions to extend the frame so I decided to see if I could print some. If that doesn't work out, I'll have to glue it up out of sheet I guess. -
AMT Autocar Dumptruck kit questions
PHPaul replied to PHPaul's topic in Model Building Questions and Answers
Finally got some warm-ish days and clear weather so I could scoot over to the log yard on the motorcycle and grab some pix and measurements. Dang sure wasn't taking the truck with $4+ gas and 17mpg! Using this as a reference for everything from the cab back. Probably be quite a while before any significant progress is made on the model, nice weather and other pursuits will take precedence. When I DO start making progress, I'll start a WIP thread.
-
May or may not work, depending on the type of motor.
-
I took a slightly different approach to the same problem. A power supply out of an old desktop computer, a DC motor with chuck and a variable speed control from Amazon. About $20 tied up in the whole (hole?) thing.
-
One of the things I want to include in my pulp truck built (stalled waiting on warmer weather so I can get pictures and dimensions of 1:1 truck) is some IFTA fuel decals for the driver's door. Push comes to shove, I can copy some off the 'net, reduce and print them, but I was wondering if anyone has beat me to it and has them available commercially?
-
Where in Michigan, Rudy? I scanned through the entire topic and don't think I mentioned anywhere that I grew up in Michigan. The farm pictured elsewhere is pretty much in the center of the lower peninsula, about 10 miles West of St. Johns just off M21.
-
Very nice! I was stationed in Japan at Misawa Air Base twice - 1972/3 and 1976/8 On my second tour, I drove a Nissan Cedric!
-
I am normally not a fan of the "slammed" look, but I must say it looks perfect in this case. Nicely done!
-
TinkerCad? Do you use it or other free 3D?
PHPaul replied to Oldmopars's topic in Model Building Questions and Answers
Again, VERY impressive! You obviously have a knack for it, and pick up new processes much faster than I do! -
TinkerCad? Do you use it or other free 3D?
PHPaul replied to Oldmopars's topic in Model Building Questions and Answers
My response was geared to PLA printing, but I'll have a look at your link as well. I'm still a beginner at this, always willing to learn. -
TinkerCad? Do you use it or other free 3D?
PHPaul replied to Oldmopars's topic in Model Building Questions and Answers
I've looked into resin printers and they're still a bit beyond my budget, especially when considering supplies. Print orientation and support structures are much more complex too, as far as I can see. At the moment, I'm happy with my PLA printer. The results are adequate and sometimes surprisingly nice, and the printer and supplies are very reasonable.