PHPaul
-
Posts
491 -
Joined
-
Last visited
Content Type
Profiles
Forums
Events
Gallery
Everything posted by PHPaul
-
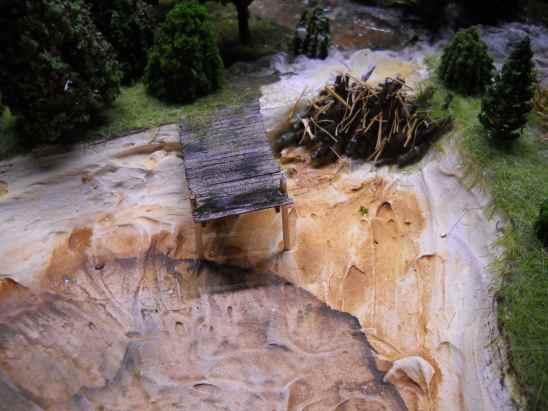
Looking at it now, I wish I'd have added some bottom debris and (if I could find any in an appropriate size) fish. I'll be adding details around the shore, I'm working on a beaver lodge and have 3D printed the beaver and a turtle. Need to find or mix appropriate colors to make the exposed bank look muddy.
-
Thanks, David. This is the part of the process I enjoy the most.
-
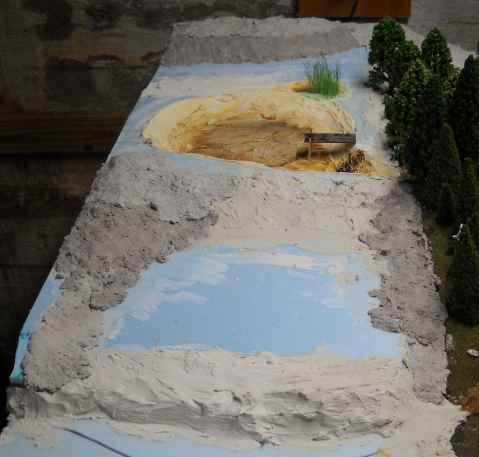
Got a good start on finishing the added acreage. The hill area in the back left corner has been expanded into the new area with a pond. Waiting on some resin tint for the water in the pond and cattail marsh. Still contemplating what to do with the flat areas. Do have one building in mind for the front to the left of the house.

-
After further testing, a couple of notes: 1. Blending the fiber goes MUCH faster and more thoroughly if you pre-soak the torn up carton in water with a drop of dish soap. I put it in to soak and went off to do other things so I don't know exactly how long but it was thoroughly soaked and I actually wrung it lightly before popping it in the blender. 2. This should have been obvious, but the more plaster you add the quicker and stronger it sets up. Of course working time is reduced but not inconveniently so.
-
NOBLING is correct, styrofoam insulation board. Great for building up thickness, light and easy to carve with a hot knife.
-
Very nice! Judging by your wall art, we could be brothers. I'm 3/4 German as well. What did you use for your roof slate?
-
Sounds amazing. Looking forward to more pictures!
-
Looks like a great start! What will you be finishing the exterior of the garage with?
-
Sculptamold is a common material for building larger terrain features. It's basically paper fiber mixed with plaster powder and works much like plaster but is lighter and goes further than plain plaster. However, it is - at least on my budget - expensive with a 3 pound bag running around $20US. For larger dioramas and model train layouts, 3 pounds doesn't go very far. There are a number of Youtube videos on how to make your own. The consensus seems to be that the best source of paper fiber is the gray paper egg cartons. The cartons are torn up into small pieces and then chopped into fine fibers with a blender. The video I watched chopped them dry, but that didn't work worth a hoot in my old cast-off single knife blender. After some experimentation, I found the following "recipe" works best for me: 1 egg carton 20oz of water 2 cups of plaster of paris. Put about half the water in the blender. Add torn up bits of carton slowly, adding more bits as they are reduced to a slurry. Add more water as needed to keep the mixture about the consistency of sloppy oatmeal. When the entire carton has been reduced to slurry, pour it into a bowl and add the plaster of paris in roughly 1/2 cup portions, mixing thoroughly as you go. Obviously, this mixture is for immediate use but one batch will cover quite a bit of area. Working time is dependent on how wet the mix is. The proportions I listed worked well for me, the mixture held it's shape and working time was more than adequate.
-
I'm in coastal Maine. This area is referred to as "Downeast Maine" as it's less than 100 miles from the Eastern border with Canada.
-
Especially right now! 25°F (-3°C) and 20 knots of wind after snowing all day yesterday and sleet/ice all night. The basement stays around 15°C year around. Cool in Summer, warm enough in Winter.
-
Thanks, David. It has a 4 foot LED fixture on each end and I'm thinking a third in the center of the room while I have things cleared out would be a good addition. My 73 year old eyes need all the light they can get!
-
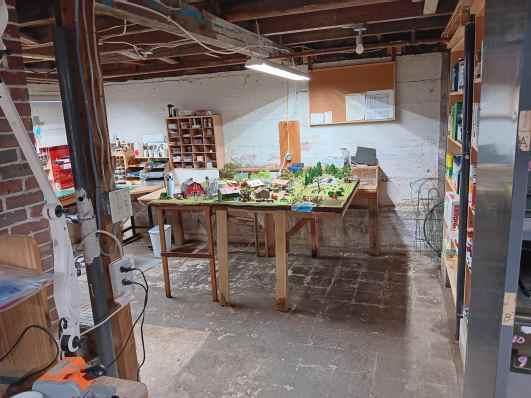
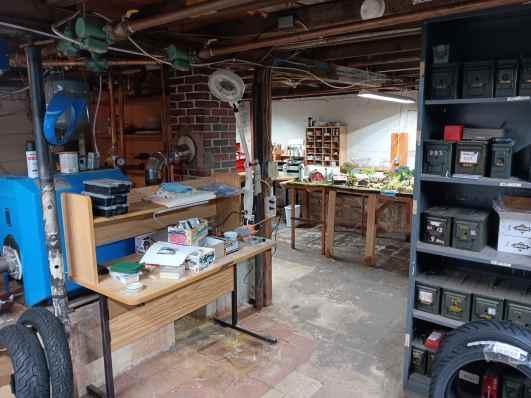
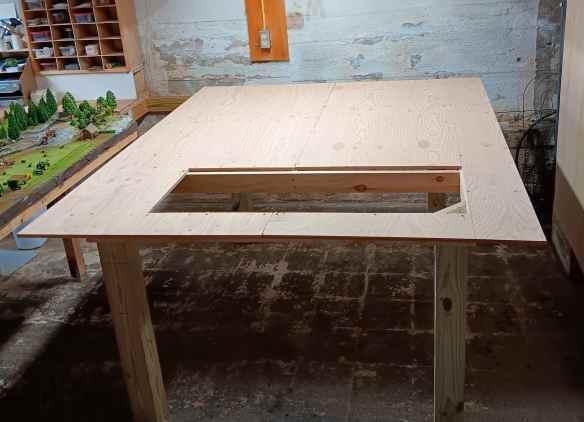
Rumors of my demise, etc. etc. My wife mentioned that she thought I should buy/build a shed to house my hobbies so I'd have more room!!! I looked into the concept and soon realized that in order to have significantly more room, plus add heat and electricity I'd be spending a LOT of money, plus I'd have to go outdoors every time I wanted to play. So I came up with Plan B: Undertake a major rearrangement/remodel of existing space in the basement where the "hobby room" is now. This is before. The room is roughly 10x14, but the perimeter is taken up with an old reloading bench, shelves and a desk. By cleaning out a bunch of junk that should have been disposed of years ago, moving the shelves to another location, moving the desk out of the room and tearing out the old reloading bench, I gained enough room to increase the diorama from 4x5 to 5x6 and still be able to walk around all four sides. As you can see, the existing diorama "table" is a hodge-podge of whatever I had laying around as I added on here and there. As part of the remodel/consolidation, I built a new table to move the modules to. The cutout is for the wiring and various light features on the front of the diorama. As of this afternoon, I have the modules separated and sitting on the new table. I'll shim them up, match the joints between modules and screw things down as the next step. A few upgrades/repairs will be taken care of in the process. Meanwhile, I'm dreaming up stuff to take advantage of the additional acreage.
-
-
Started on the weathering.
-
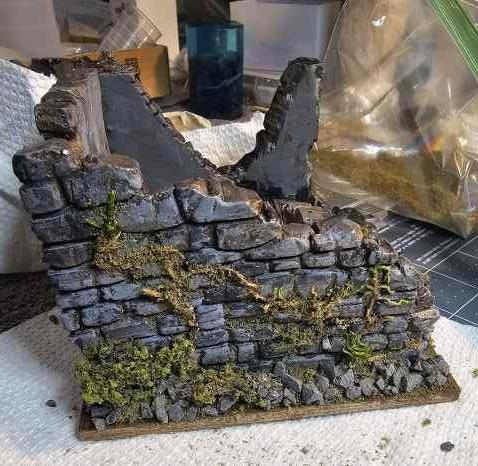
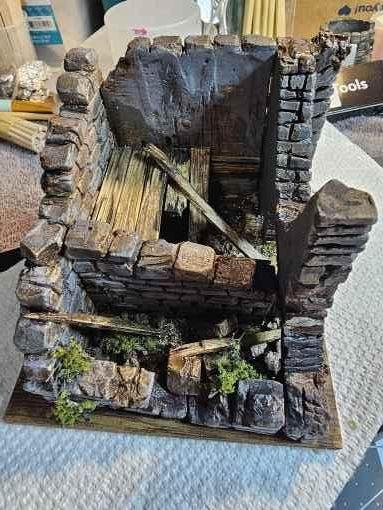
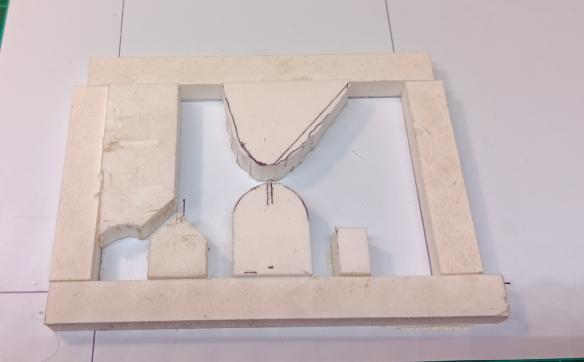
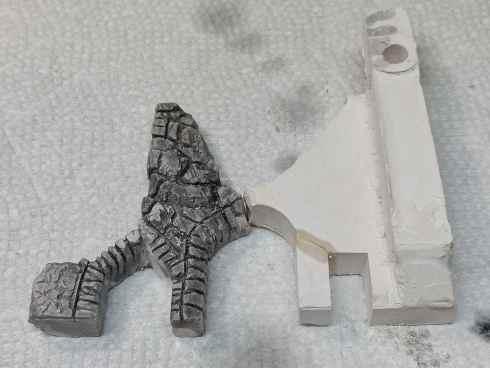
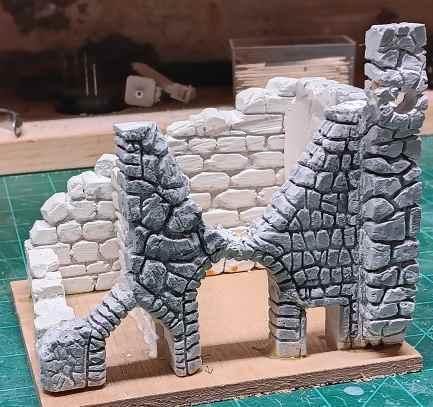
My youngest daughter, who has more artistic talent in her pinkie finger than I'll ever have, wants to do a diorama in a terrarium setting. The center piece will be the ruins of a small castle. She chose this picture from the web as the model. She's never worked with plaster so I volunteered to build the basic form for her, while demonstrating a few techniques. I printed out the picture which, conveniently, was scaled to nearly the exact size of the space available in the diorama, took some measurements and built a form to pour the front wall. Removing the casting from the form caused breaks in some of the thinner areas, but that's a "feature, not a bug" as it's supposed to be a crumbling ruin anyway, right? I carved the left side and did a dark wash on it to demonstrate the technique and then poured, carved and erected the other walls. And here's the "finished" project as far as I'm going to take it. She will finished weathering, detailing, adding rubble and vegetation and blending it into the rest of the diorama. I'll try to remember to post a picture when she finishes it. Given her skills in every other art/craft she enjoys, I expect it will be fabulous. Of course there's a small chance I could be prejudiced...
-

Revell-Monogram '66 GTO Kit
PHPaul replied to PHPaul's topic in Model Building Questions and Answers
Just what I needed to know. Thanks! -
A picture on the internet has given me an idea for a project. I will need the front clip from a '66 GTO and I'm wondering about the quality of this kit.
-
Really first class work!
-
VERY nice work! And I've heard the "No, it's not for sale, I'm going to fix it up some day" story more times than I care to remember. In at least one instance, it's still sitting there rotting away 20 years later.
-
The next thing that has transpired, is that this diorama is no longer a sensible 4 feet by 4 feet. It has now grown another 8 feet longer, giving it a size of 4 feet by 12 feet, as evidenced in the next photo. Yeah, that'll happen I started with 2x2 and am now at 6x4 and would expand more if I had the room. VERY nice work, I love the section with the cars parked in the bushes and trees growing up through the engine compartment. Very real, I've nabbed parts off cars and trucks in just such a situation.
-
A Whitney Punch works great for thicker plastic and metal.