PHPaul
-
Posts
491 -
Joined
-
Last visited
Content Type
Profiles
Forums
Events
Gallery
Everything posted by PHPaul
-
Nice progress David! I'm going to have to look into resin 3D, there's some amazing stuff out there. Quite a lot more complex than printing with PLA tho.
-
Lots of detail! Reinforces my prejudices about cities too...
-

Service Truck Kitbash
PHPaul replied to PHPaul's topic in WIP: Model Trucks: Big Rigs and Heavy Equipment
Couldn't resist a quick and dirty mockup.
-
Service Truck Kitbash
PHPaul replied to PHPaul's topic in WIP: Model Trucks: Big Rigs and Heavy Equipment
Extremely. Hence the 2 month lay-off. But the bottom line is - to coin a phrase - "A man's gotta know his limitations." -
Service Truck Kitbash
PHPaul replied to PHPaul's topic in WIP: Model Trucks: Big Rigs and Heavy Equipment
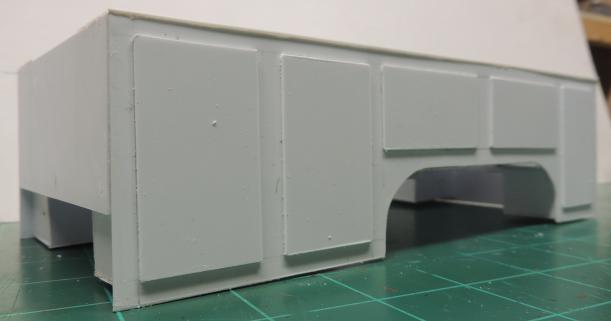
After many hours and several attempts to create acceptable operating doors on the service body, I came to the conclusion that it was beyond my skills and I'd rather have non-opening doors than crappy looking opening doors. So, I bit the bullet and scrapped this final attempt and started over from scratch. I am now at this stage. The basic body is complete less rear bumper, ready for sanding and paint prep. The top of the side boxes is diamond plate as will be the bumper. They'll get silver paint, the rest of the truck will be red except possibly the front fenders (haven't decided yet). It being Winter in Maine, currently 20° and 77% humidity, it'll likely be some time before any paint gets laid down
-
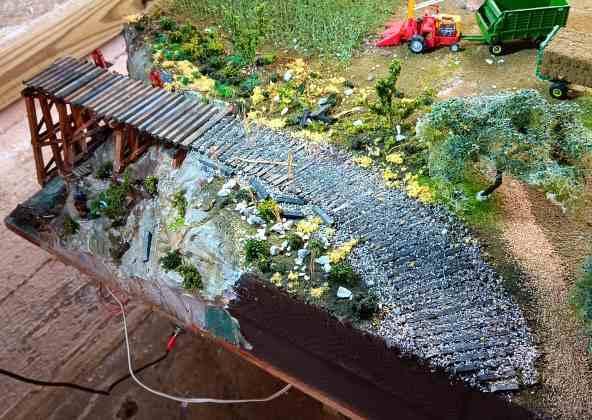
Pretty much done detailing the abandoned track scene. Would like to find some scraps of rail, gave all my HO stuff away.
-
Coming along nicely. Did you know there are people out there that - dare I say it - actually use 1-2-3 blocks for machining? That's just crazy... (I actually have three sets - one set on the modeling bench, one set in the mini-machine shop and one set in the main shop)
-
Taking maximum advantage of the view makes sense.
-
My comments were based on the drawing. It just seems odd to have bedrooms right by the front door. I typically expect to see bedrooms at the rear of the house with kitchen and living areas in the front. Probably just me.
-
Nice work so far, David! That floor plan strikes me as a bit odd by US standards. It appears that the main door (what we'd call the "front door") opens into the hallway between the bedrooms. The only other exterior door I see opens into the utility room. Am I missing something here? EDIT: I re-read your initial post and see what appear to be "french doors" opening into the kitchen and living room. The garage is considered the "back" of the house?
-
Thanks, David. I spent the day redoing the wiring on all the lighting. Much like the rest of the diorama it got wired up as a temporary mish-mash and never properly sorted. Changed everything from breadboards and pins to screw terminals and soldered connections. Much more reliable that way. One of those things I've been meaning to do for literally years and just never had the urge/ambition. Adding the fire barrel on the far end of the layout from the power source finally bestirred me to do something about it.
-
Added a couple of hobos warming themselves under the trestle. Got some flickering nano-LEDs in the barrel to simulate the fire.
-
Frustration is a very rare occurrence when working on the diorama. Some of the larger bits (such as the scratch-built corn crib above) can be a tad tedious but overall it's far and away my most enjoyable hobby.
-
Trestle structure complete. More detailing and some repairs to the scenery as I misjudged the placement of the bents a tad. Also gonna hit Fee Bay for some train-related debris to scatter around in the gorge and put some fire barrels on the trestle. Ordered some scale ballast to do the ties on the flat part of the scenery to the right of the trestle.
-
Steering gear gaiters?
PHPaul replied to YellowHound's topic in Model Building Questions and Answers
Not sure of scale, but the pleated section of bendable straws maybe?
-
Well, that went back in the "box" quickly. Much smaller overall and much more detail than the Corsair. Given that I was absent the day patience was handed out, added to the fact that I'm 74 with failing eyesight and arthritic hands, I put it away before I did something I'd regret. Maybe later...
-
Thanks! I'll post a picture of the completed trestle in a day or two.
-
I got that one for Christmas as well. I've built several ROKR kits and they're flawless. Good instructions, laser work is spot on, everything just fits. On this one, be aware that the seats are VERY delicate and the exhaust needs a little fiddling to lock together properly.
- 39,001 replies
-
- 2
-

-
- johan
- glue bombs
- (and 1 more)
-
First trestle bent complete and installed. About 20 scale feet tall.
-
One of my grandsons got me this for Christmas. I've built a F4U Corsair from ME which is likely where he got the idea. To give you an idea what's involved, the item in the picture consists of three subassemblies, each with 2 or 3 parts. Fold to shape, insert Tab A in Slot B, fold the tabs over. My magnifying visor (and my patience) are getting a workout!
-
Thanks, David! Supplies to build trestles came in yesterday, first one about half completed. Hopefully a picture later today.
-
Mostly detailed. I'll add more vegetation and debris after the trestles are installed.
-
VERY cool! So much to look at, hard to take it all in in one visit. What scale?
-
What do I drive? Well, after spending the morning cruising internet truck dealers, it looks like I'll be driving my '13 Toyota Tundra for the foreseeable future. Which, really, is fine. Only has 71,xxx miles on it and I've kept up the maintenance. Just kinda had the twitch for a new one until I started checking prices. If I don't need the truck (which is mostly...) my '20 RAV4 gets the nod. With the fold down rear seats, it'll haul most anything volume-wise that the truck will and gets 33+ MPG vs. 17 on the truck. And, if it's a nice day and my right foot is feeling 16 again, I'll flop the top down on the '90 Corvette...