PHPaul
-
Posts
491 -
Joined
-
Last visited
Content Type
Profiles
Forums
Events
Gallery
Everything posted by PHPaul
-
I added this long, narrow strip to my diorama several months ago as part of an overall enlargement. The shape was constrained by the available space in my hobby room. I've been thinking about various uses for it off and on for months. I've mentioned before that my most productive approach is to let things percolate for a while and eventually, something bubbles to the top. The end near the pond on the right of the picture is done with pictures posted elsewhere in this thread. I did start on a small hops yard (brewing hops, grown on vertical vines) near the pond and I'm still deciding if I like that or not. The remainder of the strip has been a head-scratcher. Part of the problem is that I really don't want another flat area as it's too small for buildings or fields, and just continuing the hills/forest seems like a waste in the "been there, done that" vein. Something finally bubbled to the top, at least for about a third of it. Several folks have mentioned adding something with a railroad theme. My initial reaction was that any actual train engines/cars would be out of scale unless I invested in VERY spendy "S" scale stuff, plus would be easily knocked off the diorama. Just not loving the concept. Then it occurred to me: Abandoned Rail Line! Always wanted to build a trestle anyway. So I grabbed the saw and hacked a corner off the two 2 inch layers of insulation foam I use as a base for everything. Carve random faces and levels into the result and cover with a layer of Plaster of Paris. That also gives me an excuse to indulge in one of my favorite processes, carving stacked rock walls. These are retaining walls that will act as a base for the bents supporting the trestle. While I'm waiting on the scale lumber to build the trestle, I can work on detailing and coloring the gorge walls. Debating whether or not to do a small stream at the bottom. Probably will.

-
I keep two: One for cut-offs of basic shapes - sheet, tubing, rod, etc. One for actual parts or 3D prints that wound up not being used. As John said, one or the other - often both - get dipped into on most projects.
-
Yes, I actually drew the pump up and printed it out. I'll look and see what's out there for u-joints. Thanks! EDIT: My 3D printer (Creality Ender 3) won't print u joints small enough. Larger ones like for a driveshaft are doable, but the pump shaft joints are about 2mm wide and it won't print that small. Not enough plate contact area. Possibly with a raft but then I'd likely destroy the print separating it from the raft.
-
Need shafts and pump for a PTO driven hydraulic pump as used on dump truck kits. 1:25 scale. Doesn't need to be exactly like this one as it's being retro-fitted to non-dump truck tractor to power a knuckle boom crane.
-

Service Truck Kitbash
PHPaul replied to PHPaul's topic in WIP: Model Trucks: Big Rigs and Heavy Equipment
Here's the final decision on mounting the doors on the service body. All plastic, hinge pins spaced off the body with LRPD's - Little Round Plastic Dots - punched out with a Whitney punch. Outside trim locates them in the frame and covers any irregularities in the cut out. I thought I could live with the shorter door over the wheels, but I'm going to have to redo that. Had to redo the second door from the front as well, got the trim on cockeyed the first time.
-
Service Truck Kitbash
PHPaul replied to PHPaul's topic in WIP: Model Trucks: Big Rigs and Heavy Equipment
Can't take credit for that Gary, I was gifted that truck as a partially built glue bomb. Pretty much all I did was clean it up, strip and re-paint it. -
Service Truck Kitbash
PHPaul replied to PHPaul's topic in WIP: Model Trucks: Big Rigs and Heavy Equipment
In case anyone is curious/interested, the "hoses" are made from this 28ga wire from Amazon Comes in various colors and a nice little dispenser box. -
Service Truck Kitbash
PHPaul replied to PHPaul's topic in WIP: Model Trucks: Big Rigs and Heavy Equipment
Mounted on the truck. Just a little plumbing left to do. Still working on doors for the service body. Not 100% satisfied (primarily due to non-scale size of components), but have pretty much exhausted my options. I'll post pix when I get one side finished up.
-
You're welcome Noel, glad I could help.
-
I looked it up under the X-Acto part number 7726 and found a couple of on-line sources for it, including Amazon.
-
I've had it quite a long time, possibly since the 1980's when I got into HO model railroading. I'll look around and see what I can find on it.
-
M-9 45 Ton Trailer Build
PHPaul replied to Chariots of Fire's topic in WIP: Model Trucks: Big Rigs and Heavy Equipment
Most excellent! The prime mover is a real beast! I bet it was a chore to drive IRL. -
They are available. Whether they last longer is anyone's guess.
-
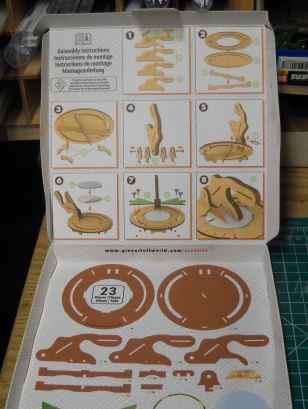
For years, I have been using this K-Tool miter/chopper to cut plastic and wood. I have several issues with it: No repeatability, no reference line for blade position so it's hard to see where you're actually cutting, the single-edge razor blade flexes under even moderate pressure, the method of holding the blade to the handle is sloppy, the angles are approximate and the blade digs into the soft plastic base. With my increasing desire for accuracy it just wasn't cutting it any more (arrrr...humor!) I spent quite a bit of time surfing the 'net looking for something better and spotted this unit from Green Stuff World. Received it today. I saw several things that attracted me to it: Price (around $17 plus shipping), the heavy box-cutter type blade, the repeatable method of setting angles, the blade is clearly visible and there are reference lines in the center so you KNOW where you're cutting and the heavier construction (no flexing). It's made of a laser-cut masonite-like material. Assembly is required but dead simple and everything fits together well. A sample 45° cut came out very well. I was a little concerned about the thickness of the blade but it doesn't seem to be an issue and the lack of flex is VERY welcome. One of the other things that attracted me was (I thought...) the use of ordinary utility knife blades. That turns out not to be the case and is really the only downside I can see so far. I will have to find a source for replacement blades, altho they should last a good long time cutting only soft plastic and thin wood. EDIT: Turns out the blades are commonly available, ULine is one source.
-
Service Truck Kitbash
PHPaul replied to PHPaul's topic in WIP: Model Trucks: Big Rigs and Heavy Equipment
Thanks, Gents. High praise coming from this company! -
Service Truck Kitbash
PHPaul replied to PHPaul's topic in WIP: Model Trucks: Big Rigs and Heavy Equipment
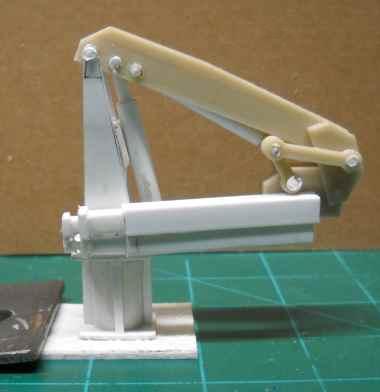
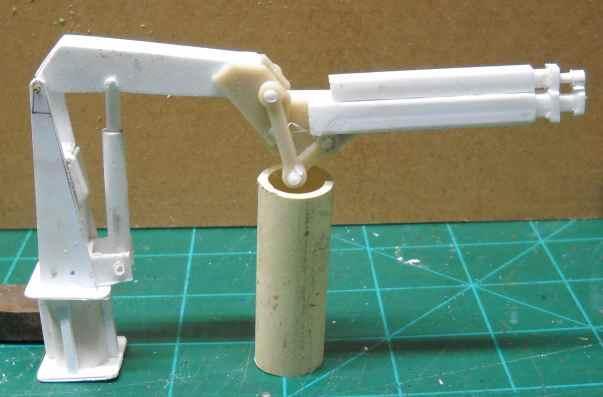
Final iteration of the knuckleboom crane. I re-designed and re-printed the main boom 3 times before I got the pin locations for the hydraulic cylinders right and got full articulation of the folding boom. Right now, the rods slide freely in the cylinders, hence the props to hold it in the extended position. I'm hoping a coat of paint on the rods will provide enough stiction to hold it in position. I have come up with Plan C for the doors on the service body. Just waiting on some materials to arrive. I'll post pictures if it works as envisioned.
-
Service Truck Kitbash
PHPaul replied to PHPaul's topic in WIP: Model Trucks: Big Rigs and Heavy Equipment
I have a Prentiss style loader on the straight truck. I'm thinking of the knuckle boom making the 4300 more of a multi-use truck. Crane would be useful for loading stuff onto a flatbed for instance.
-
Service Truck Kitbash
PHPaul replied to PHPaul's topic in WIP: Model Trucks: Big Rigs and Heavy Equipment
Still flip-flopping on mounting the doors. Plan C works well but still looks pretty chunky. Letting that simmer for a while to see if a better idea bubbles to the surface. Meanwhile, I started on a knuckleboom crane several months ago and never quite figured out how to get it to fold as compactly as the real thing. Coincidentally, a neighbor who works on cars had one parked in his yard for some repairs (hydraulic leaks) and I got a chance to look at one close up and get some pictures. The solution was obvious once I saw it. So I 3D printed the necessary parts and retro-fitted my first attempt: Stowed. Unfolded. Propped up until I can snug up the joints just enough to hold it in position. Fully extended. Now that I have the concept figured out, I'll either fine-tune this one or build another to go on my International 4300 with the log trailer.
-
The bane of my existence! Pete 353
PHPaul replied to Bren's topic in WIP: Model Trucks: Big Rigs and Heavy Equipment
Thanks, Brendan. Filed away for future reference. -
Making a realistic bush - My Way!(Very Simple)
PHPaul replied to tiking's topic in Tips, Tricks, and Tutorials
Nice! I've used the lichen just as it comes off the tree for vines. Never thought about adding leaves. I've also built vines/bushes using unraveled wrapping twine as the base. Hit it with a little spray adhesive, sprinkle some Noch leaves over it and BOOM! you're done. -
The bane of my existence! Pete 353
PHPaul replied to Bren's topic in WIP: Model Trucks: Big Rigs and Heavy Equipment
I REALLY like the rust treatment on the hot side of the turbo and the 5th wheel. Would you mind providing details on how you went about that? -
Service Truck Kitbash
PHPaul replied to PHPaul's topic in WIP: Model Trucks: Big Rigs and Heavy Equipment
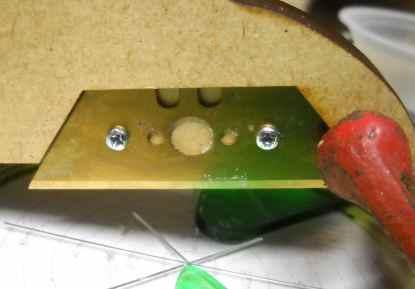
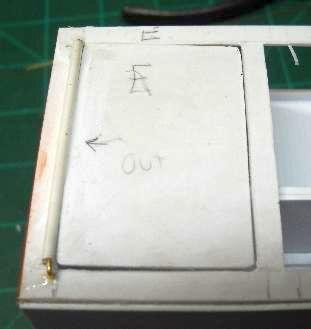
I got to thinking about my hinge problems and thought more about the lack of contact area for the glue. I'm trying a modified version of Charles' approach using ABS tube along the full length of the door and brass pivots superglued into holes drilled in the body. The full-length tube seems to be providing plenty of contact area and the joint seems solid. Looking at the picture, I think the tube needs to be mounted ON the door as opposed to beside it so the door will fit flush. I'll try that in the morning.
-
Service Truck Kitbash
PHPaul replied to PHPaul's topic in WIP: Model Trucks: Big Rigs and Heavy Equipment
Testors styrene glue is my go-to and works perfectly on styrene-to-styrene joints. The problem is two-fold: 1. Dissimilar materials. Trying to glue PLA (3D print material) or ABS (small tubing) to styrene is not working for me. 2. Very small contact area on the joint. While either Testors or super glue would probably work over a larger area, there's just not enough strength in this application. -
Service Truck Kitbash
PHPaul replied to PHPaul's topic in WIP: Model Trucks: Big Rigs and Heavy Equipment
Well, much like Thomas Edison, "I have not failed, I've discovered at least 3 ways that will not work." Superglue looked promising but didn't bond well to the styrene. Very little effort required to pop a hinge off, would never have survived opening and closing. I guess I'll have to try Charles' method with brass. Need to check my inventory, pretty sure I'll have to lay in more brass tubing. -
Service Truck Kitbash
PHPaul replied to PHPaul's topic in WIP: Model Trucks: Big Rigs and Heavy Equipment
I've been struggling with the hinges. The 3D printed ones work well, but they're YUGE! I got some smaller plastic tubing and discovered upon working with it that it's ABS and pretty much impervious to styrene-type glue. Nothing would stay glued in place. Tried some UV-set superglue this evening, and I think that's gonna work. If it does, I'll post some pictures. Lotta other stuff going on before Winter weather sets in, so it may be a while.