PHPaul
-
Posts
491 -
Joined
-
Last visited
Content Type
Profiles
Forums
Events
Gallery
Everything posted by PHPaul
-
 A little progress indeed! That's gorgeous!
 -
LOT of detail! Glad I don't live in that neighborhood tho.
-
Outlaw Kart
PHPaul replied to Stevens19's topic in WIP: Other Racing: Road Racing, Land Speed Racers
Cool! Also looking forward to updates! -
LOVE the truck! Very realistic patina.
-
I love trucks from this era! They required DRIVERS, not steering wheel holders. Following.
-
VERY nice! What are you using for the cast iron soil pipe? Whatever it is, it looks great! Very realistic.
-
Model building versus other hobbies
PHPaul replied to Sledsel's topic in General Automotive Talk (Trucks and Cars)
There are, in my experience, a certain percentage of "My way is the only way" people in ANY hobby. It's certainly true in motorcycling and firearms. The trick is to find a forum that discourages/moderates that sort of behavior. This one, for instance... -
Wow! If you follow all the links, it turns into a real rabbit hole and suck up hours! That's a Good Thing!
-
Willys Pickup
PHPaul replied to PHPaul's topic in WIP: Model Trucks: Pickups, Vans, SUVs, Light Commercial
Whoops, wrong forum. Mods, please move. Thanks. -
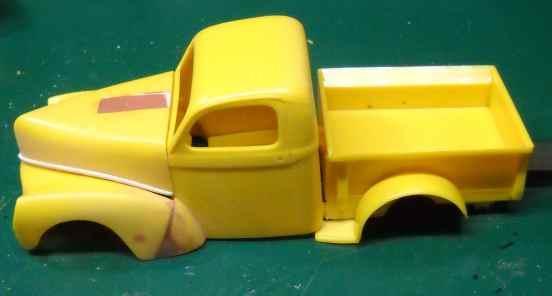
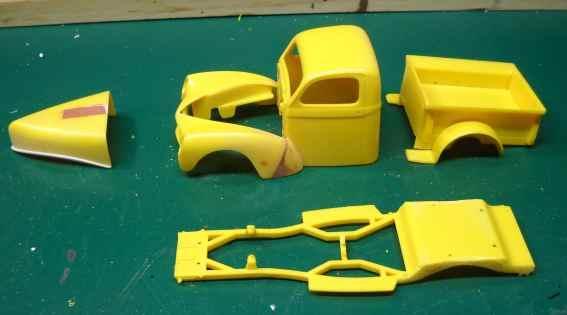
I was gifted several Willys Kits a while back. The '33 is being kit-bashed into a 40's dirt track car, I'll do up a WIP thread later. One of the 41's was built pretty much as an out-of-the-box Gasser. Another was traded for some stuff including a flathead six engine which will wind up in this build: This is the pickup version of the other 2-in-1 gasser kit which I'm building as a more-or-less stock Willys pickup. Obviously, the blown gasser engine wouldn't be appropriate, hence the 6 banger. I'm aware that Willys of this era were 4 cylinders, my story is that the 4 banger was worn out and replaced with the six. The flip-front hood/fender assembly would also be inappropriate, so I cut the hood free (multiple scores with the back of a #11 blade), filled the blower hole and glued the fender section to the cab with splices on the inside of the fender. I used a little glazing putty to ease the transitions and bring everything up to level . I put a bit of trim on the edges of the hood after cutting it free so that it sits properly on the fenders and doesn't just fall into the engine bay. Thinking over options for hood hinges. I have some nice steel wheels and narrow tires that will work well for this build. The next step is to figure out the suspension. Pretty sure the original bits from the kit will result in much too tall a stance, we'll see what can be done about that.

-
Looks pretty authentic to me, Good Job!
-
When I was into model railroading, ballasting track was one of my least-favorite jobs. Yours looks good.
-
Source for a flathead 6 engine?
PHPaul replied to PHPaul's topic in Model Building Questions and Answers
Thanks for that information, NOBLNG. That's a great looking 4 cylinder you've built! I have a line on a suitable flathead 6. My story will be that the 4-holer blew up and the 6 was transplanted in... -
Source for a flathead 6 engine?
PHPaul replied to PHPaul's topic in Model Building Questions and Answers
Ah! It's from the '40/'41 2-in-1 kits, (I have one of each...) so the 4 banger would be correct. That might be a little easier to find. Excellent, thanks. -
I was gifted some Willys 2-in-1 kits and will have enough leftovers to build a Willys pickup. These kits were all intended to be drag cars/trucks so the engines are blown V8's. I plan to build the truck as a farm pickup so a flathead 6 would seem to be the most logical choice for an engine. What reasonably available kits have a flathead 6 in them? I'm also going to post in the swap section with the hopes of just getting the engine vs. having to buy an entire kit. Thanks!
-
Very nice! One problem with modeling a farm in general and in 1:64 in particular is that there are very few figures available, and what IS available is ridiculously expensive.
-
Very nice!
-
I love what I see so far!
-
Thanks, David, glad you enjoyed it. My "accent" isn't really New England. I grew up in Michigan and then spent 20+ years mixing with all sorts of people in all sorts of places while in the Navy. It's sort of a conglomeration of midwest drawl, New England Yankee and a little Dixie Rebel. I can DO a pretty authentic New England/Maine accent and often do when pulling someone's leg.
-
The black and white photo is particularly realistic. It's the sort of scene and weather that I picture when I think of London.
-
-
Question about drag cars from the 60's
PHPaul replied to PHPaul's topic in General Automotive Talk (Trucks and Cars)
Ah. Just what I needed, thanks! -
I'm building a '65 Nova drag car. Stripped interior, full roll cage, narrowed rear with tubs and slicks, no inner fenders on the front, straight front axle, heavily modified small block (2x4bbl, etc). I'm guessing it would have run in an Altered class, perhaps B or C/Altered. I haven't been able to find anything searching for NHRA data. I want to mark the windshield with class and dial-in ET. So, two questions: 1. What would be a reasonable class for such a car to run in, and 2. What would be a reasonable dial-in for that class?
-
Don't have a current need, but can see where they'd be useful. Was going to order a few just to have on hand. Thanks for the additional information!
-
Thanks, David. Interestingly, a google search seems to indicate that handrail knobs are primarily a UK thing.