PHPaul
-
Posts
491 -
Joined
-
Last visited
Content Type
Profiles
Forums
Events
Gallery
Everything posted by PHPaul
-

Service Truck Kitbash
PHPaul replied to PHPaul's topic in WIP: Model Trucks: Big Rigs and Heavy Equipment
I'll look into it, thanks! -
Service Truck Kitbash
PHPaul replied to PHPaul's topic in WIP: Model Trucks: Big Rigs and Heavy Equipment
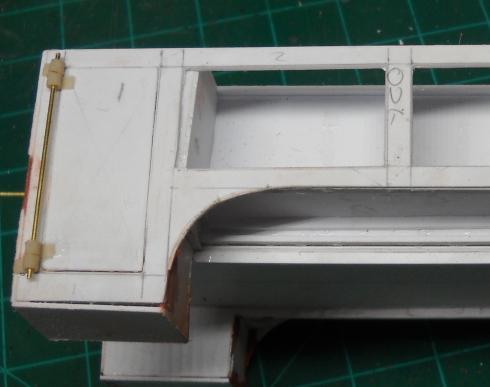
It looks like this hinge design is going to work. A bit large for the scale, but the truck is driven by a mechanic who's favorite tool is a hammer, so that's not all bad. Plan A is small, individual pins top and bottom, assuming that's strong enough. The door side hinges were glued in place first, then when fully set up, the full length rod was installed to facilitate placement of the frame side hinges. Full length doesn't look horrible tho. If I go that way, I'll need more brass stock. I've started fairing the body work with glazing putty, I see I missed a spot.
-
Service Truck Kitbash
PHPaul replied to PHPaul's topic in WIP: Model Trucks: Big Rigs and Heavy Equipment
Somewhat humorous aside: I'm from the USA. We don't DO metric, it's a point of pride with us (or at least me...) to stick with the traditional (and admittedly unwieldy) Imperial system. However, when I started using TinkerCAD the default unit was metric and I just got in the habit of using it. Also, using 1mm=1 inch is VERY close to 1/25 scale which is quite handy when designing things from scratch. The metric system is kinda handy sometimes... Of course, if you quote me I'll deny ever saying such an heretical thing! -
Service Truck Kitbash
PHPaul replied to PHPaul's topic in WIP: Model Trucks: Big Rigs and Heavy Equipment
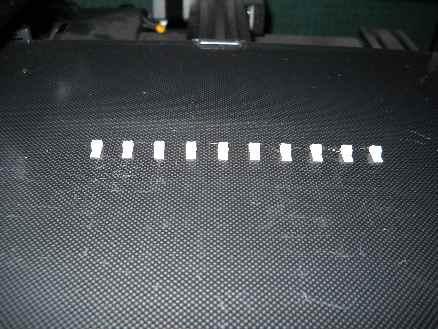
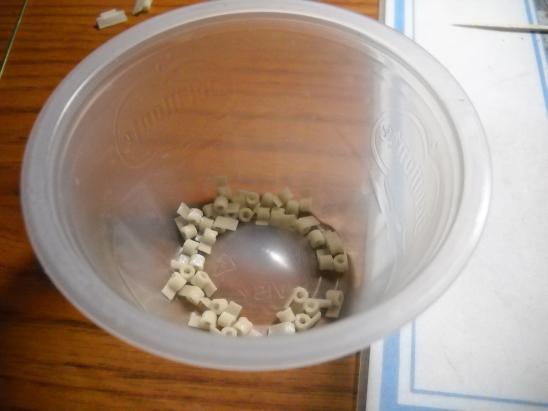
After 5 iterations, I went with something very similar to what @Jürgen M. used on his Jeep. Versions 1-3 were variations on a piano hinge but alignment and clearance was problematic. Version 4 was a single hinge as shown, Version 5 was just a size tweak to make the pin fit better. They are 3mm barrels with a 1.75mm bore and a 3x3mm mounting plate. Pins will be 1.1mm brass rod. Oversize holes are to allow for shrinkage as they cool. Now to assemble 40 of these things...(4 per door times 10 doors)
-
Service Truck Kitbash
PHPaul replied to PHPaul's topic in WIP: Model Trucks: Big Rigs and Heavy Equipment
First set was very close, made a couple of adjustments, printing the second set now. They're a bit large for the scale, but if they work, a LOT less fussing than other methods. We shall see. -
Service Truck Kitbash
PHPaul replied to PHPaul's topic in WIP: Model Trucks: Big Rigs and Heavy Equipment
Hmmmmmmmm...printed hinges. Hadn't thought of that, I'll try printing a set and see how that goes. -
Service Truck Kitbash
PHPaul replied to PHPaul's topic in WIP: Model Trucks: Big Rigs and Heavy Equipment
Yup, mounting doors is going to be tedious for sure. Right up there with cutting them out to begin with. Do you have a specific source for the hinges? -
Service Truck Kitbash
PHPaul replied to PHPaul's topic in WIP: Model Trucks: Big Rigs and Heavy Equipment
Body is coming along. Several interior partitions to install between compartments and some filling and sanding on the joints. Plan A is to mount the doors as "plug mount" in the original cutouts. Trying to find a way to make hinges that are somewhere near scale and not too fussy to make. These look too big to me. Suggestions? I've seen some photo etch piano hinges but can't tell if they actually work or are just decorative.
-
Service Truck Kitbash
PHPaul replied to PHPaul's topic in WIP: Model Trucks: Big Rigs and Heavy Equipment
Those are nice folding cranes! I want to build a knuckle-boom crane. I've done one and learned a lot but it's not even up to MY standards, which isn't saying much. I'll build another using lessons learned and more 3D prints. The first one was built from scratch with plastic shapes. -
Service Truck Kitbash
PHPaul replied to PHPaul's topic in WIP: Model Trucks: Big Rigs and Heavy Equipment
Crane print files on Thingiverse I posted the print files for the crane, feel free to download and use them if interested. -
Service Truck Kitbash
PHPaul replied to PHPaul's topic in WIP: Model Trucks: Big Rigs and Heavy Equipment
If you can use Fusion360 (I tried, learning curve too steep) then TinkerCAD is a breeze. Also free, just sign up on-line. -
Service Truck Kitbash
PHPaul replied to PHPaul's topic in WIP: Model Trucks: Big Rigs and Heavy Equipment
I created the files for the printed parts in TinkerCAD. The telescoping booms are just standard Plastruct shapes, I can get you the part numbers if you like. When I'm sure I'm done with the crane prints, I'll post them to Thingiverse and put a link here. -
Service Truck Kitbash
PHPaul replied to PHPaul's topic in WIP: Model Trucks: Big Rigs and Heavy Equipment
Thanks, @Jürgen M. I'm liking your day cab. Designing from scratch is a ways out of my skill set for sure! -
Service Truck Kitbash
PHPaul replied to PHPaul's topic in WIP: Model Trucks: Big Rigs and Heavy Equipment
"Precise" he sez... My work(usually) gets a little better with each project but I'm not sure "precise" is an applicable term just yet... Thanks, again very kind, the standards here are very high and I'm essentially a beginner. Thanks Gary, it's coming along. Not sure why the method didn't occur to me earlier. -
Service Truck Kitbash
PHPaul replied to PHPaul's topic in WIP: Model Trucks: Big Rigs and Heavy Equipment
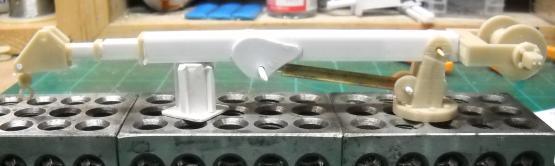
Thanks Jeff, that's high praise coming from this group! In between scoring sessions on the body sides (old, arthritic hands... ) I've been printing details for the service crane. The hinge pins are (obviously...) temporary to check articulation. Once I'm happy it'll come back apart for paint.
-
Service Truck Kitbash
PHPaul replied to PHPaul's topic in WIP: Model Trucks: Big Rigs and Heavy Equipment
Final layout of body. Transferring to styrene now.
-
Service Truck Kitbash
PHPaul replied to PHPaul's topic in WIP: Model Trucks: Big Rigs and Heavy Equipment
First pass at the service crane. Version 2 of the base is printing now to allow more lift angle on the boom and provide a mount for the lift cylinder. Telescoping booms are Plastruct shapes, the brown stuff (boom stops, base, winch) are 3D printed. With some detailing such as hydraulic motor for the winch, lift cylinder and hoses, hook mounts on the booms, block on the end etc. I think it will do nicely.
-
Service Truck Kitbash
PHPaul replied to PHPaul's topic in WIP: Model Trucks: Big Rigs and Heavy Equipment
Cancel that request for a crane print. I figured out a way to build one with a combination of scratch building and 3D printing that should be quite realistic. We'll see how that goes. -
Service Truck Kitbash
PHPaul replied to PHPaul's topic in WIP: Model Trucks: Big Rigs and Heavy Equipment
I cut down the poster board template and I think that's going to work. Just need to lay out the side doors. Probably one full height at the rear, two at the front and one over the wheel well. Also pictured is some of the stuff I've printed for the "load". Bumper vise (there'll be a diamond plate bumper full width of the rear) compressor with hose, welder and oxy/acetylene tanks. I want to do a crane and the one posted by @yh70 in the original thread is perfect, but it appears to be configured to be printed by a resin printer. If someone can confirm that and/or is willing to print it and send it to me (for a fee, of course) I'd love to use it.
-
Service Truck Kitbash
PHPaul replied to PHPaul's topic in WIP: Model Trucks: Big Rigs and Heavy Equipment
@yh70 I agree, that's much better. Thanks for the picture, I haven't had much luck finding 10 wheel service trucks. I'm even planning on painting it red! -
In this post, I asked some questions about building a service truck. I ordered the AMT Paystar 5000 Dump Truck kit and in my usual impatient fashion, I have started on what was supposed to be a Winter project. . In order to design the service body, I had to build the basic frame and mock up the cab to see what I have to work with. I'm a very visually-oriented person. Fairly often, I have a mental picture of what I think I want, but when I actually build it, I find several things I'd do differently. That's particularly true in this case as the entire focus of the project is the service body. Build, re-think, rebuild is the path to satisfactory results, but that gets expensive in styrene, so I did a couple of mockups out of poster board. As is often the case, Plan A was unsatisfactory. Plan B is much closer to what I want, and with a little tweaking will likely be the way I go. I dropped it down over the frame, and made it longer. The extra length will require a frame extension and the drop will require removing the second fuel tank or moving it to the other side. I'm thinking it's too tall as a 6 foot man standing on the ground wouldn't be able to reach anything in the top of the side boxes. I'll probably shorten it to at least the top of the cab. The next step will be to fab up the inside partitions and wheel well (also out of poster board) and make some final decisions on design before hacking up some styrene. Comments/suggestions/criticisms welcome.
-
Amazon Prime big deals
PHPaul replied to Ridge Rider's topic in General Automotive Talk (Trucks and Cars)
Oh, thanks very little! I really shouldn't spend more money on models if for no other reason than that I don't have a place to put them, but I grabbed the Galaxie/Falcon combo anyway. -
That seems like a good idea, David. I'll give that a shot. Thanks!
-
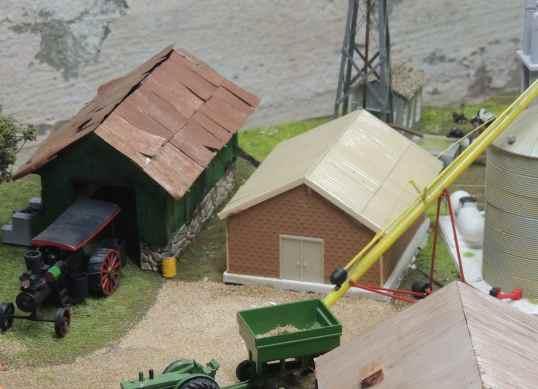
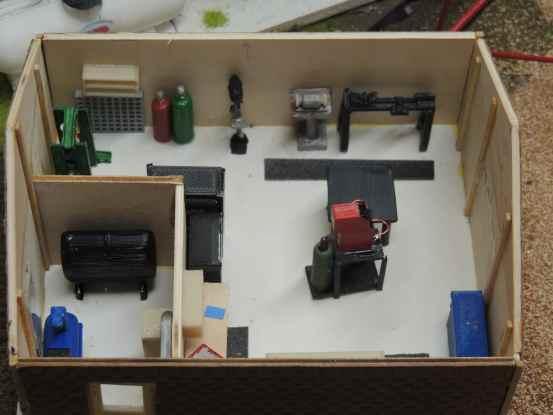
Exterior of the shop pretty much done (still need to add the external part of the furnace chimney) and placed on the diorama. Just need to "landscape" around the foundation. Took a little head-scratching to find a reasonably logical place to put it. Inside details are largely done tho things may occur to me later on. Printing hand tools at 1:64 is pretty sketchy. I used to be able to find photo etched stuff online but can't remember the search phrase that brought them up.
-
Looking specifically for hand tools to detail my shop on my 1:64 diorama. I know I found some a couple of years ago, but I can't remember where.