PHPaul
-
Posts
491 -
Joined
-
Last visited
Content Type
Profiles
Forums
Events
Gallery
Everything posted by PHPaul
-
Thanks, David. Still working on the interior. My 3D printer is getting a workout!
-
Thanks, David. The building is my 1:1 repair and fabrication shop. My modeling space is a corner of the basement.

-
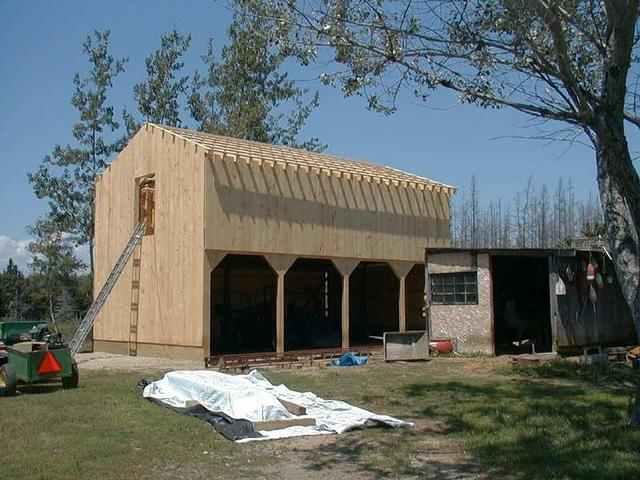
Fall is in the air, and the diorama is calling to me... I decided to replicate another 1:1 building on my place. I built this 20x24 building originally as a tool shed to store lawn tractors and ATV's and such. Several years later, after simplifying life by giving up farm animals and selling little-used toys, I decided to convert it to a heated shop. I ran power to it, insulated the dickens out of it and finished the interior. It's been MUCH more useful as a year-around shop. I built the model with a removeable roof and am detailing the interior as closely to the 1:1 as patience and skill will allow. There are a few more things to add, both scratch built and 3D printed. This WAS supposed to be a Winter project but once I get into something, I tend to work on it until it's done.
-

1:32 Scale Hooper & Co. Coachbuilders ( 1930's )
PHPaul replied to Anglia105E's topic in WIP: Dioramas
The third shot is particularly convincing. Nice work! -
This will be a Winter project. I'll start a build thread when I start the build. I'm just laying in supplies and gathering ideas at the moment.
-
I'm thinking large construction equipment - excavators, bulldozers, haul trucks, etc. As @Warren D mentioned, any significant quantity of the basic fluids - fuel, hydraulic oil, DEF - will add up quickly, weight-wise. A 10 wheeler is starting to make a lot of sense. I just hope I'm up to the challenge.
-
Lots of good stuff there, Thanks!
-
That's almost EXACTLY what I have in mind. Thanks!
-
I can certainly use the pictures for detailing the Paystar, thanks! I'm planning a service body with a welder, air compressor, generator, fuel tank and crane among other things.
-
I'm planning to build a heavy service truck. I got the AMT International Paystar 5000 dump truck as a basis because I like the no-nonsense, brawny look of that style of truck. I'll scratch-build a service body. The question is, would a 10 wheel service truck be realistic? I don't recall ever seeing one, but I've led a sheltered life... The alternative would be to build the Paystar as a 6 wheeler and modify/shorten the frame accordingly. Does that seem reasonable?
-
Where can I find 1:25 scale shop tools
PHPaul replied to PHPaul's topic in Model Building Questions and Answers
Thanks for all the leads, folks! I did find a few very nice .STL files on Thingiverse that I'm printing now. Will need some hand tools to populate the compartments tho. -
Where can I find 1:25 scale shop tools
PHPaul posted a topic in Model Building Questions and Answers
Gathering supplies for a planned service truck build and would like find things like an air compressor, welder, oxy/acetylene tanks, tool boxes and other things of that nature to load the service body with. I did a search and did find a couple of kits but $30 to $70 for a kit I can use 2 or 3 items from is a non-starter. Most of the service truck-related posts are are 4+ years old so links are dead. I could design and 3D print some of the stuff, but I'd like to have the option of just ordering it. Any leads appreciated, thanks. -
Pretty much everything listed above to one degree or another, with some additions: 1. Long, cold Winters in Maine, keeps me from going shack-whacky. 2. I built models as a pre-teen/teenager and had pretty definite visons which I did not have the resources or skills to achieve. Now that I'm retired, I have better (tho not unlimited) resources and am developing some of the skills. 3. While models of cars and trucks provide some outlet, what REALLY gets my creative juices flowing is dioramas. I absolutely LOVE starting with nothing more than an idea and creating things for which no kit is available and, often, never existed anywhere but in my imagination.
-
1:32 Scale Hooper & Co. Coachbuilders ( 1930's )
PHPaul replied to Anglia105E's topic in WIP: Dioramas
The shots with the camera at "ground level" are quite convincing. Looks like "depth of field" might be an issue. There are camera settings that will help with that but my manual camera days are long past and I don't remember the details. -
Making Tracks
PHPaul replied to Chariots of Fire's topic in WIP: Model Trucks: Big Rigs and Heavy Equipment
You'd be surprised how easy it can be. Entry level 3D printers are very affordable, and the design (TinkerCAD) and slicing (Cura) software are free. I picked up the basic functions of TinkerCAD in 2 or 3 sessions. If I get stuck on how to do something, there are a multitude of YouTube tutorials. -
Making Tracks
PHPaul replied to Chariots of Fire's topic in WIP: Model Trucks: Big Rigs and Heavy Equipment
I 3D printed a set for a 1:16 metal toy I was fixing. Not the same level of detail, but WAY better than the rubber strips normally used. -
1:32 Scale Hooper & Co. Coachbuilders ( 1930's )
PHPaul replied to Anglia105E's topic in WIP: Dioramas
Liking the re-do David! Mr. Hitchcock looks pleased... -
In my opinion, the "score" depends. Is it scratch built or assembled from a kit? If built from scratch, added points for a very nicely done job. If assembled from a kit, neatly done but much less effort/originality required, so fewer points. Again, my opinion, as shown it's a "model" not a diorama. A diorama would include weathering and added features such as landscaping, people, vehicles or other things to make it "come alive". Either way, it's nicely done.
-
Excellent weathering!
-
Barn pretty much finished, need to do a little dressing up around the edges with ground cover and some detailing inside - tools and fence remnants and scrap lumber and such.
-
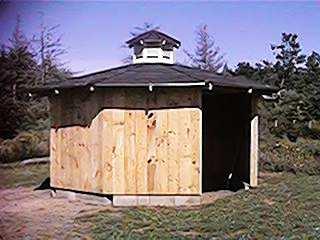
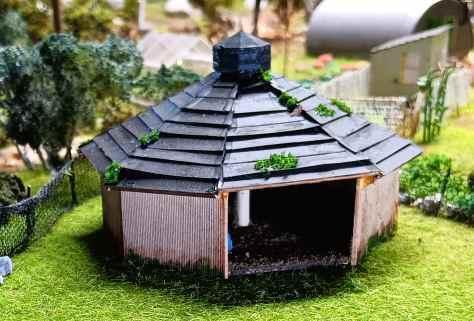
This is the 1:1 barn I built in 2001 when I was raising sheep. Needed hay and equipment storage space. This will be going on the diorama when finished. This is the sheep shelter I built to cover their hay feeder and give them a place to get out of the rain if they wanted. Just waiting on my scale sheep.
-
Exactly. One of the reasons I enjoy it so much. I like to tuck a few inside jokes here and there too.
-
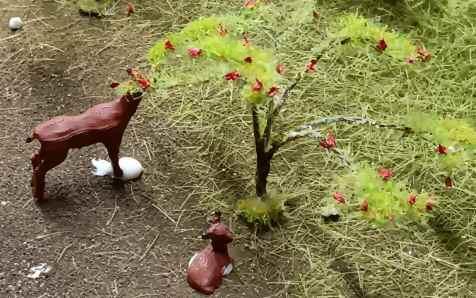
Put a new glass bed on the 3D printer and am able to print small objects again after months of struggling with adhesion issues. This is a fox sitting in the woods watching for lunch. A doe and a fawn cleaning up apples in the orchard. A buck watching from the woods.
-
Thanks. That was actually done in 4 pours/layers. The resin I used recommended no more than 200ml per pour to avoid overheating and flash curing. A previous attempt at tinting resin came out completely opaque and looked awful. This time around I used a different tinting medium and tried to sneak up on the darkness I wanted. I'd have liked to go a little darker but I was afraid of overdoing it.