PHPaul
-
Posts
491 -
Joined
-
Last visited
Content Type
Profiles
Forums
Events
Gallery
Everything posted by PHPaul
-

TinkerCad? Do you use it or other free 3D?
PHPaul replied to Oldmopars's topic in Model Building Questions and Answers
VERY nice! How did you create the tread pattern? -
TinkerCad? Do you use it or other free 3D?
PHPaul replied to Oldmopars's topic in Model Building Questions and Answers
Another tip: If you print the filter in the orientation shown, it will require supports. That works fine, but requires a lot of trimming/dressing when removing from the printer. If you rotate it 90° and use the "drop" (D on your keyboard) command to set it back down on the print bed it puts the long surface on the bed and requires fewer (if any) supports and will make it easier to clean up. Basically, the more surface you have contacting the print bed, the better. -
TinkerCad? Do you use it or other free 3D?
PHPaul replied to Oldmopars's topic in Model Building Questions and Answers
I may have misunderstood your question. The "radius" command is in the pull-down box for the object. Basically, it rounds the corners
-
TinkerCad? Do you use it or other free 3D?
PHPaul replied to Oldmopars's topic in Model Building Questions and Answers
It's not a separate command as such. 1. Create object. 2. Duplicate it, offset it to the diameter you want, (that can be changed when all duplicates have been created) and group the two objects. 3. Select the two objects, select duplicate, and rotate them around each other. 60° will create an array of 6 objects. 4. First duplication. 5. Second duplication. Then you can select the left/right and top/bottom dimensions to resize the diameter if needed.
-
TinkerCad? Do you use it or other free 3D?
PHPaul replied to Oldmopars's topic in Model Building Questions and Answers
I use it exclusively. I tried Fusion 360 but it's WAAAAAY overkill and the learning "curve" is pretty much vertical. You're on the right track, use basic shapes and then negative shapes to remove anything that doesn't look like your final product. Tip #1: When working with cylinders, set sides to max - usually 64. That'll smooth out the segmented effect in your filter. Tip #2: There are libraries of premade shapes that include several types of tires that can be resized for what you're looking for. Tip #3: The "duplicate/copy" command is quite powerful. Select an object, click duplicate, move it to where you want (up/down, left/right or angular) and when you hit duplicate again it will create a third object, moving in the same direction as the first copy. For instance, you can create "X" number of objects in a circle for a bolt pattern. This is a round-about way to create the array you're looking for. Tip #4: Use the "radius" command to create bevels or radii on the edges of objects. Looks like you know that looking at your fuel tank, but it works on most shapes and you can create some pretty interesting shapes that way. -
AMT Autocar Dumptruck kit questions
PHPaul replied to PHPaul's topic in Model Building Questions and Answers
I believe .stl (Stereo Lithography) files are pretty much a standard. .stl files are not an allowed file type so I can't attach them, but I'll post them up on Thingiverse and provide a link for both the door hardware and the cooler. Lunch box STL file Door Hardware STL file Might need to wait a bit on the door hardware file, Thingiverse is VERY slow uploading files. -
AMT Autocar Dumptruck kit questions
PHPaul replied to PHPaul's topic in Model Building Questions and Answers
Here's how they appear in TinkerCAD. and installed. For some reason, my camera didn't want to focus. If needed, I can try my "big" camera and see if I can get a better shot. Happy to share the .stl files via Thingiverse if anyone is interested.
-
Nice work! I need to find room for a 1:25 dio.
-
Wow! Amazing detail on that! She's very talented. And, judging from the size of some of those details, very patient.
-
AMT Autocar Dumptruck kit questions
PHPaul replied to PHPaul's topic in Model Building Questions and Answers
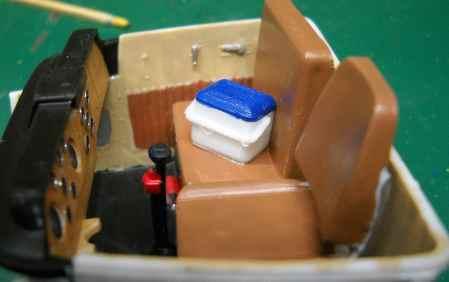
Working on the interior. Does anybody make door hardware and window crank details? They are VERY faintly cast into the door panels but too thin to be even remotely realistic and difficult if not impossible to highlight with a Molotow pen. Push comes to shove, I could probably scratch build something that would at least be better than what's there. NEMMIND. Somewhat to my surprise, I was able to 3D print some reasonably scale hardware that looks okay. Had to use my magnifying visor to trim them! -
AMT Autocar Dumptruck kit questions
PHPaul replied to PHPaul's topic in Model Building Questions and Answers
@Oldmopars - Thanks that gives me a number of ideas for my build. I started on engine assembly today. I noticed a couple of things about the kit: 1. LOT of flash. Every part had to be cleaned up not just for appearance but to make it fit properly. Don't remember that from the model kits I built as a youngster, but perhaps I just didn't care then. There was quite a bit of sanding to get the block halves aligned so the other pieces mounted properly. 2. The numbers called out in the instructions don't even remotely match up with the numbers cast into the sprues. Part ID is strictly visual. So far that hasn't been a problem but I can see it causing issues when there are right/left parts to assemble. -
KrAZ-255B Bro wrecker truck
PHPaul replied to lwcolors's topic in WIP: Model Trucks: Big Rigs and Heavy Equipment
VERY nice! I like that sort of truck. Big, rugged, no-nonsense working beast. -
AMT Autocar Dumptruck kit questions
PHPaul replied to PHPaul's topic in Model Building Questions and Answers
Super. I appreciate a link! -
AMT Autocar Dumptruck kit questions
PHPaul replied to PHPaul's topic in Model Building Questions and Answers
Thank you, Brian. -
AMT Autocar Dumptruck kit questions
PHPaul replied to PHPaul's topic in Model Building Questions and Answers
I suspected it might be a Cummins, but wasn't sure. I'll go with that. I'll build it as a turbo and tack it into the frame and then mock up the cab and hood. Thanks for your input! -
I got the AMT Autocar DC-9964B Dumptruck Kit to use as the basis for a pulp truck (logging truck) build. I plan to spend at least as much time detailing it as building it. Just opened the box and perused the instructions and right away two questions come up: 1. What engine is this supposed to be? I'm not really up on big diesels, so can't ID it from the parts tree (assuming it's even modeled after a specific engine). If I have at least a brand (Cummins or Cat or whatever) I can find pictures, get correct colors and perhaps add some details. 2. The kit includes parts for a normally aspirated and a turbo version. The turbo parts are marked as "Do Not Use". I'd much prefer to use the turbo version and I'm prepared to build a custom exhaust for it, but I'm curious if the turbo version will fit under the stock hood. If major bodywork is needed to make it fit, I may pass on that idea. Thanks in advance for any information. Paul
-
Link-Belt HC-218 Truck Crane
PHPaul replied to redneckrigger's topic in WIP: Model Trucks: Big Rigs and Heavy Equipment
Fabulous! T'was me, I'd be awful tempted to leave it unpainted just to show off all the intricate fabrication that went into building it. -
Yup, that's where I got mine.
-
Perfect! Thank you.
-
@Khils - Thanks for that. I have a bunch of leftover scale chain I grabbed for another project but thanks for the reminder. It'll make an excellent detail.
-
K+S doesn't list the specific sizes I need. Also checked all the places mentioned. All 1/4 inch wide and up.
-
After looking around at what's available and prices (GASP!!!) I've decided to use the AMT Autocar Dump as a starting point. I really wanted an International Paystar but Good Golly Miss Molly! $200 and up? Not happening. Initial idea is to stretch the frame and make a logging truck out of it. Around here, there are a lot of straight trucks that have been stretched and log bunks built onto them for hauling pulpwood and firewood. Most have a Prentiss-style log grapple between the cab and the log bunks. There's a log yard not too far from me. Next nice day that comes along, I'll drop in and see if they'll let me take some pictures and maybe grab a couple of measurements.
-
I KNOW this stuff is (or at least was...) available, I have a couple of each left in my stash. I want to re-supply but I can't find anything narrower than 1/4 inch. Silly me, I unpackaged it to store in a cubbyhole and don't have the part number. Reasonably sure it's K+S, but maybe not.
-
le couronne
PHPaul replied to Bronzekeg's topic in WIP: All The Rest: Motorcycles, Aviation, Military, Sci-Fi, Figures
WOW! I can't imagine the labor that went into that! -
That looks like a great reference, thanks!