.jpg.b9265433dc8c3b550370b1d0e4e4d2fc.jpg)
MarkJ
-
Posts
4,686 -
Joined
-
Last visited
Content Type
Profiles
Forums
Events
Gallery
Everything posted by MarkJ
-
.jpg.b9265433dc8c3b550370b1d0e4e4d2fc.thumb.jpg.915f5b46e3c9402eeaa6972073121c87.jpg)
1966 Mercury Comet
MarkJ replied to MarkJ's topic in WIP: Stock Cars (NASCAR, Super Stock, Late Model, etc.)
Thanks, Pierre. I don't think so. I will have to cut off the rear bumper from the rear panel to save the chrome bumper. I'm not as good as you when it comes to redoing chrome bumpers. The toughest part of the grille will be making the grilles that go into the upper and lower grille cavitys. One good thing is that the real car had the grille painted black. -
1966 Mercury Comet
MarkJ replied to MarkJ's topic in WIP: Stock Cars (NASCAR, Super Stock, Late Model, etc.)
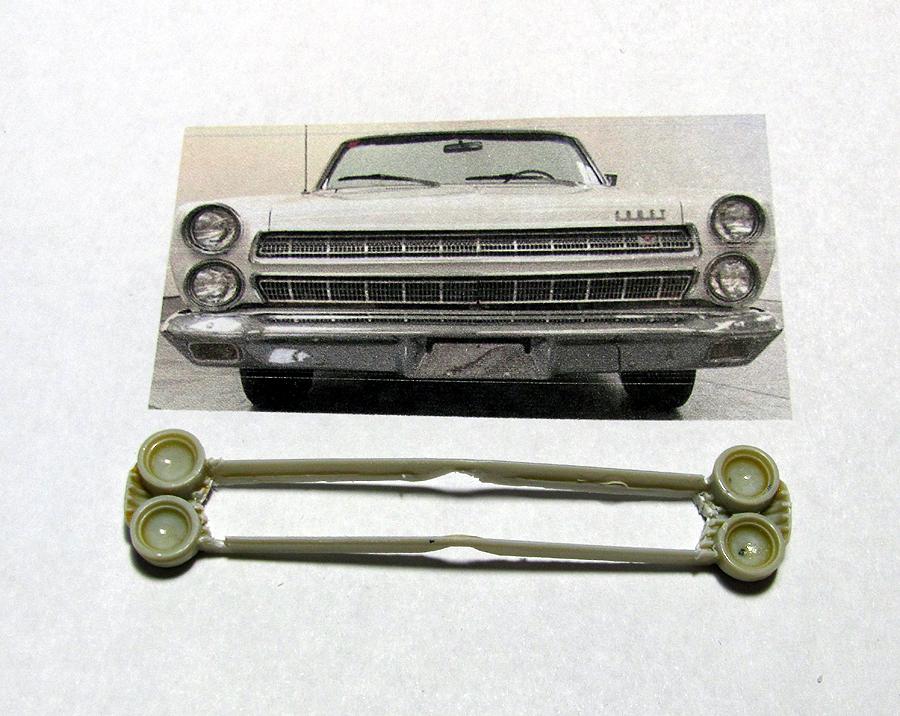
Got some more work done changing the grille from a 1967 to a 1966.
-
1966 Mercury Comet
MarkJ replied to MarkJ's topic in WIP: Stock Cars (NASCAR, Super Stock, Late Model, etc.)
Thanks, Pierre. As always, I don't give away what the project is ahead of time to hopefully cut down on hijackers who want to share their like builds in this thread. But I think as the build goes along it will become obvious which car, I will be modeling. Thanks for your positive thoughts about the build. I don't think the scratch building will be as intense as the last project. It's a build I have always wanted to do and now finally getting around to doing it. -
1966 Mercury Comet
MarkJ replied to MarkJ's topic in WIP: Stock Cars (NASCAR, Super Stock, Late Model, etc.)
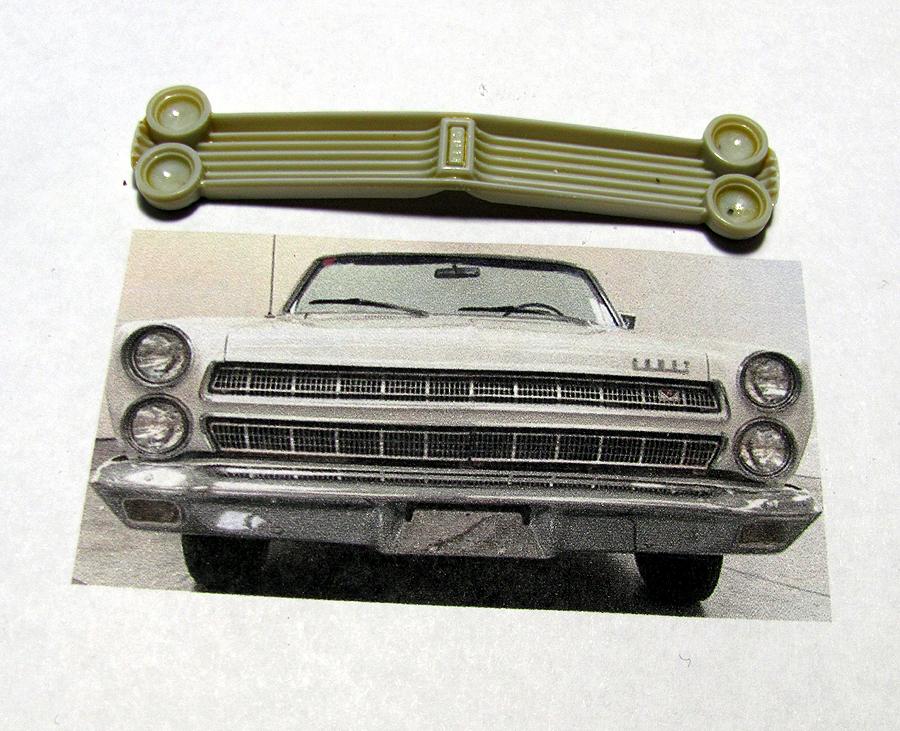
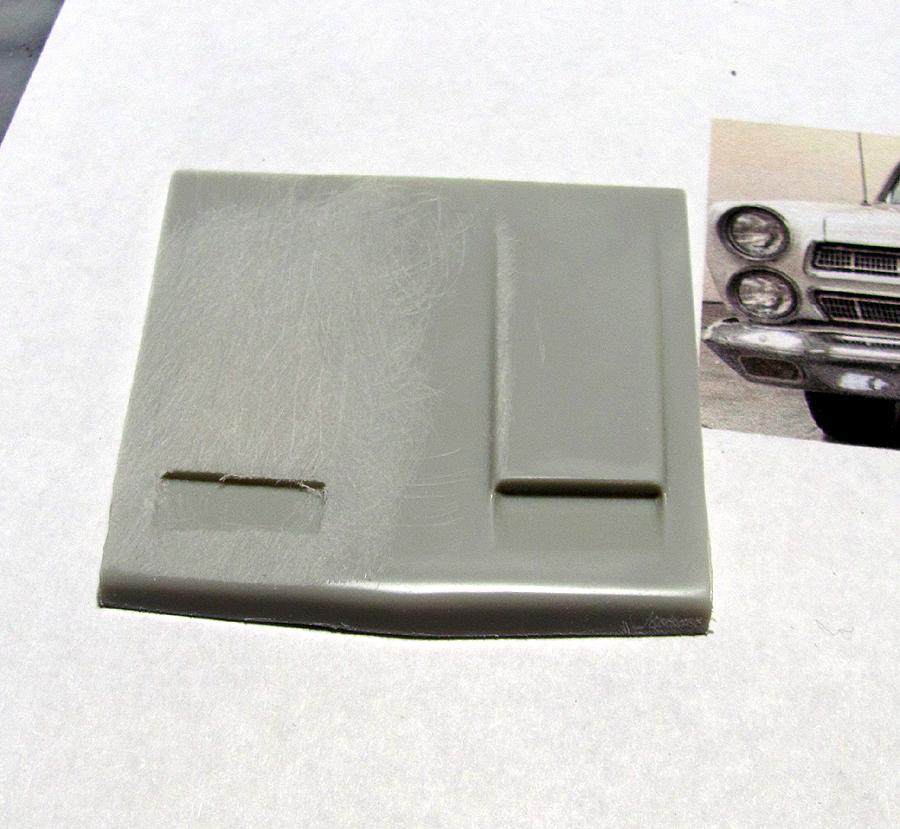
I will have to dechrome and change the grille and also remove the scoops from the hood and make it flat with a center strip down the middle.
-
1966 Mercury Comet
MarkJ replied to MarkJ's topic in WIP: Stock Cars (NASCAR, Super Stock, Late Model, etc.)
Here is the kit.
-
1966 Mercury Comet
MarkJ replied to MarkJ's topic in WIP: Stock Cars (NASCAR, Super Stock, Late Model, etc.)
Yes, they will be coming soon. -
Finally finished the decals for this and will begin the build today. Will be changing a 67 Comet into a 66 Comet.
-
James Hilton Charger...in 2014
MarkJ replied to Pierre Rivard's topic in Stock Cars (NASCAR, Super Stock, Late Model, etc.)
Wow, Pierre, Excellent, Excellent diorama. I haven't got the words to give it, it's due. Even more impressive than I was expecting. Just through the roof in every category of a build. All of your hard work surely paid off. You shoudl be super proud of this one. I could sit and study it all day. -
Pierre, leave a link at this thread to direct us to the finished product in the under-glass forum. Really looking forward to seeing this one finished.
-
Great news. I'm really looking forward to seeing this one finished.
-
Wow Pierre, This just keeps getting awesomer and awesomer. The realism is through the roof excellent.
-
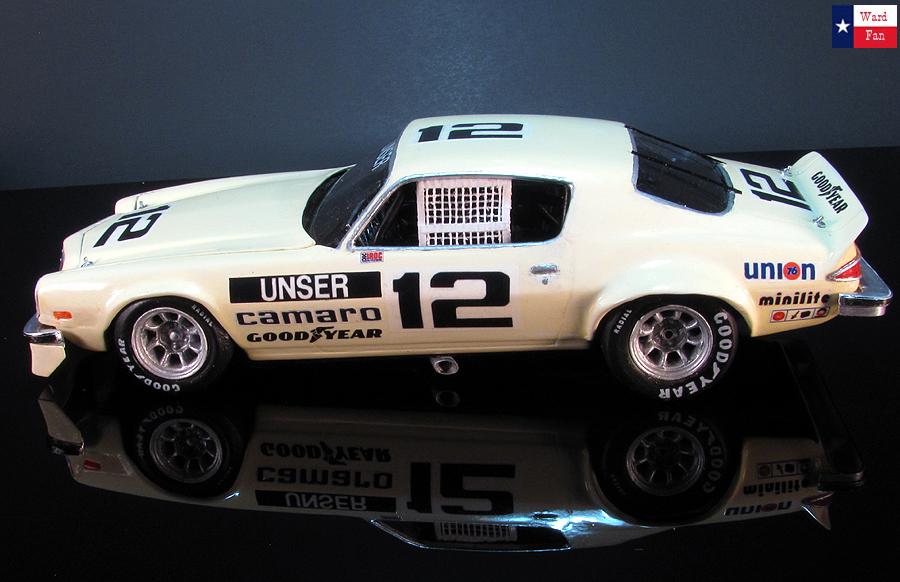
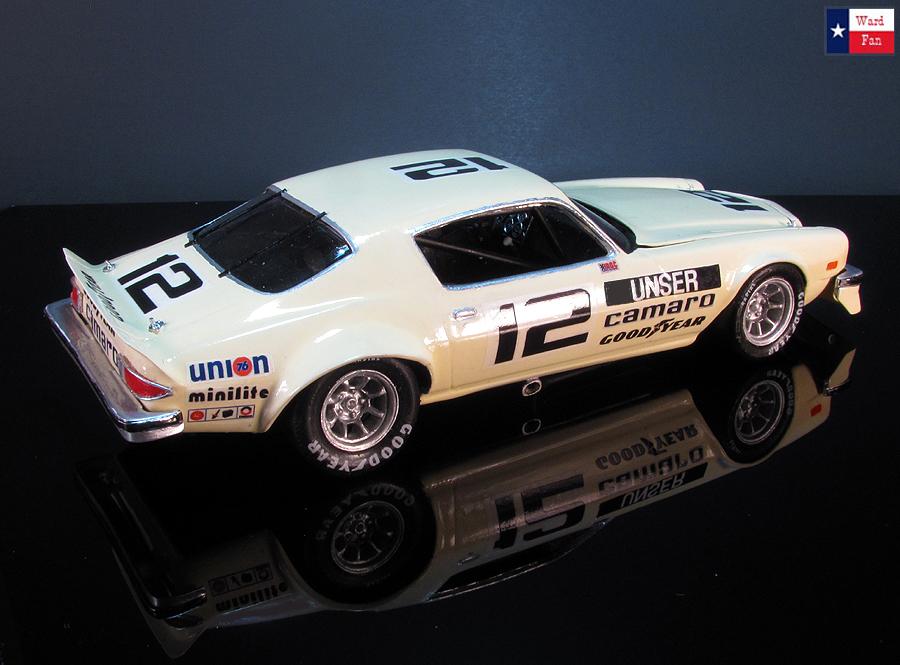
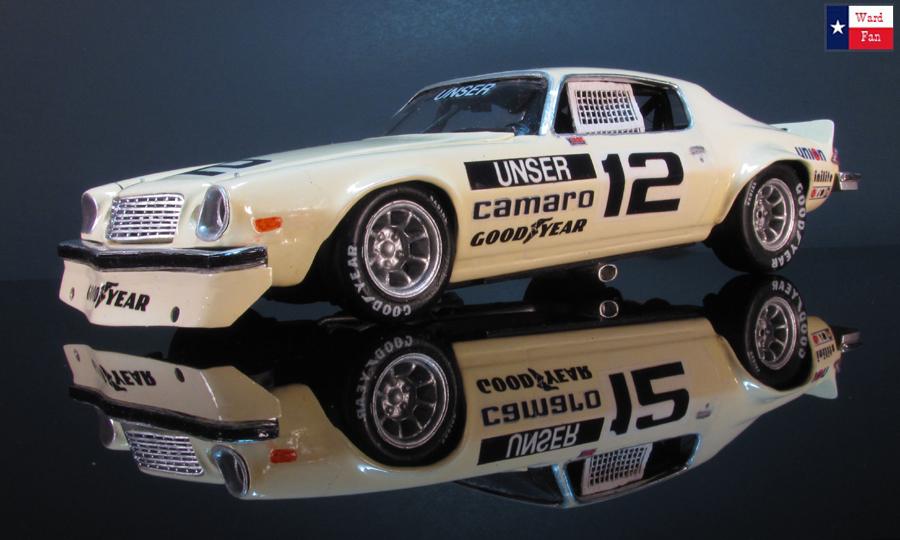
Bobby Unser 1974 IROC Camaro
MarkJ replied to MarkJ's topic in Other Racing: Road Racing, Salt Flat Racers
Thanks, Josh and Jonathan for the props. I really appreciate it. -
Bobby Unser 1974 IROC Camaro
MarkJ replied to MarkJ's topic in Other Racing: Road Racing, Salt Flat Racers
Thanks, guys, for all the great comments. It was a sort of fun build and very educational. I forgot to mention that the hood had a very narrow tunnel built into it with a hole that matched the opening in the air cleaner to get air from the windshield to the carburetor. So basically, the hood acted as the top of the air cleaner, if you were wondering why the air cleaner, I modeled, did not have a top for it. -
I swear they look just like 1:1 boxes shrunk down to 1/25th scale. Amazing.
-
Bobby Unser 1974 IROC Camaro
MarkJ replied to MarkJ's topic in Other Racing: Road Racing, Salt Flat Racers
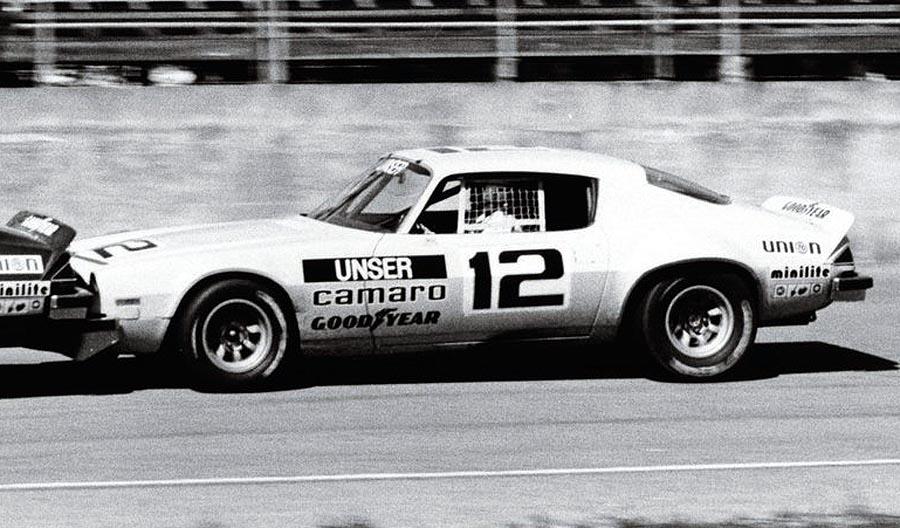
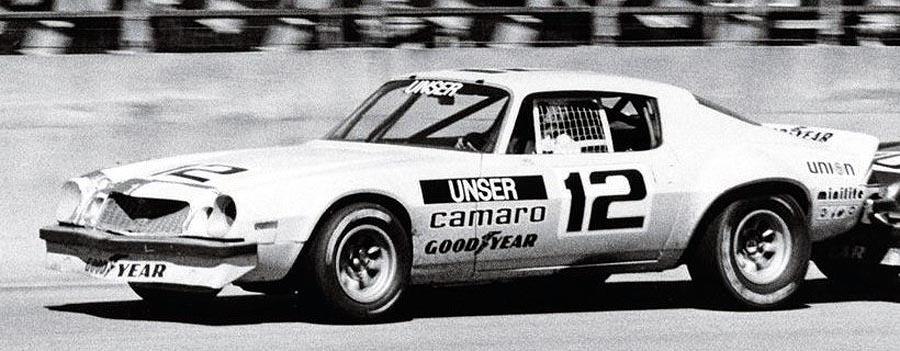
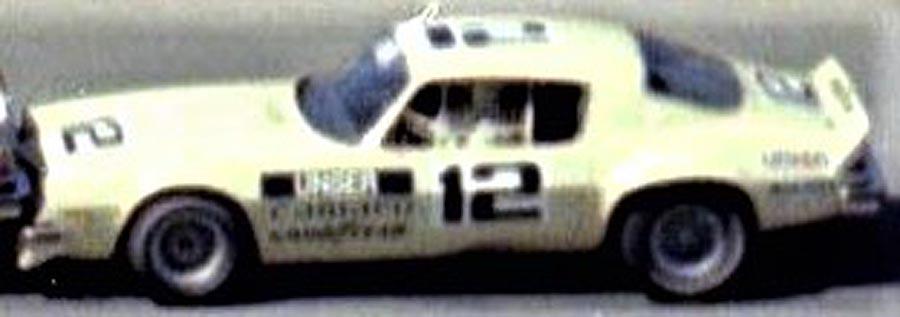
Here are some shots of the real car at the final race at Daytona which is the one I wanted to do. Only had one small picture in color. The last one is of the car he wrecked and had to start over in one of the spare cars at Riverside at the start of the race.
-
1974 Camaro , continued
MarkJ replied to MarkJ's topic in WIP: Other Racing: Road Racing, Land Speed Racers
I can't believe it's finally finished. More pictures are at the under glass for other road racing here, under Bobby Unser and also at Randy Ayres Showroom
-
Bobby Unser 1974 IROC Camaro
MarkJ replied to MarkJ's topic in Other Racing: Road Racing, Salt Flat Racers
-
Bobby Unser 1974 IROC Camaro
MarkJ replied to MarkJ's topic in Other Racing: Road Racing, Salt Flat Racers
-
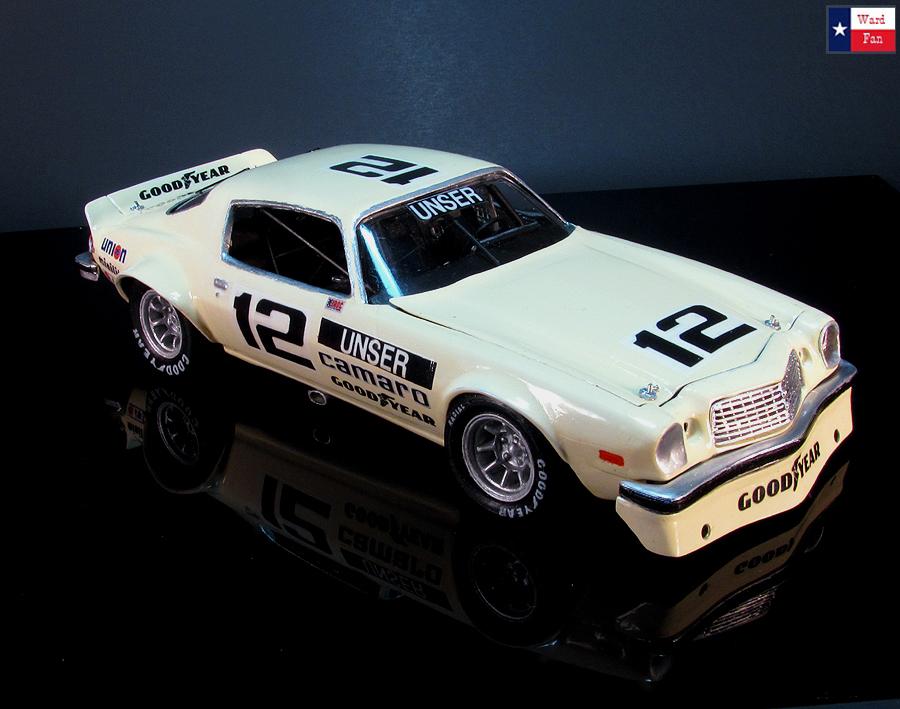
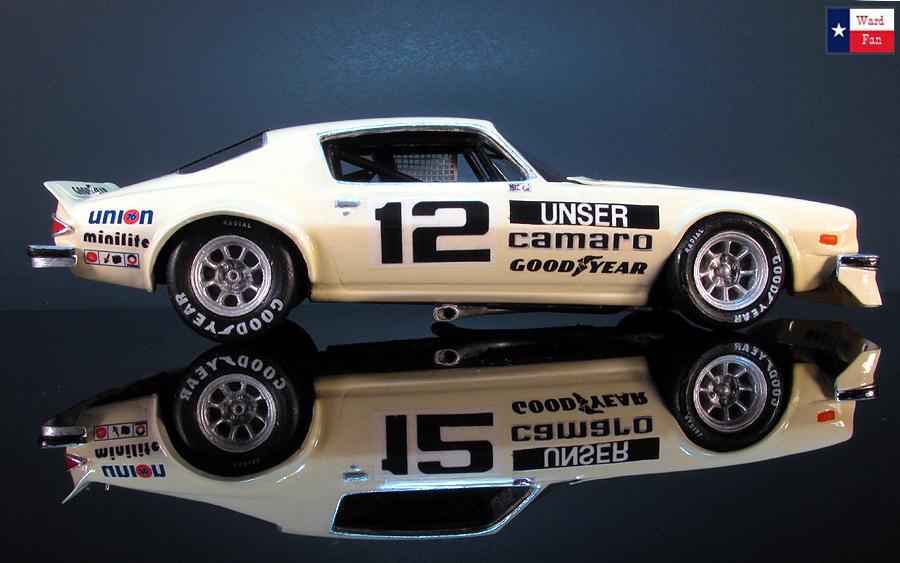
Finally got this one finished. It took 333 hours to complete or 8 months, whichever way you want to look at it. It is my first totally brush painted model. I used Vallejo acrylic paint throughout the build. The 1974/75 IROC season was the first that the Camaro was used as the make for the series of 4 races. Two were at Riverside and one each at Michigan and the finale at Daytona during the 1975 Speedweeks. Unser just beat Foyt by a nose to win the race and the series championship. The Camaro was basically a stock car with unibody construction. They did not use a Banjo chassis till 1977. It had a Traco Chevy 336 cubic inch engine pumping out 440 horsepower. The engines were built within 5 horsepower up or down between them and tuned for longevity not raw power. Revs were kept at 7200. Roger Penske and Les Richter came up with the IROC series and decided after the first year using Porsches they would switch to the Camaro. 15 identical cars were built for the series with 12 actually competing and 3 kept as backups. Unser had to use a backup after crashing his car at the start of the first Riverside race. He was lucky to have escaped without any injuries. The right side of the car was caved in right to the transmission tunnel. Dave Marcis, Jim Sauter and Dick Trickle set the cars up for competition. The 1974 Camaro body was used for the 1974 through the 1980 seasons. Unser won 50,000 dollars for his championship. I learned a lot about IROC from doing this build.
-
bump
-
Coming together magnificently.
-
1974 Camaro , continued
MarkJ replied to MarkJ's topic in WIP: Other Racing: Road Racing, Land Speed Racers
Finished the model yesterday. It took 333 hours or about 8 months to complete it. Probably the longest I have ever spent on one build. Hope to take the finished photos today. I am going to try to use the black mirror effect to do it. If it doesn't turn out well, I will go back to the old light gray poster board method. -
Pierre, All I can say is Wow. The realism is astounding. This is going to be so cool when finished.
-
1974 Camaro , continued
MarkJ replied to MarkJ's topic in WIP: Other Racing: Road Racing, Land Speed Racers
Thanks, Carl. Yes, those are the wheels I made. I couldn't find any minilites that looked like these in the aftermarket. Too bad P.P.P. doesn't offer them. I started on the decaling yesterday, so it shouldn't be too much longer. -
1974 Camaro , continued
MarkJ replied to MarkJ's topic in WIP: Other Racing: Road Racing, Land Speed Racers
As long as your model is from the seventies, it will be great. That's when the rope type window nets were used. You can borrow anything I do. it would be an honor if you did. They might have been used in the eighties too. I'm not really sure.