

FASTBACK340
-
Posts
2,886 -
Joined
-
Last visited
Content Type
Profiles
Forums
Events
Gallery
Everything posted by FASTBACK340
-
While waiting for the paint to gas out, I had to do SOMETHING tonight. After entertaining my Mother-in-Law for dinner this afternoon I managed to hit the bench. Tonight I'll show you how I replicated the side marker lights on 1968 Chrysler products. A,B,C bodies all had them, so this applies to Road Runners, GTX's, Dart's, etc. It's rather simple, but it's small pieces to manipulate. I started by drilling out the cast-in side marker lights using a 3/32" drill bit. Use a hand-operated pin vise and use the kit cast-in lights as pilots. Go back a few pages to see how I almost roached the body using a Dremel for this procedure. Don't do it. It's slow and tedious, but safe. Not to mention you don't want to egg-out the hole causing a loose fit of the tubing. Then I slice short lengths of 3/32" aluminum tube and insert in the Dremel to polish. Then I took a length of clear acrylic rod I had. I fits inside the 3/32" tubing. Might be 5/64"…. All I know is I had it and it fits snuggly. I place it too in the Dremel and polish the tip to a slightly rounded surface, like the actual piece. If your going to do it, do it right. Half hearted attempts don't cut it. By gently beveling the inside and outside of the tubing using a 800 grit sanding stick you get a nice soft metal appearance. Here the full set has been assembled. A dot of CA on the side of the rod near the tip is all it needs. When assembled, they'll all be cut down to about half a grain of rice….. But first I hit the two rear marker lights with Tamiya clear red, and the two fronts with clear yellow, like the actual car. Just the way if you want to shave a pound off a race car you look for 16 one ounce items to delete, if you want to step-up detailing, each item has to become an assembly. If attention is paid to the little things it all stands out in the end. I have a neat tip on bare metal foil that no one gets "right". When I show you it's going to be obvious, yet simple to do correctly. Stay tuned, more to come. Deadline is Saturday……
-
Scale Finishes Paints & Airbrushing
FASTBACK340 replied to FASTBACK340's topic in General Automotive Talk (Trucks and Cars)
I have Don's CD somewhere. I bought it last year, watched about a 1/2 hour, got sidetracked, and never followed up. I actually forgot I had it….. And yes, it was about 22-23 PSI I sprayed at. I still can't believe how nice it laid down. I might regret asking this, but should I invest in a decent air brush? Any suggestions? -
Wow….. nice workmanship. Everything you've posted has been a clean, quality build.
-
65 impala pro street...Its finished..
FASTBACK340 replied to 1 bad55 stan's topic in WIP: Model Cars
Nice fabrication on the cowl scoop. Just have to address the very front edge a bit. The cage and chassis are coming together nicely. Good job!!! Just yesterday at work a neighboring shop had a light blue metallic `65 fastback Impala at their shop. -
That is so original and twisted at the same time. And blowers coming out of the side windows! Genius!!!!
-
Keith Marks does an outstanding set of reproduction emblems for all the badging, emblems, scripts, even the side marker light. If you do a search you'll easily find his Fotki Album page where he does business. Here's a picture taken of the first attempt at building my car using Keith's decals. EDIT: Here's the link for Keith Marks Decals http://public.fotki.com/mofobow/ Here's the page in particular your looking for….. http://public.fotki.com/mofobow/plymouth/barracuda/68_barracuda/ His page has color pictures of actual cars for proper placement and alignment.
-
Such a bummer: Chinese-built Craftsman tools.
FASTBACK340 replied to LDO's topic in The Off-Topic Lounge
I've stopped buying "Tool Truck" stuff years ago. Sears is now my go-to source if for nothing else, I have a well stocked Sears Hardware in my neighborhood. Replacements are easily gotten. Although I did buy something nice last week from Mac. It's a lithium battery booster pack the fits in your pocket and will start a car that has NO BATTERY. Works like a dream, I can power a laptop with it, and charge my phone/electronics too. I don't care if it's made on Mars, it's a nice, well made tool. And it was comparably priced to old-school jumper boxed that were huge and heavy…. -
Good catch! I missed that on mine!!!! I'll have to black it out….. Here's the opening on my car. It runs just about from the inside edges of the parking/signal lights.
-
I too saw a show from the the Black Ice tour and enjoyed it. For a guy reaching retirement age Angus put on some show, along with Brian Johnson. Too bad about Malcom. Aside from being an original member and brother to Angus, they could definitely go on with a substitute. It's not like Pantera can tour again, or Zeppilin. For crying out loud, KISS is nothing more than a cover band now with half the members replaced! Wishing Malcolm a full & speedy recovery.
-
Just had a private conversation with a board member over a personal opinion that didn't jive with mine and was told he was sorry for ever doing something for me in the past…. How does ones opinion change your entire perspective on someone? You did me a favor and I appreciated it. Just because you now find out you like Vanilla and I like Chocolate makes me a different person? Kind of goes against what your original belief and views are, huh? This will probably get yanked, but just had to vent. Don't I have "rights" too for MY opinion? Hypocrite….
-
Thank you for the compliment John. Being a mechanic by trade and a car guy in general gives me an edge on accurate detailing. My day job surrounds me with inspiration (check out my work link at the bottom for Pauls) and replicating my actual Hot Rod makes it even more special. I too have seen models get built "too far" just as some 1:1 cars get "over-restored". I constantly take jabs at certain builders whom are well know cover-car candy builders that produce jokes as far as reality. Biggest pet-peeve are the panel lines buried in 800 coats of clear. But boy does it SHINE! The more I look at it, I might just apply some Future and leave the finish as-is. As nice as the real one shines, I don't want to kill it in scale.
-
I get Super Clean from Pep Boys (or a similar national chain auto-center) as it's sold as a driveway degreaser. It MUST be used in a plastic tub, as the first time I tried it I used an old meatloaf pan, which promptly corroded and leaked down the side of our old washing machine……… talk about a messy, icky puddle of gloop on the floor! I have a 2 qt. tupperware container with a snap-on lid that I keep Super Clean stored in. I also have a plastic strainer I submerge small parts to be stripped of paint or chrome. Works nice and after you buy a gallon it lasts a long time as it's re-useable. Recommend you use some disposable rubber gloves as it IS a chemical. I think a gallon was about $10. There's a bad joke about an inexpensive stripper in there somewhere…..
-
Scale Finishes Paints & Airbrushing
FASTBACK340 replied to FASTBACK340's topic in General Automotive Talk (Trucks and Cars)
Thanks Pete, as I was just surfing both of their sites and making a list. At $7.50 an ounce for paint I better choose wisely, not cheap stuff. If I can't get them at NNL East, I'll just ask a lot of questions on builds in attendance and make a mail-order list. And as for the air pressure, I was wrong. I checked my gauge and I mistakenly read 2 Kpg as 2 lbs. I actually sprayed at approx. 23 lbs. Is this too high, low, or average? No orange peel and a nice in-scale gloss. Did I get lucky, or just used good judgement? Please, share! -
Scale Finishes Paints & Airbrushing
FASTBACK340 replied to FASTBACK340's topic in General Automotive Talk (Trucks and Cars)
I have to go check my air pressure gauge on my compressor as I was asked off-line if I made a mistake. I had said 2 lbs. and a fellow modeler asked if I meant 20 lbs. I honestly don't know at the moment as my dog is sleeping on my right thigh and I'm paralyzed (he weighs 112lbs) and I can't go upstairs to look. But other than that piece of info, I'm hooked on the air brush with contemporary paint availability. Now I know how much to buy/use per project it doesn't become all that more expensive. I don't want to post what I just paid for canned Tamiya surfacer primer last Friday…… I'll get back to ya… but yeah, air brushing is the way to go. Looks like I'm making my shopping list for NNL East next week. -
Nice job! Those colors pop so vividly and a really nice build. Really nice color choice!
-
Hit it out of the park? That's bouncing down the street behind the stadium!!!! Sweeeeeeeeet build!
-
Have you tried Castrol Super Clean? There's pro's & con's as I personally don't like brake fluid, but the Castrol will eat through metal. I use a soft bristle tooth brush and scrub off the remains after I let it soak overnight. When done you strain it and it's re-useable. You can also pour it down the drain to dispose of. It's also great for stripping chrome. Brake fluid is a petroleum product that should be safely disposed of. Brake fluid works, but to me, is messy and icky…..
-
Days away…. days away….. My build is days away from being finished…… days away to NNL East…... No days of sleeping….. Tom & company have been doing a great job of keeping NNL East one of the country's primier modeling events for years now. Even the years I wasn't actively building, I think I've only missed 3 shows in the last 20-odd years. Awesome experience if your participating or spectating. See you Saturday, both me & my wife Amy with our name tags on. Great idea!
-
In another thread I mentioned using Scale Finishes paint for the first time. I haven't air brushed a model in over 15 years, which means my equipment isn't exactly cutting edge. The compressor is an older Badger and the brush a mid-line Paasche. I shot it @ just under 2 lbs. of pressure and the paint laid out so nicely without ANY issues. The color and sheen is a dead match for my actual car, and the mix was perfect. VERY nice product. I used less than 1/3 of a 2oz. bottle on this spray. I don't think I could have deliberately made it run…… like using a hand-held bristle brush, that easy. My questions are: Why is there such a phobia over using an air brush? Is it strictly a financial aspect, although old stuff like mine can be bought cheap used? Is it a space limitation? I think rattle cans require more area for overspray. Is it people don't want the responsibility of cleaning up after themselves or it's too much trouble? I remember fighting with mixing the paint and trying to get the right consistency with the old hobby enamels. The pre-mixed paint is a breeze to use. In the intervening years things have definitely changed for the better to use it. Yesterday was a eye opener.
-
Last night at about 11:30 I had a sudden realization that made the bottom of my stomach drop: I used MCW rattle can paint for the engine compartment, and Scale Finishes for the body through the air brush. Is it going to match when assembled? Yes….. it does. <whew!> Imagine THAT happening this close to NNL East!?!?!?!?!?
-
Such a bummer: Chinese-built Craftsman tools.
FASTBACK340 replied to LDO's topic in The Off-Topic Lounge
I'm having 30 yr. old Snap On sockets wear out and are getting loose on bolt heads. I'm replacing them and the new ones are breaking within 8 months. Unfortunately, the prices haven't gotten cheaper for off-shore junk. The 30 yr. old will wear out. Replacements break within a year, they don't even get a chance to wear out. Needless to say, I don't buy Snap On. -
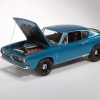
These are the initial pictures I didn't post. Although they are a bit out of focus, you can see how the finish reflects light. I can't wait to foil it and drop in the glass, add the side markers and emblems.
-
Thanks guys! I came home from work and sat in the recliner and said to myself "I gotta paint that thing" and got up, went upstairs, and just did it. I haven't air brushed a car in 15 yrs. It went on perfectly, like using a magic marker. I'm so please with the results I may just hit it with Future and call it done. Clear would give it too much gloss for the scale finish to be "right". It's not a custom, it don't need mile-deep paint….. Here's a few shots standing in my bathroom in sunlight.
-
SEM etching primer, Tamiya white fine surfacer, 4 coats of Scale Finishes L1 Surf Turquoise Metallic. Clear maybe tomorrow night, Monday THE LATEST. Here's a few shots. This shot almost shows the true shade, as it's more a greenish Turquoise over Blue, and not BLUE blue as the color photographs most times. I'm VERY pleased!
-
Thank you for your compliment Bill. Coming from a talented builder as yourself I appreciate it very much. It's guys like YOU that push modelers to try a little harder. As I figure it out I'm trying to share so other builders will try. I know I inspired another `68 `Cuda build and the thread has 10K+ views. Wow…. thank you everyone for the interest. Now let me go get some better pictures. The ones I have are meh….