Spottedlaurel
-
Posts
1,980 -
Joined
-
Last visited
Content Type
Profiles
Forums
Events
Gallery
Everything posted by Spottedlaurel
-
Datsun 240/280Z & Nissan Fairlady Z/ZG multiple builds
Spottedlaurel replied to Spottedlaurel's topic in WIP: Model Cars
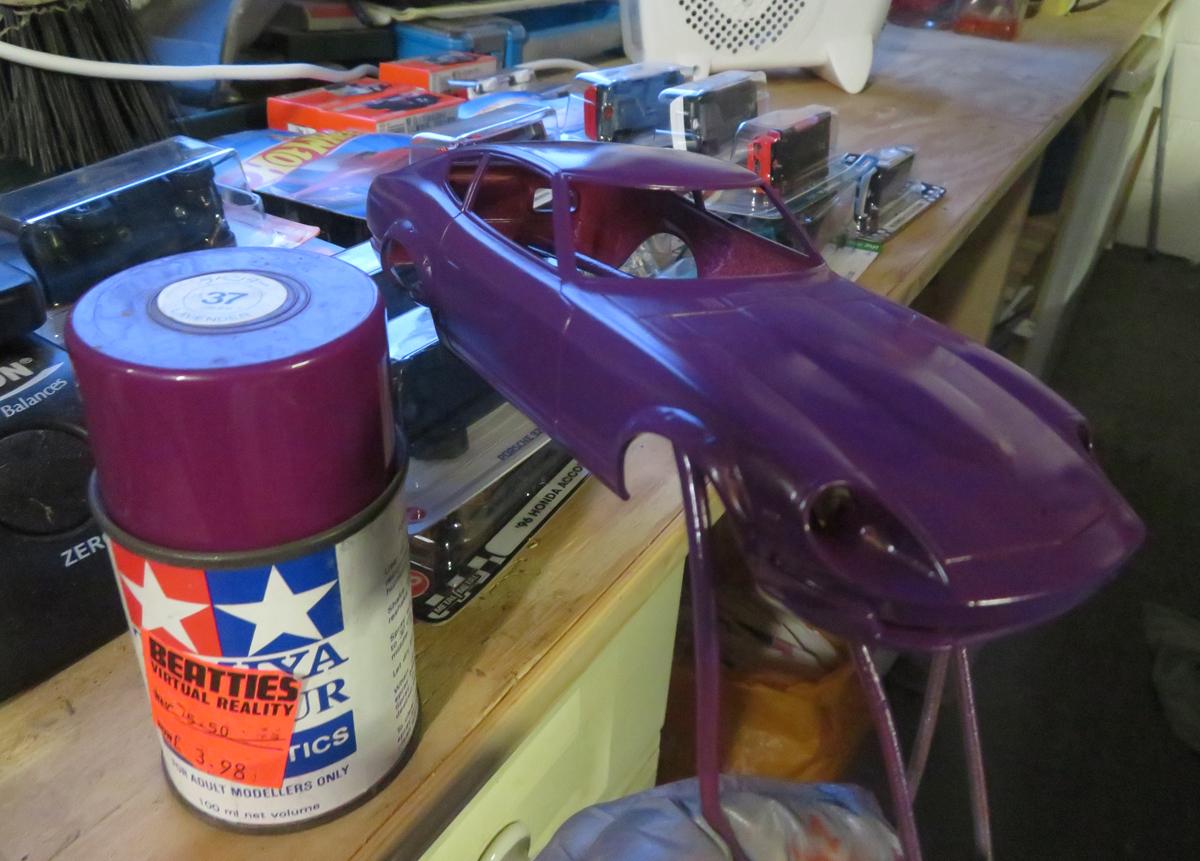
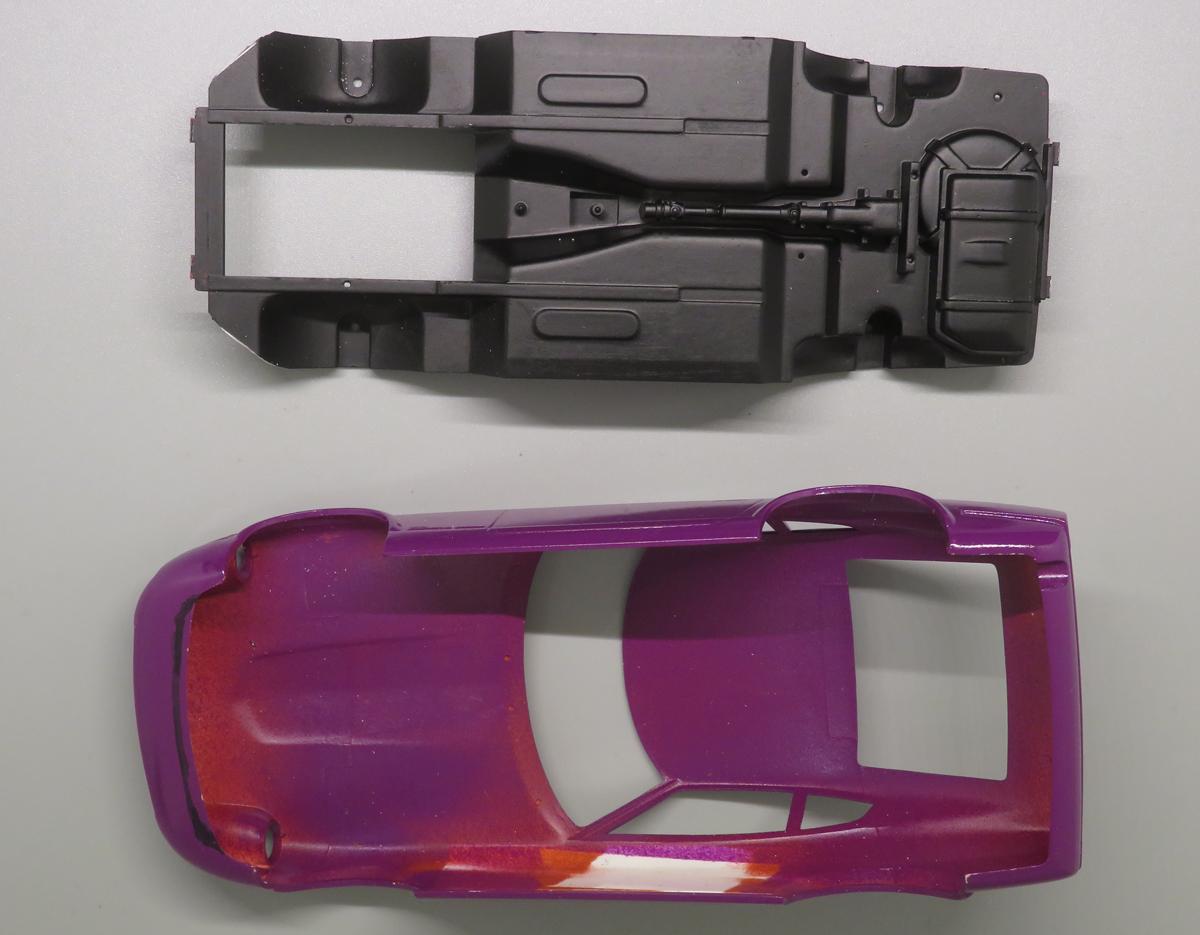
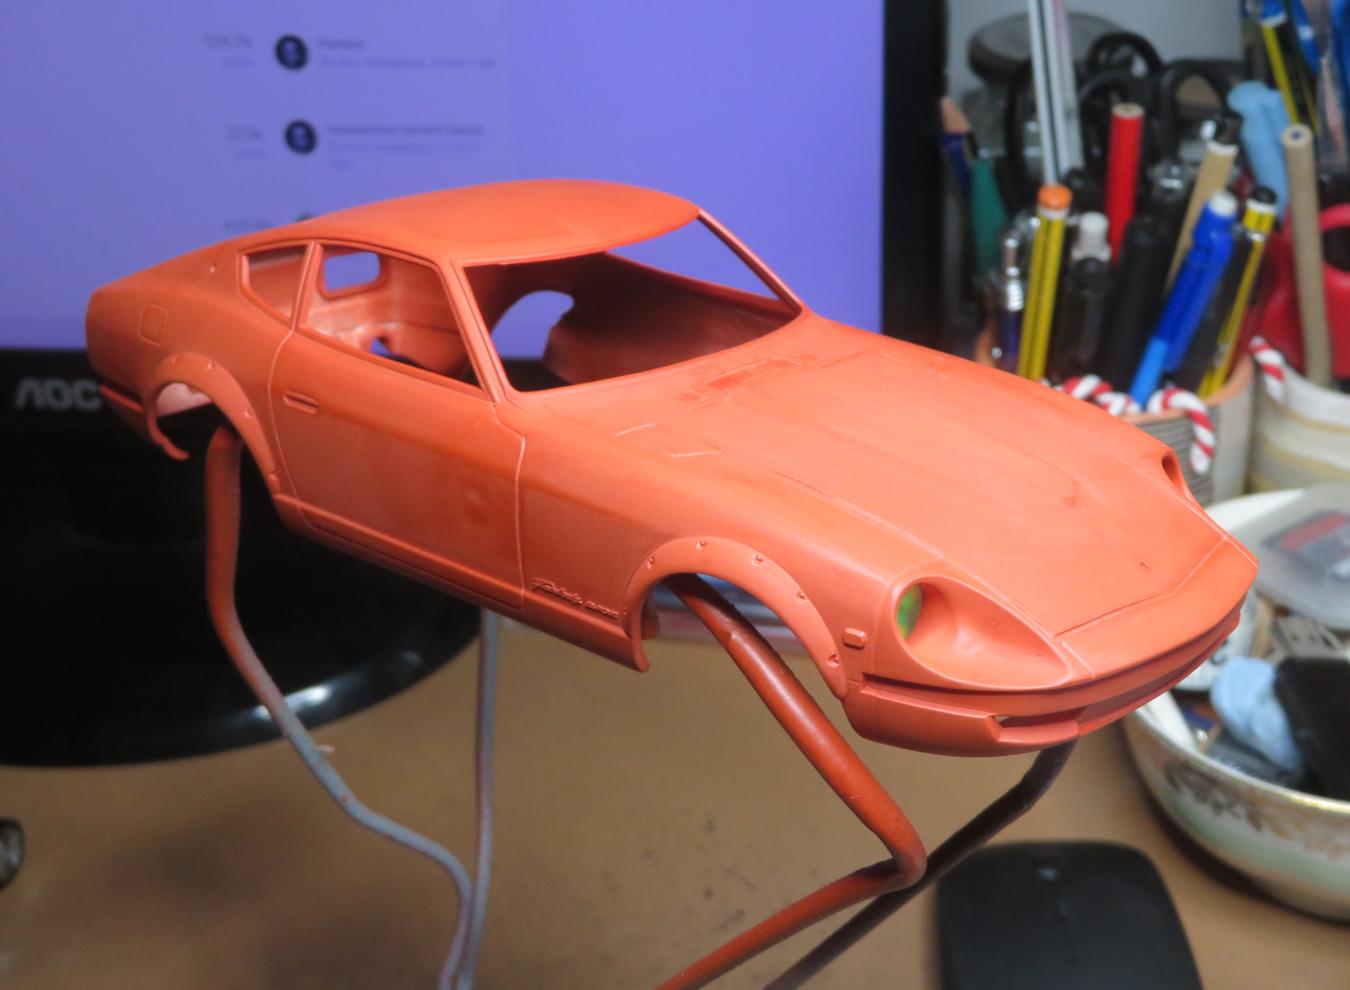
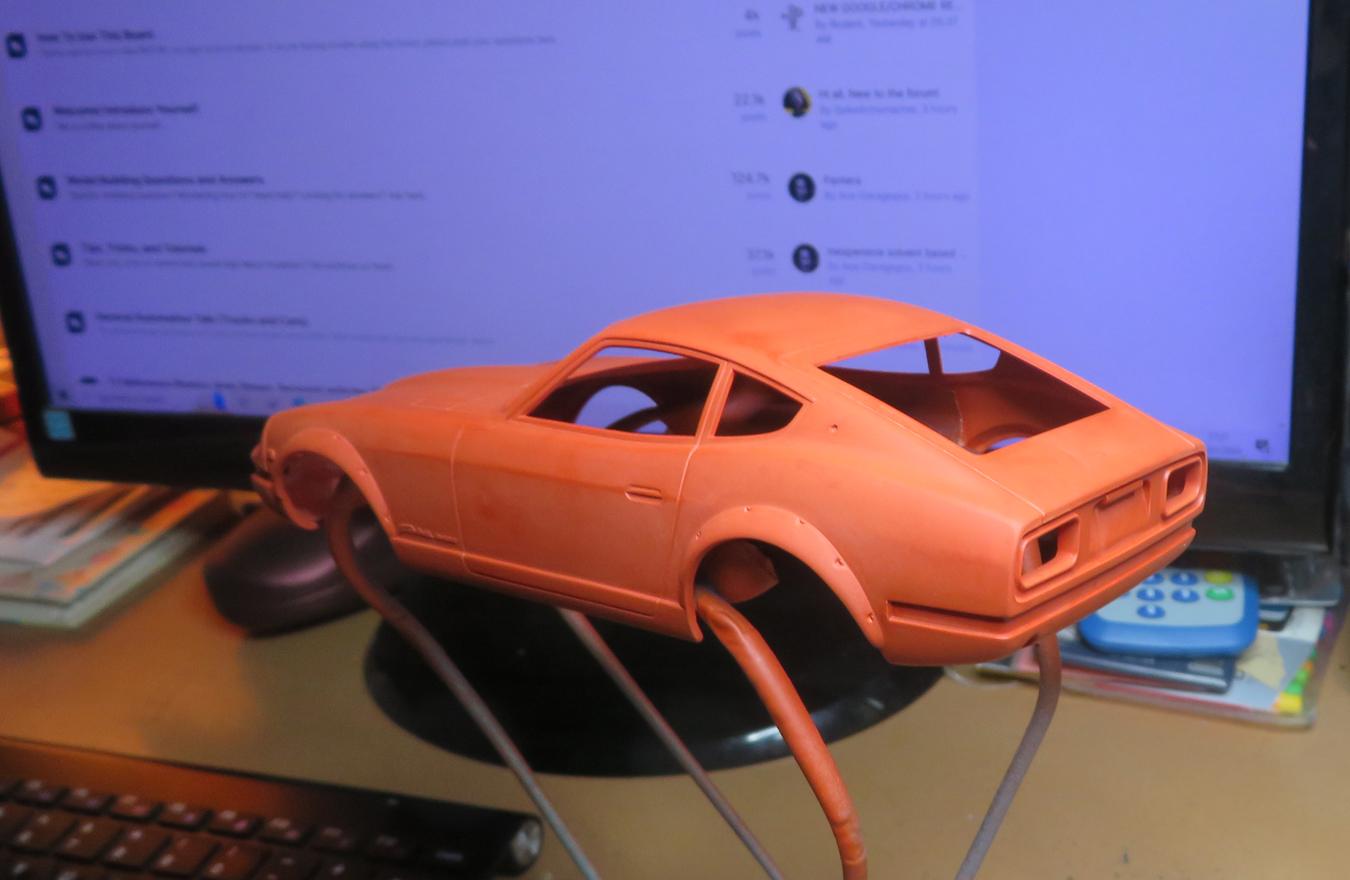
Thanks David. I don't remember a huge number of 1:1 Zs around back in the 1970s/80s, but there was always a good number of them at Japanese car shows I attended from the early '90s onwards. As a subject it's certainly well-served by the kitmakers, there could well be one or two others? I suppose it's like Japan's answer to the Corvette in that regard. Interior colour reveal: Tamiya pearl light red! I plan to tone it down slightly with a coat of semi-gloss clear, and possibly light grey fabric/carpet areas. I seem to paint a lot of black vinyl and nylon interiors and fancied a change. The body had a gentle wet sand with 1200 grit and a final coat of lavender. I think that will look less stark once it's had the pearl clearcoat appplied.
-
Datsun 240/280Z & Nissan Fairlady Z/ZG multiple builds
Spottedlaurel replied to Spottedlaurel's topic in WIP: Model Cars
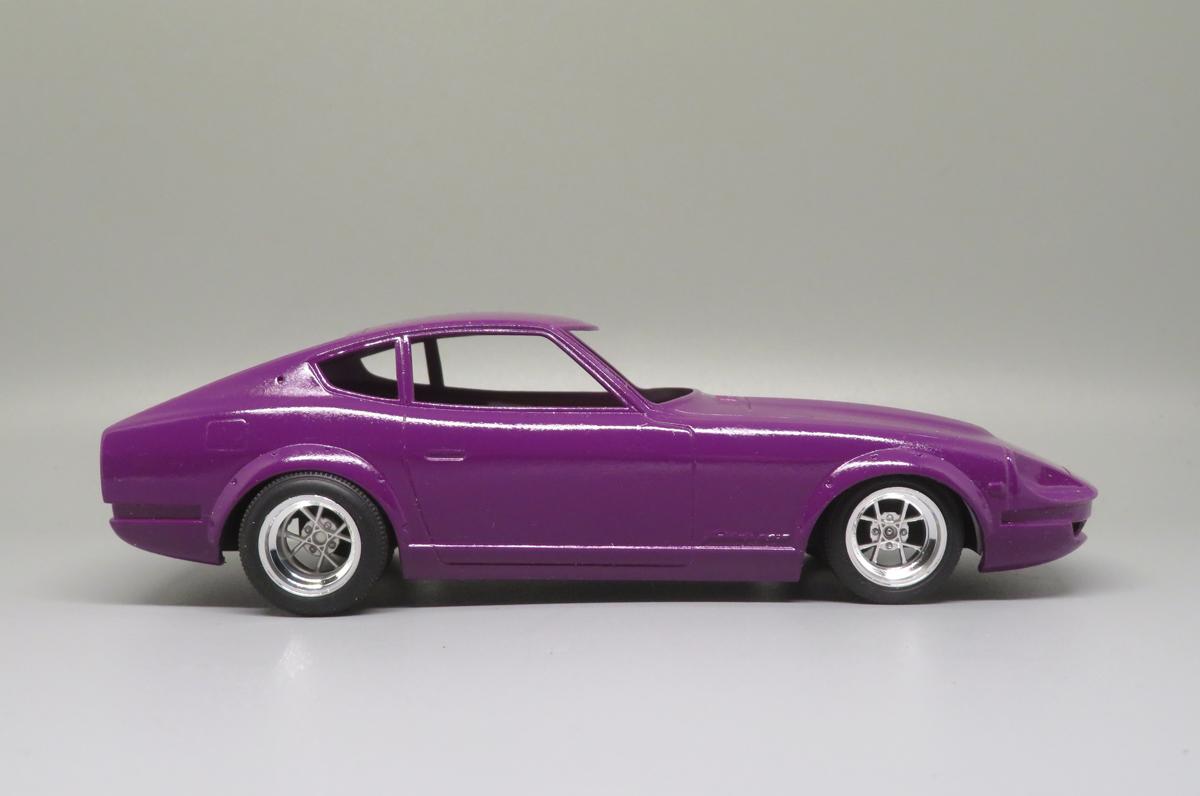
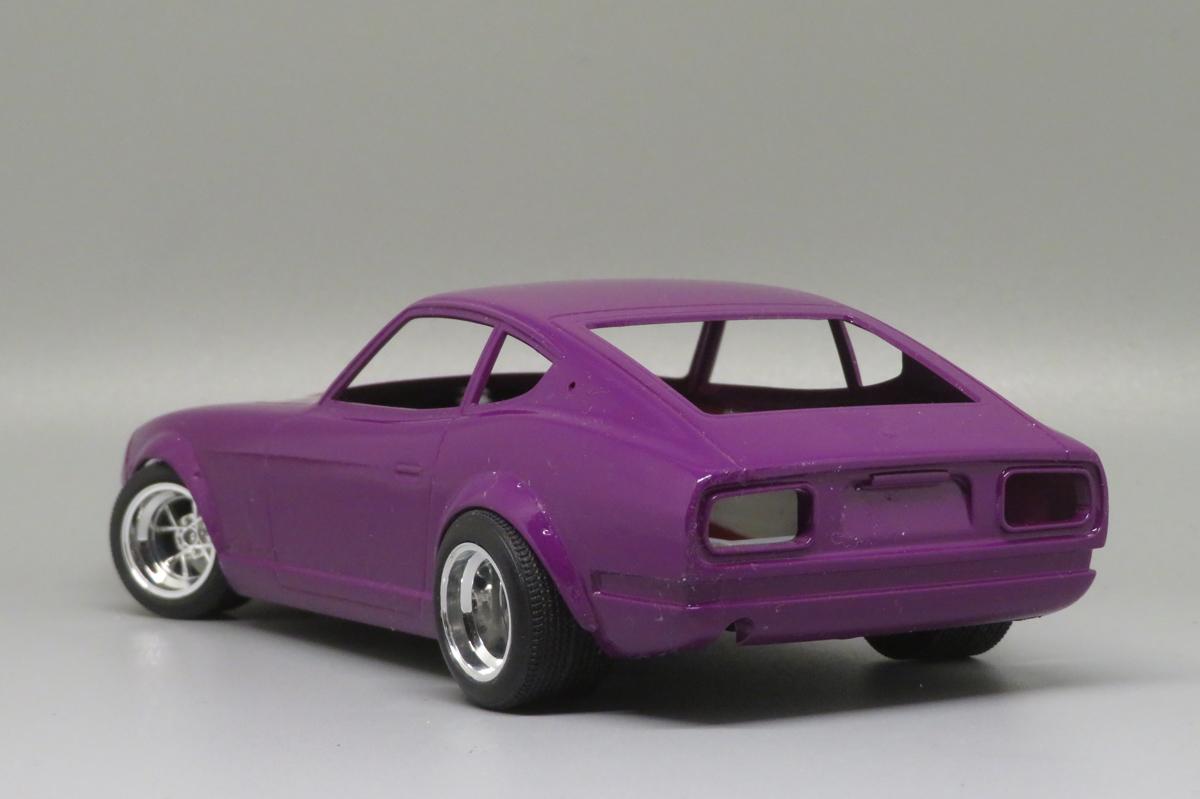
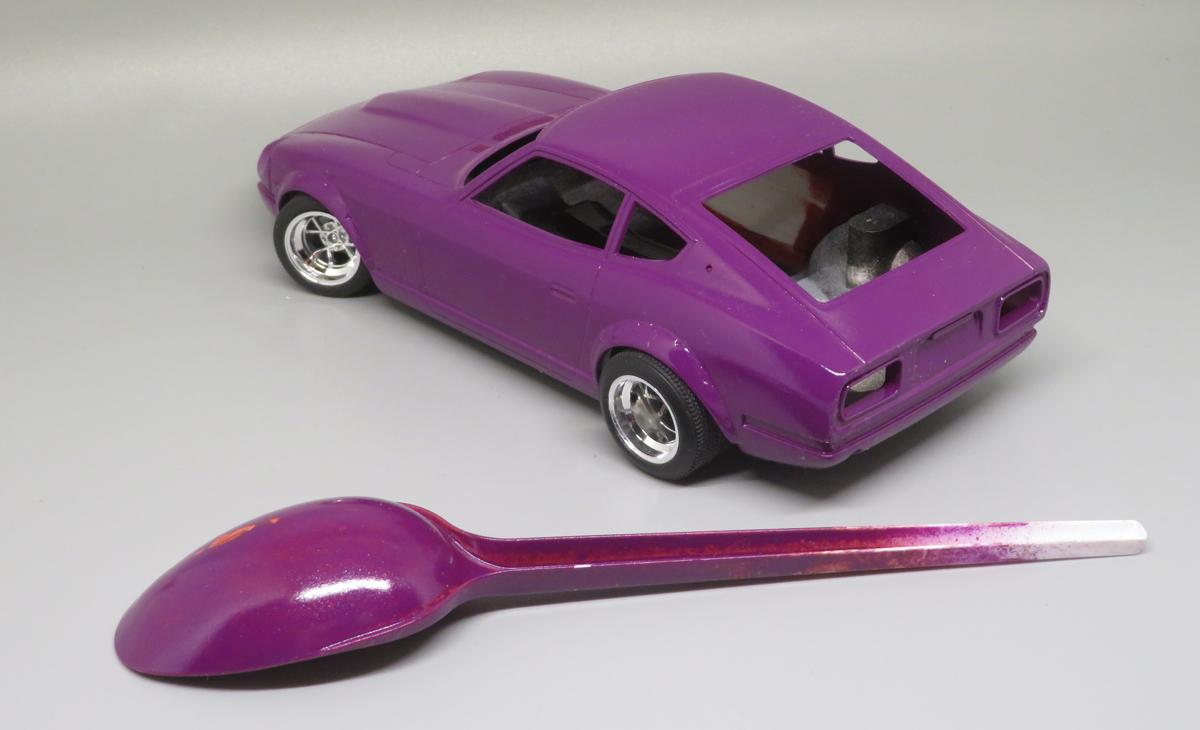
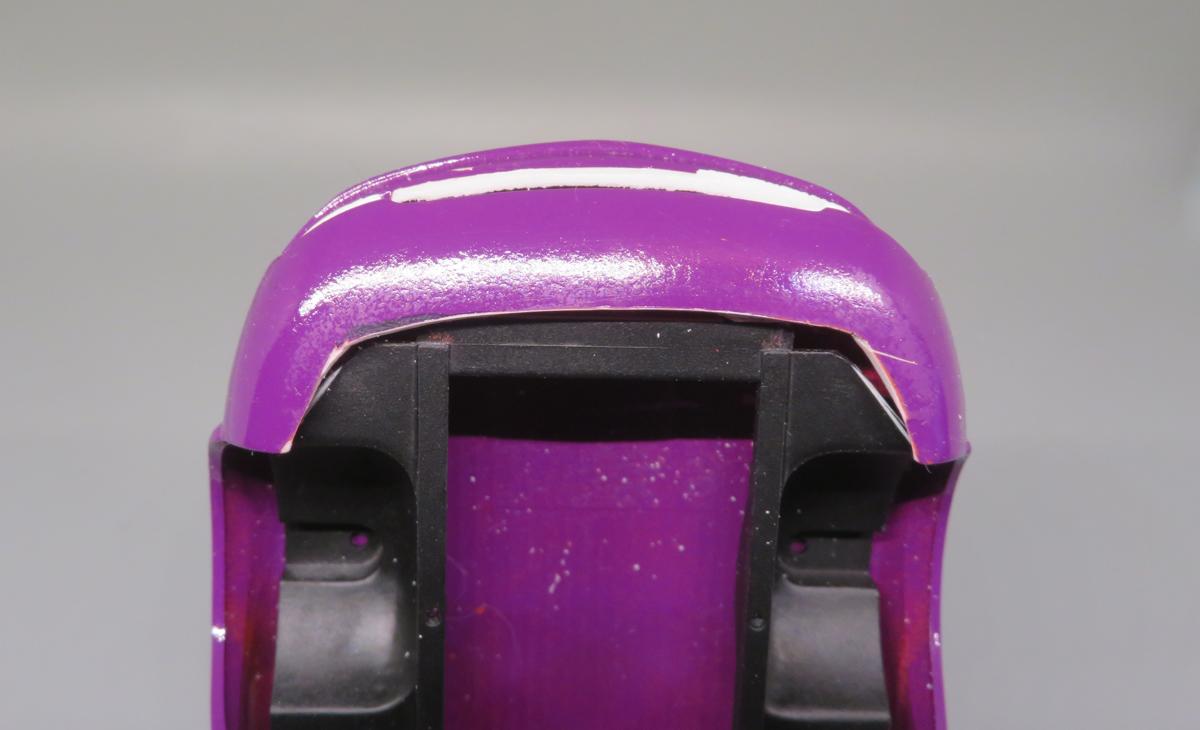
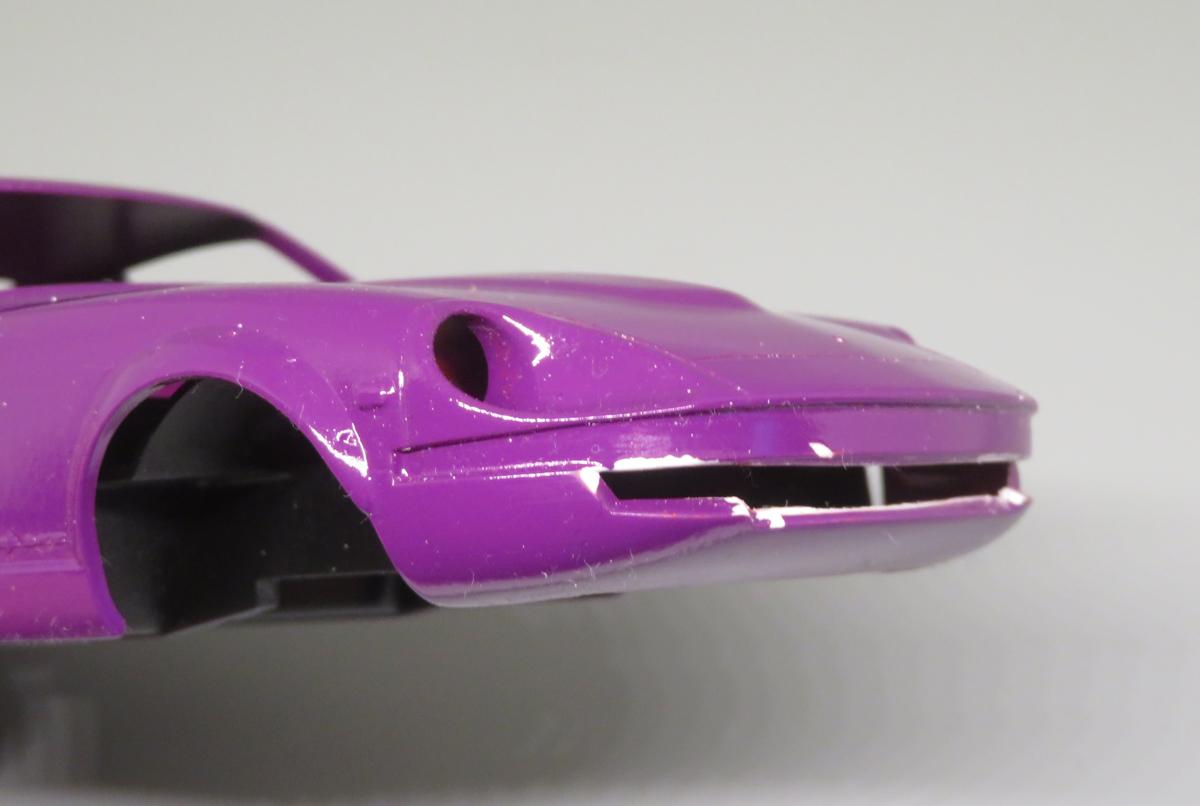
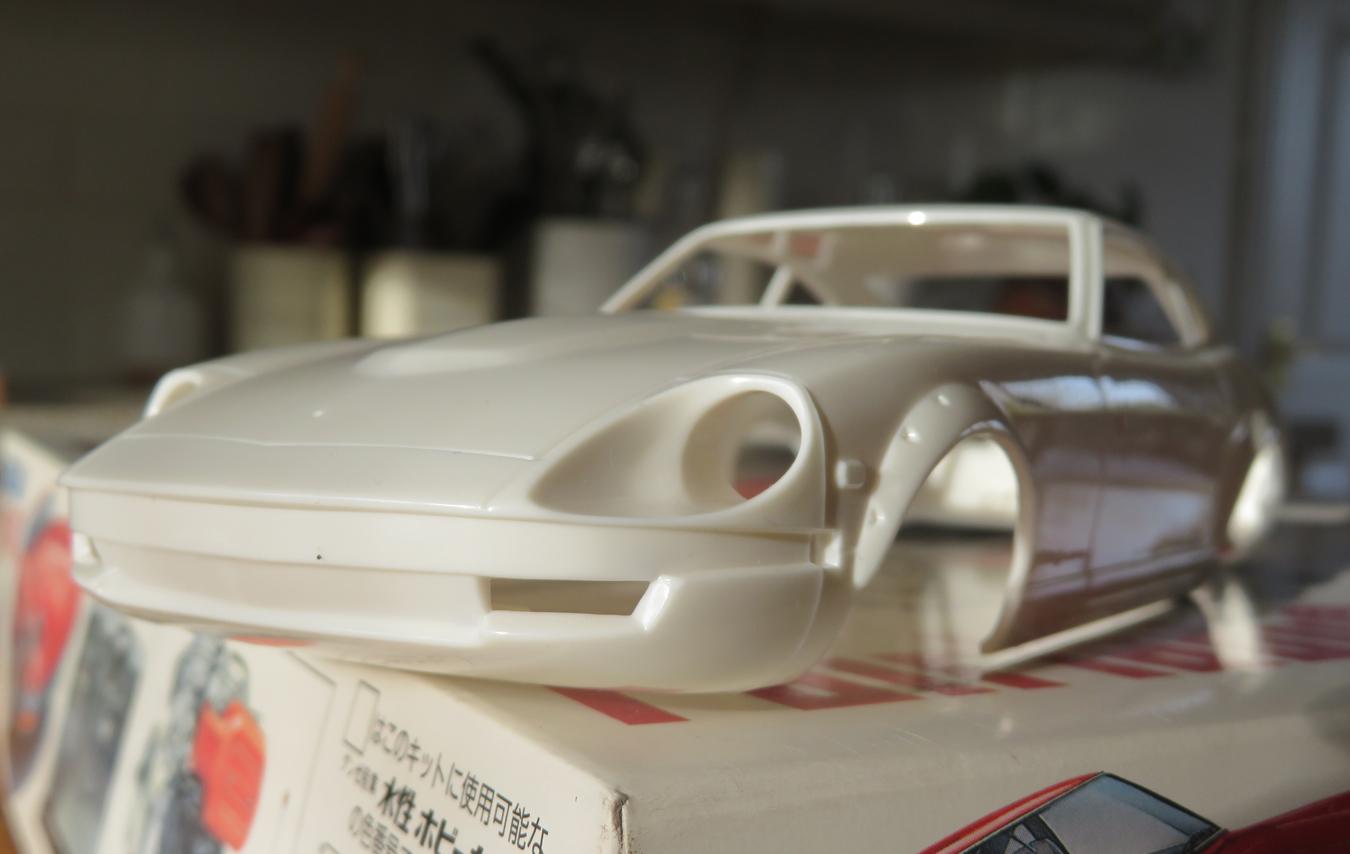
Making some progress on the simple Fujimi kit: Made use of the mild weather to get a few coats of TS-37 down. Used a very old can I bought some years ago, maybe 1990s vintage? Updated mock-up time, the Lavender is bright!.... Found another set of tyres for Bilbo wheels, nice and wide but without being too low on the sidewall depth. They'll all get the chunky inner rim removed, which will allow the rear wheels to sit a bit further into the arch. Haven't worried about getting a super-glossy finish, because.... It'll be getting pearl clear laid over it. Then possibly Mr Hobby gloss clear, it worked OK on the spoon. Getting the floorpan and body together was somewhat nerve-wracking, even with the male nibs trimmed back it was a very tight fit to the point of wondering if I'd snap my freshly-painted body. I decided to take some material away from the bottom of the front valance, as marked above. The paint has suffered a bit of collateral damage, but from the bumper downwards it will be painted anthracite or gunmetal so it's not a problem. While I had the right tools out I thought I may as well open up that slot below the bumper - I daren't have done it before relieving the valance, something definitely would have broken. Basic prep just done on the interior and it's been given a first coat of.........
-
1:16 Gunze Sangyo 1937 Rolls-Royce Phantom III Sports Saloon
Spottedlaurel replied to Anglia105E's topic in WIP: Model Cars
A wonderful looking car at 1:1, and it looks like a kit that should do it justice. I recently completed a Gunze Sangyo kit and it went together nicely. Hopefully you won't have to do the same amount of rectification that you do on the 1/24 Minicraft kits and you can concentrate on the details. -
Your diligence in making it a workable solution is to be applauded! Looks like some challenging clean-up required around the bodywork front end? That junction between the fender and hood/bonnet/boot(?!) is 'interesting'....
-
Fantastic! Looking forward to seeing what other versions they offer. The 2-door version is a very nice kit, even though it's one of their older Historic Cars now. This is only going to be better.
-
Best wishes for a speedy recovery! Maybe it's the lack of camber at the back end, but somehow it still looks like it needs to go a little lower?
-
The Datsun is a fun kit, I enjoyed doing one a few years ago. And $12.99 for a kit in a store?! It's been an awul long time since it was possible to do the same here with the equivalent amount of £.....
-
Mercedes-Benz 450 SLC 5.0 (Esci/Italeri, 1/24 scale)
Spottedlaurel replied to Tommy124's topic in Model Cars
Very nicely done, certainly has the look of the 1:1. I have one to do someday, so it was helpful to read your comments. I think mine is missing its chassis, but perhaps I'm not missing much and I'll just make it look right on a spare one off something else. 1/24. -
Good news! I hope it's a bit quicker to the market than some of the kits they announced for 2023 - the Renault 4F van for example is still listed as "Coming soon".....
-
News from Nuremberg:Tamiya Giuilia Sprint GTA is back!
Spottedlaurel replied to Matt Bacon's topic in Car Kit News & Reviews
That's really good news, for you and your customers. I was pleased to see Hiroboy already have it listed here for pre-order, £32.98 on the Alfa and £24.98 for the 695SS (same as the 500F). -
News from Nuremberg:Tamiya Giuilia Sprint GTA is back!
Spottedlaurel replied to Matt Bacon's topic in Car Kit News & Reviews
Never had this one, but certainly looking forward to getting one. Do you think it will do well in your store? -
Datsun 240/280Z & Nissan Fairlady Z/ZG multiple builds
Spottedlaurel replied to Spottedlaurel's topic in WIP: Model Cars
I've been heavily involved with 1:1 Datsuns and have owned one or more (often several more) over the years, but for affordability I've always gone for the non-Z/ZX cars. The scale would be slightly out, but I'd still like to give one of the Revell versions a go someday. Thanks Mark. I pondered whether to put it in the Reviews section, but I want to crack on with building them so thought it fitted better here. Just the sort of info I was hoping would be shared here, thanks Scott. As you'll have seen from your build the way Tamiya put the kit together it's obvious they engineered it with other versions in mind, just a shame they haven't done so yet. The Z432 conversion complete with non-G nose should be quite straightforward. In using the R32's RB26 on my CBR build I'm giving myself a bit more work, as the front diff and transfer case need to be removed. If there's not enough room for the twin turbo set-up I might have something else I can use. With the Hobby Design PE detail set and lowered suspension, Studio Rosso wheels and specially mixed paint I've already thrown a bit of money at it, so best I try and use an engine I already have in stock.... That's the one Les, yes it's an S20 in that parts pack. I also have one of them in a C110 GT-R kit (which has a bonus white metal version for display). I think Tamiya's version will be better-detailed however, and I can always drop something else into the Hakosuka Skyline.... -
Thank you David. Doing those accessories added a week or so to the build! Thanks Les. The chassis-cab version was familiar to me in the 1970s/80s as our local dairy ran a fleet of them as milk floats. Saw this really nice example in France last summer: Any I've seen here in recent years have been campers:
-
Datsun 240/280Z & Nissan Fairlady Z/ZG multiple builds
Spottedlaurel replied to Spottedlaurel's topic in WIP: Model Cars
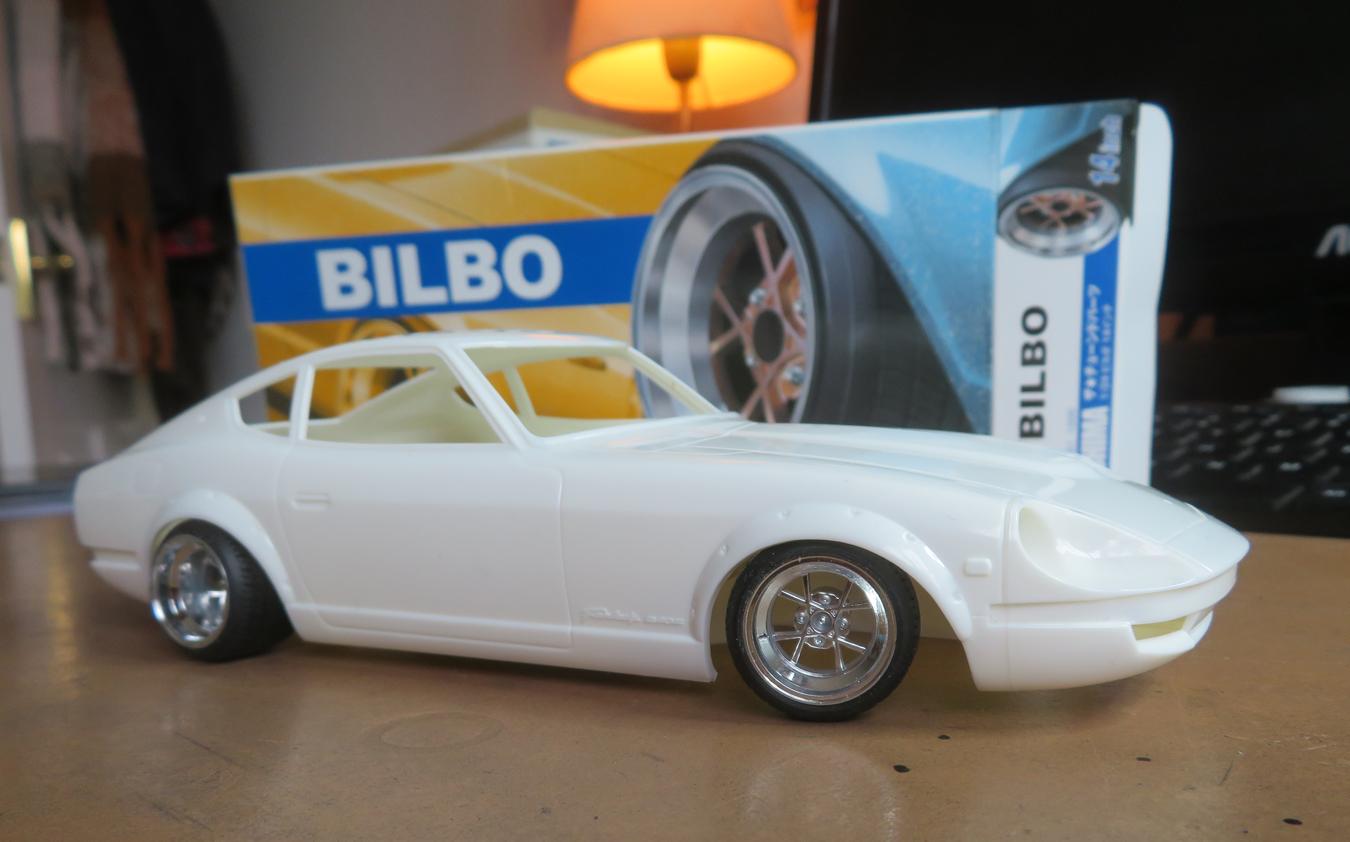
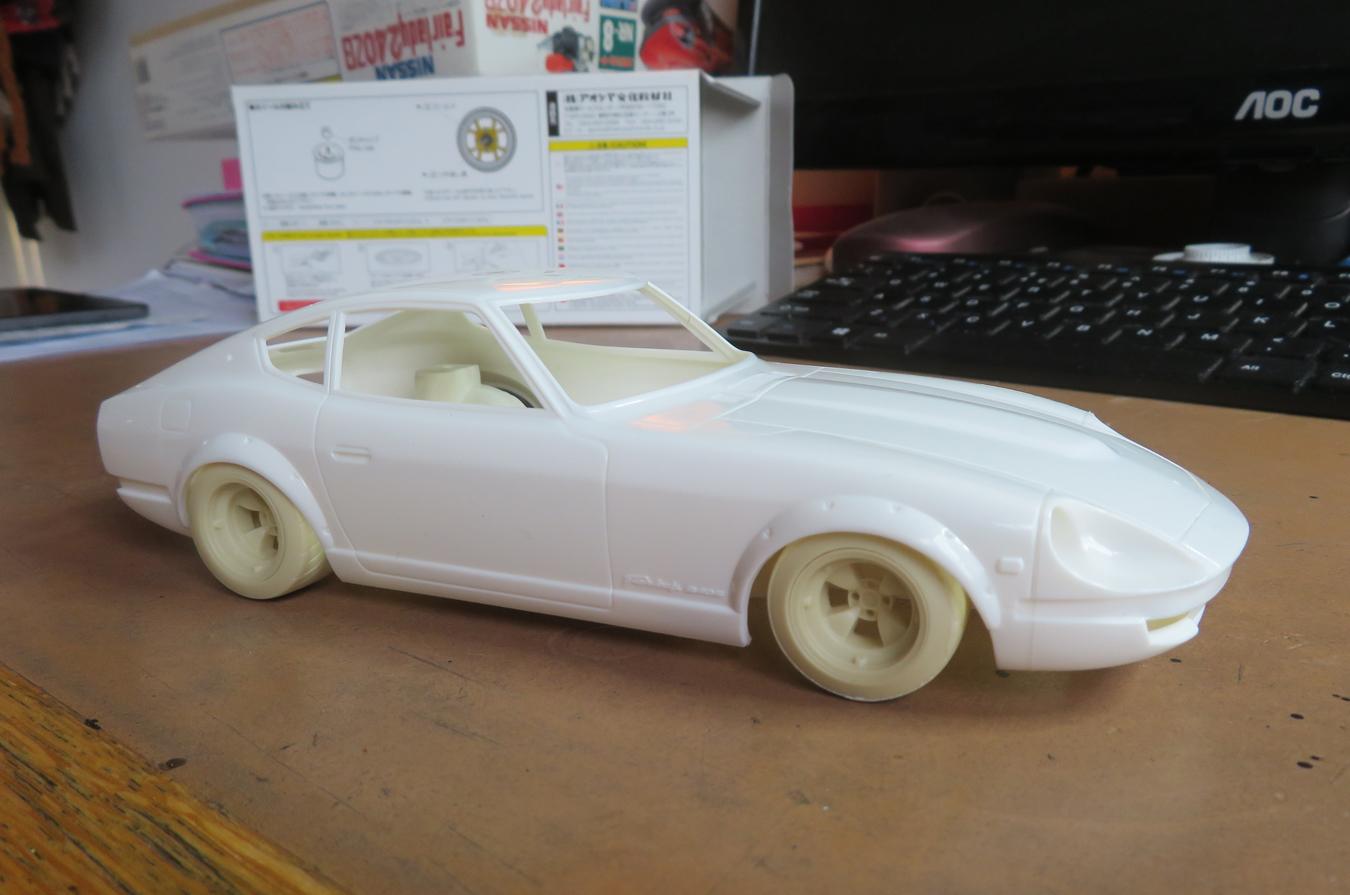
Where I've got to with build #1: Box contents, with LHD dashboard missing and skinny wheels with hubcaps traded with another member on here some time ago. Bilbo wheels are my current preference. The engine looks like a reasonable copy of the L24, but due to the closed hood and lack of engine bay detailing and wanting this to be a quick, simple build I'm going to build it curbside. Mock-up on different wheels: Bilbos on the stretched tyres they came with. On the chunkier Fujimi tyres. And just for fun, on the Studio Rosso Gottis that I'm planning to use on the CBR build. However, for complicated reasons I am probably going to swap the tyres around, will see what happens when I play around with other options. Not sure yet whether I'm going to open up that slot below the bumper. Bodyshell now in red primer. I was considering a couple of colour options, possibly a metallic maroon as a twist on one of the three standard ZG offering, or Tamiya TS-37 Lavender. Probably going to be the latter, with pearl clear to give it a bit of a funky period look - this isn't meant to be a very serious build, and I might even do something silly with the interior. For my own purposes, links to some great builds of the Fujimi kit: @Tommy124 https://www.modelcarsmag.com/forums/topic/135831-nissan-240zg-fairlady-124-scale-by-fujimi/ @Michael jones https://www.modelcarsmag.com/forums/topic/146883-fujimi-datsun-240z/ @Matt Bacon https://www.modelcarsmag.com/forums/topic/184393-datsun-240z-super-samuri-fujimi-124/
-
I've ended up with several members of the Datsun/Nissan Z family from different kit makers and as an extension of my plan to do one of them for this year's CBR community build I want to have some fun with the others too. Current stash, with a second Tamiya 240ZG having arrived since. A quick comparison and review before I start on one of them.... Red primered one is by Fujimi (was moulded in white), Monogram in red styrene, Hasegawa version with alternative nosecones from my different issues for Z and ZG, and finally the Tamiya kit with separate hood and tailgate plus the various parts which make the longer ZG nose. You can see how they are separated on the tree, I just wish they'd offer the standard Z - more of that later..... All look like the 1:1. Predictably the Monogram is least accurate, but I'm still quite fond of it. With its separate rear panel as well as the panels already mentioned the Tamiya kit is going to be the easiest to build and detail. Monogram's offering suffers most at the back of the rear quarters, where it's rather square. I managed to get a bit more shape into that on a previous build: This shot emphasises it's slightly 'peaked' roof. It still has something to offer however, and both the road and race versions come with great wheels and tyres which I've used to good effect on other projects. I'm looking forward to building the red one someday, perhaps as the 'finished' version of this part-restored Z. Of the ones I have, I'd rank them as Tamiya > Hasegawa > Fujimi > Monogram in terms of parts count and level of detail/accuracy. I know Revell offer a 1/25 kit with engine detail, and Aoshima do a curbside. I've had a look at the latter online, the suspension detail looks basic but I can't say how the body compares. Tamiya is the only one to offer an opening hood and fully detailed engine. Fujimi has an engine (or even two in some versions), but the the hood is moulded shut and the engine bay detailing is minimal. So, enough waffling - what am I doing/going to do with them?..... Build #1 Fujimi kit as a quick, simple OOB-ish build. See post below for more on that one, as I've already started it. Build #2 Tamiya kit as my CBR entry. This is the one that started me going with them this year, and it's going to be the most detailed. Will keep it standard-looking as a restomod, just lowered on different wheels, probably Gotti 15". Under the hood the L24 'six' will be removed in favour of an ex-R32 Skyline GT-R RB26DETT, converted from 4wd to RWD. The RB25/26 seems to be a reasonably common swap at 1:1, and physically the basic engine is of similar size. Build #3 Monogram kit to match the one I've already done, but as the completed project in a single colour. Build #4 Hasegawa ZG, opening up the hood, adding a bit of engine bay detail and installing a Fujimi L24 engine. Can also use some of the leftover Tamiya parts and a Hobby Design detail set that I recently bought. Build #5 2nd Tamiya kit, but converted to Z432 spec. As I discovered when messing about with them over Christmas, and @Matt Bacon also found recently, it seems that the Hasegawa nosecone will fit the Tamiya bodyshell with just trimming of the fitment tabs. The Z432 has a different fuel tank and spare wheel arrangement which need swapping across, and the other big thing to do is fit an S20 engine. This is the hi-po straight-6 which was fitted to the Skyline GT-R of the time. There are two options, either that offered by Fujimi in various kits and a parts set, or taking one from the Tamiya C10 Skyline GT-R. I'm going to do the latter, as I have the Street Custom version in the stash. @lghtngyello03 did the same thing here in his wonderful ZG: https://www.modelcarsmag.com/forums/topic/170576-tamiya-nissan-240zg-wvolk-te37v-and-s20-gtr-engine/ BTW, the Z432 gets its name from having 4 valves per cylinder, triple carb's and twin OHC. There's also a lightweight 'R' version. Build #6 Do something with the leftovers! This will eventually include using the redundant Tamiya L24 engines in other Datsuns, like replica/tribute builds of my current 1980 Laurel and previous 240K Skyline.
-
Thanks guys! It would be interesting to see with your weathering applied to it.... Ha ha, yes - I need to work harder on my desert/beach setting next time! I prefer taking outdoor shots of completed builds, but the garden of where I am now is more enclosed than my old place and I haven't found a good location yet.
-
Post your truck mockups.
Spottedlaurel replied to Mike C.'s topic in WIP: Model Trucks: Pickups, Vans, SUVs, Light Commercial
I'm posting this one here in the hope that it might inspire me to get on with it! AMT Courier which I was planning to fit with the V6 from (I think) a Revell '90 Thunderbird. I still like my plans for it, just need to get over working with the soft styrene and decide whether I'm going to get the bed sitting at a more accurate level relative to the cab.
-
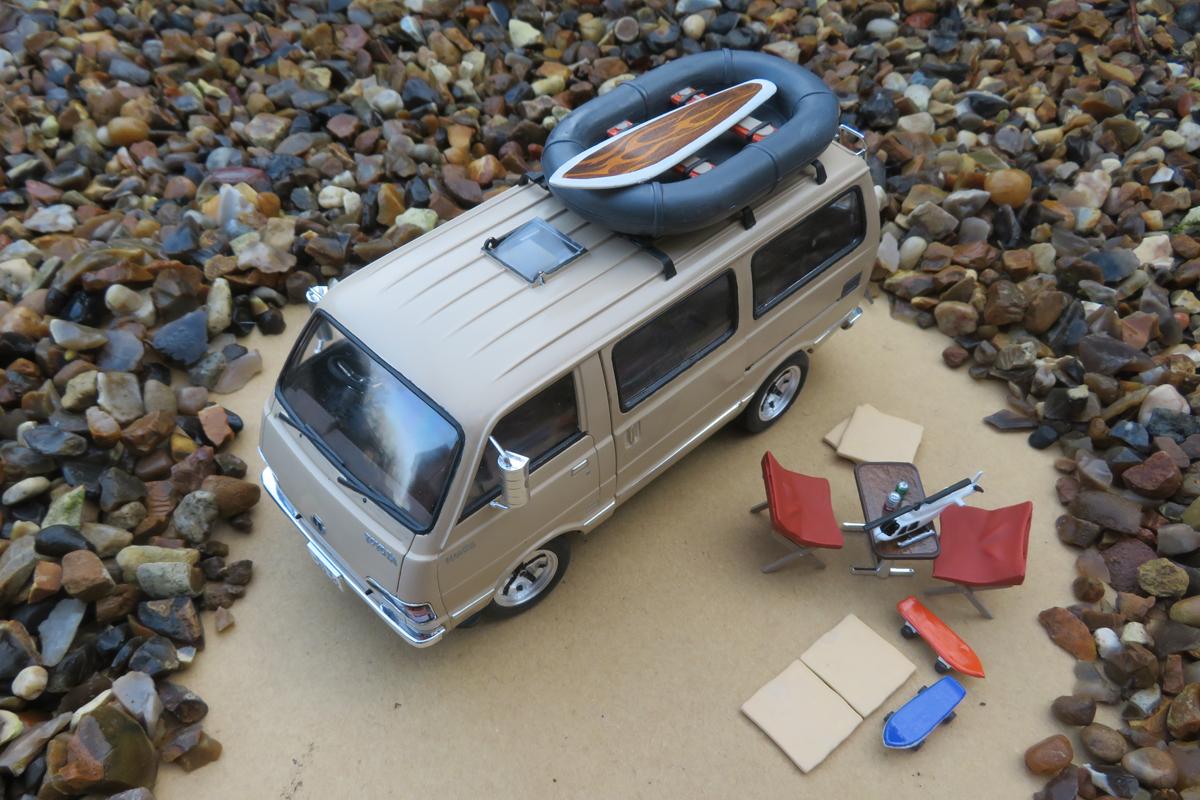
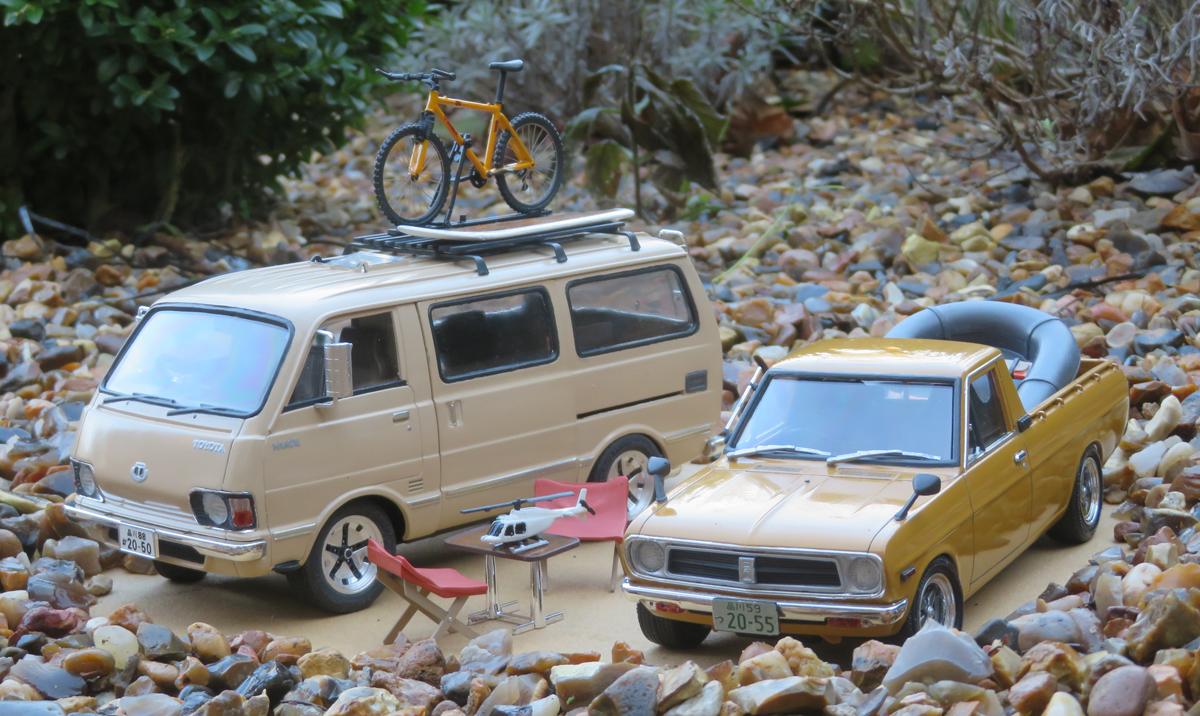
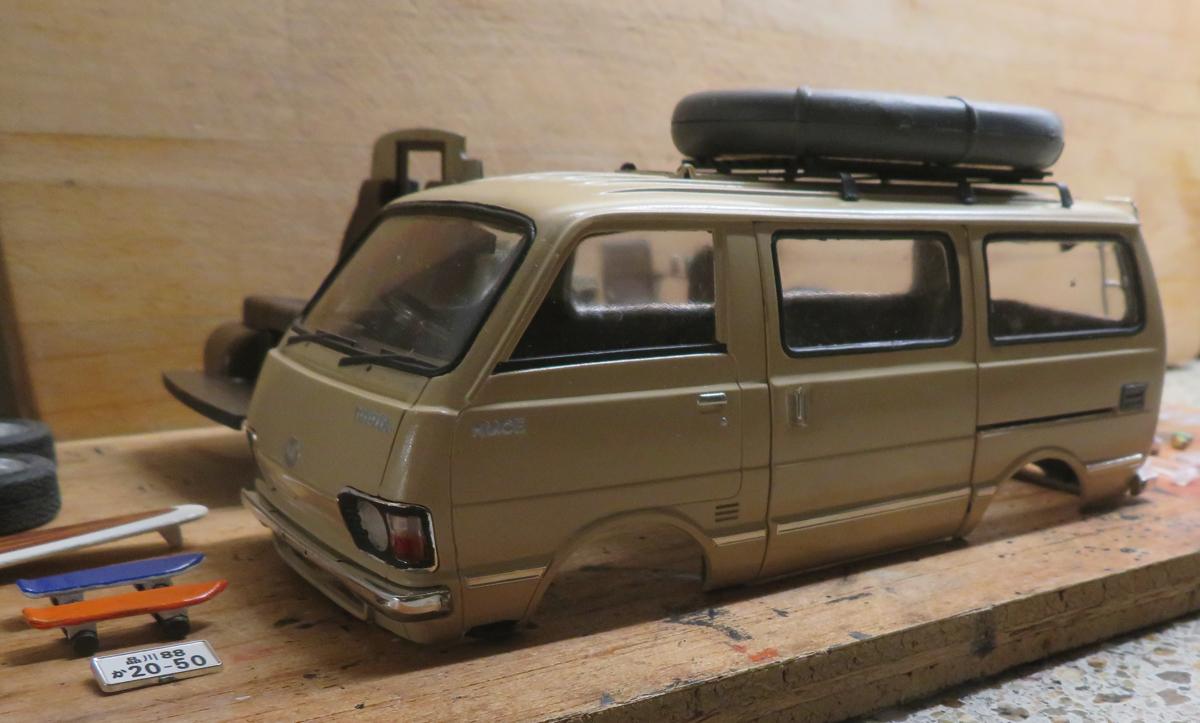
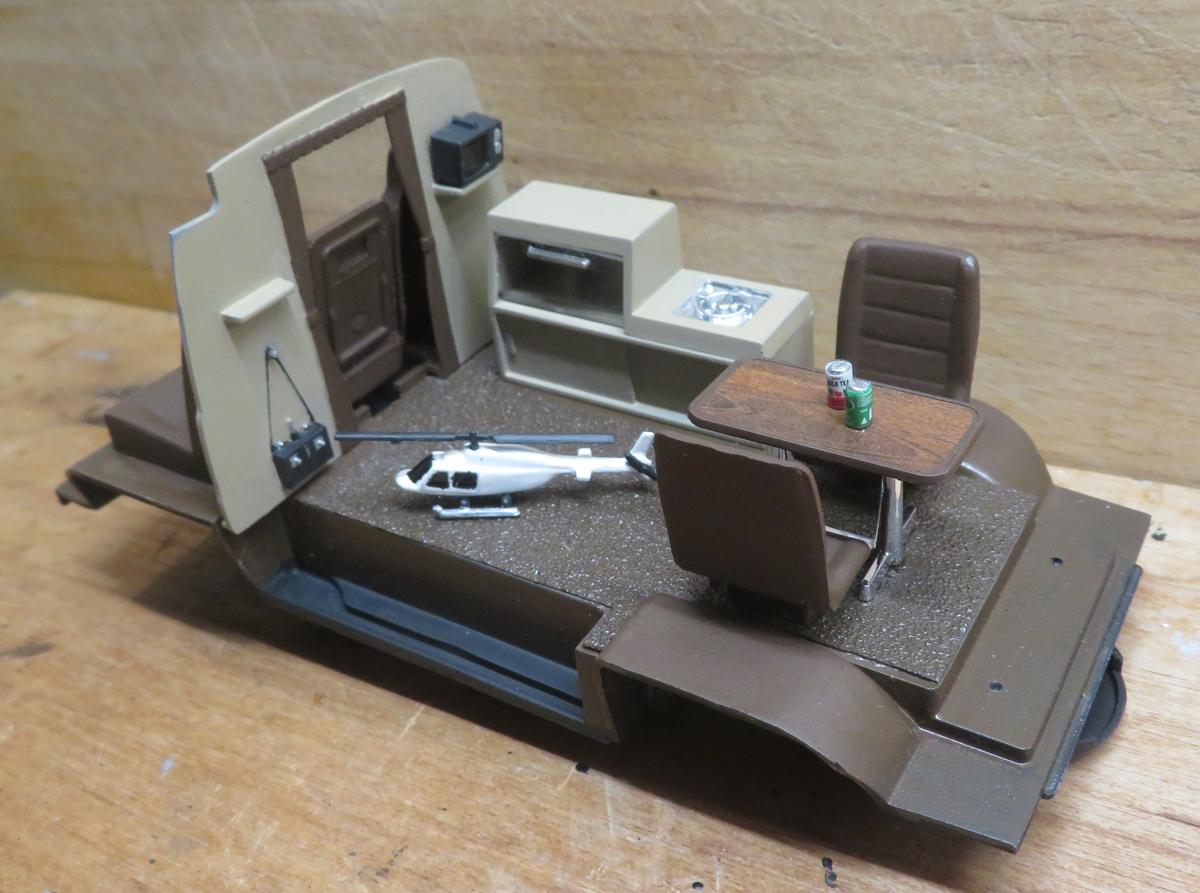
Not really sure why it took me so long but I finally got this one finished today: WIP thread here: Fairly basic kit with some accessories. I trimmed the front spoiler, painted it Austin-Rover sandalwood beige (an early '80s colour) from a Halfords automotive aerosol and fitted the Aoshima wheels. Also added some extra seats, cushions and drink cans from a Fujimi accessory pack and the rubber dinghy from an AMT Hilux. Surfboard decal came from the side panel of a Revell Chevelle wagon. I used offcuts of it for the tabletop too. I ditched the kit-supplied sidepipe and fitted this muffler and tailpipe for another Fujimi accessory pack. Bumpers came with chrome finish and used BMF on the lower body trims. Window trims were not fun to paint.... I could have gone a lot further wth the interior. I thought this Sunny Truck made for a good companion to it. I know it's not one of my better efforts and the kit itself is fairly basic, as it was intended to be motorized, but once I'd removed the spoiler I think it nicely captures the feel of the 1:1. Thanks for looking.
-
Nicely done, and good to see an unusual kit like this get built. As the 1:1 is quite small 1/20 scale probably makes it a nice size for display.
-
Looks pretty much identical to mine. I found the background looked better if taped back to the white box, and the LED lights eventually lost their adhesion so I tied them up with thin fuse wire.
- 38,985 replies
-
- 1
-

-
- johan
- glue bombs
- (and 1 more)
-
Thanks, and good to know someone else has one! I have the Urvan/Caravan E20 too, but I'd love to get the Vanette as well - there was one on eBay here, but it was something like £150.... Final shots before I plan to get it finished at the weekend: Rear door isn't properly fitted yet. Dots in the glass are from where it should have a chrome porthole surround. I added the accessories that came with it and added some deckchairs, cushions and drink cans from a Fujimi parts pack plus the dinghy from an AMT Hilux.
-
Beating that Ol' Dead Horse - Color
Spottedlaurel replied to Lunajammer's topic in General Automotive Talk (Trucks and Cars)
I thought of this thread today when I saw a 2023 Mercedes CLA wagon/tourer, not normally something that would interest me but it was a bright, almost turquoise, metallic blue - just looked online and it's Hyper Blue. Definitely one to consider on a future build... -
Only other thing on the lights might be to apply BMF to the non-red areas, then paint them with amber clear or leave as-is for the reverse light portion? Obviously not going to look as good as the red tinted area, I'd be inclined not to do anything....
-
2024 Cannonball Run Restomods Build Thread
Spottedlaurel replied to White Rabbit's topic in Community Builds
Nice work Enzo. For ease of detailing, and flexibility on male/female fitment, could you do the studs/lugs as separate pieces like on the Gottis I got for my CBR project? There's a set of four for each option.
-
Great to see that you persevered, it was worthwhile as the finished result looks really good.