Spottedlaurel
-
Posts
1,980 -
Joined
-
Last visited
Content Type
Profiles
Forums
Events
Gallery
Everything posted by Spottedlaurel
-
Tamiya 1/24 Nissan 240Z (street custom?)
Spottedlaurel replied to Bennyg's topic in Car Kit News & Reviews
Something we can try in 1/24 at least! I don't want to distract myself from the RB26 conversion I'm currently doing on a Tamiya ZG build, but I think I do have one of those engines somewhere..... -
Tamiya 1/24 Nissan 240Z (street custom?)
Spottedlaurel replied to Bennyg's topic in Car Kit News & Reviews
That's very nice! Another option for slot mags would be the old Monogram 280Z road car kit, and they're 4-stud too. Is there also a Lotus Esprit that has them too? From memory they're a bit wider. As I think has probably been mentioned the Hasegawa nosecone appears to fit the Tamiya shell very nicely, so with a bit of mixing and matching and the availability of the Tamiya Z with LHD that now gives scope to build pretty much any variant with full engine and underbonnet detail without going too far into the aftermarket/conversion world. -
2024 Cannonball Run Restomods Build Thread
Spottedlaurel replied to White Rabbit's topic in Community Builds
The red and black paint combo is lookig sharp @avidinha -
It's coming together nicely Atin, the way it's turned out slightly darker looks good to me. Polishing should be a fairly minimal exercise?
-
Nice work Tom! And certainly a fitting tribute to Snake.
-
Thanks Atin! And yes it did, been here for over 2.5 years now, so pretty much settled in. Still don't have quite as good a modelling set-up as I used to have, but I found room to store all the unbuilt kits and I keep messing about with the WIPs whenever I can. No photos, but I gave the first couple of colour coats a wet sanding and then applied another two coats followed by the Mr Hobby Gloss Clear. That looks to have gone down nicely, should just need minimal polishing which I'll do at the weekend. Have also made a start on a new engine and 'box from one of the spare sprues. Should go together pretty simply from this point onwards.
-
Picked this batch of built Tamiya kits at a 1:1 car show and autojumble yesterday: Have no idea what I'm going to do with them, but it seemed a shame to let them continue to get carted around and sustain damage and loss until they were no good to anybody. Maybe restore one or two and use the others as basis for hi-po road cars?

- 38,982 replies
-
- 4
-

-
- johan
- glue bombs
- (and 1 more)
-
Great to see the Silvia S110 done by Hasegawa! Now for the uglybug S10 to be offered by somebody..... Any shots of the sprues for the Tamiya 240Z? Interesting to know what options there might be with it, like a standard front end without spoiler?
-
Thanks Helmut, looks like he was enjoying himself! Really useful to see a road car photo, and it's reminded me I'd forgotten about the spoiler above the rear window. No rollcage, so that's something I don't necessarily have to find and repair. Got the colour down on it today, Tamiya TS-53 Deep Metallic Blue as I thought it would be reminiscent of the dark blue used on the Olio Fiat cars. It needs clearcoat, but I'm happy with it so far. Strange to see it properly in colour after 40+ years.
-
Looks great, and I'm in agreement about the window tint looking just right. Certainly sits nicely with your '70s Japanese car builds. I think some Aoshima kits have an opening hood to house a battery compartment for the electic motor and/or lights which were common on older Japanese kits.
-
Practice makes perfect! Looks great, the black trim defines many cars of that time but it can be a challenge to get right and you certainly pulled it off.
-
Nicely done. The 2-tone must have been a challenge with quite a contrast between the colours and some places where you can't rely on the trim to break it up, but you got it down just right. Great work on the badges and tail lights with the Molotow.
-
I thought this had been hanging around for too long, and the filler should be about ready to sand after three years! I'm going through repeated cycles of fill, sand and prime, but hopefully I'm now on the last one of those before I can can get some colour down, maybe later today as we have a public holiday here. Most traces of the old spotlight holes gone. Nearly there with filling of the bootlid fuel filler. I'm hoping it should now move forwards quite quickly, as I'm using as much as I can of my orignla 1980s build and the new detailing is fairly simple, plus as a road car it won't have many decals.
-
2024 Cannonball Run Restomods Build Thread
Spottedlaurel replied to White Rabbit's topic in Community Builds
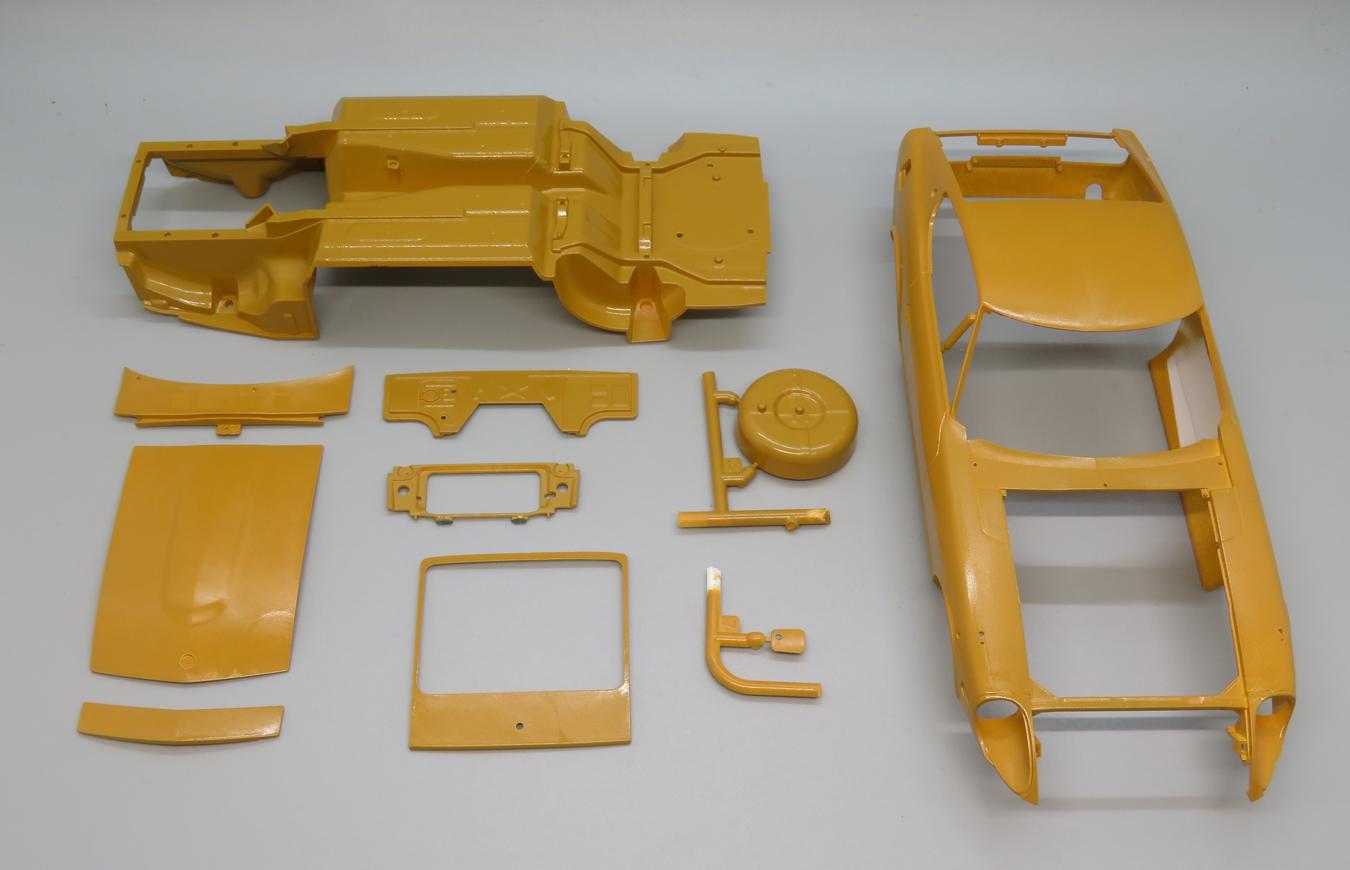
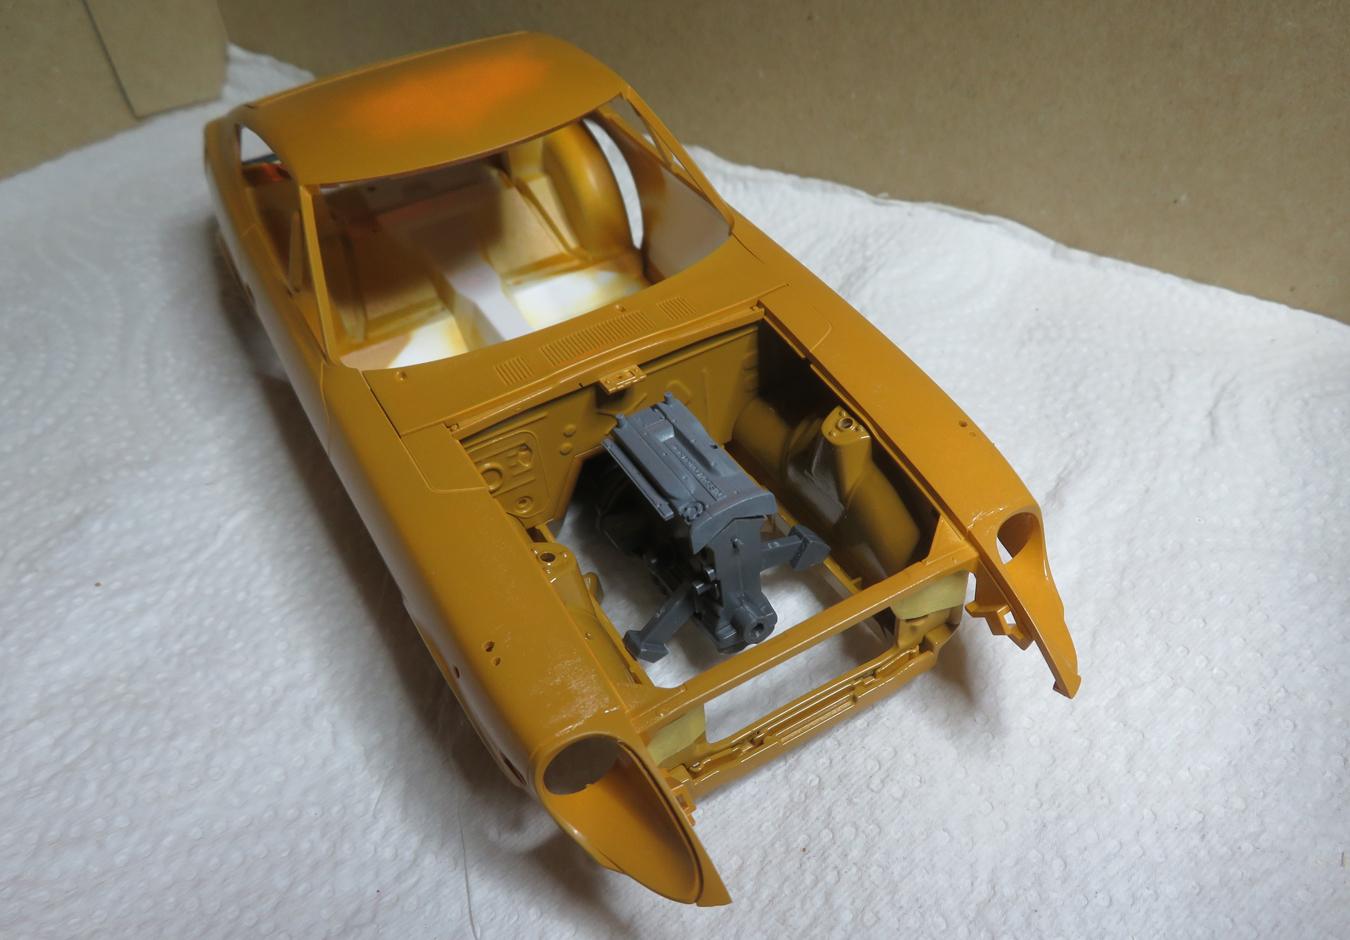
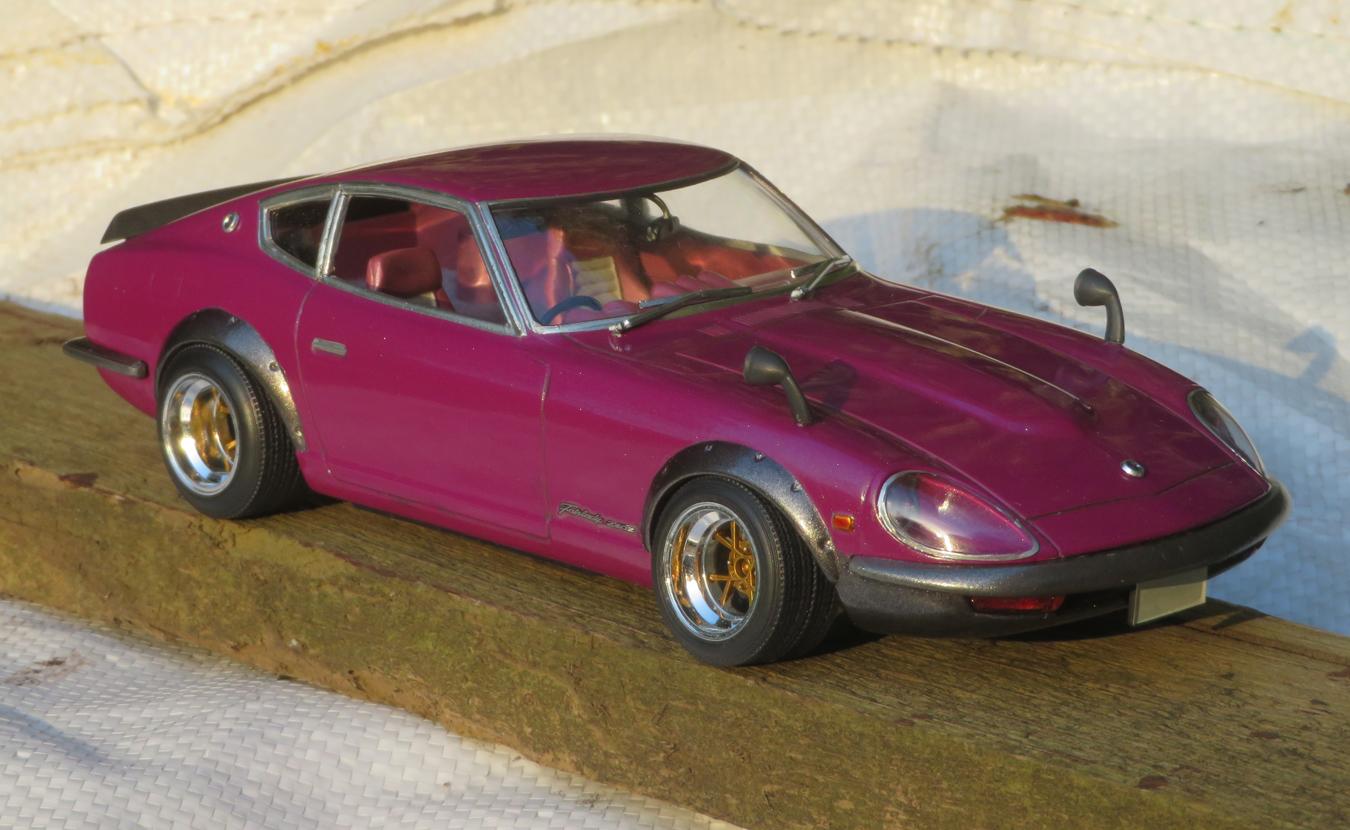
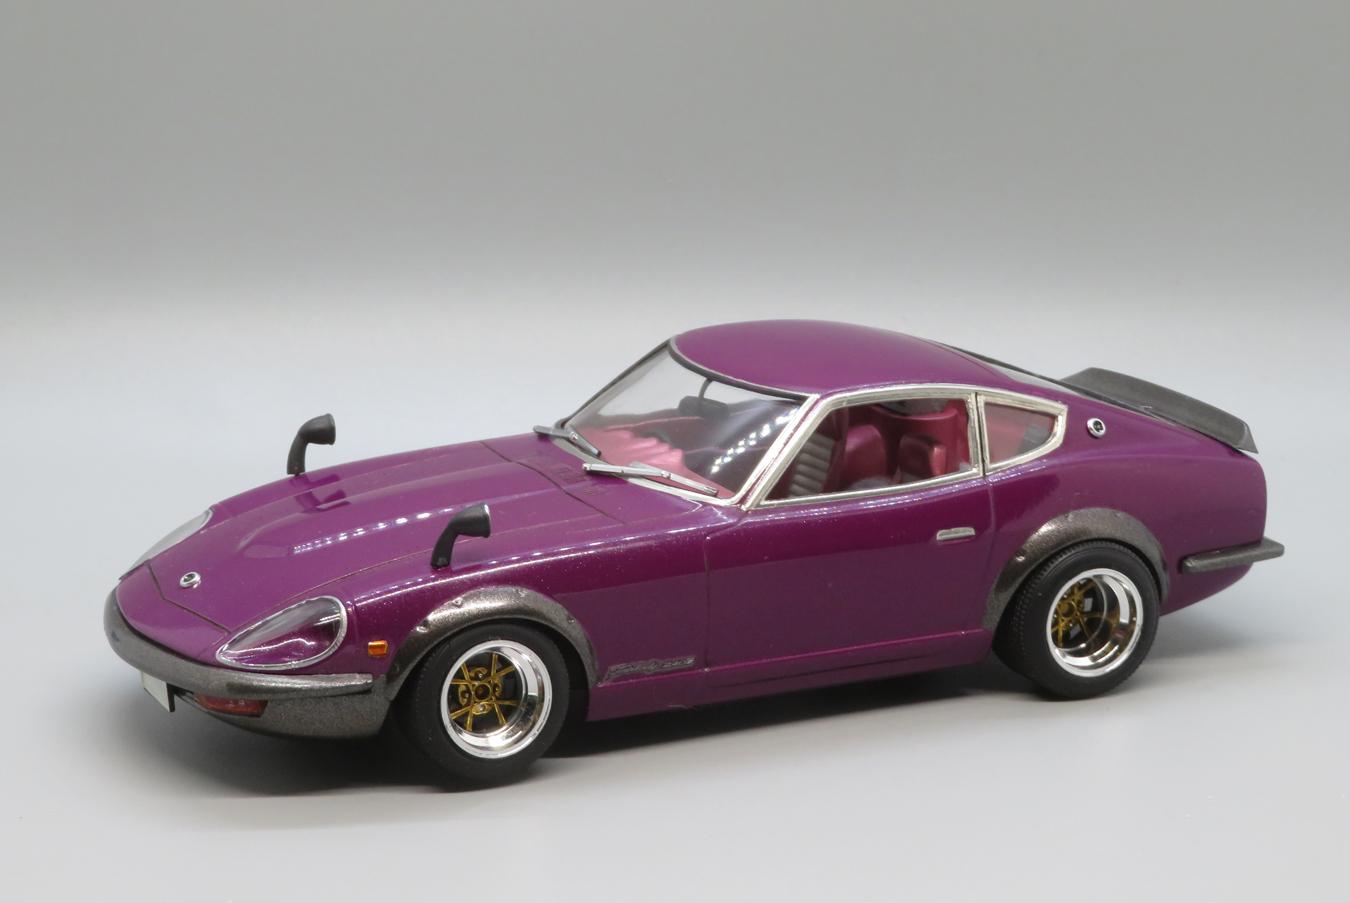
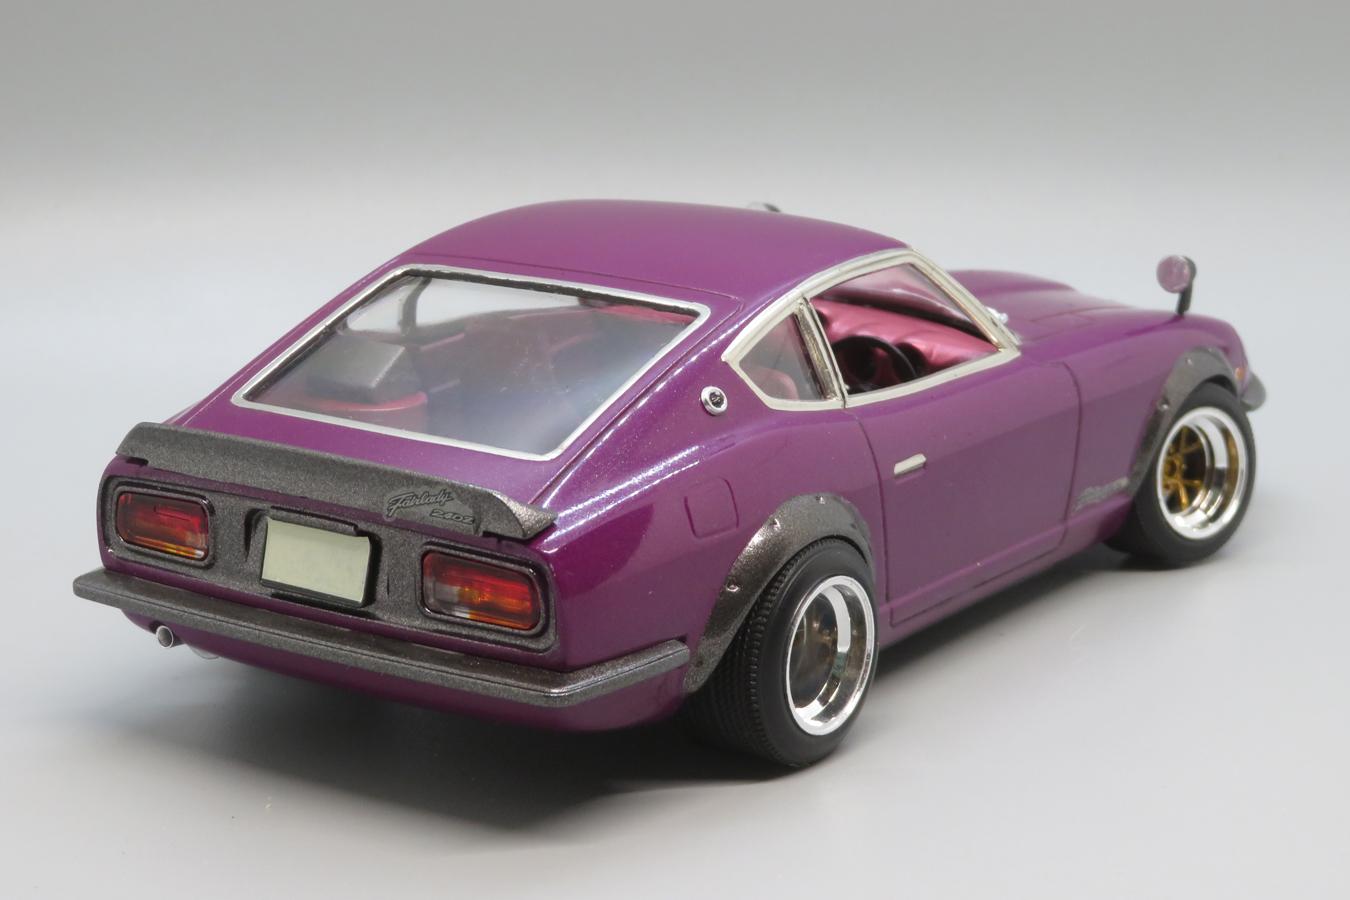
Made use of some rare fine weather plus a more leisurely weekend thanks to having a public holiday today (Monday) to get some primer and paint on my 240ZG + RB26 build.... Tamiya TS-94 Metallic Grey (with no clear) on the various arch flares, spoiler, bumpers etc. It worked well on the 'practice' Fujimi kit build. Colour painted (over white primer) on everything needing it, albeit just a couple of thin coats so far on the outer bodywork. It's an original 1970s Datsun colour 931 Ochre which I had mixed-up by the local1:1 car parts shop. Technically this is probably not quite correct but I wanted it for another Datsun kit and it's very close to 920 Gold which I believe was used on 1970/71 240Zs, plus I wanted to do something different to the three standard colours of white, red and maroon which were all they offered on the ZG. The important thing is it looks right for the period. Possibly the first kit I've ever built with a separate fuel filler lid! Quick mock-up. the grey looks good with the body colour. Not sure yet on the wheel colour, maybe gunmetal or a dark bronze. The body needed some faint mould lines sanding down and a few holes drilling for the mirrors and arch flares. I think I still need to do two more for the rear spoiler. First time with the bulkhead and radiator support panel in place. I know the overall engine and 'box length is about the same as the original, so I think I'm going to be fairly quick at getting the rear suspension, diff and propshaft in place, and I'll then see where that puts the engine relative to the radiator. The newer RB26 engine will have more 'stuff' on it than the old L24, so I need to keep an eye on that. I can see from this shot that I need to do a little clean-up and scribing where I attached the headlight cowls. It wasn't so easy to see that in the white primer. However, I'm happy to get a bit of colour laid down - it's given me a useful motivation boost and I can get on with building-up the interior, chassis and running gear.
-
That's nice - very cleanly done, simple but very effective look.
-
Arrivals from a couple of different sellers: I was surprised to find I hadn't already got one of the 430-series Nissan Gloria, as a hardtop sedan at least. I got a pillared version a while back, which seems to be a different, more detailed kit. It has a couple of interesting wheel sets with it which will be of use on other builds. Wheels and tyres on the Jeep were the main draw, I need some replacements for a Land Cruiser, and maybe the chassis could go under something else?
- 38,982 replies
-
- 1
-
-
- johan
- glue bombs
- (and 1 more)
-
Tribute to Snake45
Spottedlaurel replied to bobthehobbyguy's topic in General Automotive Talk (Trucks and Cars)
Sad news. He was in my mind just a week or two ago when I did a bit of detailing to finish off a kit built by someone else, Snake-Fu as he called it. His Bring Out Your Dead thread and words of encouragement certainly helped me get a few longstanding WIPs back onto the bench and finally into the cabinet. -
Group 5 Special Production Cars
Spottedlaurel replied to Pierre Rivard's topic in Model Building Questions and Answers
I have had the 1/20 Tamiya Celica pass through my hands, but I don't do much at that scale so I moved it on. About 40 years ago I built the simplified 1/24 version, it's still complete and looks decent sat in my cabinet: It went together nicely and it remains still my most ambitious use of decals! Body was unpainted, which given the standard of what I was doing back then is perhaps a blessing.... -
2024 Cannonball Run Restomods Build Thread
Spottedlaurel replied to White Rabbit's topic in Community Builds
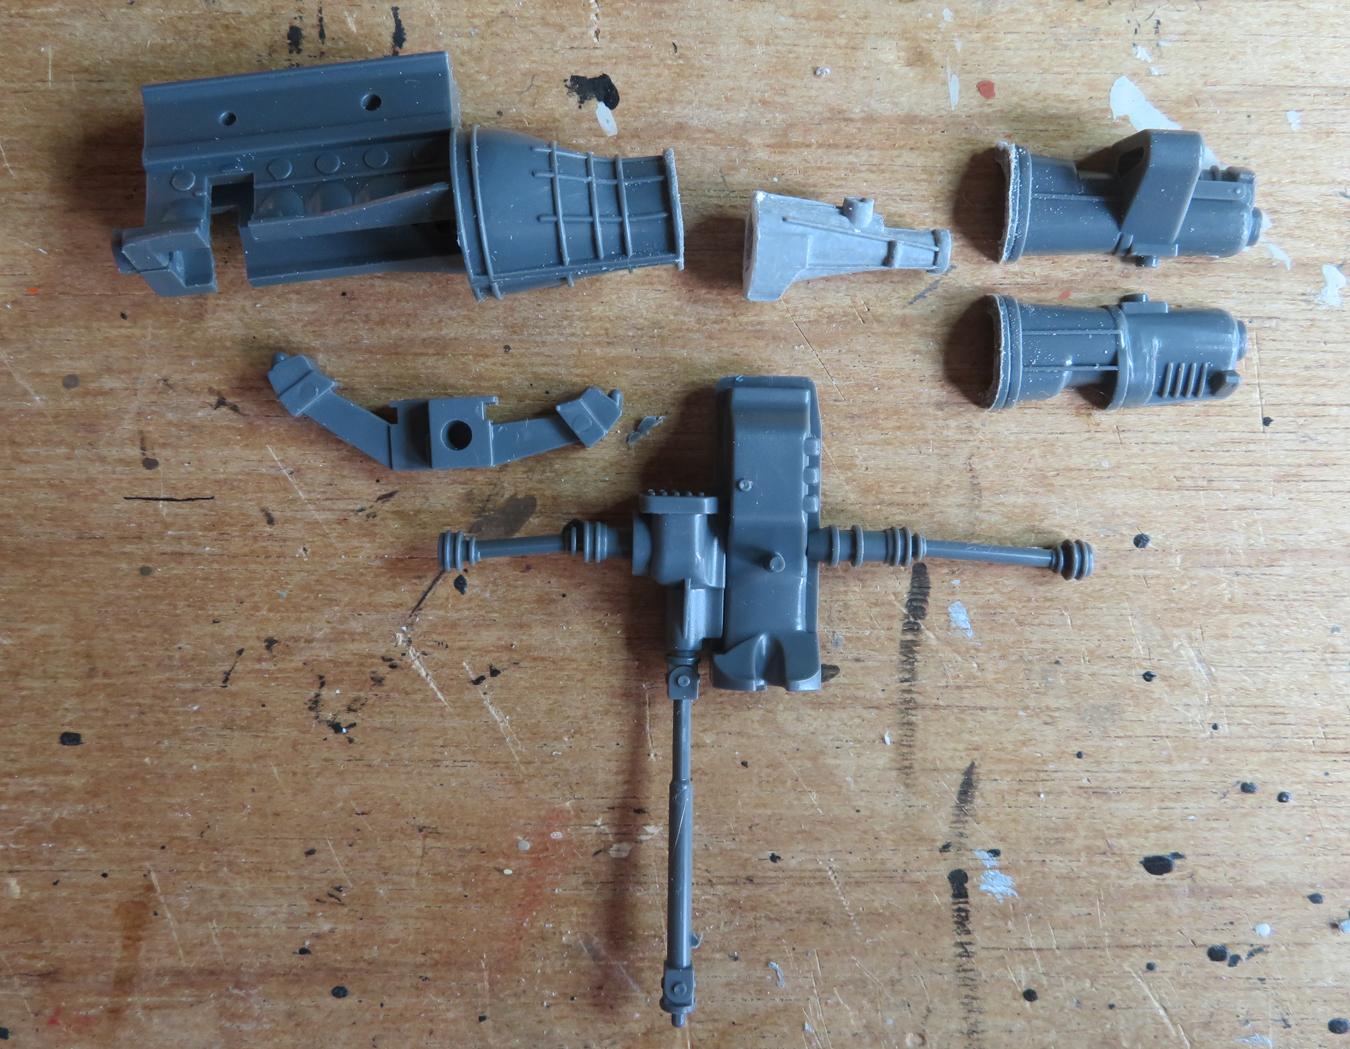
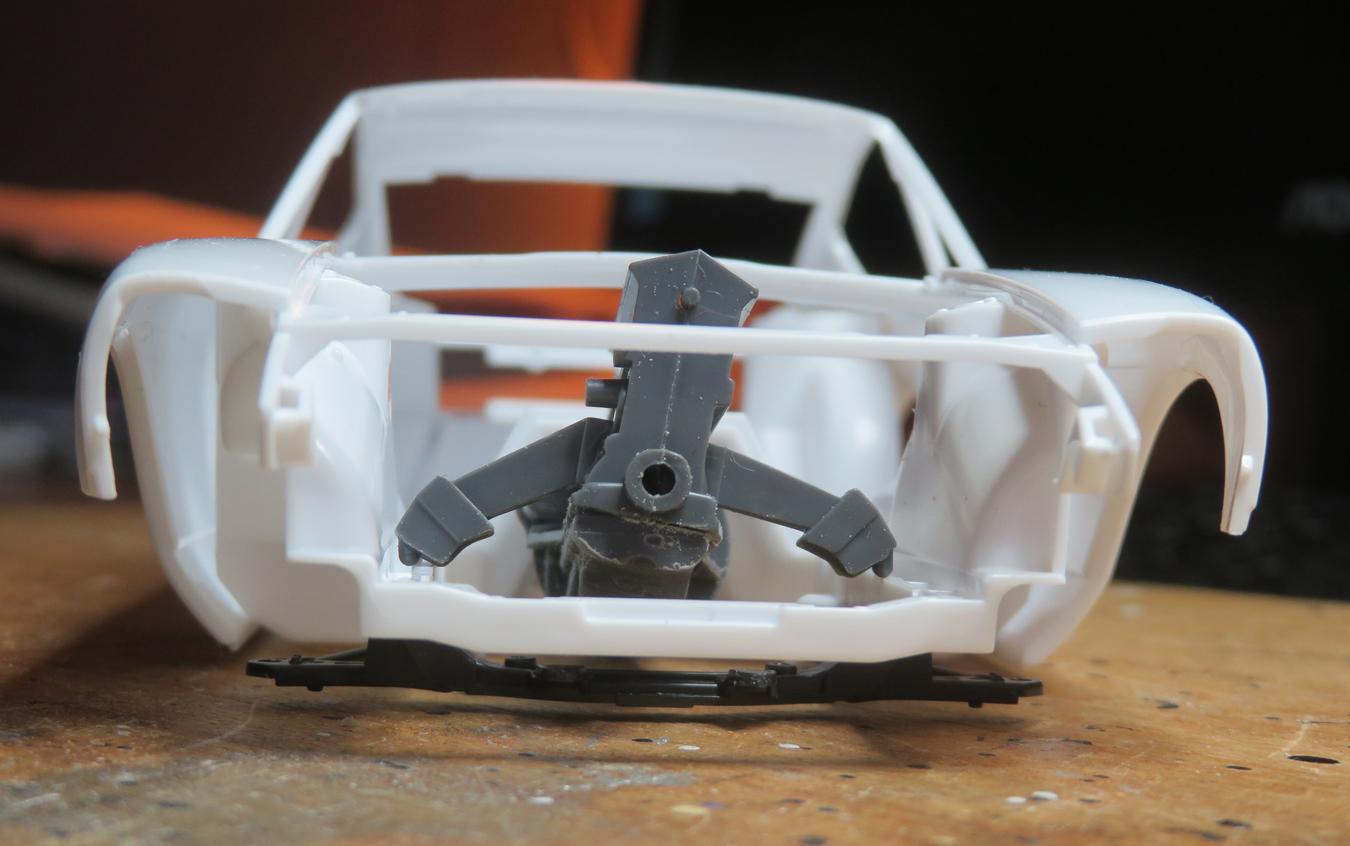
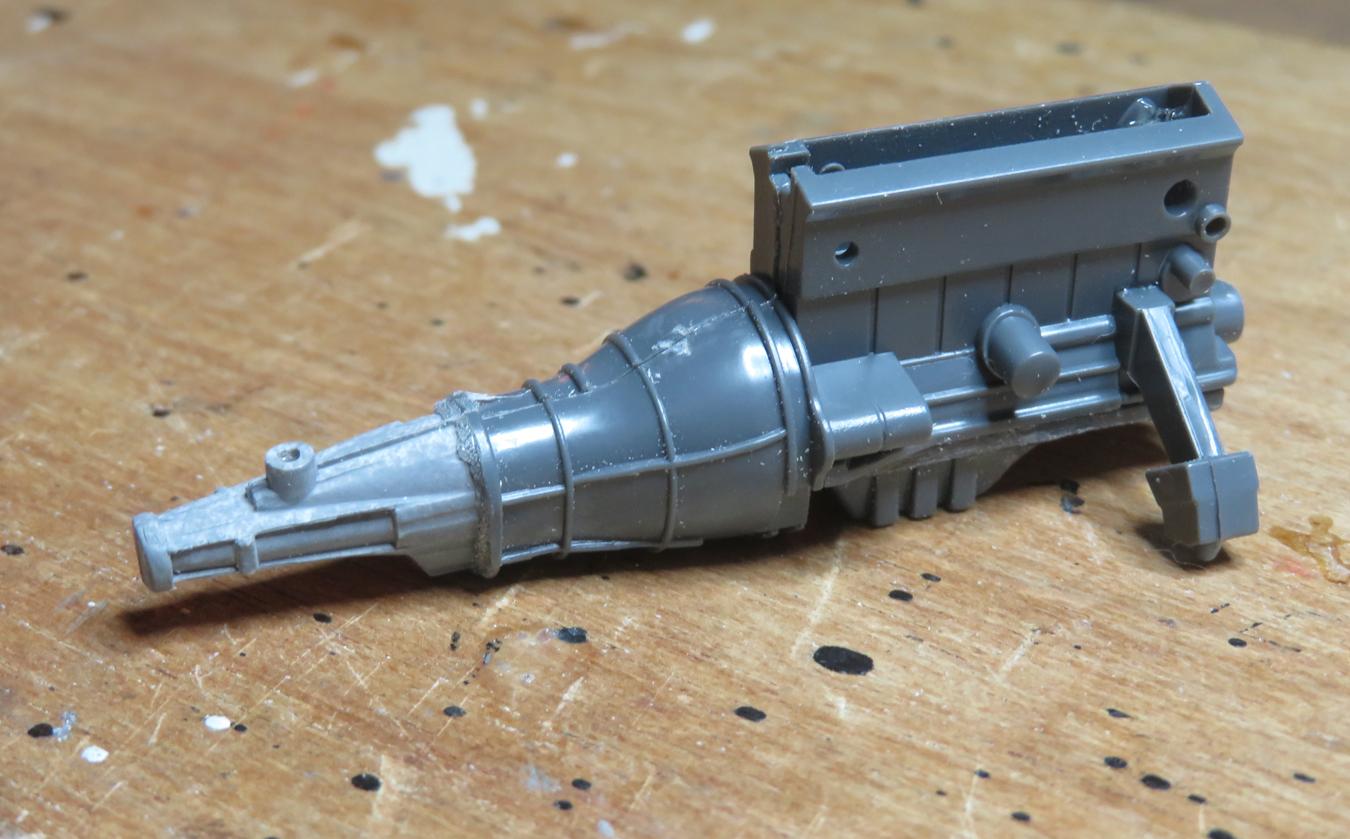
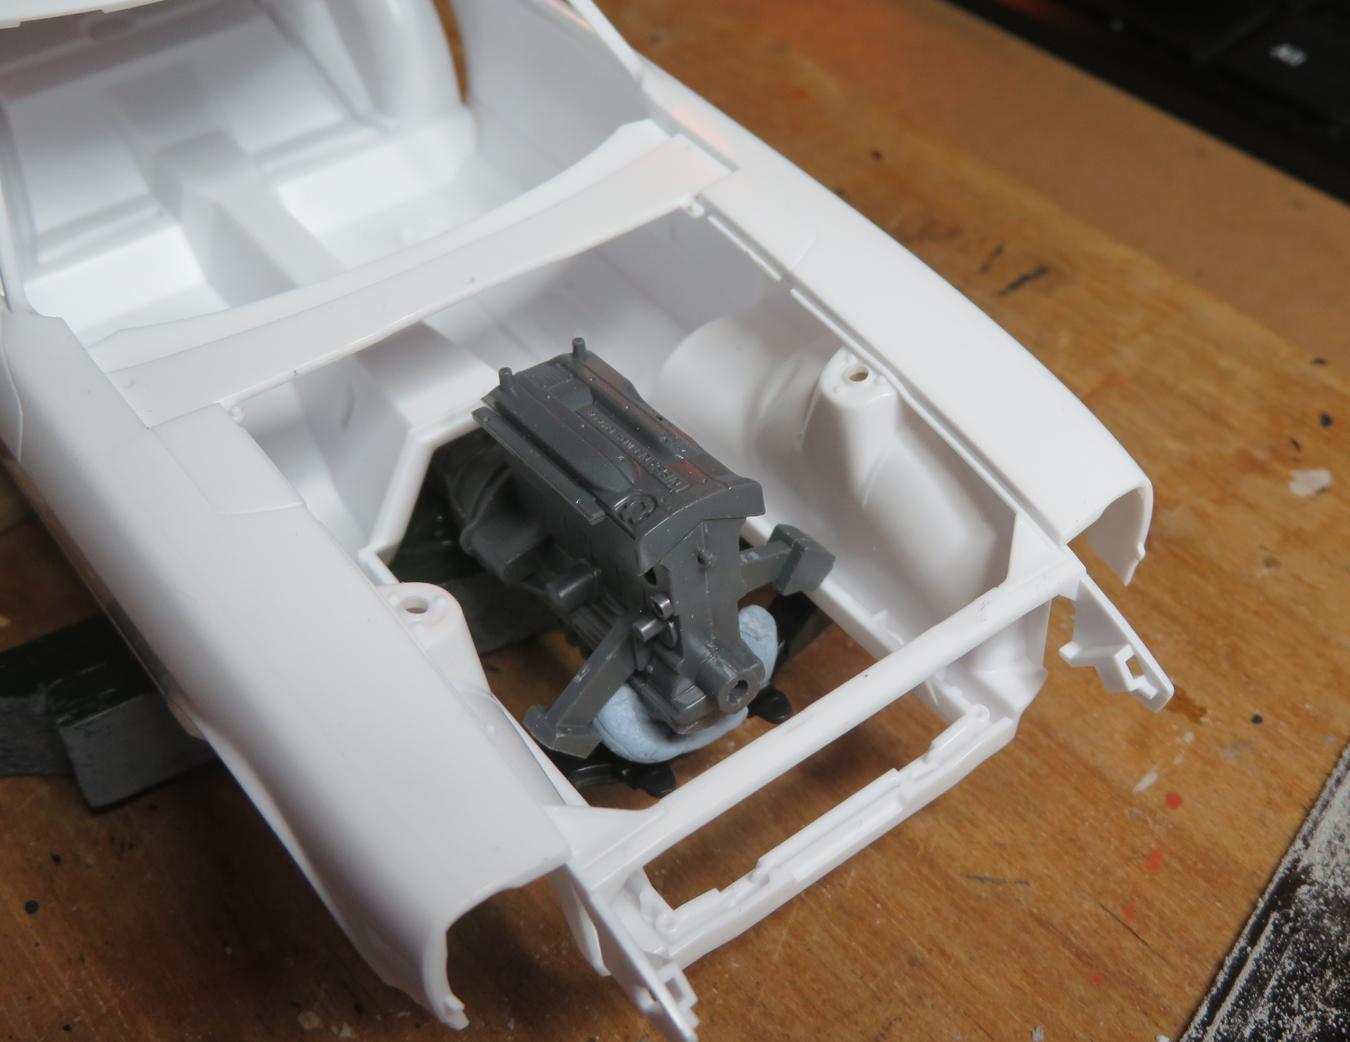
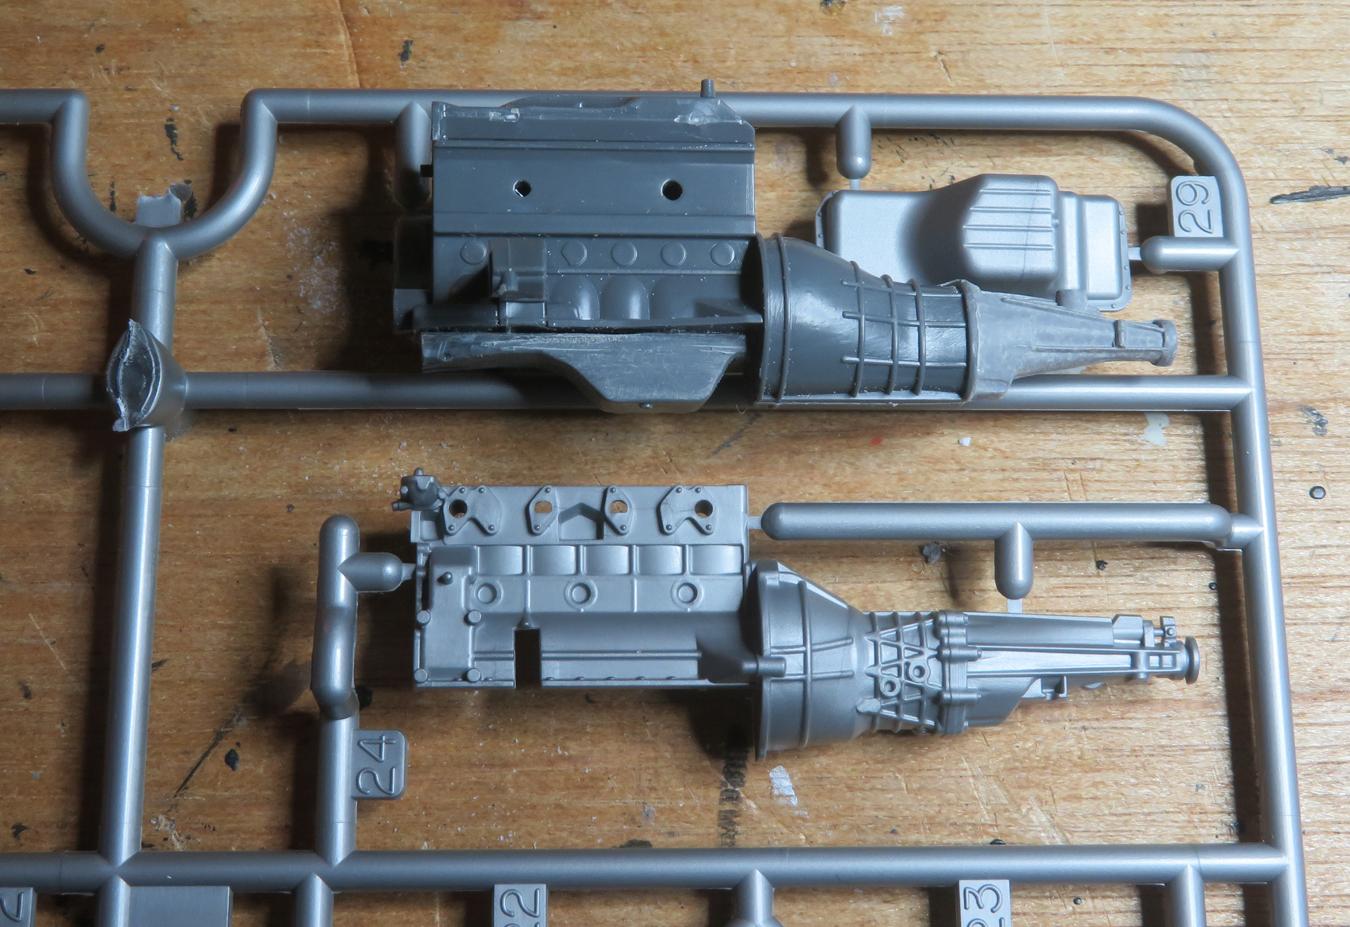
Good to see others progressing with the CBR builds, and even one or two completions! Got another build out of the way last weekend and I can now start messing about with my CBR entry, the Nissan 240ZG (Datsun 240Z with aero nose) fitted with Skyline RB26 engine. The transplant is probably the most complicated part of this build, otherwise it's 'just' a case of putting this very nicely detailed kit together and trying to do it justice. Started the day with a fresh RB26 engine: This sprue appears to be the same for road and race cars, although I think some of the latter have different turbos on other sprues. The major issue to address is that the Skyline is 4wd, so there's a transfer box, front diff and driveshafts that need to be removed. For the 'box I decided to graft the tailshaft of a Fujimi 240ZG transmission one to the back end of the original, which is in progress above. After much chopping and fettling I ended up with the arrangement on the left, compared to the standard set-up which I had in a part-built kit. The sump needed to be reversed and it still requires some tidying. It's interesting to compare the overall length of the block plus 'box with the L24 unit in the Tamiya kit - they're very close. The detail on the recent Tamiya offering is worthy of note, I look forward to using this in another project. So, how does it fit? First attempt showed that the mounts need work - the engine is slanted in the Skyline. All good underneath - the need to flip the sump pan around is obvious here. Trimming one mount did the trick in making it vertical. I'll have to fabricate something for the mount to positively attach to, and also perhaps add something between the sump and crossmember. The important thing is that the bonnet closes nicely, and there is a bit of clearance over the valve cover. Has worked out OK so far, hopefully there'll be room for the exhaust, turbos etc....
-
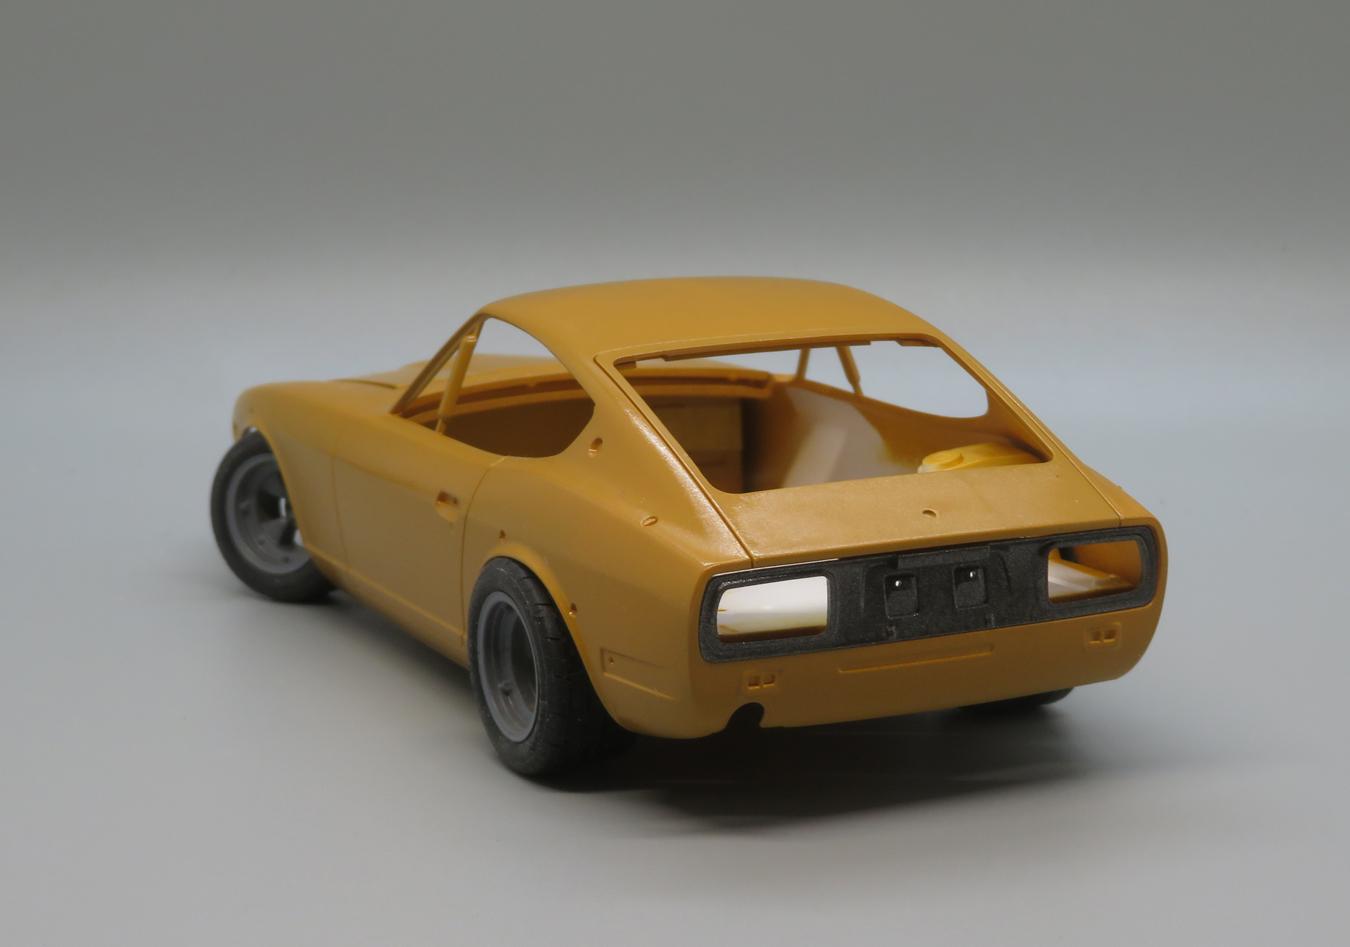
The first of my Datsun/Nissan Z builds off the bench, before I get on with the more detailed Tamiya kit. WIP thread here: Built largely OOB, with Aoshima Bilbo wheels fitted with tyres off another kit (possibly Fujimi). Suspension lowered and a lot of fettling done to get the different wheels sitting in the arches (more or less anyway). I deleted the engine and 'box, as there isn't really any other underbonnet detail and opening the bonnet up would have been a chore. Window trims done with BMF, and on the wipers and headlight fairing surrounds I used a Gundam chrome marker. Paint was where I wanted to get a little experimental, and it's certainly not a stock 1:1 colour. I used Tamiya TS-37 lavender, then their pearl clear and topped it off with my first use of Mr Hobby gloss clearcoat. After the clear was applied I then did some tedious masking and painted the moulded-in arch flares, rear panel, bumpers, spoiler etc with un-cleared Tamiya dark metallic grey. I do enough black interiors so I thought I'd have some fun this time. I used TS-59 pearl light red, finished with flat clear to tone it down. Accents were brush-painted light grey enamel, with felt used for carpeted areas - a little overscale perhaps, but it gave a bit of texture when seen through the glass or buried down in the footwells. Compare and contrast with the Monogram 280Z I built back in 2020: The Fujimi kit is probably more accurate, but it has one or two shortcomings and I'm still fond of the basic Monogram version. I'm pleased with how the paint turned out. The pearl catches natural light nicely and the Mr Hobby gave it a good shine without being too thick. I attempted to capture it here, but we're not seeing much sun at the moment: Doing this has been a good exercise in learning a bit more about the Z, which will be useful to me when I buld the more detailed Tamiya kit as my CBR entry this year. Thanks for looking.
-
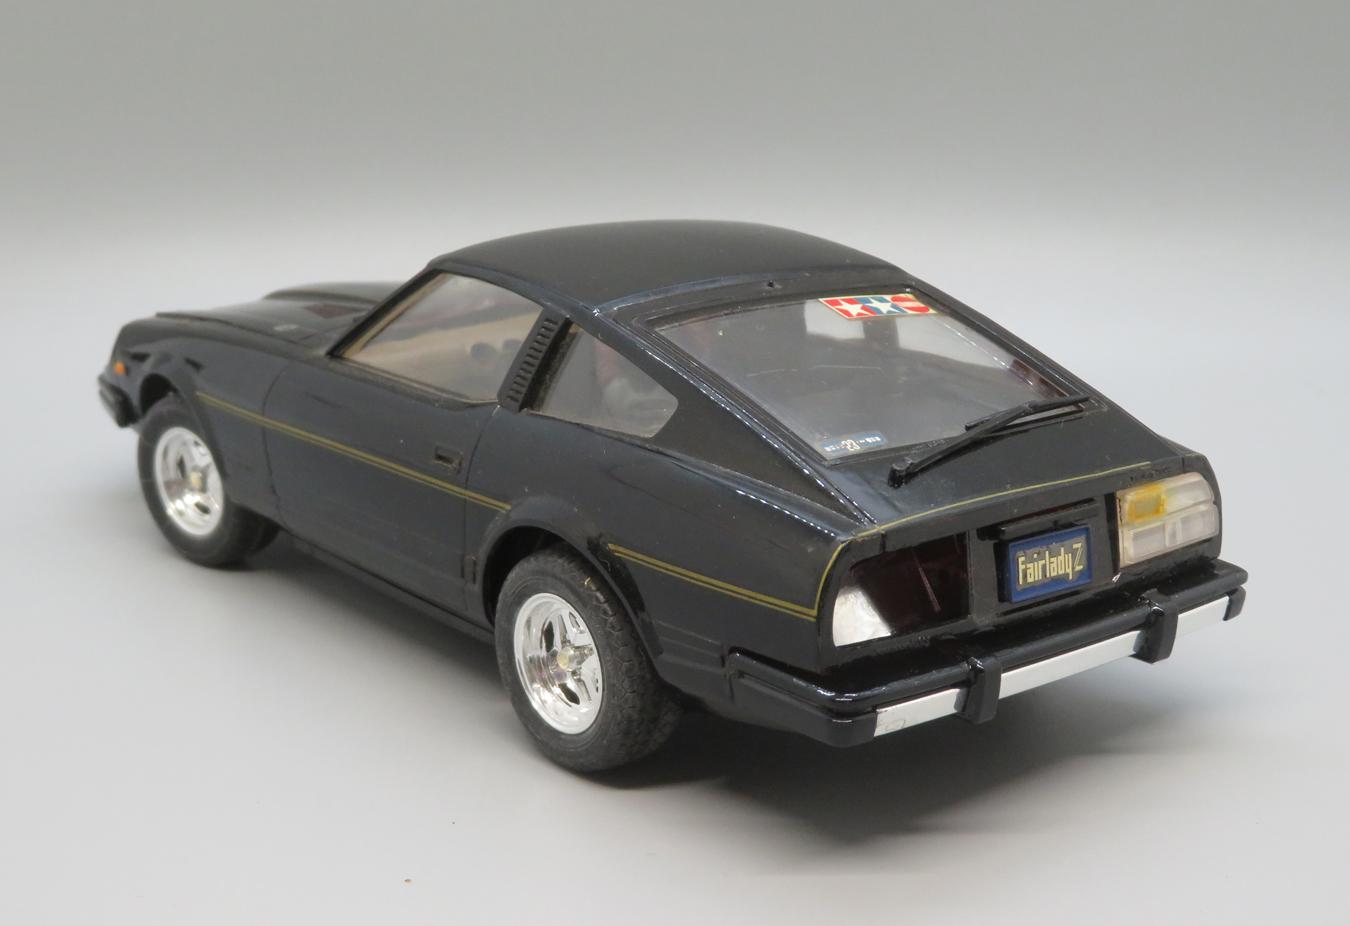
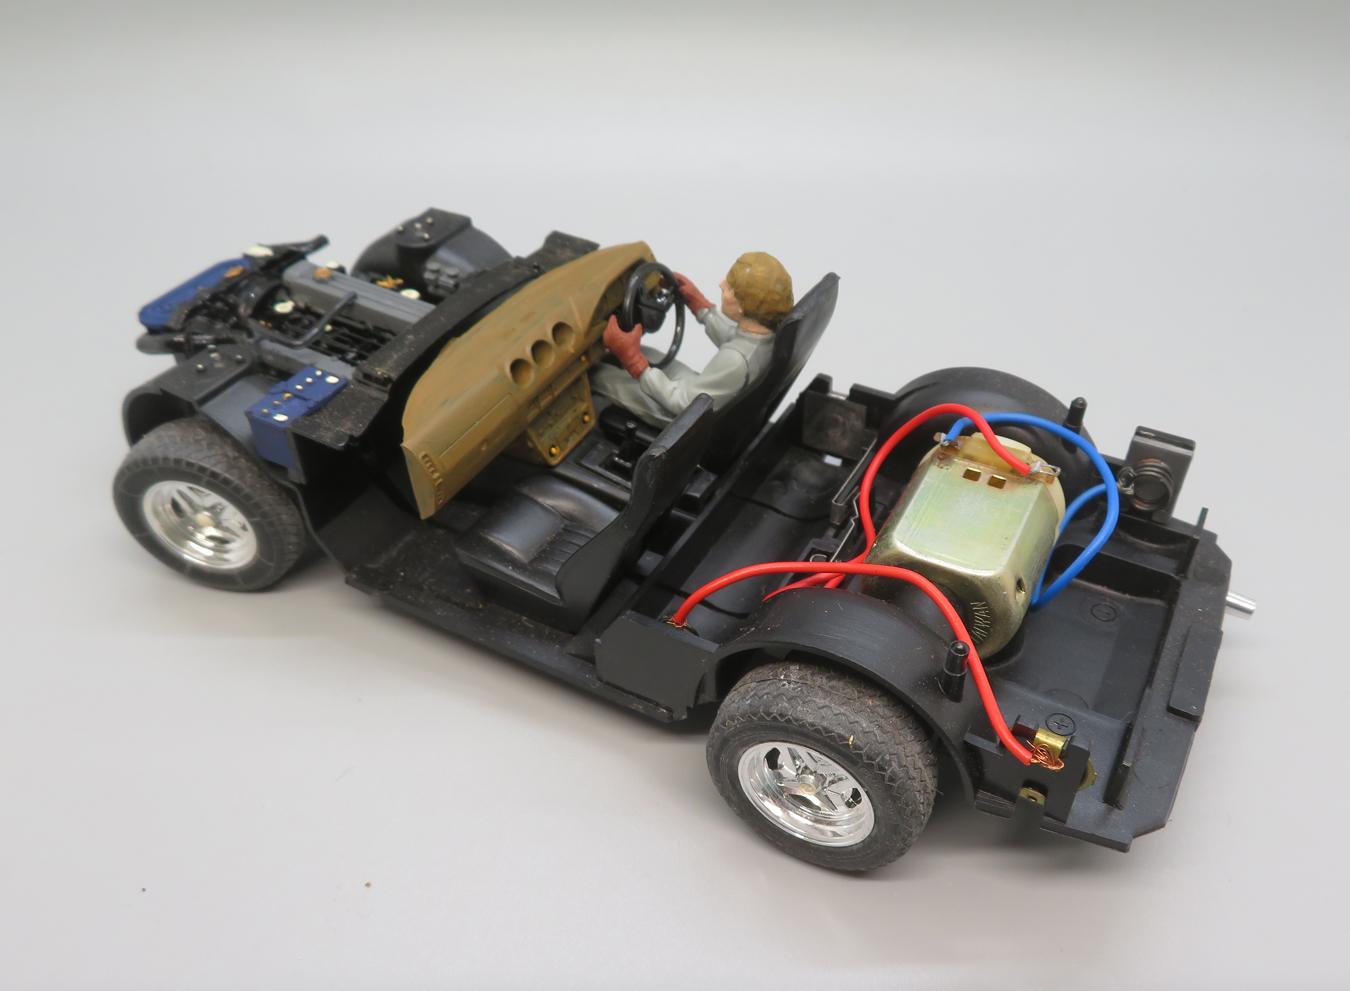
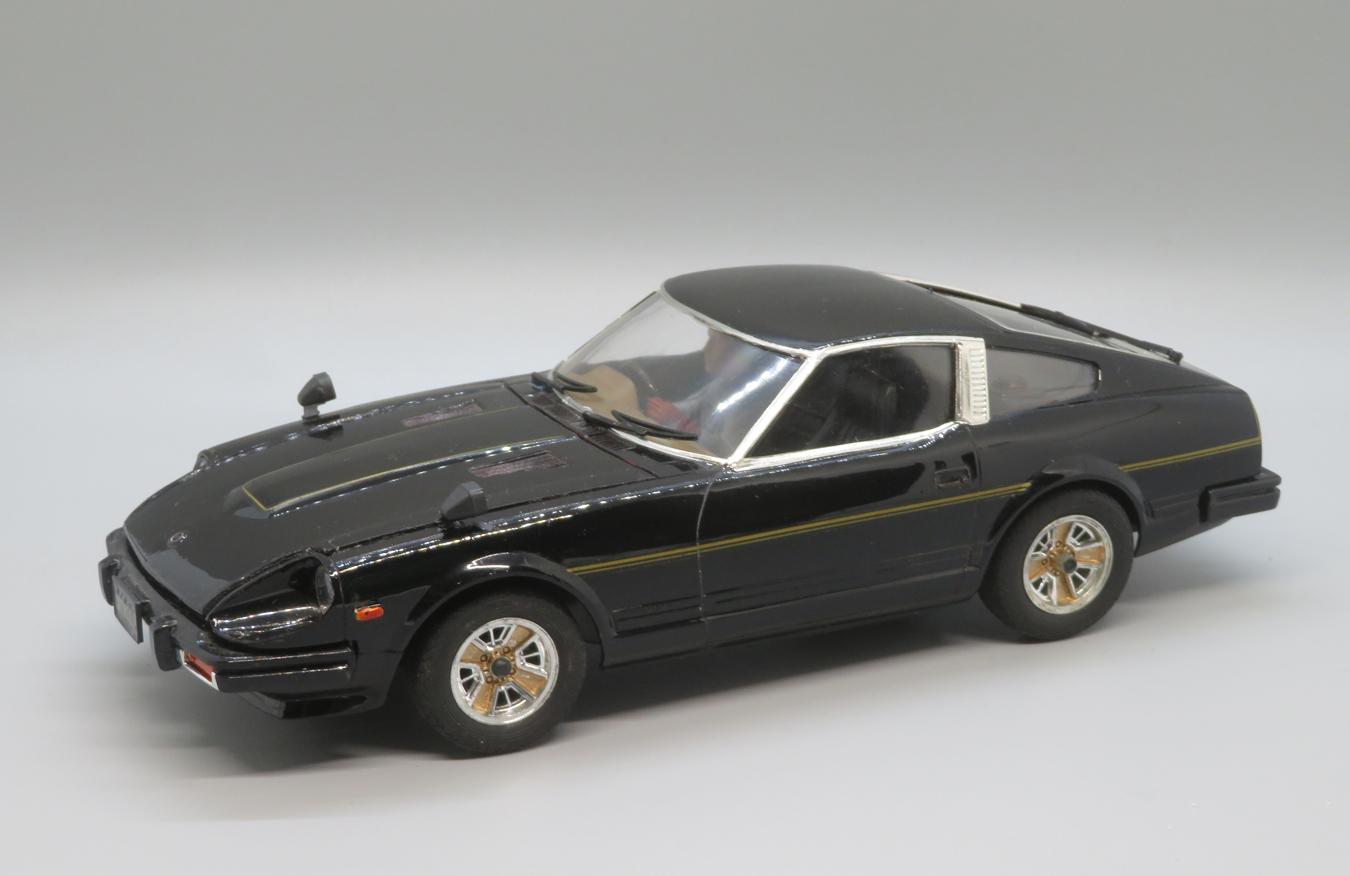
I bought this built kit off eBay recently, thinking it would be something I could strip and rebuild (eventually). As purchased: Built completely OOB, brush-painted enamel bodywork, some parts loose, but glass clear of glue. The paint was at a similar level to what I'd have been doing in the mid '80s, and it was dusty from years of display/storage. But, it was intact and I wondered if there was a chance of salvaging it and getting it on display rather sitting in a box awaiting its turn. Engine neatly done. Minimal detailing on the interior. It had been built with the motor - I popped in a couple of AA batteries, switched it on and it scooted across the garage floor with a fair turn of speed! Good job I'd set it heading for something soft.... I spent a couple of weekends on it while I was finishing off another build. I removed the body and gave it a wash and resin polish. The glass wasn't going to come out, so I worked around that. I applied BMF to the window trims, replaced the wheels and tyres with those from a different Tamiya issue of the 280ZX, located the missing rear light inside the body and painted the lenses with clear red and orange, then put it all back together. After: Applying foil with the glass in place was an interesting experience, but I manged to do it without any collateral damage. I'm pleased with how it turned out, a nice testament to the original builder. It looks good on the shelf and with the worn pinstripes it has the look of a slightly timeworn 1:1 survivor. Makes for a neat comparison with the 240ZG I completed the same day: I still have an unstarted version in the stash for when I want to build one my own way: Thanks for looking!
-
Very nice Justin. I can just imagine the delicacy of some of those components and being able to appreciate how Tamiya have engineered the kit - you've certainly done it justice.
-
Toyota Crown, Majesta. Old rebuild from 2011 modernized for 2024
Spottedlaurel replied to Lownslow's topic in Model Cars
Nice update! The boot install looks great. -
Was cheap. Looks like the chassis will fit nicely under a '69 Nova, maybe other things too.
- 38,982 replies
-
- 1
-
-
- johan
- glue bombs
- (and 1 more)
-
A fantastic build Michael, and great colour choice. I would never have believed that so little masking was required.