kjohan
-
Posts
191 -
Joined
-
Last visited
Content Type
Profiles
Forums
Events
Gallery
Everything posted by kjohan
-
John: Can only express my admiration for your beautiful builds And re discussion on a ´63 Catalina SD: such a kit is very high on my wish list (as apparently for some other forum members)
-
One never get tired of these. Nice.
-
A very confident pair The steel grey colour is very appropriate also considering your nearby huge source for that raw material
-
A most impressive and productive year. Impressed / G
-
Fred´s Ford in light frost
kjohan replied to kjohan's topic in Stock Cars (NASCAR, Super Stock, Late Model, etc.)
Thanks James for the info about the Randy Ayers forum Did not know about that, saw a lot of interesting things there already Saw also on the net a preview of a book how to build Nascar model cars Also there a lot of useful info Think I now know what the hoop is -
Fred´s Ford in light frost
kjohan replied to kjohan's topic in Stock Cars (NASCAR, Super Stock, Late Model, etc.)
1) Re James info on the Ford front structures ´65/´66: where can photos be found how it looked ? So far I have not been able to find on the net 2) Re Anton´s comment Yes, have noticed the presence of a few fellow Swedes in this forum Have actually taken the liberty to take a couple of direct contacts and recieving valuable help, both a few parts needed and info on missing facts of the actual cars Much appreciated and very nice to have this opportunity and dialogue Concerning Tradera (Swedish auction site): After a long pause taking up modelling again during the pandemi, there have been a number of visits there, perhaps a little too many... The stash have grown quite considerably. My wife looks slightly concerned ; where to put the finished products ??? Began modelling in college ca 1963, a friend there had found out how to buy directly from Auto World. In those years very little available in Swedish shops, now we got the latest releases of the newest cars (+ quite an assortment of older ones) Among my first ones were ´63 Pontiac Bonneville, ´64 Corvette Coupe´, ´64 Falcon Futura Sprint Monte C rally car And the first generation of the AMT kit of the Cobra In 2014 we sold our house, hence needed to "reduce inventory" and sold a few of the surviving models. To my surprise, the Corvette I built in ´64 and sold 50 years later, appeared for sale at Tradera last autumn, from what I could see completely intact as I once built it Concerning the Cobra, that was also sold in 2014. Two years ago, I bought and built a newer generation of the kit. Was rather disappointed ; compared to what I remembered from the original kit , the newer one had "degraded" in several aspects. But, late this autumn, on this Tradera-site came up a kit from the very first generation. And I could by it. Look very much forward to build that, hopefully it meets my memories (though the decals probably may be brittle, the kit is OLD now) But first I have to build/ finish a couple of pre-war Fords and a MiniCooper; for children and grandchildren; thus also in a way transferring the space problem -
Thank you all for kind words on my little Ford With best wishes for a good modelling year 2022 Gunnar
-
Fred´s Ford in light frost
kjohan replied to kjohan's topic in Stock Cars (NASCAR, Super Stock, Late Model, etc.)
Thanks James for interesting info on the "hybrid" Galaxie/ Fairlane Question(s): When did the "tube front end structures" come into use in the NASCAR cars ? I have impression the cars in the late ´60s hade that kind of structure So : what kind of front structure did the´65 and ´66 cars have? The standard type made from pressed steel sheet metal? Or tubes ? To build a ´66 "hybrid" car is certainly an intriguing idea Hmmmm ..... -
Thanks for kind comments A little more info I forgot to mention The kit is the AMT The moulded colour, which I used unpainted/just polished, is a light grey The actual Ford colour was called Cordoba Grey, a shade more yellow compared to this Ford offered, as I understand it, two reds as trim & rim colours during the course of 1934; a rather bright Vermillion red and a darker, more brown Aurora red. The Humbrol no 20 I used seems to be a compromise somewhere in between Before the introduction of the reds, the trim & rim colours available were Tacoma Cream, Cordoba grey and Silver Grey Concerning latitudes and late sunrise/early sunset: we are at a latitude corresponding to 400 km south of Anchorage
-
Tomorrow is the shortest day, the sun raises at 9 : 01, sets at 15 : 24 But thereafter we go in the right direction again.The photos were taken ca 11 : 10 today Perhaps not the best fit of the rear end of the hood despite some sanding and other adjustments, otherwise a quite nice kit Box stock with addition of a few cables and fuel lines Roof and running boards . Humbrol dark (anthracite) grey no 32, matt (thought this was better than the black, too hard contrast) Exterior otherwise unpainted, just polished the plastic, the inside painted with light grey to avoid "shine through" The rims and decor line : Humbrol crimsom red no 20 The interior/ upholstery : home made mix matt beige and light grey to simulate the mohair + a little dark wash "in the creases" BMF on the lock handles and cranks The instrument panel and a moulding below the side windows should be walnut ; the matt Humbrol no 73, here and there a little diluted to make it lighter, + clear gloss worked rather well. The engine : home made mix of satin green and grey + dark wash Unfortunately some dust on the windows, sorry Thanks for looking

-
Thanks Rex, JC and William for comments and nice photos The 427 engine photos were very instructive for future builds
-
Fred´s Ford in light frost
kjohan replied to kjohan's topic in Stock Cars (NASCAR, Super Stock, Late Model, etc.)
Second thoughts coming: What was the reason to put the larger Galaxie front end clip on the presumably smaller Fairlane in -66 ? And how was that accomplished ? Assume the Fairlane dimensions (narrower) were intact from the fire wall and rearwards, but what about the difference in width in front of the firewall ? Guess some "transitional modifications" could be done on the front structure to get the fenders in the right position. If the front bumper from the Galaxie was a little to wide probably did not matter so much But the hood and the grille ? -
Fred´s Ford in light frost
kjohan replied to kjohan's topic in Stock Cars (NASCAR, Super Stock, Late Model, etc.)
The -66 Fairlane having a Galaxie front end was interesting and new info for me, had not seen that before. Explains why i have had difficulties to understand/ differentiate which -66 car was a Galaxie, which one was a Fairlane. Hence my obviously erratic comment on John´s photo above. Sorry for that John and thanks for your fine photo and kind words Also thanks Misha for your help with clarification / Gunnar -
Fred´s Ford in light frost
kjohan replied to kjohan's topic in Stock Cars (NASCAR, Super Stock, Late Model, etc.)
Three more comments 1) When I "trawled" on the net for information before building my model, I also got the impression , that, in -65, more than one Galaxie was used, perhaps two or three (?) 2) Thanks for encouraging comments from all of you 3) Like the NASCAR-cars from this era. Very expressive also in thetable-top scale, and still with stong connection to the actual stock cars Imagine these large cars crusing at 150 mph, a couple of years later considerably faster. -
Fred´s Ford in light frost
kjohan replied to kjohan's topic in Stock Cars (NASCAR, Super Stock, Late Model, etc.)
I think this might be the intermediate sized Fairlane, driven in -66, perhaps also in -67, the kit I built was the full-size -65 Galaxie. If I have understood it correctly, they in -66 also used a Galaxie, which actually had the engine, frame, chassis transferred from the -65 car. The reason for the swap of only the body/ maintaing the underpinnings, was perhaps that Ford wanted to have the newest body visible on the tracks. But this is (somewhat uncertain) understanding from me, sitting very remotely from the actual centre of action and knowledge. Perhaps other forum members can bring further clarity/understanding ? -
Fred´s Ford in light frost
kjohan replied to kjohan's topic in Stock Cars (NASCAR, Super Stock, Late Model, etc.)
forgot to mention it is the AMT kit of the Galaxie -65 / Gunnar -
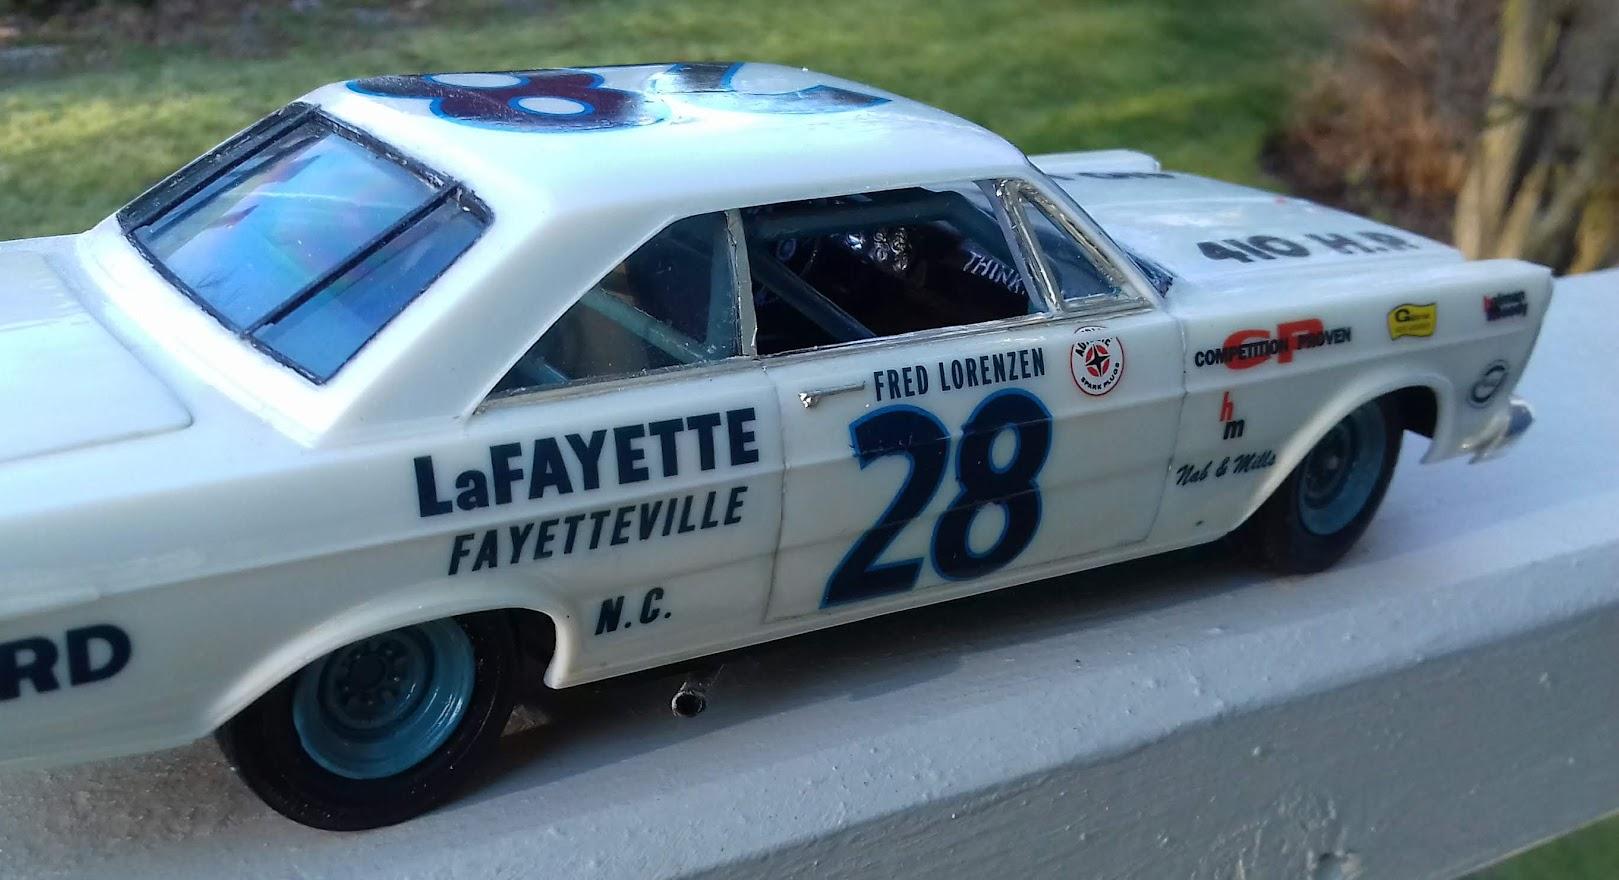
Slightly frosty morning today Photos of one of my first builds during the pandemi Finish not the best but nice kit, only real problem was the large decals were prone to cracking, particularily "28" on the roof Additions to the box kit - a little exterior foiling. actually my first try with foiling, obviously not very good but anyway it´s there now - some cabling in the engine bay - battery with cables moved to the right side of trunk - fuel filler cap added and filler pipe in the luggage compartment to the tank - cut away the moulded exhausts/mufflers ( hence the underside a little grubby) - seat belts of own manufacture - in the kit there was a fairly long/large part with a number of instuments according to instructions an accessory thing cut away the area around the regular instruments and inserted this part, fitted well gave at least a better rendition of a NASCAR panel. - "THINK ! W.H.M.?" on the right side of the instrument panel
-
Just Fantastic/ Gunnar
-
Thank you Bill so much for your efforts and information to clarify this / Gunnar
-
Thanks Bill, very kind, If problems I post a photo of the part
-
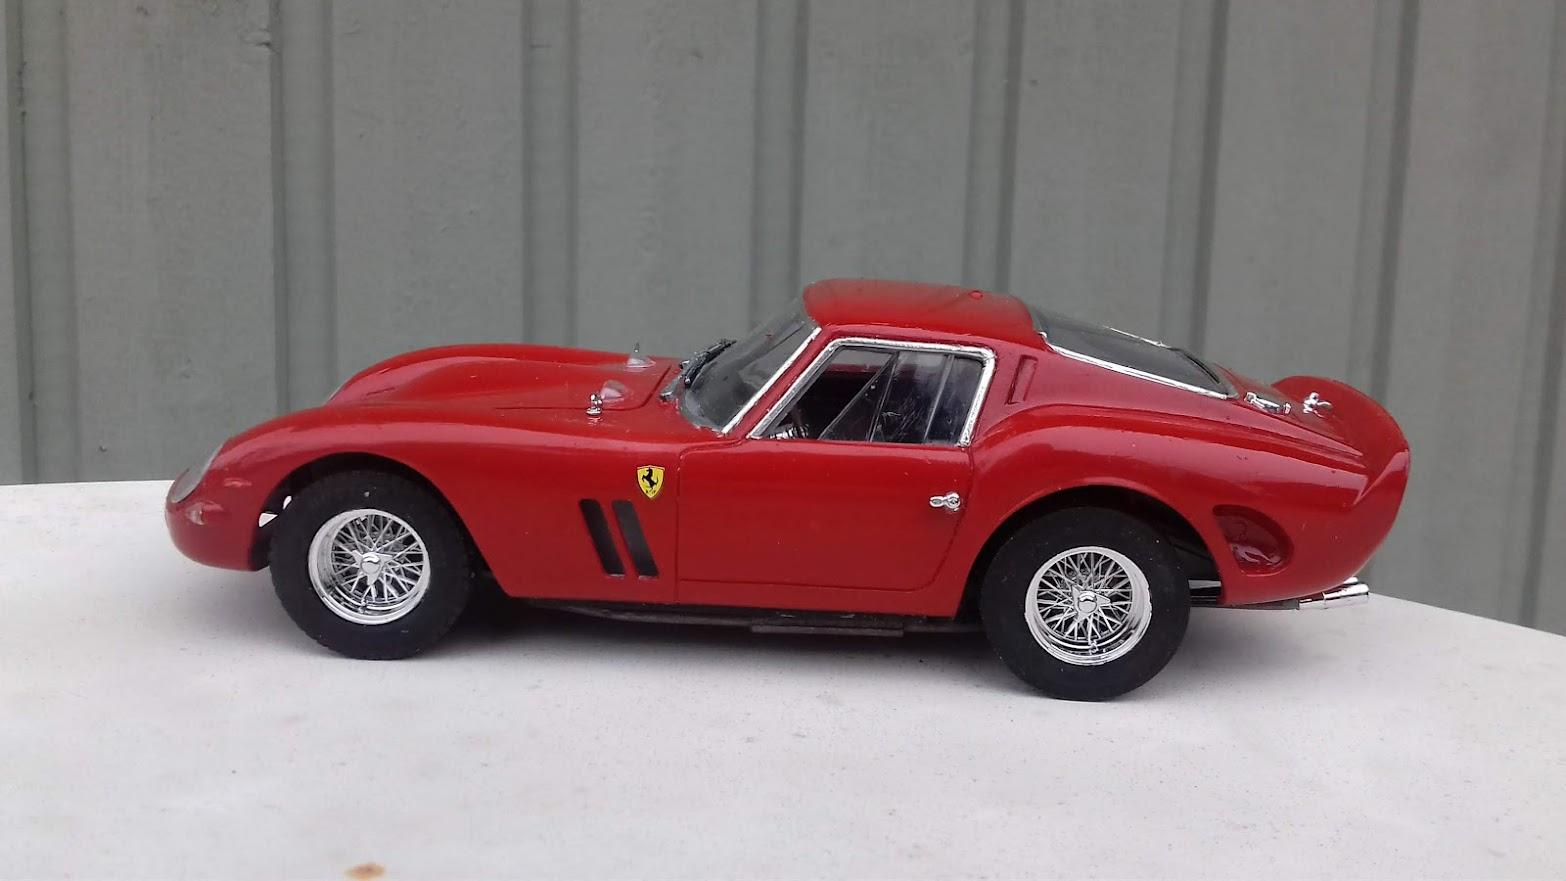
Thanks all for encouraging comments I googled the registration number on the decal included in the kit, Mo 19 553. What I found: This number sat and still sits on a GTO with chassis no 4399,originally a series 1 car with right-hand drive. It was originally purchased and campaigned by well-known British enthusiast Col. Ronnie Hoare. When the series 2 bodies were available in 1964, this was one of the four series 1 cars which were rebodied with the new body. This serie2- body remains on the original chassis. After a couple of decades a recreation of the original car was apparently built, reportedly to be based on a 330 GT 2+2.
-
Thanks Bill for a most comprehensive answer Firstly that clarifies for me, that IF a remote oilfilter is used, which as I understand it, was most commonly used system on the Cobra 427 racing S/C, then there shall be no filter "down below" near the sump. What remains for me to understand is whether the seemingly very shallow sumps included in the Revellogram kits, are they correct for "wet sump cars/engines" ? Or are the included sumps actually for a dry sump system ? Looking at the fine photo provided, the sump on that engine is rather "wide and shallow" , and this depicts a wet sump engine as i understand it. If so, the sumps/ parts provided in the Revellogram kits are actually (fairly at least) correct for a "wet sump car". Correctly understood ?
-
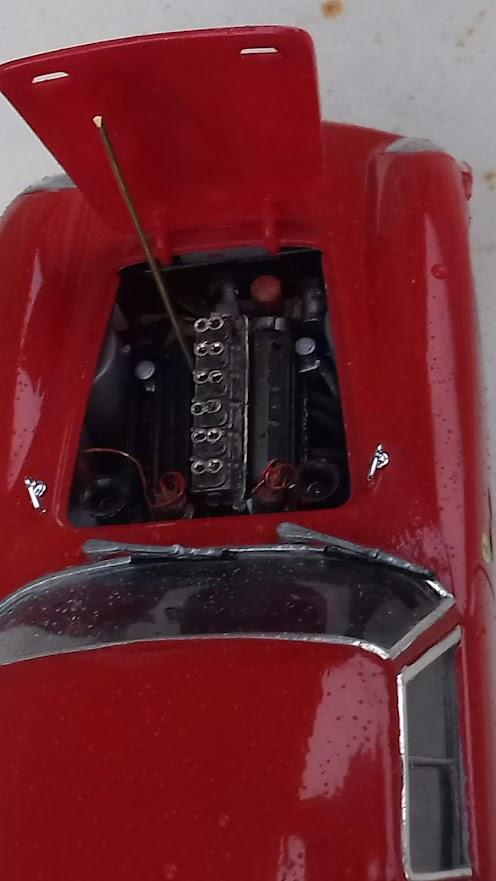
My attempt on a GTO There was a slight drizzle when I photoed but why not...The light was not the best = the engine bay is (too) dark To make the12 ingintion cables from the distributors to the "flutes", another 12 coming out of the flutes +plugs + dual ignition coils with their cables, required patience. It is an Italeri kit. Box std with the exception of: - the cables mentioned above The flutes came a bit too low, making the engine in total a little too wide, hence slight interference with left foot well Some sanding on the foot weell wall solved that - an incoming fuel line, a "feeder pipe" along the carburettors, and another line coming out of the front end of the pipe , going down to a fuel filter on the low left of the engine - made three short, straight ventilation "chimneys" on the top center of the instrument panel - BMF on the exterior The kit came together nicely with two major exceptions: - There was interence between the windscreen and the instrument cluster, making the body sit too high on the chassis = sanding on the cluster required. As the location of the cluster/ instrument panel is clearly defined as well as the side panels to the chassis and the glass to the body, there might be a dimensional problem For those intending to build this kit: Lower the IP / cluster by ca 1 mm in their locations in the respective side panels BEFORE gluing the IP/cluster assy into the side panels - There was also interference between the large luggage compartment paritition and the lower lonitudinal edges of the rear glass as well as to the longitudinal body crease above the fender Required extensive sanding of the upper rear cuntours of the paritition For those intending to build this kit: it is better to lower the partition by removing material, ca 1 - 1,5 mm along the lower contour of the paritition BEFORE gluing it into position on the interior In general i think it is good to make provisions on the various inner panels to allow the body to come down properly, should it be too low, it is easy to add back a few spacers The body on my build still sits a little too high but now it is at least reasonable, difficult to correct further when everything is into place The exterior colour is Humbrol Ferrari Red no 220
-
In my attempts to build Cobra 427 S/C I got stuck on the question of oil pans and ask here with help for clarifications 1) The Revellogram Cobra in its five iterations/ four kits ( The "blue one" intended to depict the CSX3002, The white Essex Wire CSX 3009 , The combined Feinstein CSX3009 and Keck 3008, and finally the black Baldwin-Motion Cobra drag car), all have a very thin oil pan, which I interpret as a pan used for dry sump lubrication, though the only one of these cars to have this system was the CSX3002 (though the kit lacks the fender-mounted tank/filler etc needed for the dry-sump system) Is this a correct understanding from me concerning what the "thin pan" is ? 2) If so, the kits of the other cars (= the CSX 3008 ,CSX3009 and the Baldwin-Motion cars) all being "wet sump cars", really should have a conventional pan with a "tray" ? 3) I have understood that the"wet sump" Ford 427s had an oil filter built into the oil pan. Correct ? 4)Now , the Cobra 427 S/C (most of them at least) have a "device" attached to the front of the left cylinder head, close to the upper radiator hose/tube. This device is, as I understand it, a combined oil filler AND filter (There are hoses going to /from the device both to the oil cooler in the front, as well as down to an adapter/ inlet on the low left side of the engine block) Correct ? If so, do the cars, having this "device", ALSO have the oil filter built into the pan ? Or, in those cars, is this pan-mounted filter omitted ? Sounds logical, why having two filters ? = the pan-mounted filter, in that case, is used for cars/engines WITHOUT this "device" ? Appreciate all info/help/ clarifications Gunnar
-
Humbrol Brunswick Green 03 mix with a ligh/(medium grey + thereafter some wash of Tamiya Black Panel Accent