mattg
-
Posts
37 -
Joined
-
Last visited
Content Type
Profiles
Forums
Events
Gallery
Everything posted by mattg
-

Revell '32 Ford 5 window coupe with some modifications
mattg replied to mattg's topic in WIP: Model Cars
The chassis extension is done so far. A final round of filling and smoothing will be necessary before I transplant the engine mount of the donor kit.
-
Revell '32 Ford 5 window coupe with some modifications
mattg replied to mattg's topic in WIP: Model Cars
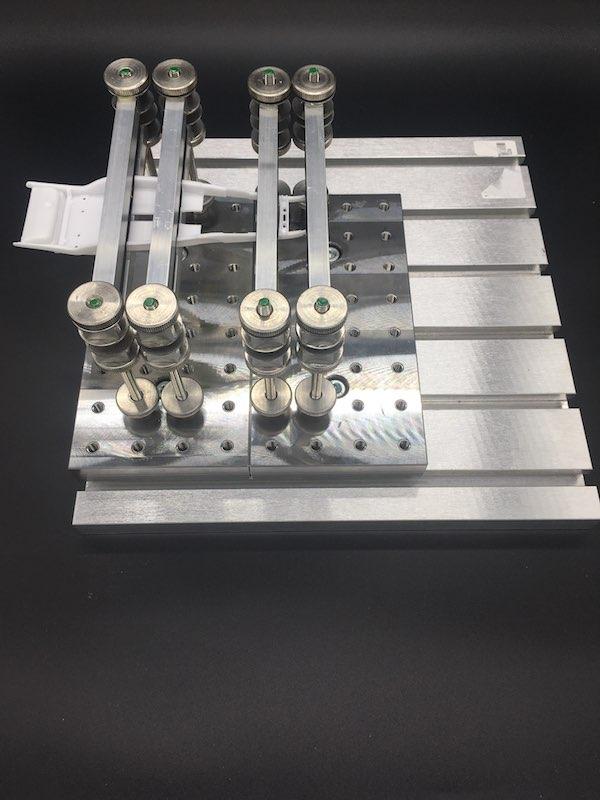
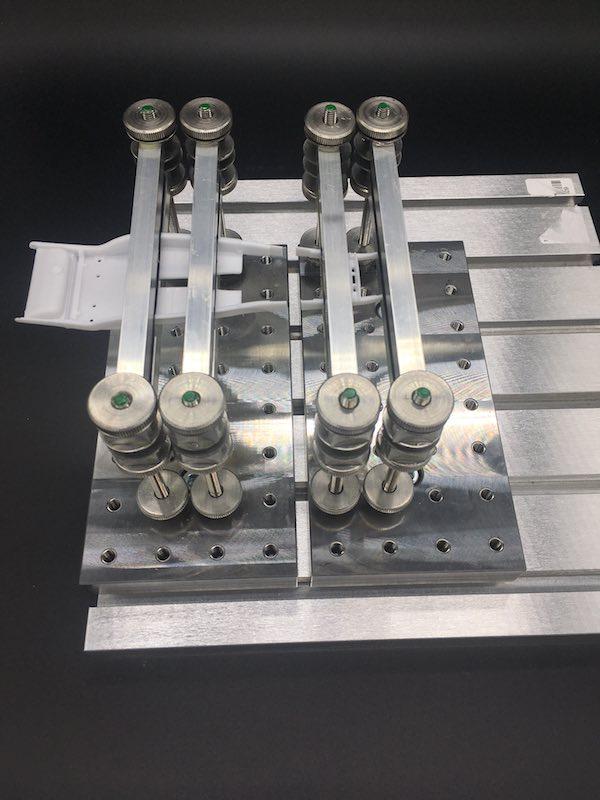
It's not really a high precision jig, but it definitely helped. 🙂 I normally use it to fix larger sub-assemblies, bodies or even fully built models in various positions when I need to attach small parts or decals to them. This way they can't move and I habe both hands free. The clamping jaws are just some spare aluminum square rods, washers and a layer of foam rubber glued together. They are adjusted with knurled nuts on threaded rods. -
Revell '32 Ford 5 window coupe with some modifications
mattg replied to mattg's topic in WIP: Model Cars
Today I started with the frame extension. Luckily, I did a second measurement and it turned out that only 6 scale inches were needed.🙂 First action was to remove the engine mounts, as I can't use them with the new engine anyway. Then I filed a groove on both sides to provide a larger glueing surface for the extension piece. The chassis then went on the model car straightening bench to keep both sides in alignment after the extension, and to not alter the stance. After clamping it up, I made the cut, moved the front section forward and inserted a piece of 1mm thick sheet into both recesses. I'll let that dry thoroughly before filling the gap on the other sides with another piece of styrene.
-
Revell '32 Ford 5 window coupe with some modifications
mattg replied to mattg's topic in WIP: Model Cars
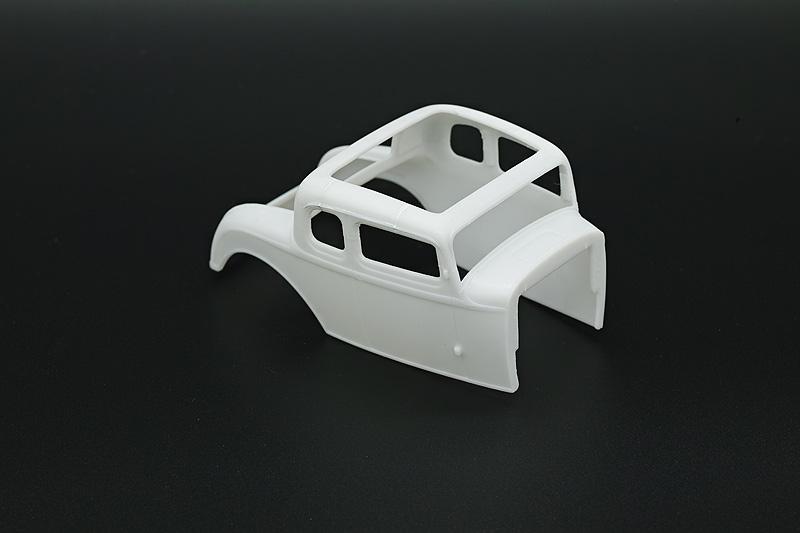
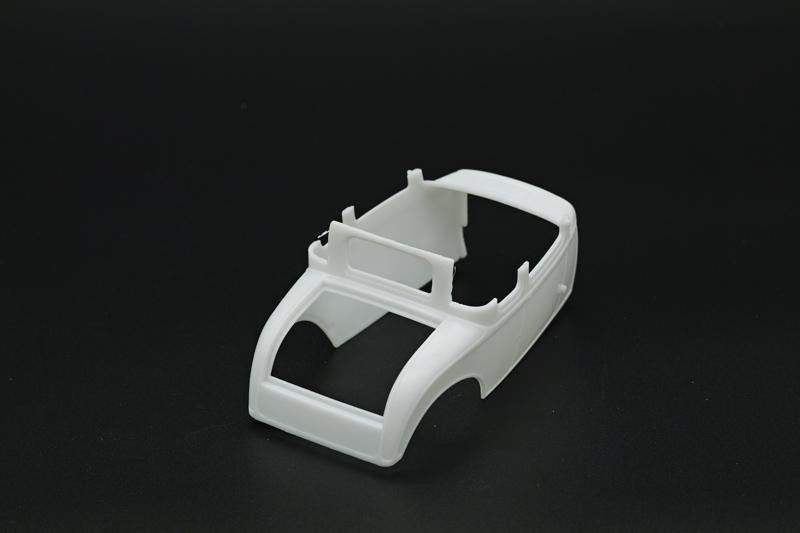
I made a bit of progress on the body. Cut the roof apart, glued everything back in place, rough-fit the rear window in the cutout and filled the gaps with some styrene. Then a first rough round of filling and sanding was done, several more to come, I'm sure... I also quickly threw together one of the Revell stock engines and the straight six that I', planning to use. Turns out that I need to extend the frame by about 7 to 8 scale inches, but I think I'll go with 8 to be on the safe side. And a quick comparison of the stock body and the current status:
-
Revell '32 Ford 5 window coupe with some modifications
mattg replied to mattg's topic in WIP: Model Cars
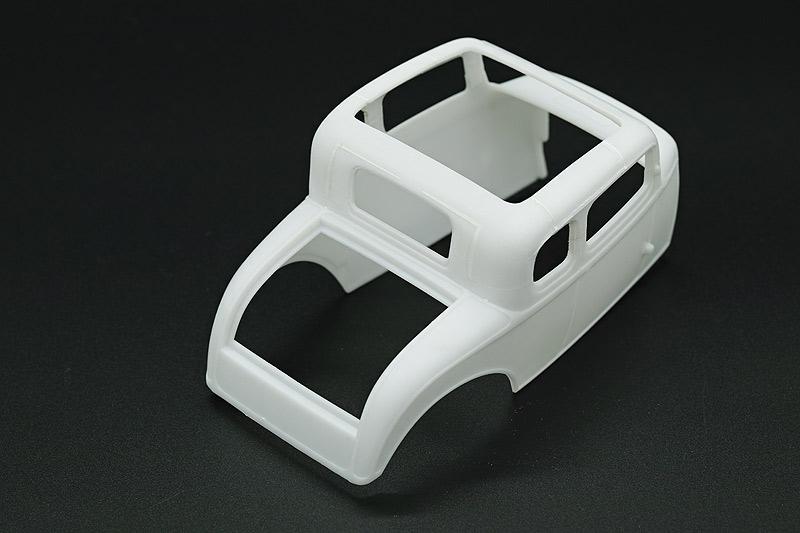
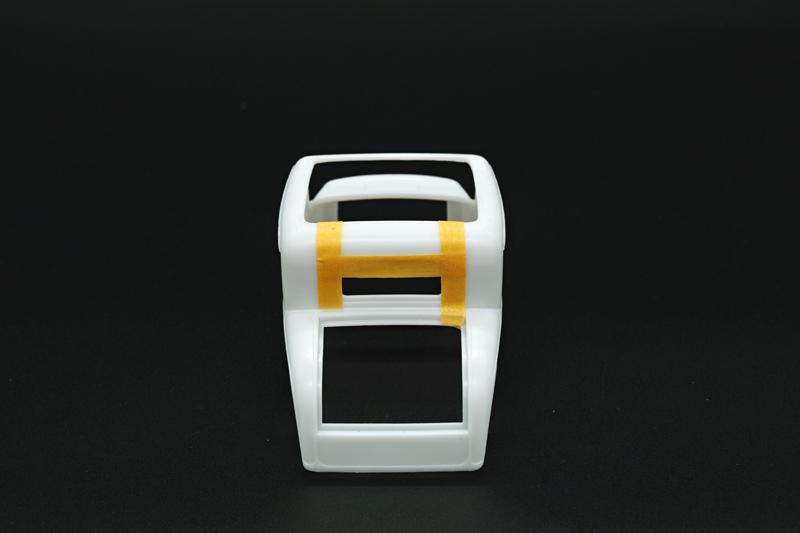
Today was chop day. I first marked the cuts around the rear window with masking tape, in order to be able to see how far I needed to cut the C pillars. I then did the C pillar cuts first, using a JLC razor saw with two blades and the spacer attachment adjusted to 3mm, which should correspond to about 3 scale inches in 1/25. After that was done, I worked my way around the rear window, again using the dull side of a scalpel blade. The A and B pillar cuts were quickly done, as I could just use the razor saw. I don't want to angle the A pillars back, so I'll need to extend the roof a bit. But this (and shaping it all back together) will be subject of the next sessions...
-
Revell '32 Ford 5 window coupe with some modifications
mattg replied to mattg's topic in WIP: Model Cars
Its Robbie the rabbit from the Silent Hill franchise: https://silenthill.fandom.com/wiki/Robbie_the_Rabbit -
Revell '32 Ford 5 window coupe with some modifications
mattg replied to mattg's topic in WIP: Model Cars
Thanks guys! It's from a German company called Bayha. They produce several grip styles, I think I have all but the longest one. https://www.bayha-skalpelle.de/produkte/griffe -
This is going to be a long project with slow progress because my time to spare on the hobby is quite limited since our kids were born in 2017... Anyway, here is what I'm planing to do: - A 3 scale inches chop. Not exciting for most of you, I'm sure, but it will be my first "chop job". I want to maintain the height of the rear window (or at least reduce it's height to a lesser extent), so it'll be a bit more involved than just making straight cuts all around. - Maybe channeling, but I'll make my decision about that later on. - Kitbashing a straight six engine into the Deuce, which will probably require a chassis extension and a scratch built hood (If I'm going to add one). - Cutting out the vinyl top section to add a folding sunroof (in the opened position). Everything else will most likely remain box-stock. Maybe I'll decide on aftermarket or kitbash wheels and tires, but that's about it. I thought it might be better to make the top cutout first (al least before the chop), when the body still has it's full stability. Also, I might have more likely broken or bent the A or B pillars if I had done this after the chop. So, using the dull side of a #11 blade, I carefully scraped my way along the inside of the rim, which fortunately acts as a nice guide for the blade. Just like when scraping panel lines, I always take my time with this kind of work, moving the blade slow but steady with little pressure. At the end I was rewarded with a nice clean cutout that required just a little bit of sanding to smooth the edges.
-
IIRC with Invision Community it's basically the same as being "invisible" in other forum software. However, the option to log in anonymously/invisible seems to be disabled for normal users here, so I guess only mods and admins are able to use that option.
-
You can get gears in countless sizes and variations by searching Ebay for watchmaker/clockmaker stuff. I got a box of hundreds of metal gears ranging from about two inches to tiny for basically free (1€ + shipping), but you should at least be able to find something for less than $50 that will last a modeler's lifetime.
-
You can use CA glue or Epoxy, but whatever you use, the bond will only be as strong as the bond between the paint and the plastic.
-
You can use the Iwata K200 grip which is more easily available and fits perfectly. I use it on my PS 290.
-
What Are You Planning/Hoping to Build in 2021?
mattg replied to Snake45's topic in General Automotive Talk (Trucks and Cars)
I usually don't find the time to build more than one kit a year (maybe two when the kits are simple and I build them box stock), so it's always a tough choice. But I think I'll do the Revell '32 5 window coupe with some modifications (top chop, kitbash engine and wheels). -
Mercedes Outlaws & Hot Rods
mattg replied to 89AKurt's topic in General Automotive Talk (Trucks and Cars)
This one should work normally. It's the same article but in German: https://roadstars.mercedes-benz.com/de_DE/magazine/route/01-2018/on-tour-with-arto-simola-in-the-actros-lowrider.html -
Mercedes Outlaws & Hot Rods
mattg replied to 89AKurt's topic in General Automotive Talk (Trucks and Cars)
Finland ? https://portal.mercedes-benz-trucks.com/en_GB/magazine/route/01-2018/on-tour-with-arto-simola-in-the-actros-lowrider.html -
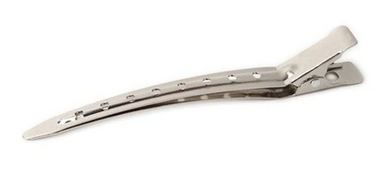
For small and/or deliacte parts, I often use cheap metal hair clips like the one pictured below. They don't have teeth which could leave marks and the clamping force isn't nearly as high as with alligator clips. The only thing I do is to sand the insides of the tips a bit because the surface is too smooth for a good grip. Also, you can get tiny wooden clothespins in crafts stores, and the "reverse trick" works with them. Just glue them to the end of a popsickle stick for better handling.
-
Removing partial chrome plating, or paint over?
mattg replied to thedude's topic in Model Building Questions and Answers
Depending on the size and shape of the area to be painted, you could scrape or sand the plating off to the bare plastic. Just how you would often do on the spots where chromed parts get glued. -
Mercedes Outlaws & Hot Rods
mattg replied to 89AKurt's topic in General Automotive Talk (Trucks and Cars)
Thanks, Kurt! I am not aware of any M 113 aftermarket engines or suitable non-curbside kits. -
Mercedes Outlaws & Hot Rods
mattg replied to 89AKurt's topic in General Automotive Talk (Trucks and Cars)
Mechatronik M-Coupe with AMG V8 engine https://www.mechatronik.de/en/new-tech/m-coupe/ You can buy them as "new" cars, but actually they are completely rebuilt and modified W111s. -
Mercedes Outlaws & Hot Rods
mattg replied to 89AKurt's topic in General Automotive Talk (Trucks and Cars)
Ah nice, the "Rote Sau"! It was kind of an outlaw in the racing business, indeed. The one from the pictures is a factory replica of the car that finished 2nd in the 1971 24 Hours of Spa. The original car was sold to French company Matra, who modified it with a mechanism to test fighter jet tires. It is unknown what happened to the car afterwards. -
Yes, the grips are interchangeable as well between Mr. Hobby, Iwata and Tamiya.
-
There is also the PS-275 which comes with a 0.3mm needle/nozzle instead of the 0.5mm and it can't do fan patterns. I use the PS-290 for car bodies and other large surface work, for small parts and detail work I prefer my HP-M1.
-
I have a Mr. Hobby PS-290, which (apart from the built in pressure screw) is identical to the Iwata HP-TH. Both are manufactured by Olympos, as most Japanese airbrushes, and spare parts are interchangable. I'm very happy with it, but I think adding the grip is a must.
-
1/32 kits with motors ?
mattg replied to Ctmodeler's topic in General Automotive Talk (Trucks and Cars)
If 1/35 is also an option, and it doesn't have to be limited to modern(ish) and US cars, you could consider some Miniart kits. These are more detailed than many 1/24 car kits, sometimes even down to spark plugs coming as single parts etc. They are mostly focused on military stuff, but also offer some interesting civilian kits. I have some of their kits in my stash, like the Mercedes 170V delivery van which can be built with doors and hoods opened, has a detailed engine and has a parts count of around 250. -
Selling Car Model Kits on eBay
mattg replied to dwdirks's topic in General Automotive Talk (Trucks and Cars)
I more or less stopped selling on Ebay for similar (and more) reasons. IMO, the only advantage over selling via forums or classifieds is that you don't have to mess with too many inquiries or offers. I recently sold most of my analogue photography and darkroom stuff, apart from 8x10" related items and things I need for alternative processes. It were only around 50 items, but handling all the inquiries, making special offers for bundles etc. was quite a nightmare...