Pierre Rivard
-
Posts
2,579 -
Joined
-
Last visited
Content Type
Profiles
Forums
Events
Gallery
Everything posted by Pierre Rivard
-
1971 Pearson GTO
Pierre Rivard replied to Pierre Rivard's topic in WIP: Stock Cars (NASCAR, Super Stock, Late Model, etc.)
Thanks Mark. I see the finish line as far as the chassis goes. Rear suspension is all cheated up but should look ok in the end. Silver coat is a must. Body will be purple but the roof will be white. -
1971 Pearson GTO
Pierre Rivard replied to Pierre Rivard's topic in WIP: Stock Cars (NASCAR, Super Stock, Late Model, etc.)
So the decision was made to retrofit this rear chassis to a long arm setup. I did not want to sacrifice a donor chassis just for these few parts so I figured I could just scratch build it. I keep doing this to myself...I look at the part and I say it's easy to copy...but it's not. Here's where I'm at after 2 days. I'll get there eventually. I needed to work on something that would give me hope there is a brighter future out there and I silver painted over the orange body.
-
1966 Mercury Comet
Pierre Rivard replied to MarkJ's topic in WIP: Stock Cars (NASCAR, Super Stock, Late Model, etc.)
What would we do without our friend Evergreen ? That body is coming along nicely. -
Amazing work!
-
Salvaging an old model and giving it a new life in such a beautiful way. Impeccable build!
-
1966 Mercury Comet
Pierre Rivard replied to MarkJ's topic in WIP: Stock Cars (NASCAR, Super Stock, Late Model, etc.)
Neat way of doing it with the pictures of the real car as templates. We learn something new every day! -
1971 Pearson GTO
Pierre Rivard replied to Pierre Rivard's topic in WIP: Stock Cars (NASCAR, Super Stock, Late Model, etc.)
Thanks Mark. I am repeating the idea I first tried on the Galaxie to build it upside down and it seems to work better that way. -
'66 Shelby Mustang Group II
Pierre Rivard replied to afx's topic in WIP: Other Racing: Road Racing, Land Speed Racers
The whole builds are superb but I still can't get over that engine. It is so so so good! Scale modeling classes for free! -
1971 Pearson GTO
Pierre Rivard replied to Pierre Rivard's topic in WIP: Stock Cars (NASCAR, Super Stock, Late Model, etc.)
Trimmed and glued the back bar assembly plus bars to top corner and to front frame. Test fitted to body. I should have shaped it tighter to the A posts but not bad overall.
-
1971 Pearson GTO
Pierre Rivard replied to Pierre Rivard's topic in WIP: Stock Cars (NASCAR, Super Stock, Late Model, etc.)
I could no agree more JC. The 2 things that bug me the most when I build a car is when I fail to get the stance right or an ill fitting roll cage. -
1971 Pearson GTO
Pierre Rivard replied to Pierre Rivard's topic in WIP: Stock Cars (NASCAR, Super Stock, Late Model, etc.)
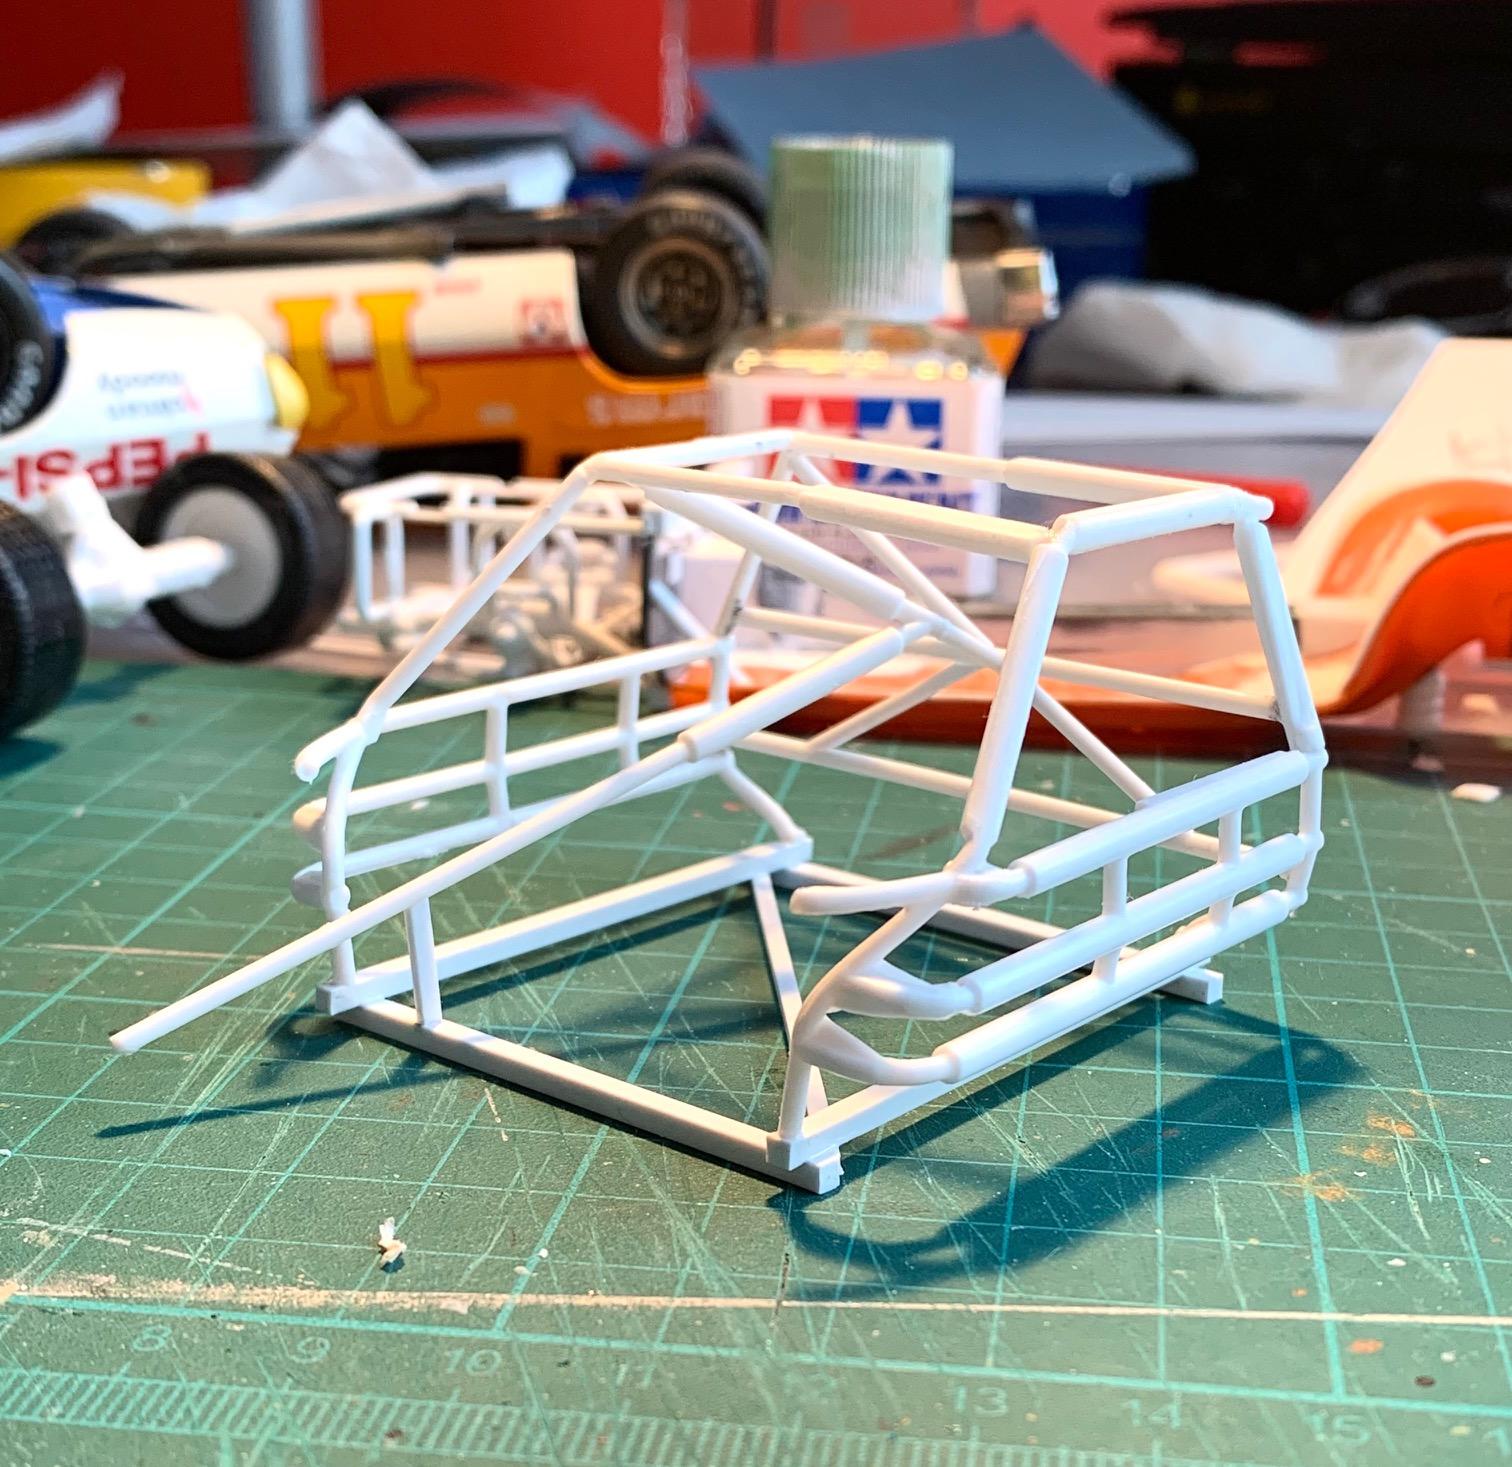
The next 3 pics show how I plan to do the rear of cage horizontal and diagonal cross bars. I placed the cage on a piece of paper to draw the shape. I then drew the location of the horizontal bars. The upper one at belt line level and the lower one to clear the floor driveshaft hump. Then the diagonal bars were sketched. Then I cut and glued together the pieces from 1.6 mm Evergreen. I made sure to make the pieces longer than desired where the contacts to the cage will be. I will trim and adjust at the assembly stage. Allowing the night for these sub assemblies glue to harden.
-
1971 Pearson GTO
Pierre Rivard replied to Pierre Rivard's topic in WIP: Stock Cars (NASCAR, Super Stock, Late Model, etc.)
Roll cage has been pulled out and I trimmed and glued the rear roof cross bar. The hard part is done.
-
1971 Pearson GTO
Pierre Rivard replied to Pierre Rivard's topic in WIP: Stock Cars (NASCAR, Super Stock, Late Model, etc.)
While I am planning away on how to modify my chassis I decided to do a bit of an update on the interior. I don't plan to use the kit's interior tub and will build up from the chassis floor. I chiseled out the almost inexistent trend and driveshaft hump and built replacements from old MPC Nascar parts. Not accurate to the real car but I deem it to be "goodenuf" For the roll cage I will start with unused Salvinos 70's Monte Carlo sides, shortened length wise. Lately I have changed strategies with roll cages to build from the roof down rather than floor up. I'm trying to get a better contour relative to the roof and A-posts. I don't know if others do it that way... What you see on the picture: I shortened the cage B post to allow a level cage but a match to the sweeping roof. I then taped the 2 sides inside the body where I want them and glued the forward roof cross bar to the sides (not to the roof lol). I then glued a temporary base to the cage to keep it all square.
-
1966 Mercury Comet
Pierre Rivard replied to MarkJ's topic in WIP: Stock Cars (NASCAR, Super Stock, Late Model, etc.)
This is really nice reference to go by. I admire the way you model your components from these detailed reference pictures. Really good stuff! -
Chevrolet Impala Hardtop '59 in "Tuxedo Black" w/ red interior
Pierre Rivard replied to Tommy124's topic in Model Cars
The best paint and chrome I have ever, ever seen! -
1971 Pearson GTO
Pierre Rivard replied to Pierre Rivard's topic in WIP: Stock Cars (NASCAR, Super Stock, Late Model, etc.)
Tim, I'm very happy you pointed me in the right direction and after a good night sleep I am fully in solution mode. I'll make the mods to a long arm setup. Looking at your beautiful build I noticed 2 other things I was unaware of. Only 2 shocks in the rear and the arrangement of the engine oil vents. Thanks for the help -
1971 Pearson GTO
Pierre Rivard replied to Pierre Rivard's topic in WIP: Stock Cars (NASCAR, Super Stock, Late Model, etc.)
Thanks Tim. I had failed to find this info in my research and took the guess... and I guessed wrong. Chassis is all done so I have to make a decision about it. Leave it as a short arm knowing it's wrong, rip off the back end or shelve the project. I'm a bit gutted but I'm glad you pointed out this major mistake of mine. -
1971 Pearson GTO
Pierre Rivard replied to Pierre Rivard's topic in WIP: Stock Cars (NASCAR, Super Stock, Late Model, etc.)
Thanks for the feedback guys. It's a bit more work than expected but a fun challenge nevertheless. Nice GTO Hobbyguy, how did you make that net. It's very nice! -
Very very nice build sir! Kudos for spending time replicating the chassis as Junior built it. What materials do you use for door panels (I love the texture) and radiator hoses?
-
'66 Shelby Mustang Group II
Pierre Rivard replied to afx's topic in WIP: Other Racing: Road Racing, Land Speed Racers
Beautiful craftsmanship as you always do! -
1966 Mercury Comet
Pierre Rivard replied to MarkJ's topic in WIP: Stock Cars (NASCAR, Super Stock, Late Model, etc.)
Backward in time. 1967 is gone, welcome 1966. Beautiful fab work! -
1971 Pearson GTO
Pierre Rivard replied to Pierre Rivard's topic in WIP: Stock Cars (NASCAR, Super Stock, Late Model, etc.)
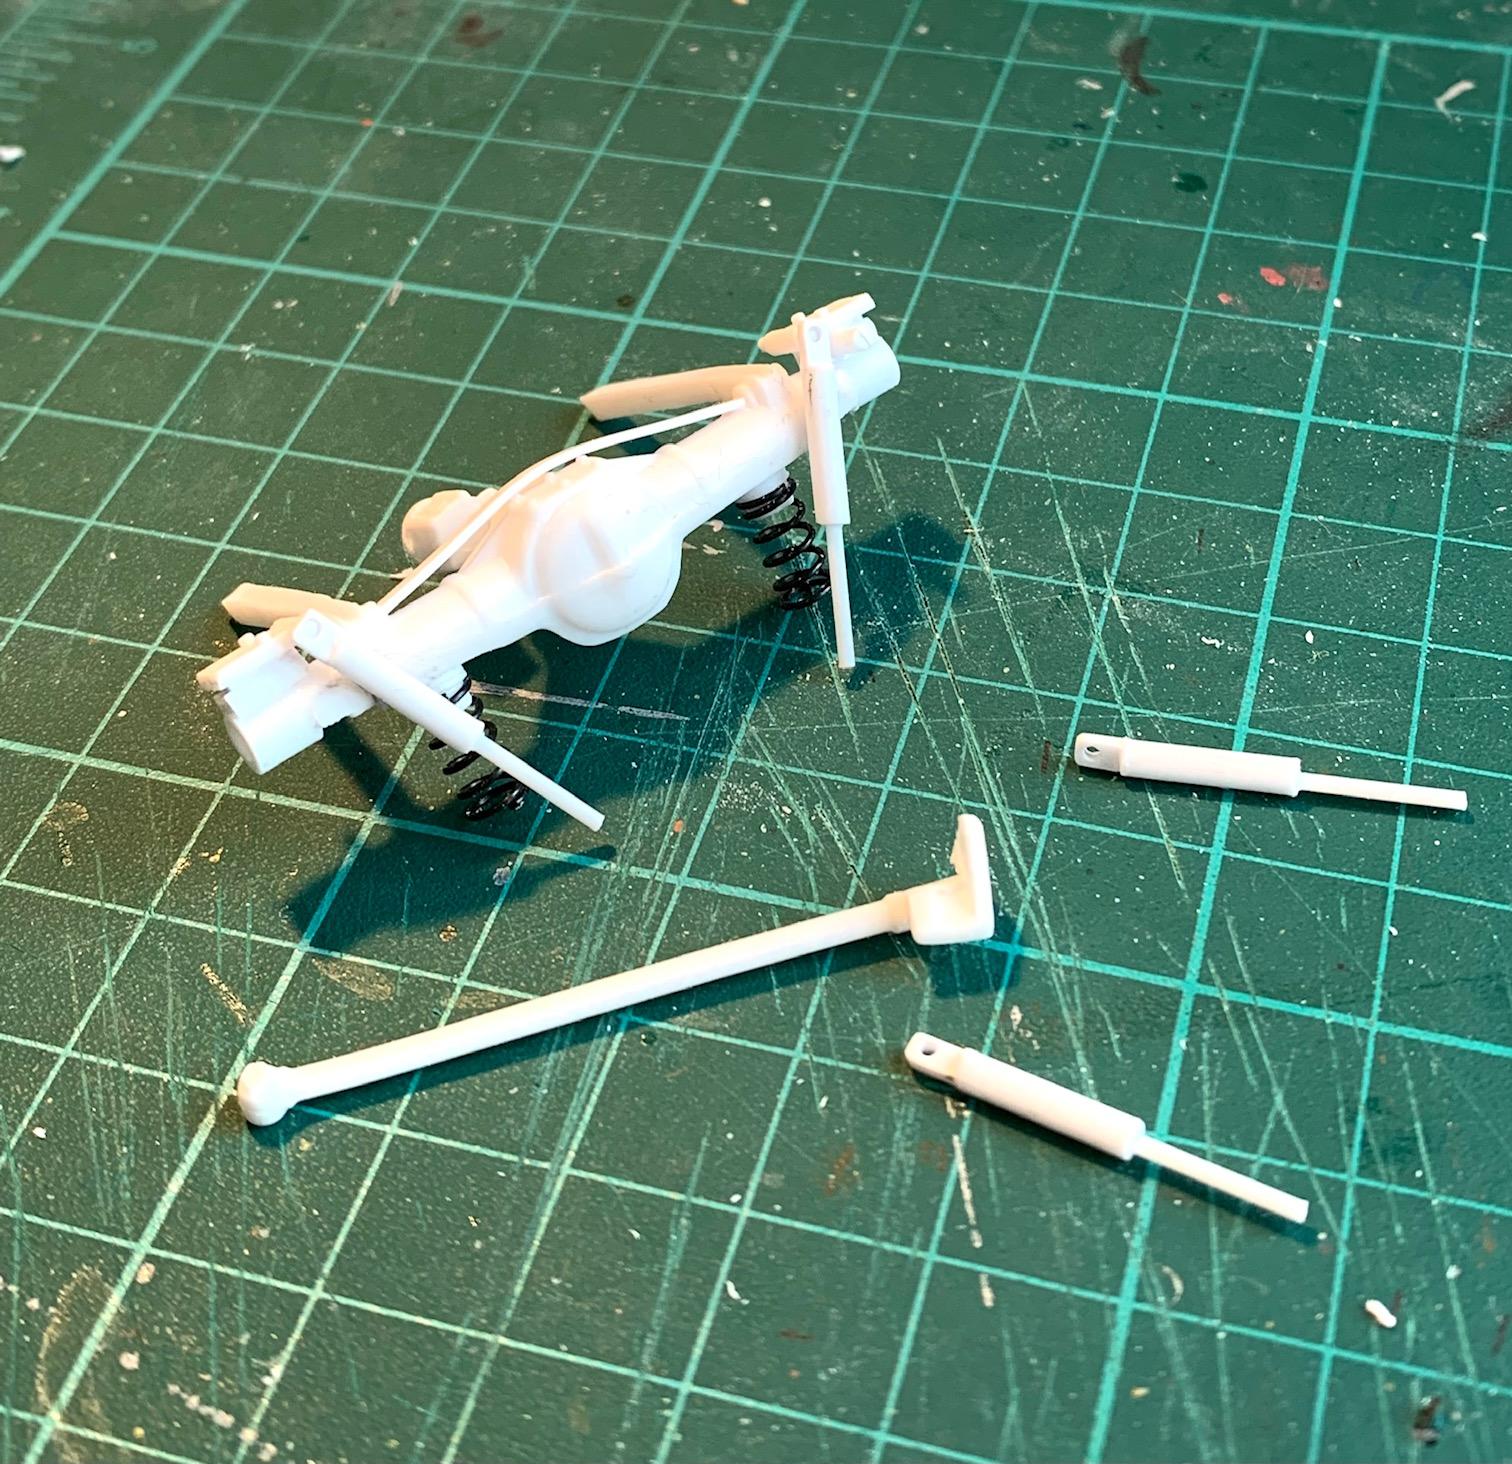
Fabrication around the MC rear axle. I fabricated spring mounts and the springs are from the spares. I added a styrene 0.5 x 1.5 mm for axle reinforcement and shock mounts brackets from the Salvino's kit. Shocks scratch built from 1mm and 2mm rods. Diff cooling pump from the Salvino's kit I chose not to do the 2 upper links for lateral control and chose to add a panhard rod.
-
1971 Pearson GTO
Pierre Rivard replied to Pierre Rivard's topic in WIP: Stock Cars (NASCAR, Super Stock, Late Model, etc.)
Starting work on the rear end. The donor is the rear axle from the AMT Bobby Allison Monte Carlo. I will upgrade the components but for now it's all about setting the attachment points to get the proper location and mostly ride height, I have 6 mm front and 8mm rear measured from ground to rocker
-
1971 Pearson GTO
Pierre Rivard replied to Pierre Rivard's topic in WIP: Stock Cars (NASCAR, Super Stock, Late Model, etc.)
Spending lots of time setting track and ride heights. Here the front is still a bit high, I'll just bend it a bit before I add the upper structure. The rear is not started yet, just the base kit metal axle. That'll get chopped up.
-
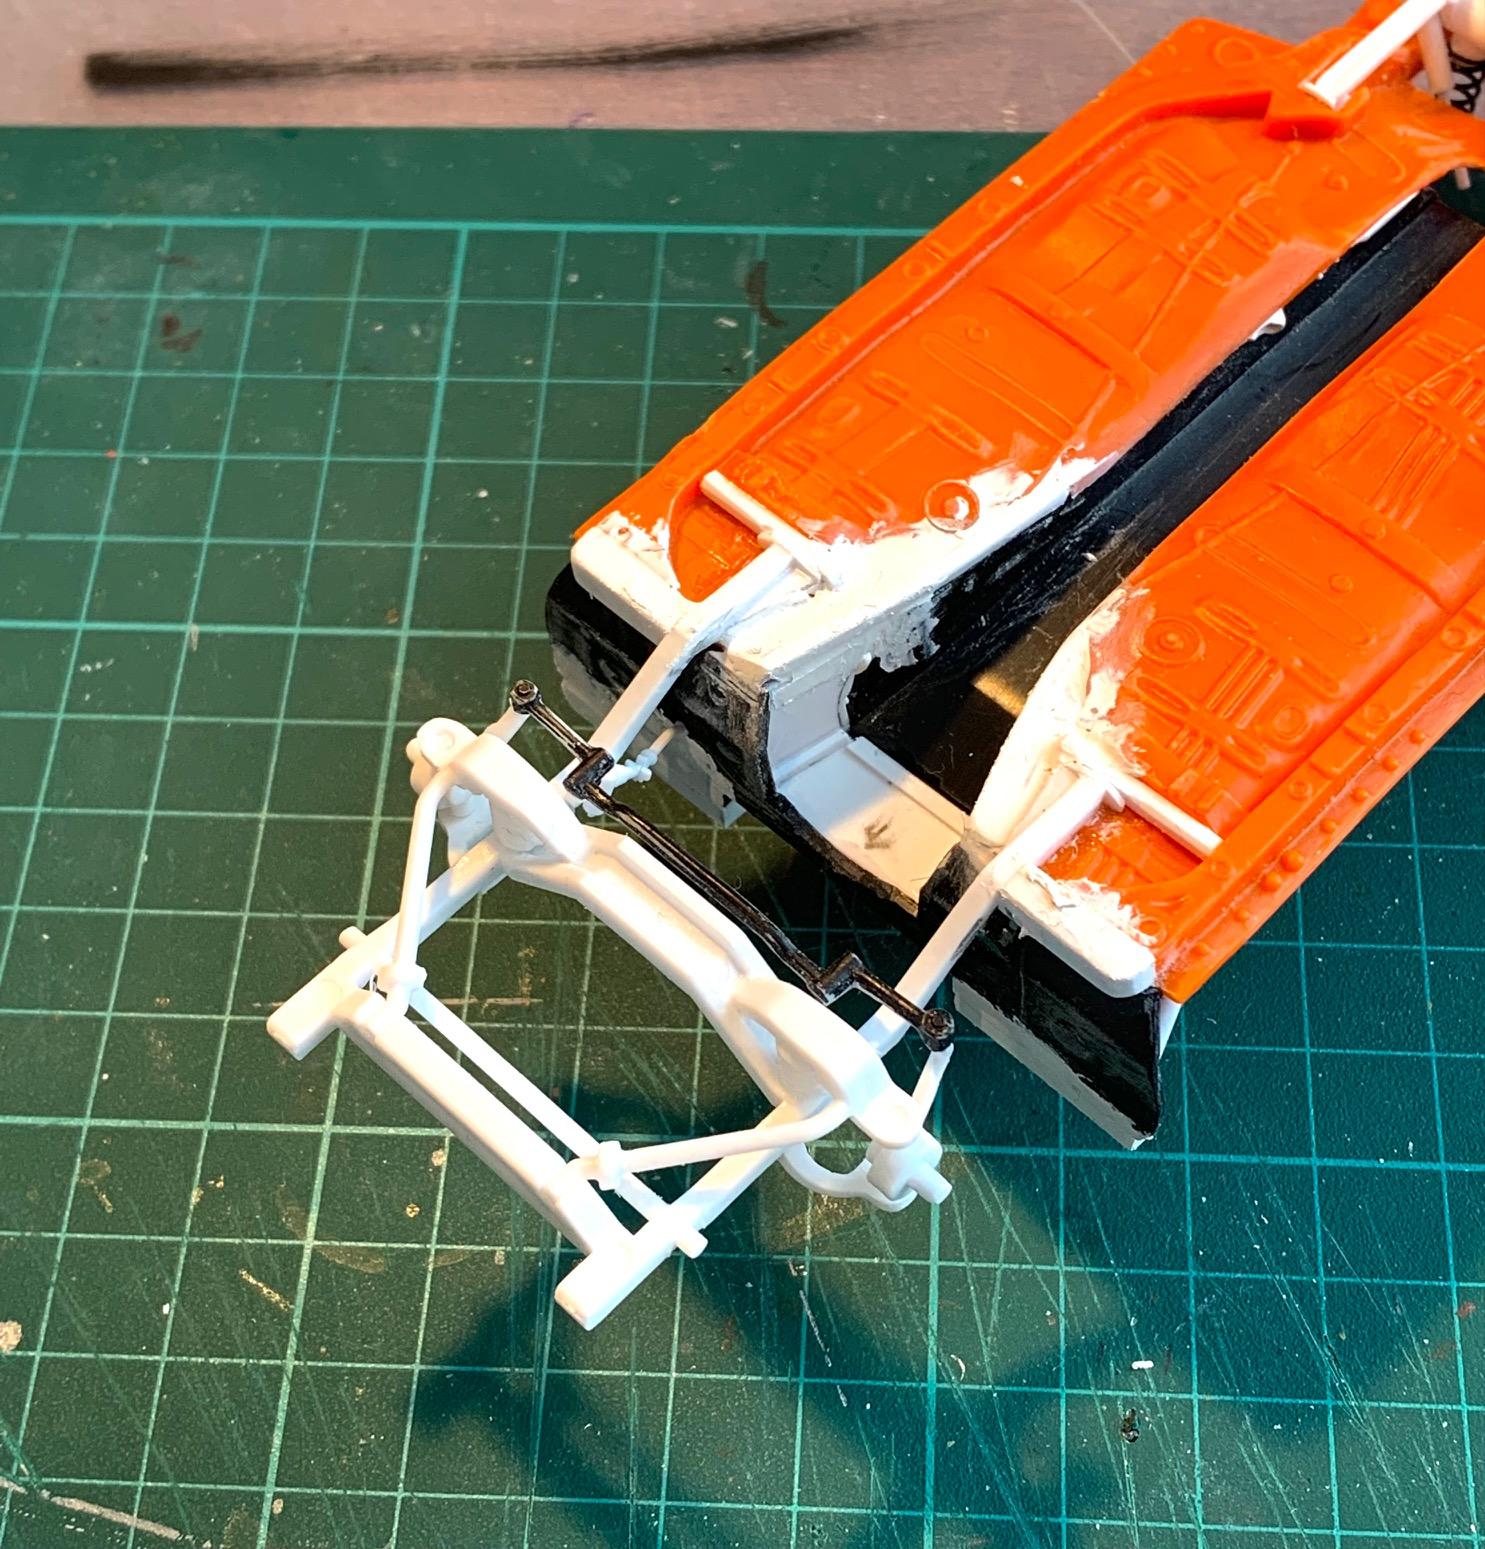
1971 Pearson GTO
Pierre Rivard replied to Pierre Rivard's topic in WIP: Stock Cars (NASCAR, Super Stock, Late Model, etc.)
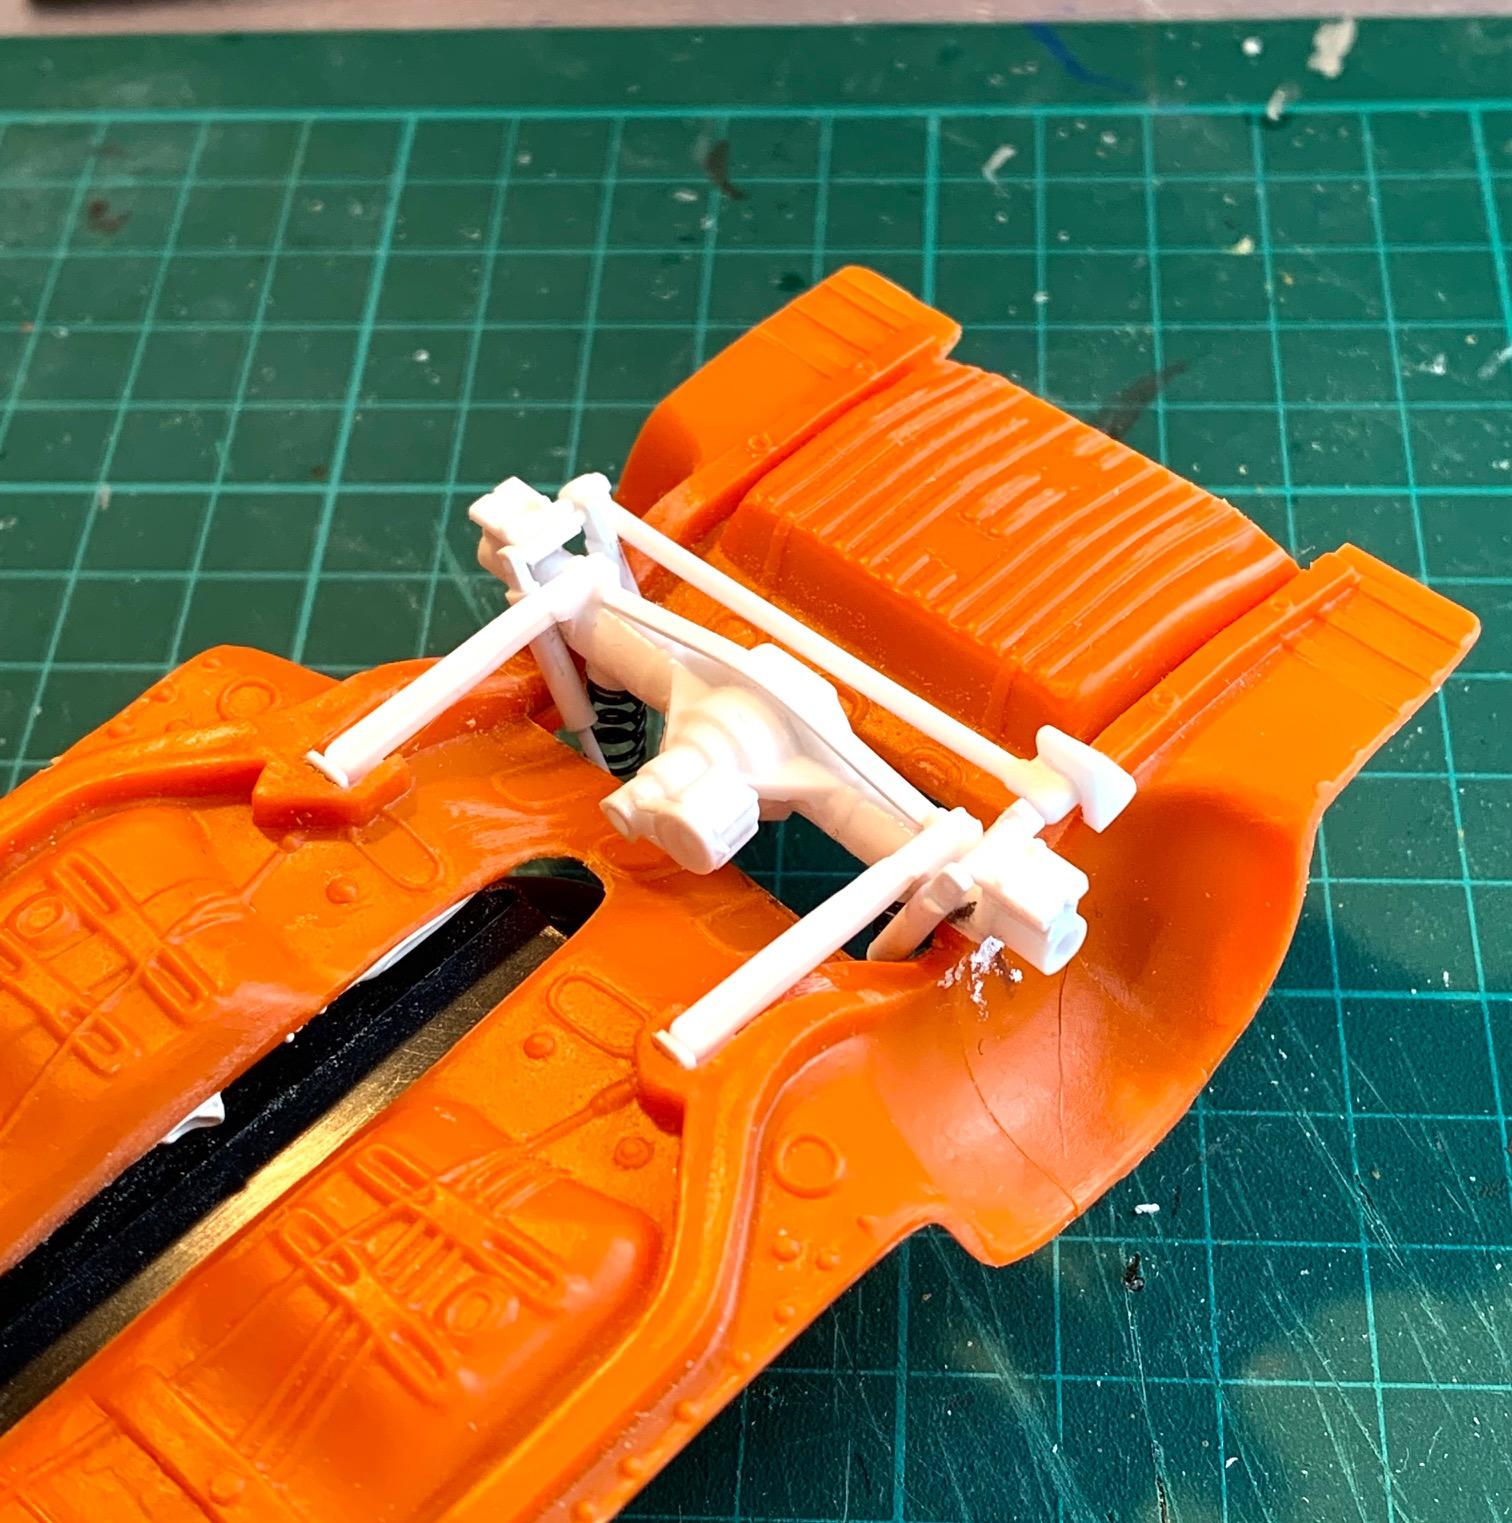
Chassis will be a bit of a dog's breakfast with parts coming from various sources and some scratch building as well. Starting at the front I grafted a Salvino's clip. Looks reasonably to a H&M setup except for the shocks which are more like what Nichels did on Dodges. I might keep it like that. It's a Nichels car after all...