Wolf
-
Posts
160 -
Joined
-
Last visited
Content Type
Profiles
Forums
Events
Gallery
Everything posted by Wolf
-
 Thanks Mathias! Cheers, Wolf
 -
Thank-you Doyle. So far it’s a typical Tamiya kit. It just needs a little extra love in places. Cheers, Wolf
-
Thanks Daniel. Thanks for looking in and leaving a comment. Much appreciated. Cheers, Wolf
-
Absolutely gorgeous! I rode one of these on a trip through Montana, Wyoming, and South Dakota back in September of 2019. I did 3,800 kilometres in 5 days on the bike. It was an extremely comfortable ride and a great trip. Cheers, Wolf
-
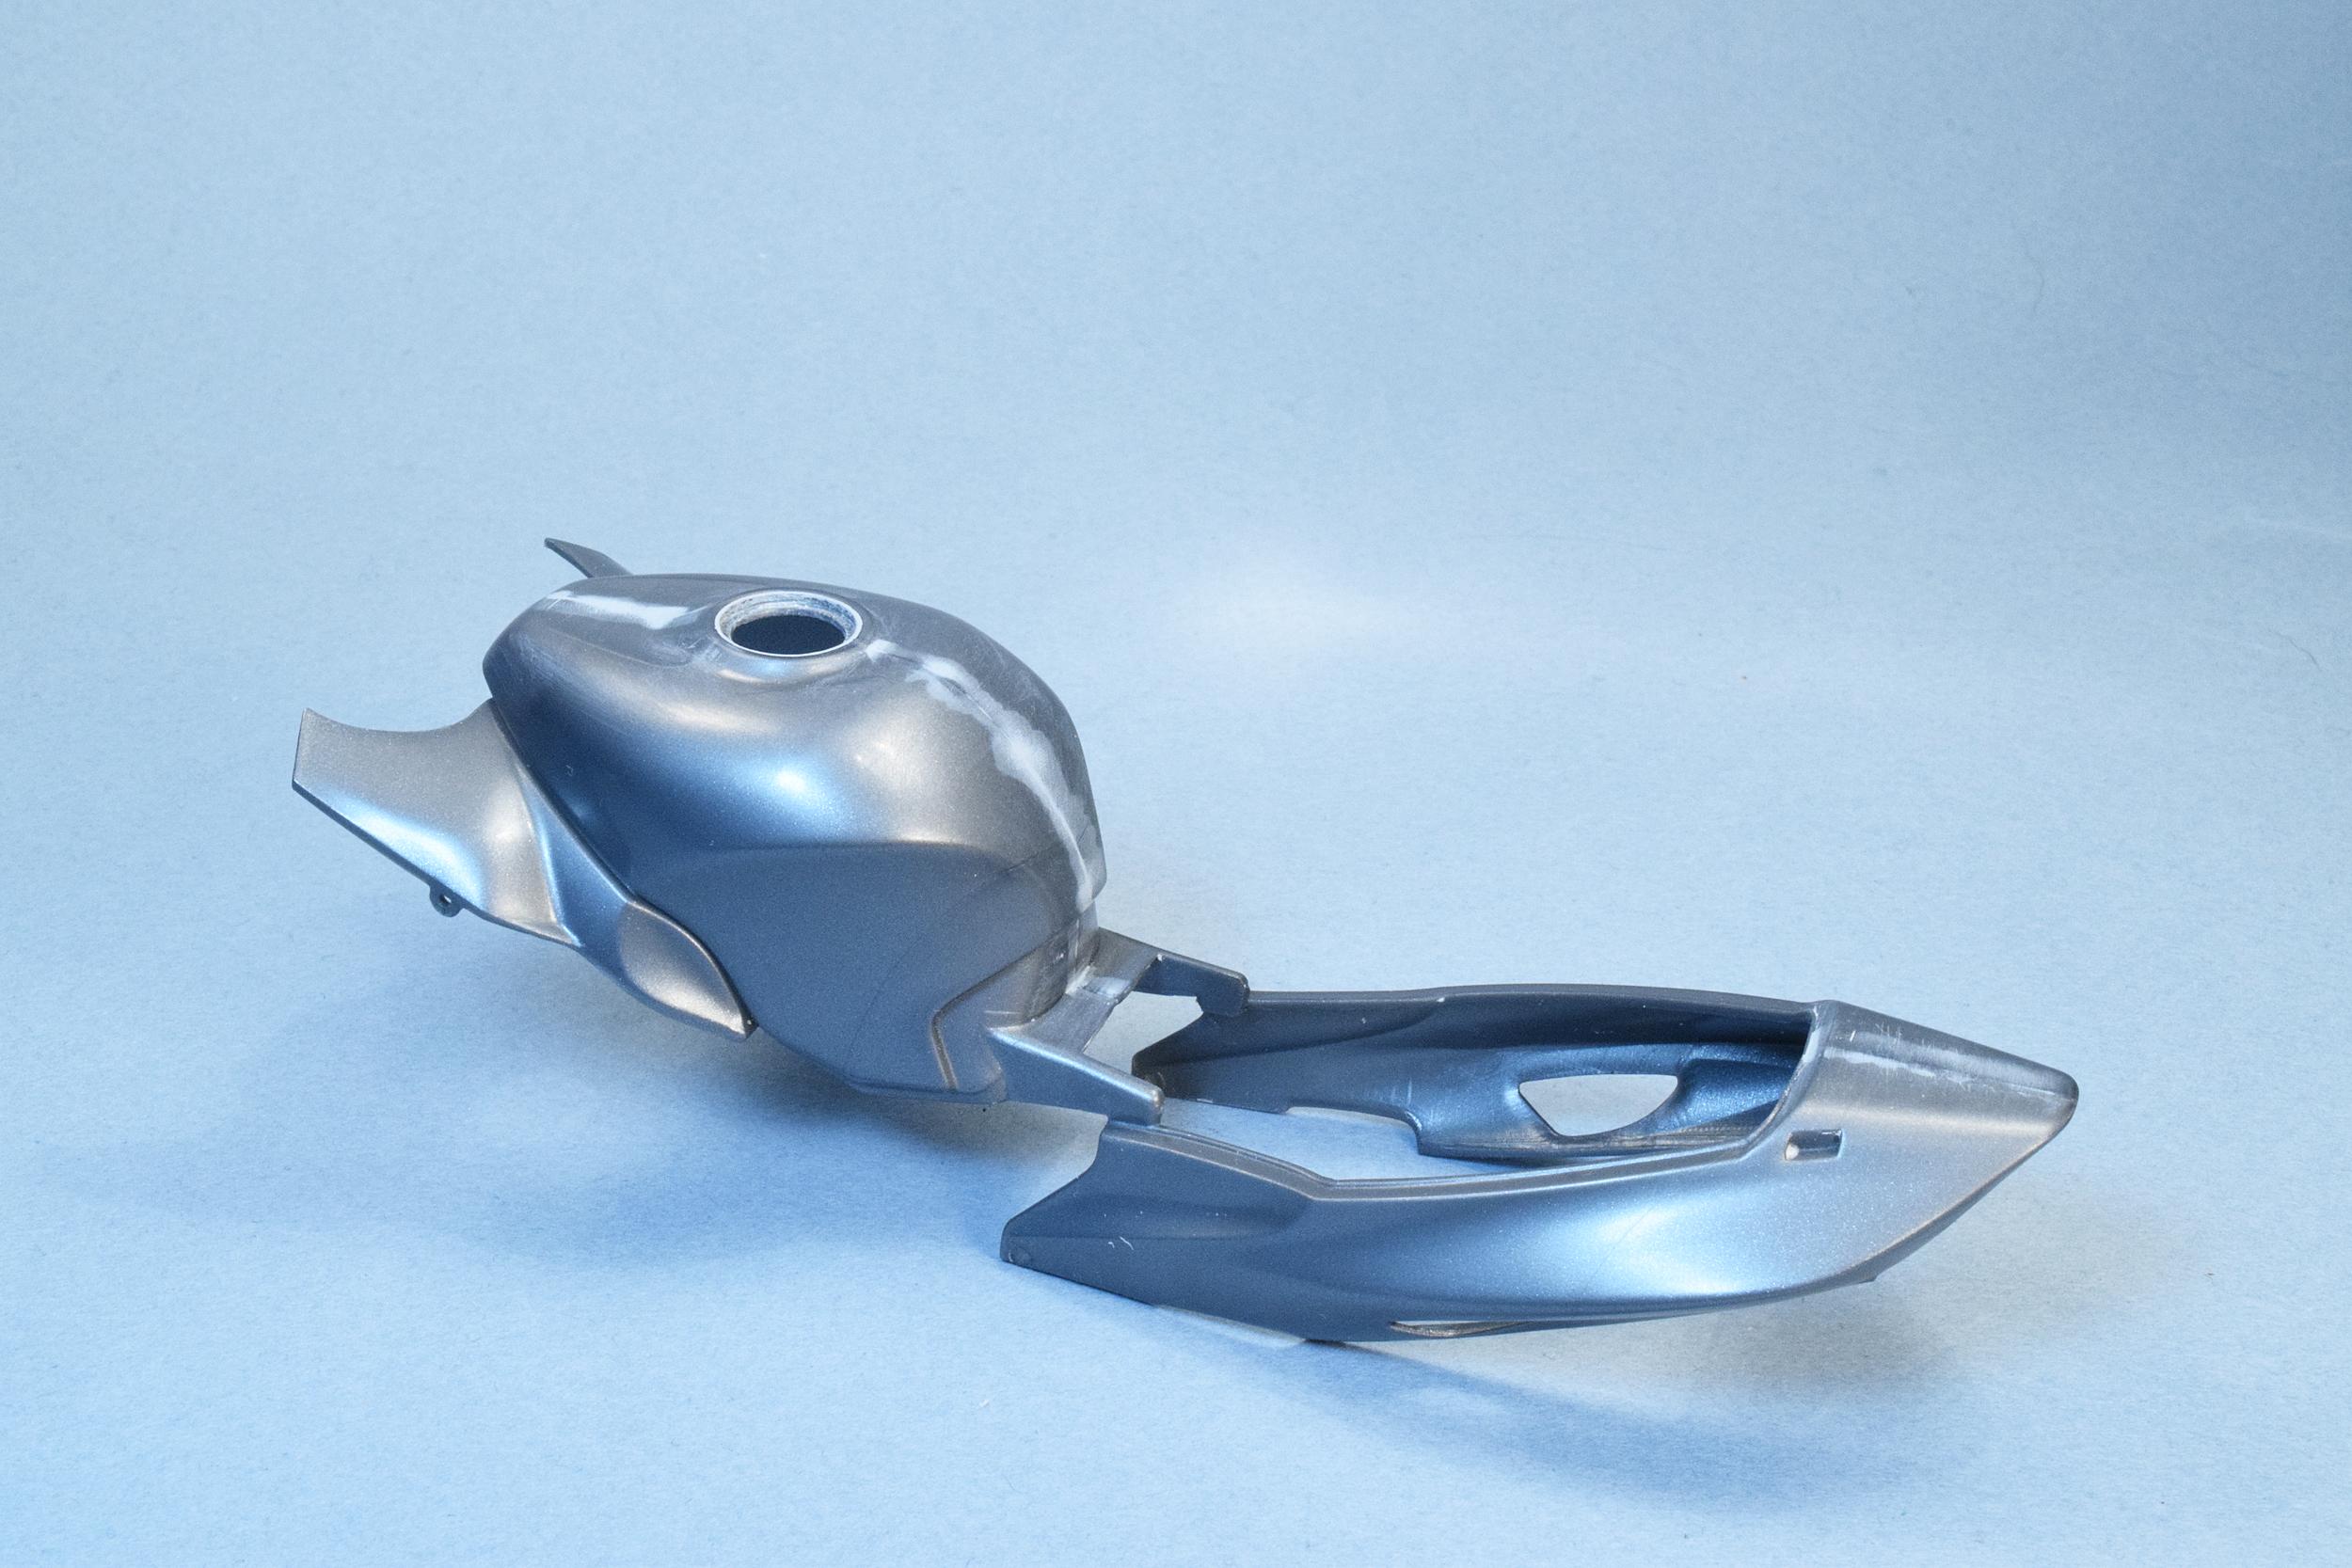
Things have been moving at the speed of life so it's been a couple of weeks since I posted my last update. This one is a bit bigger as a result. The two halves of the fuel tank cover and rear body cladding assembly were glued together and the seams sanded. They were then painted with Tamiya's white primer and resanded to ensure there were no trace of seams remaining. At the same time I decided to tackle the front fender which needed couple of small modifications. Based on photos found online there are two vents in the front fender that needed opening and also a couple of rivets that need to be added which help secure the front fender in place. Using a small drill bit I chain drilled holes to open up the vents and finished off with an X-Acto knife blade and some sanding. This was easier said than done but in the end I think it was worth the extra effort. I also drilled the holes for the 1.2mm Top Studio rivets I was adding and counter sunk them so the rivets didn't protrude past the fender's outer surface. The fender then got a coat of primer and three nice coats of Tamiya's Pure Red Metallic followed by two coats of Tamiya's TS-13 Clear Gloss. I really like Tamiya's lacquer spray and use it quite a bit, decanted from the spray can, thinned a bit more with lacquer thinner and shot through my airbrush. Next up was the instrument cluster for the bike and it was painted as per the kit instructions. I added the instrument decals and topped them off with clear acetate lenses. The fuel and temperature gauge lenses were punched out with my Waldron Punch and Die set. For the tach and speedo lenses I made punches out of brass tubing. Each lens has it's outer edge blackened with a sharpie before being installed and then secured with Future. The clock/date gauge was a simple square piece with the corners rounded off slightly. Looking at the instrument cluster and comparing it with photos I decided I would add all the various warning lights to the cluster. I punched out tiny lenses with my Waldron Sub-Miniature punch and die set, painted them with the necessary clear colours, backed them with white styrene discs so they wouldn't sit too deep, and locked 'em in place with drops of future. I'm quite happy with the end result. Cheers, Wolf

-
I absolutely agree with all the comments posted above. I also love your photography which highlights perfectly just how beautiful your build is. Definitely something to aspire to. Cheers, Wolf
-
Simply magnificent work Steve! Absolutely love it. Cheers, Wolf
-
Thank-you Mathias! I was quite pleased with how the exhaust, and particularly the mufflers, turned out. I was concerned I wasn’t going to get the results I was hoping for with the Alclad II Chrome but it turned out quite nice. I liked the contrast between the kit chrome and Alclad II as well. So far, so good. Cheers, Wolf
-
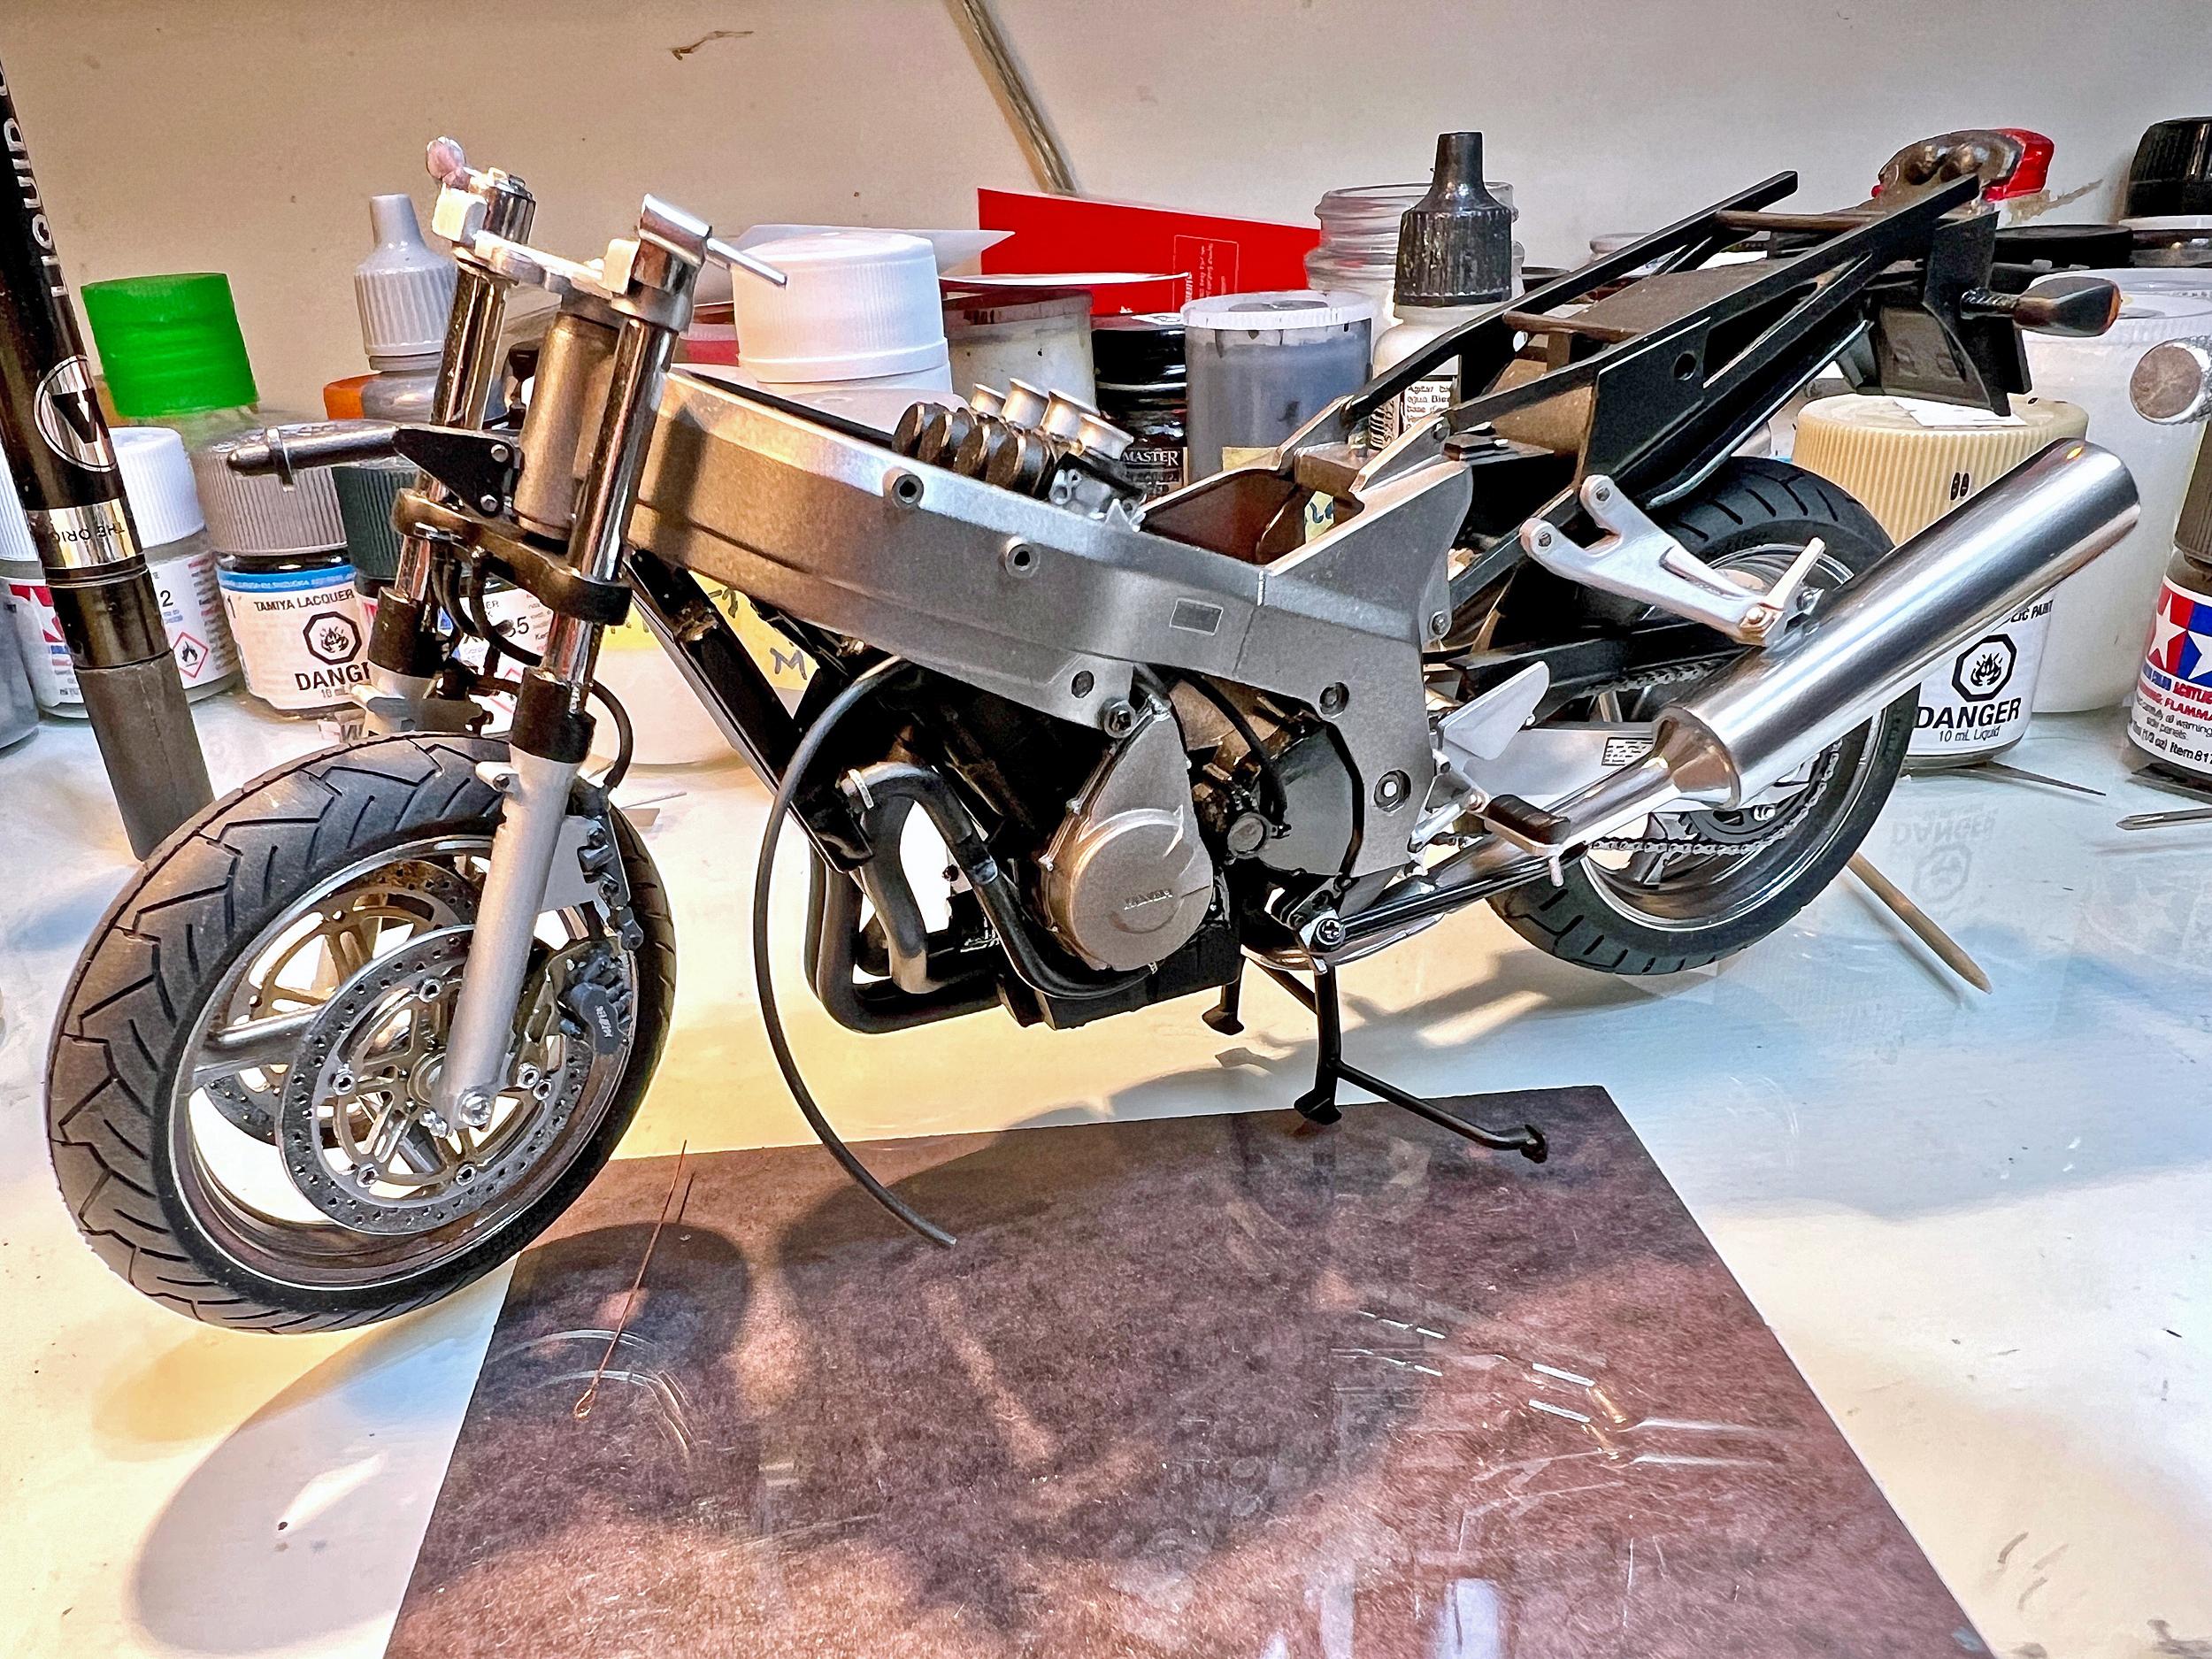
We have exhaust! The exhaust comes on the chrome sprues with the mufflers split lengthwise. Tamiya molded the sprue attachments on the gluing surfaces of the mufflers so that with careful trimming you won't mar the chrome finish. Nonetheless you're still left with a visible seam on top and bottom of the mufflers. To eliminate those I stripped off the chrome, sanded and filled the seam, and then polished the plastic to ensure a perfect finish for Tamiya's gloss black lacquer paint. Once the gloss black had dried I sprayed the mufflers with Alclad II Chrome. It's not as shiny as the kit chrome but it came out quite nice. The only kit chrome remaining on the exhaust is the very end of the mufflers where the exhaust exits. I also assembled the front fork assembly and installed it temporarily just to see how it was going to look. Lots more to do but it's getting' there, eh? Cheers, Wolf (who's wife doesn't like the smell of exhaust in the house)
-
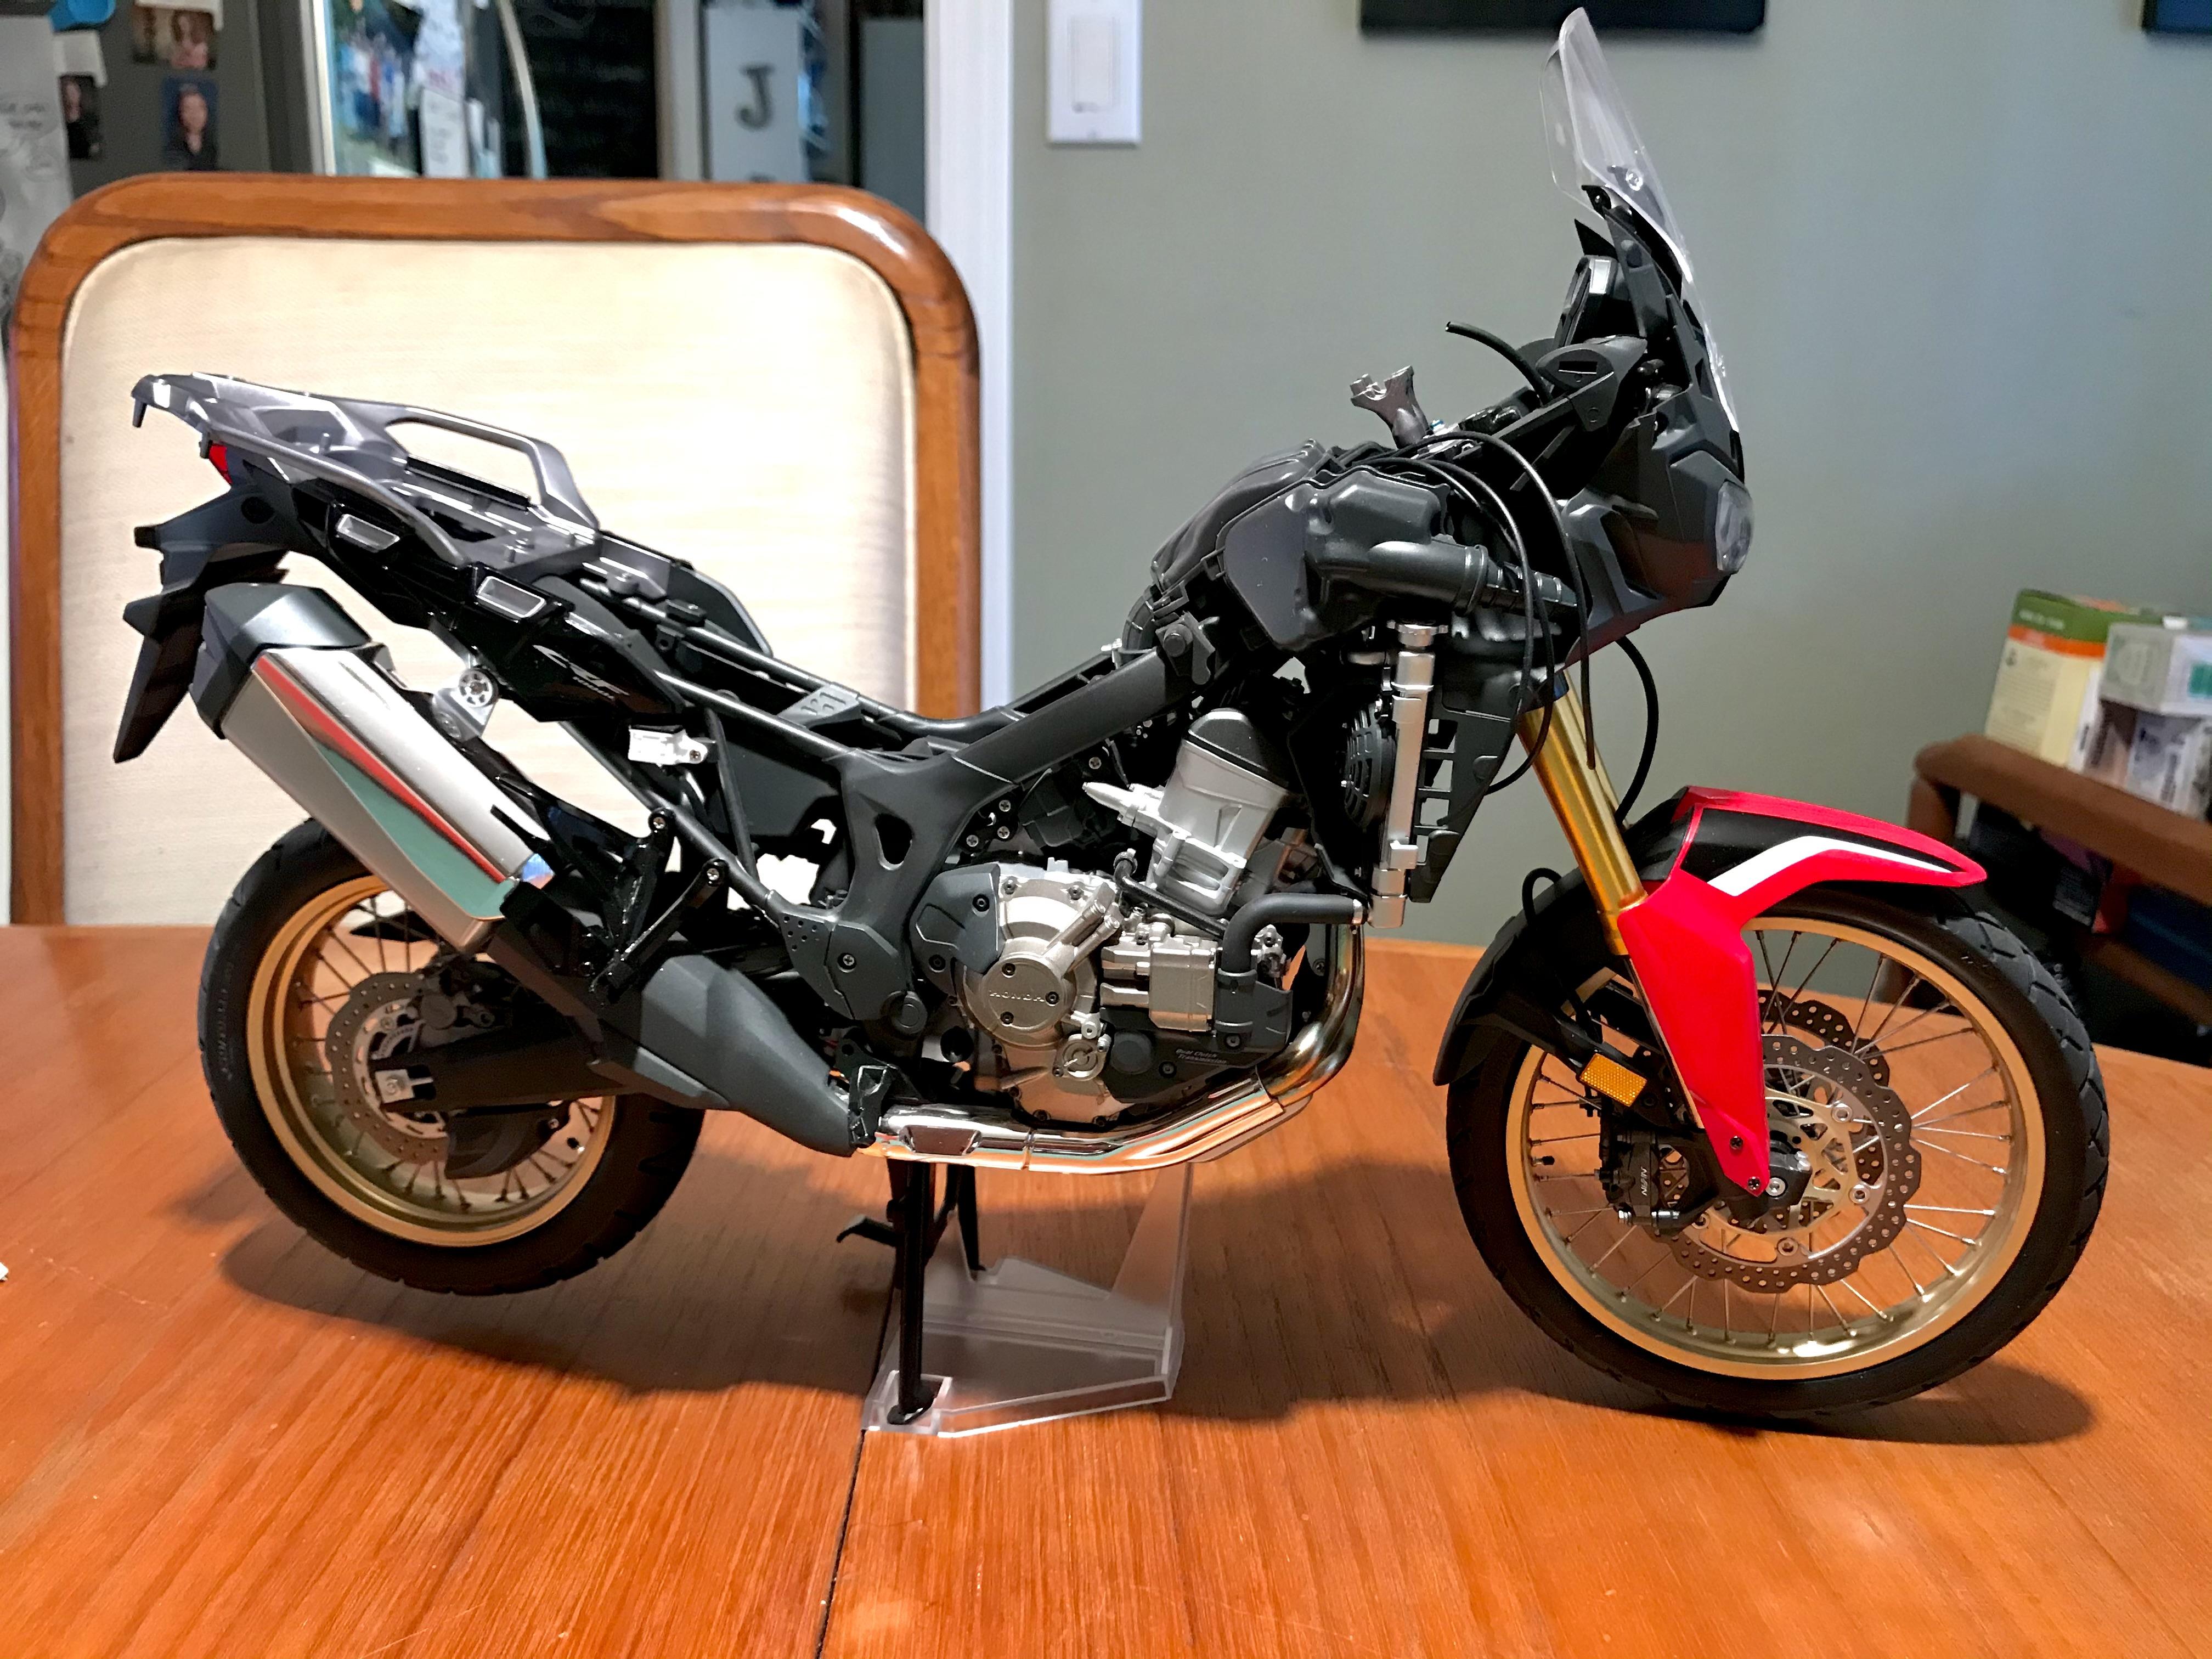
Absolutely Mathias, and very addictive too. The last one I built was the big Africa Twin. I usually get distracted by something else during a build but not with that one or the current CBR 1100XX. The Africa Twin was much more involved but I stayed with it from beginning to end. It’s really a magnificent kit. Cheers, Wolf
-
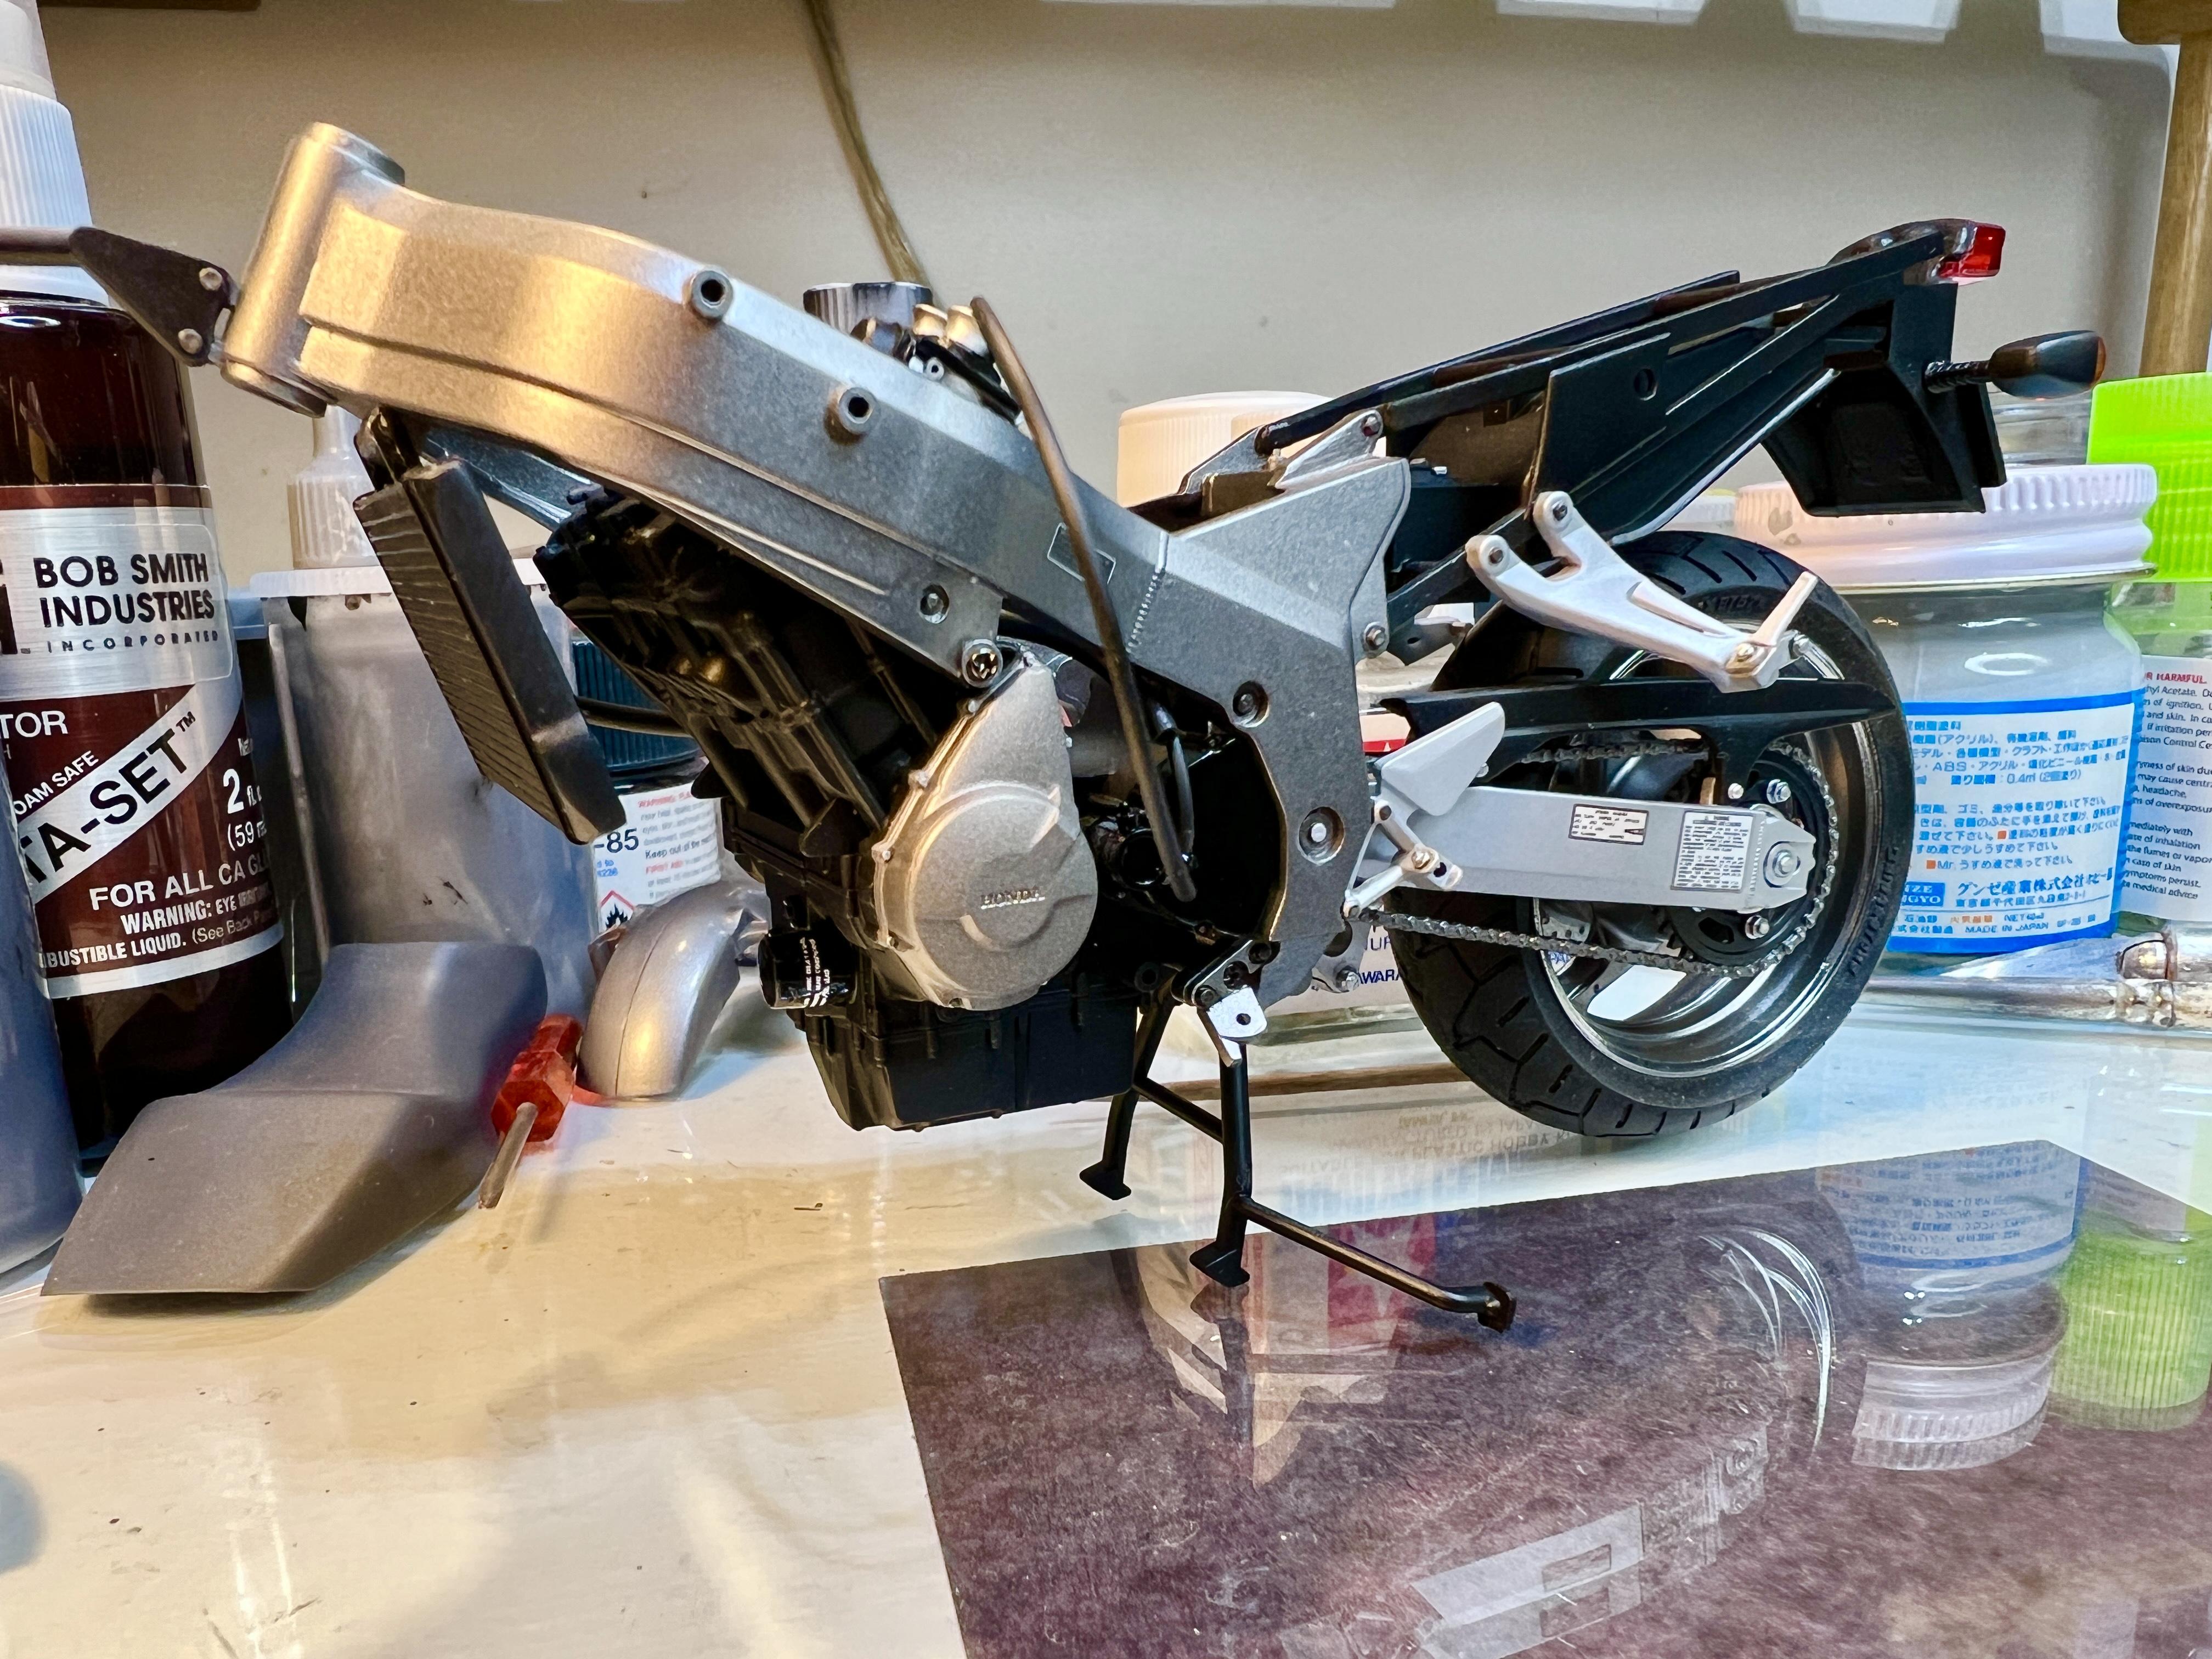
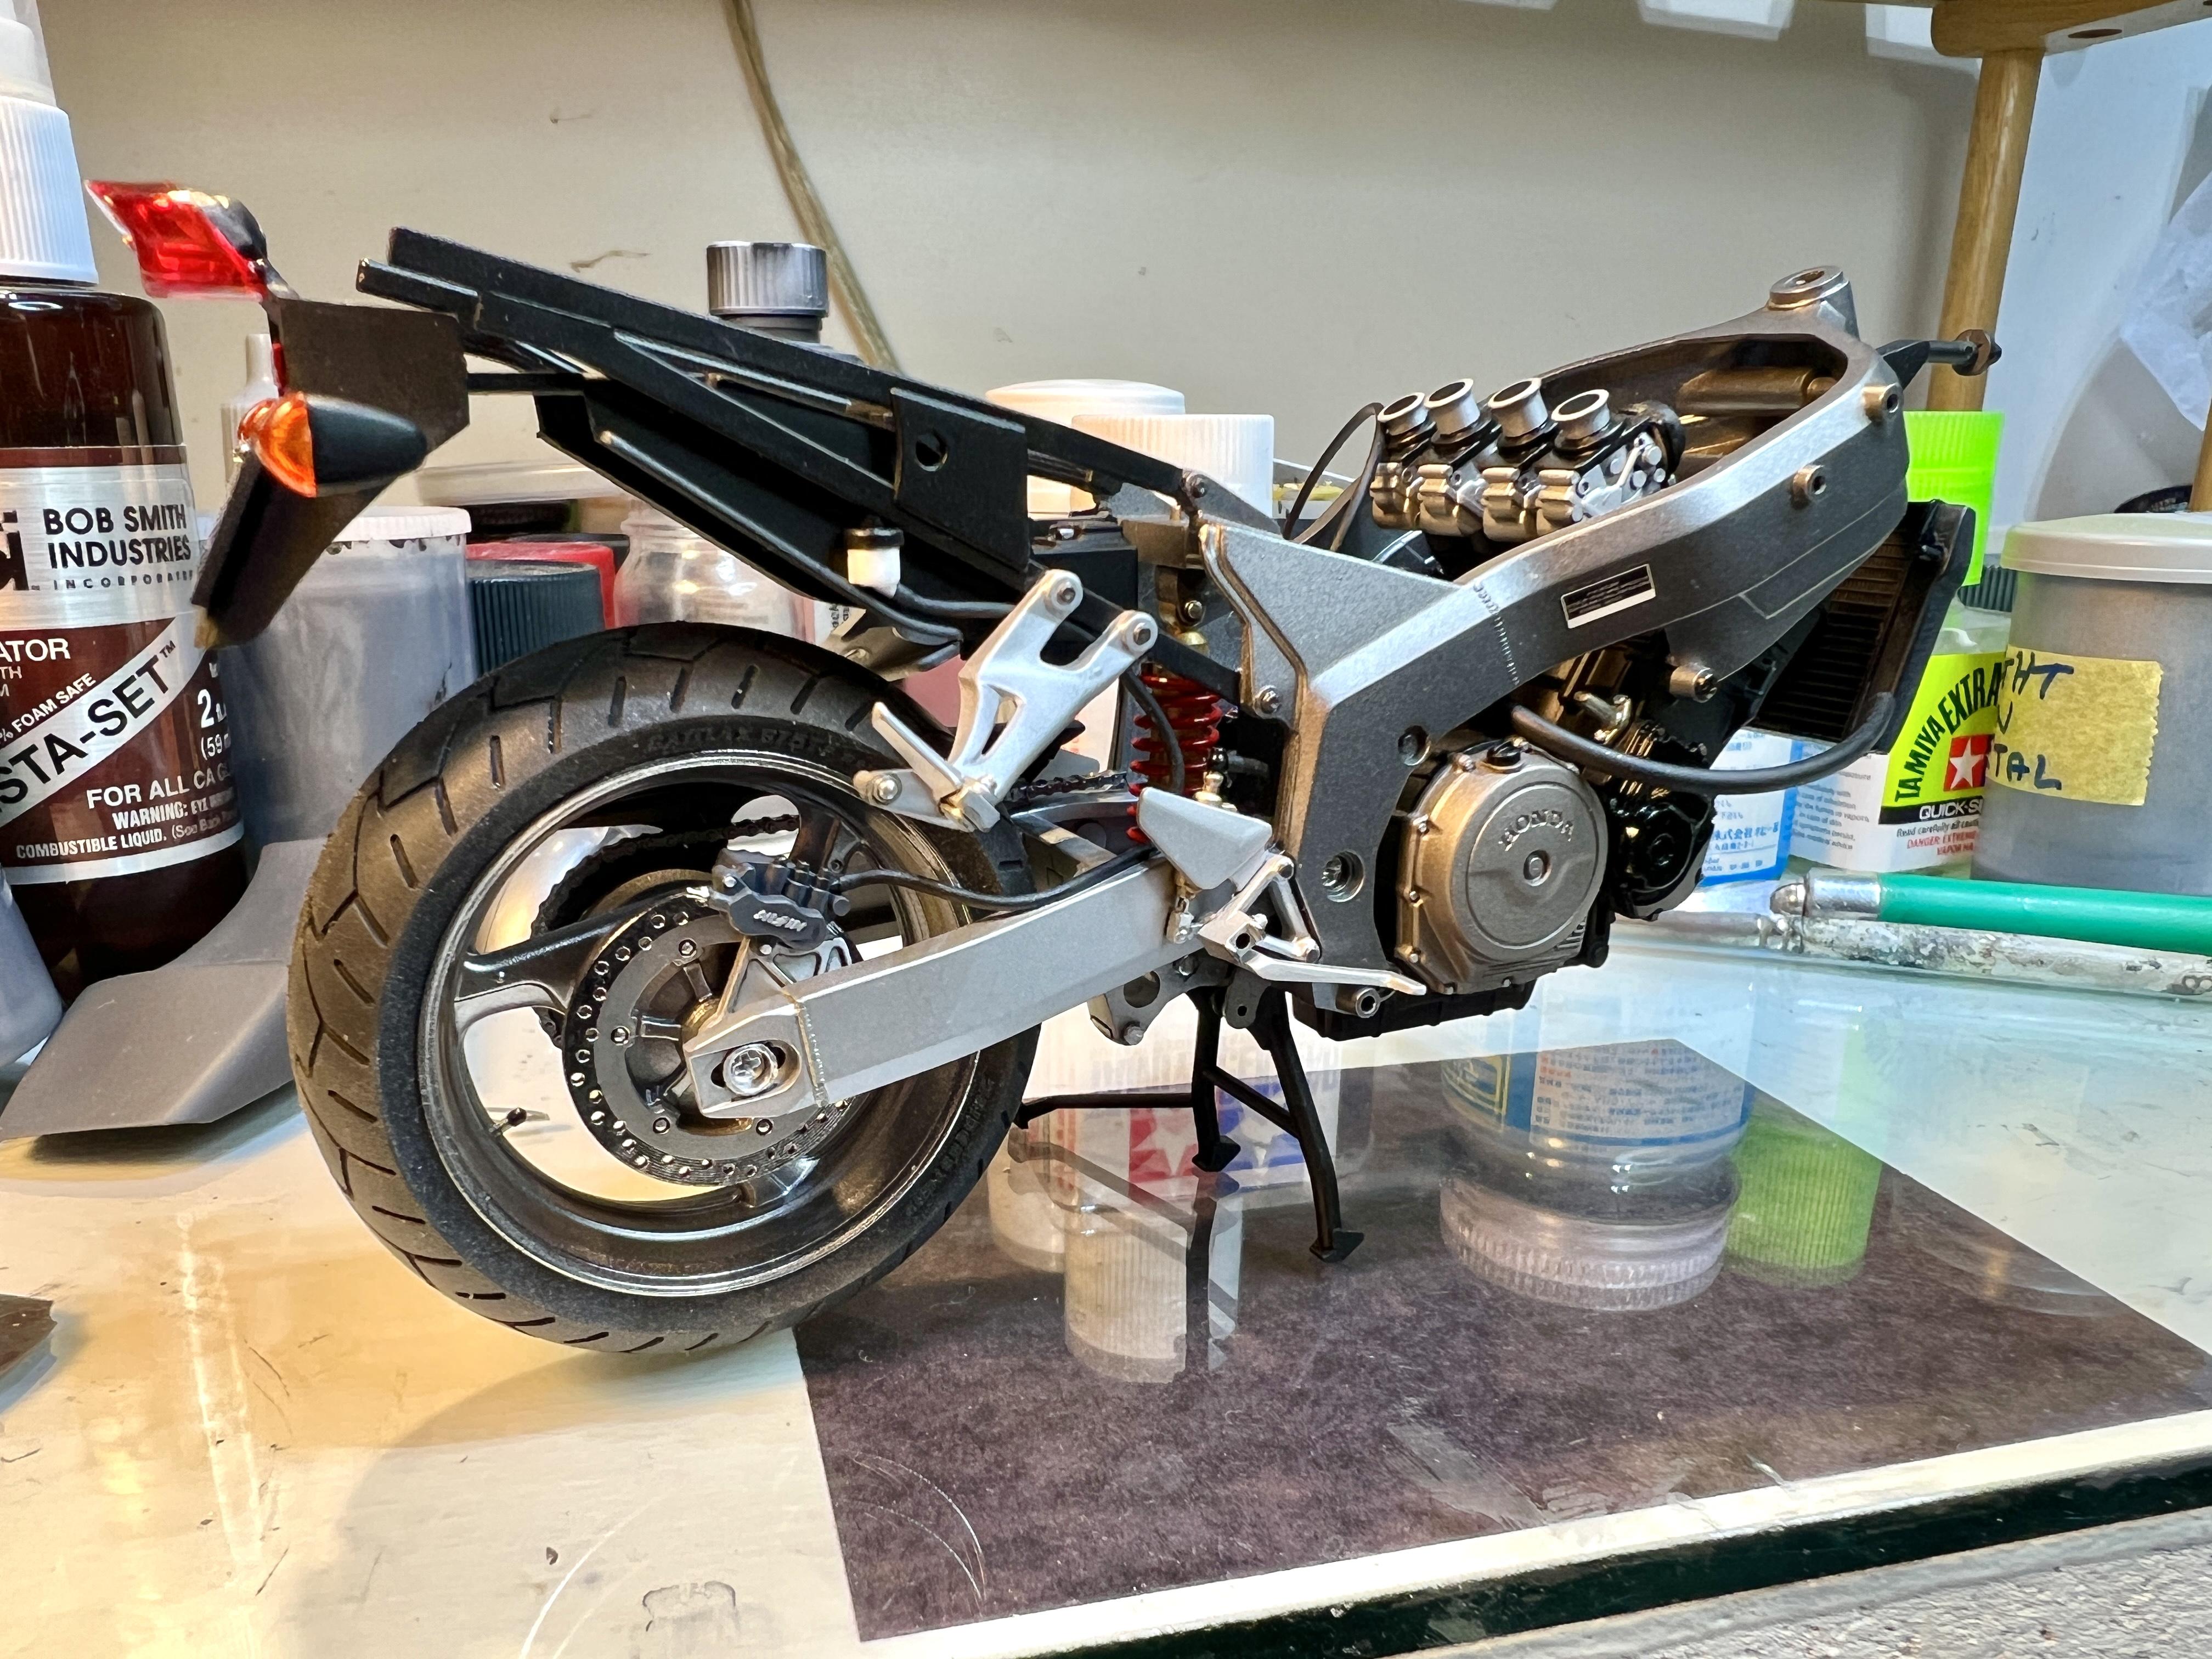
A little bit of glue and a few screws and I have something that’s starting to look like a bike. The rear fender assembly was a tight fit. I was concerned that I could potentially split the frame directly above it’s mounting position but finally it clicked in to place. Cheers, Wolf
-
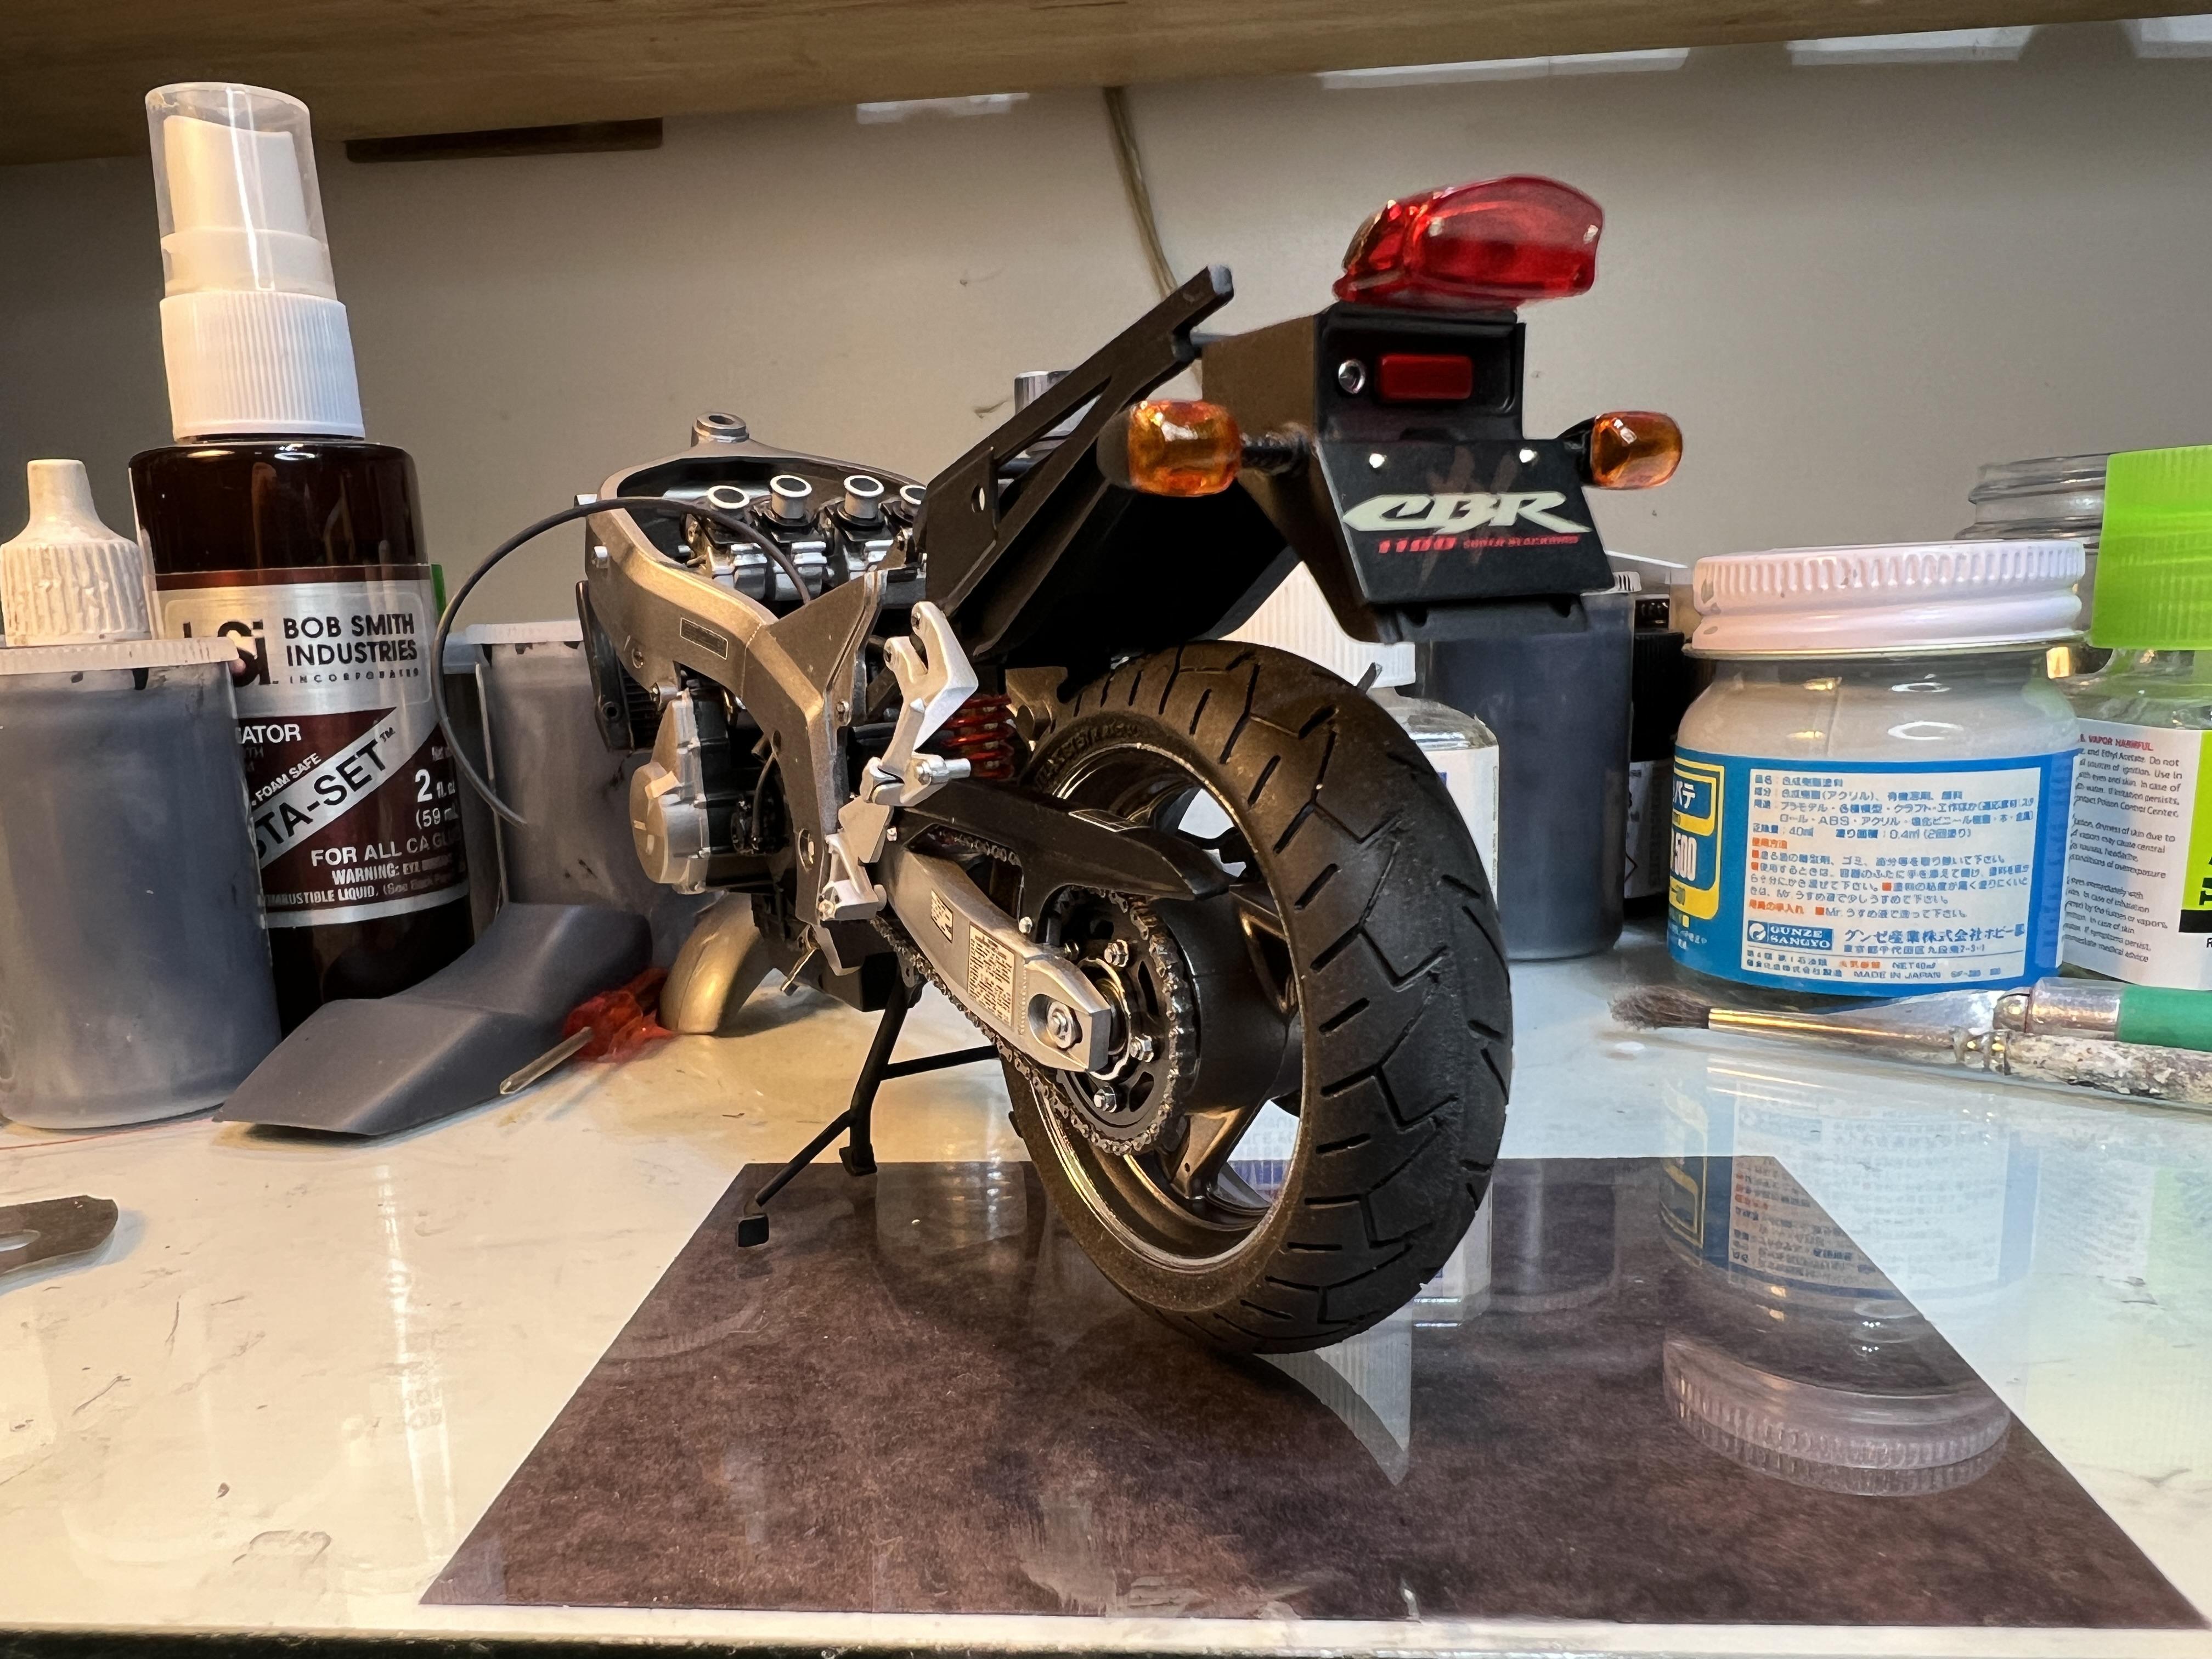
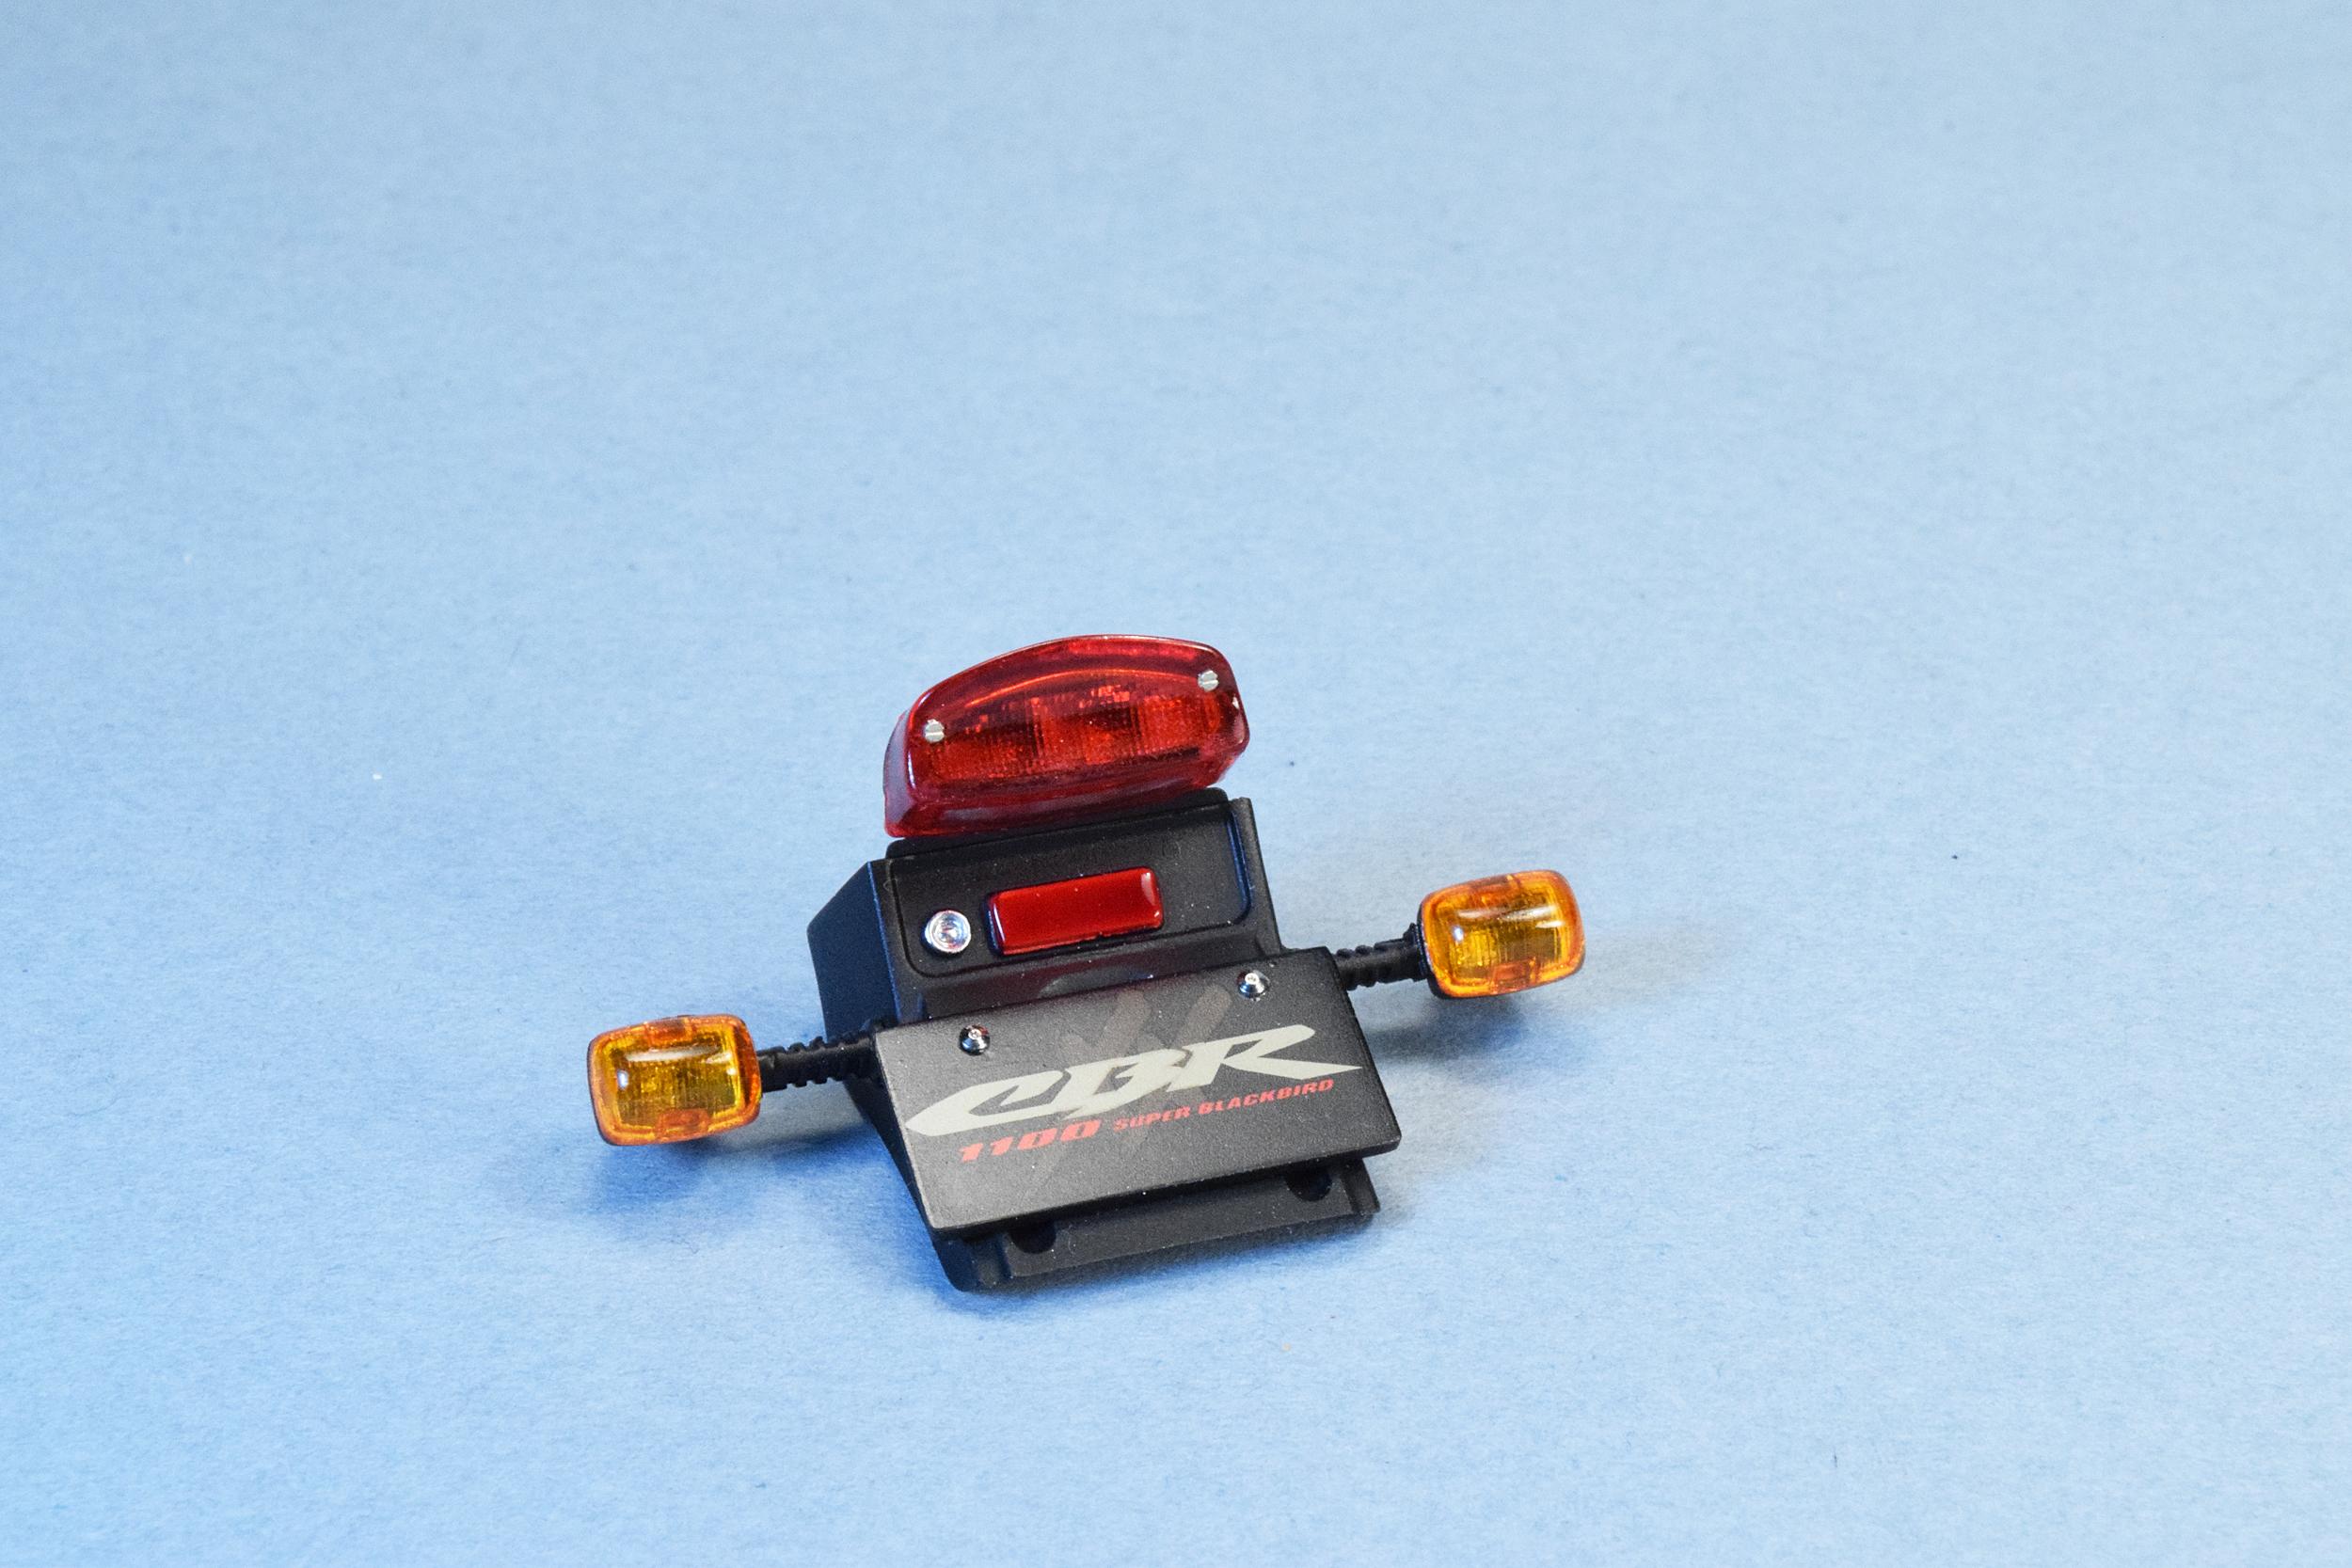
....and the beat goes on, yeah the beat goes on. Sorry Sonny and Cher...... Just a small update. The tail light lens, turn signal assembly, and licence plate holder are done. Two 0.9mm Top Studio rivets were used as fasteners for the licence plate bracket and two tiny PE screw heads were placed in the dimples on the tail light lens. The screw heads were secured with a drop of future (or whatever it's called now) floor wax. The chrome circular detail next to the red reflector is the lock cylinder for releasing the seat to access the battery. All the lenses come clear so they were sprayed with multiple coats of Tamiya's acrylic clear red and orange. Next step is attaching this and the engine to the frame. Cheers, Wolf
-
Simply gorgeous Louis! This is the nicest build of this kit I’ve seen. Ken Miles would be proud. Cheers, Wolf
-
1970 Pontiac Firebird in Lucerne blue (1/24 Monogram/Revell)
Wolf replied to e30lover's topic in Model Cars
Oooohhh, that’s pretty! Beautifully done. Well photographed as well. That’s the way you do it…… Cheers, Wolf (had a friend in high school that had a ‘69 Firebird convertible in that same colour. I envied him until he trashed the car.) -
Thank-you Sir. I’m enjoying this build and the time available to work on it since retiring. Cheers, Wolf
-
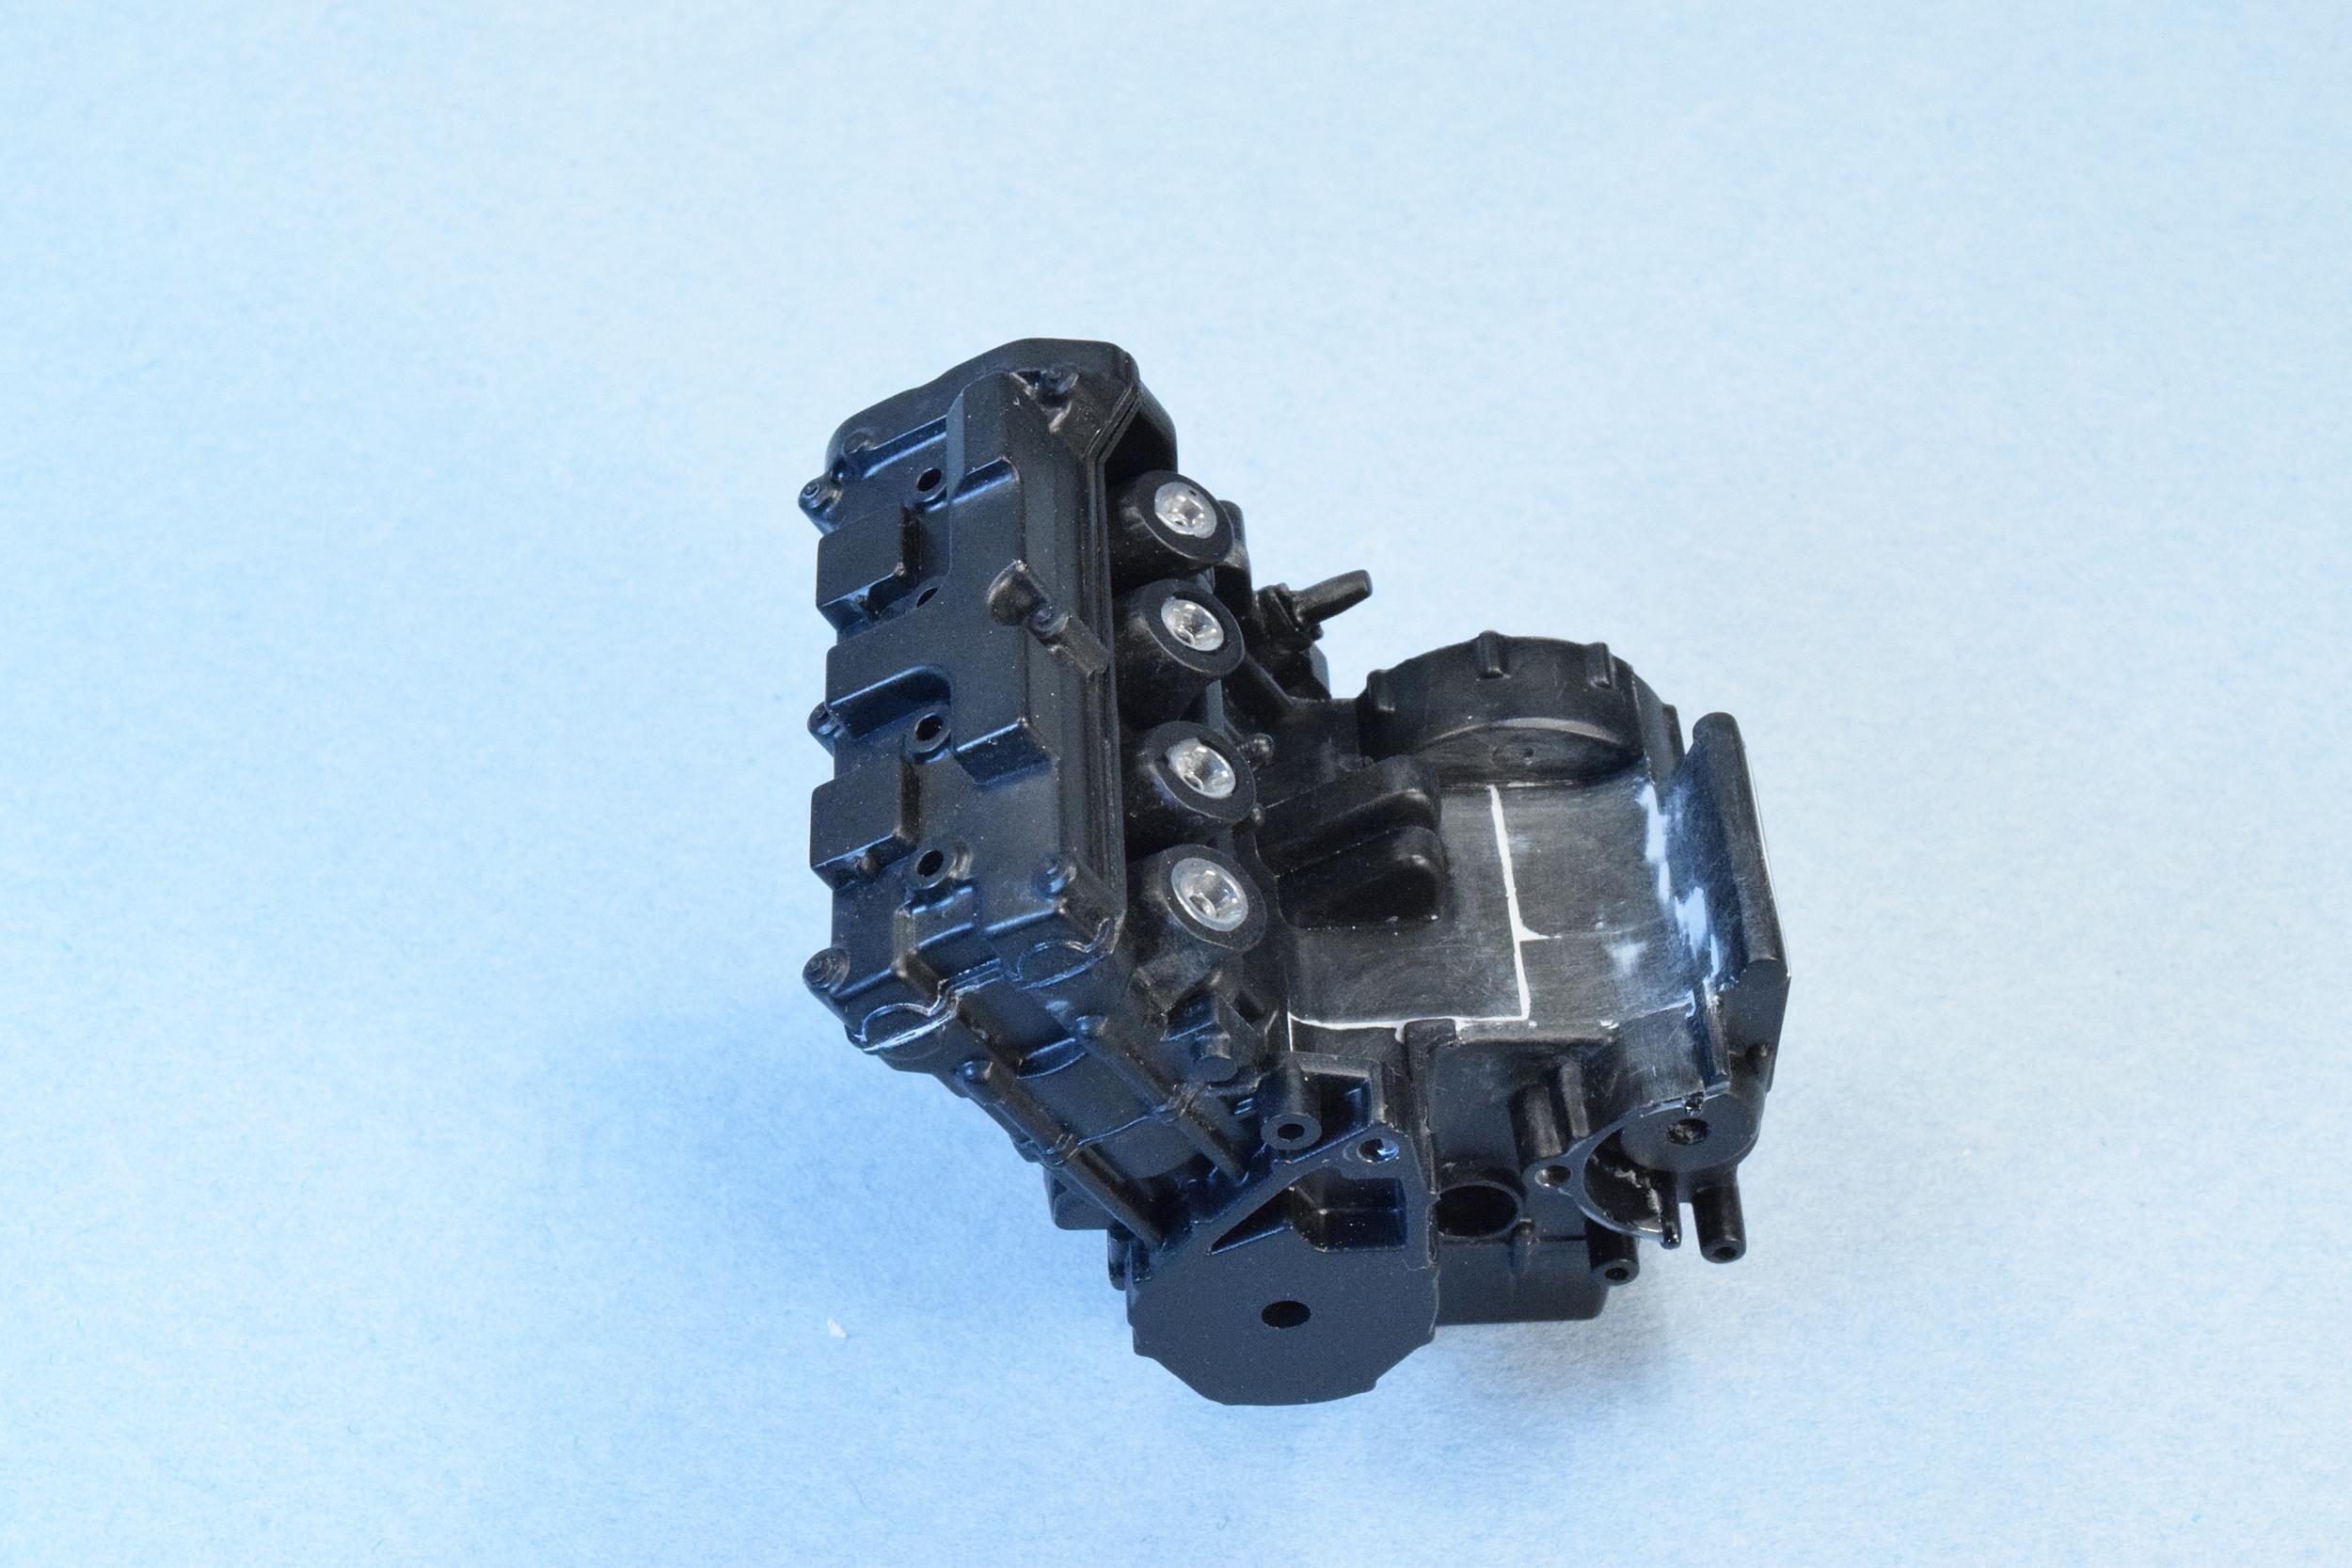
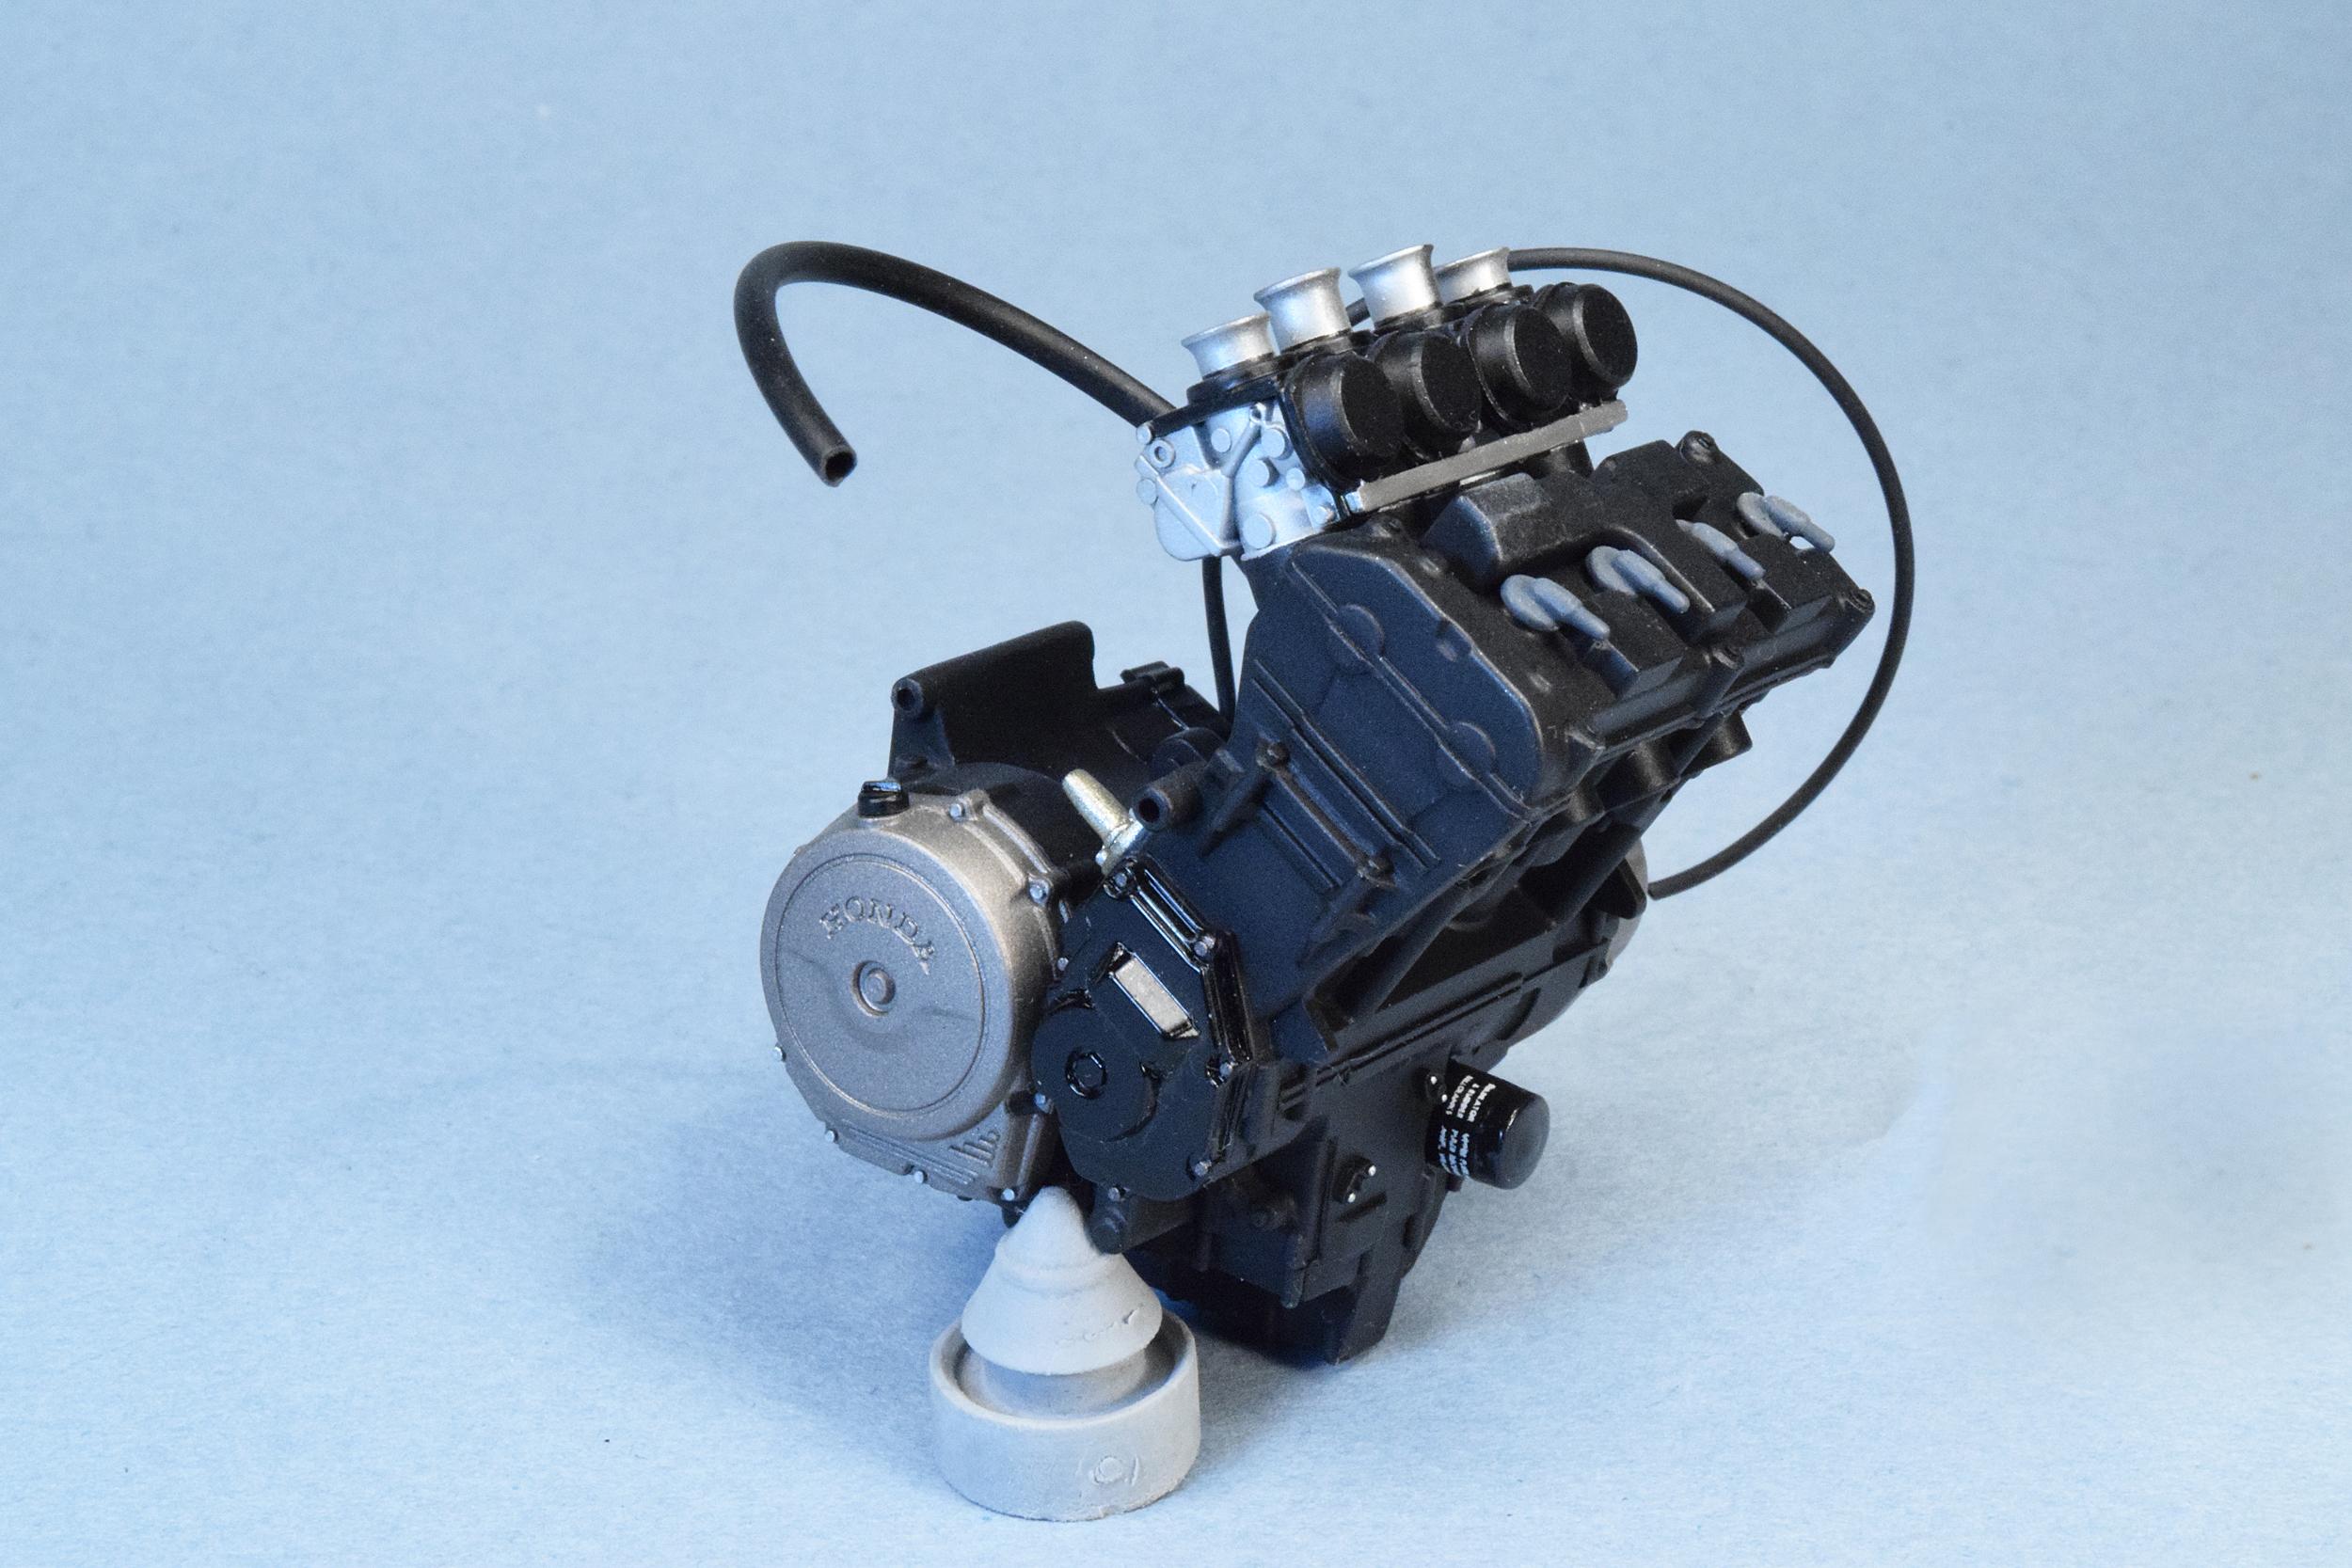
Some progress has been made with the building of the engine. There were a few seams that needed addressing with Mr. Surfacer 500 and some sanding but nothing too serious. I just wanted to be 100% sure that there wouldn't be any seams visible, where there shouldn't be, on the finished model. Tamiya calls out a light blue colour for the spark plug leads. Having been around Hondas for many years I was very sceptical about that. An internet search showed a rubber black or grey colour so I went with grey to break up the overall monotone look of the assembly. There are no coil packs provided with the kit nor provisions for spark plug wires and they won't be visible once all the fairings are attached so I left them off. As with Tamiya kits in general there's always room for extra detailing if you decide to add it but in this case I just wanted to avoid a make work project that would never be seen. I'm currently working on the rear fender, taillight and turn signal assembly and once those are done they and the engine will be mounted in the frame along with the centre stand ands should start to look at little more like a motorcycle. Cheers, Wolf
-
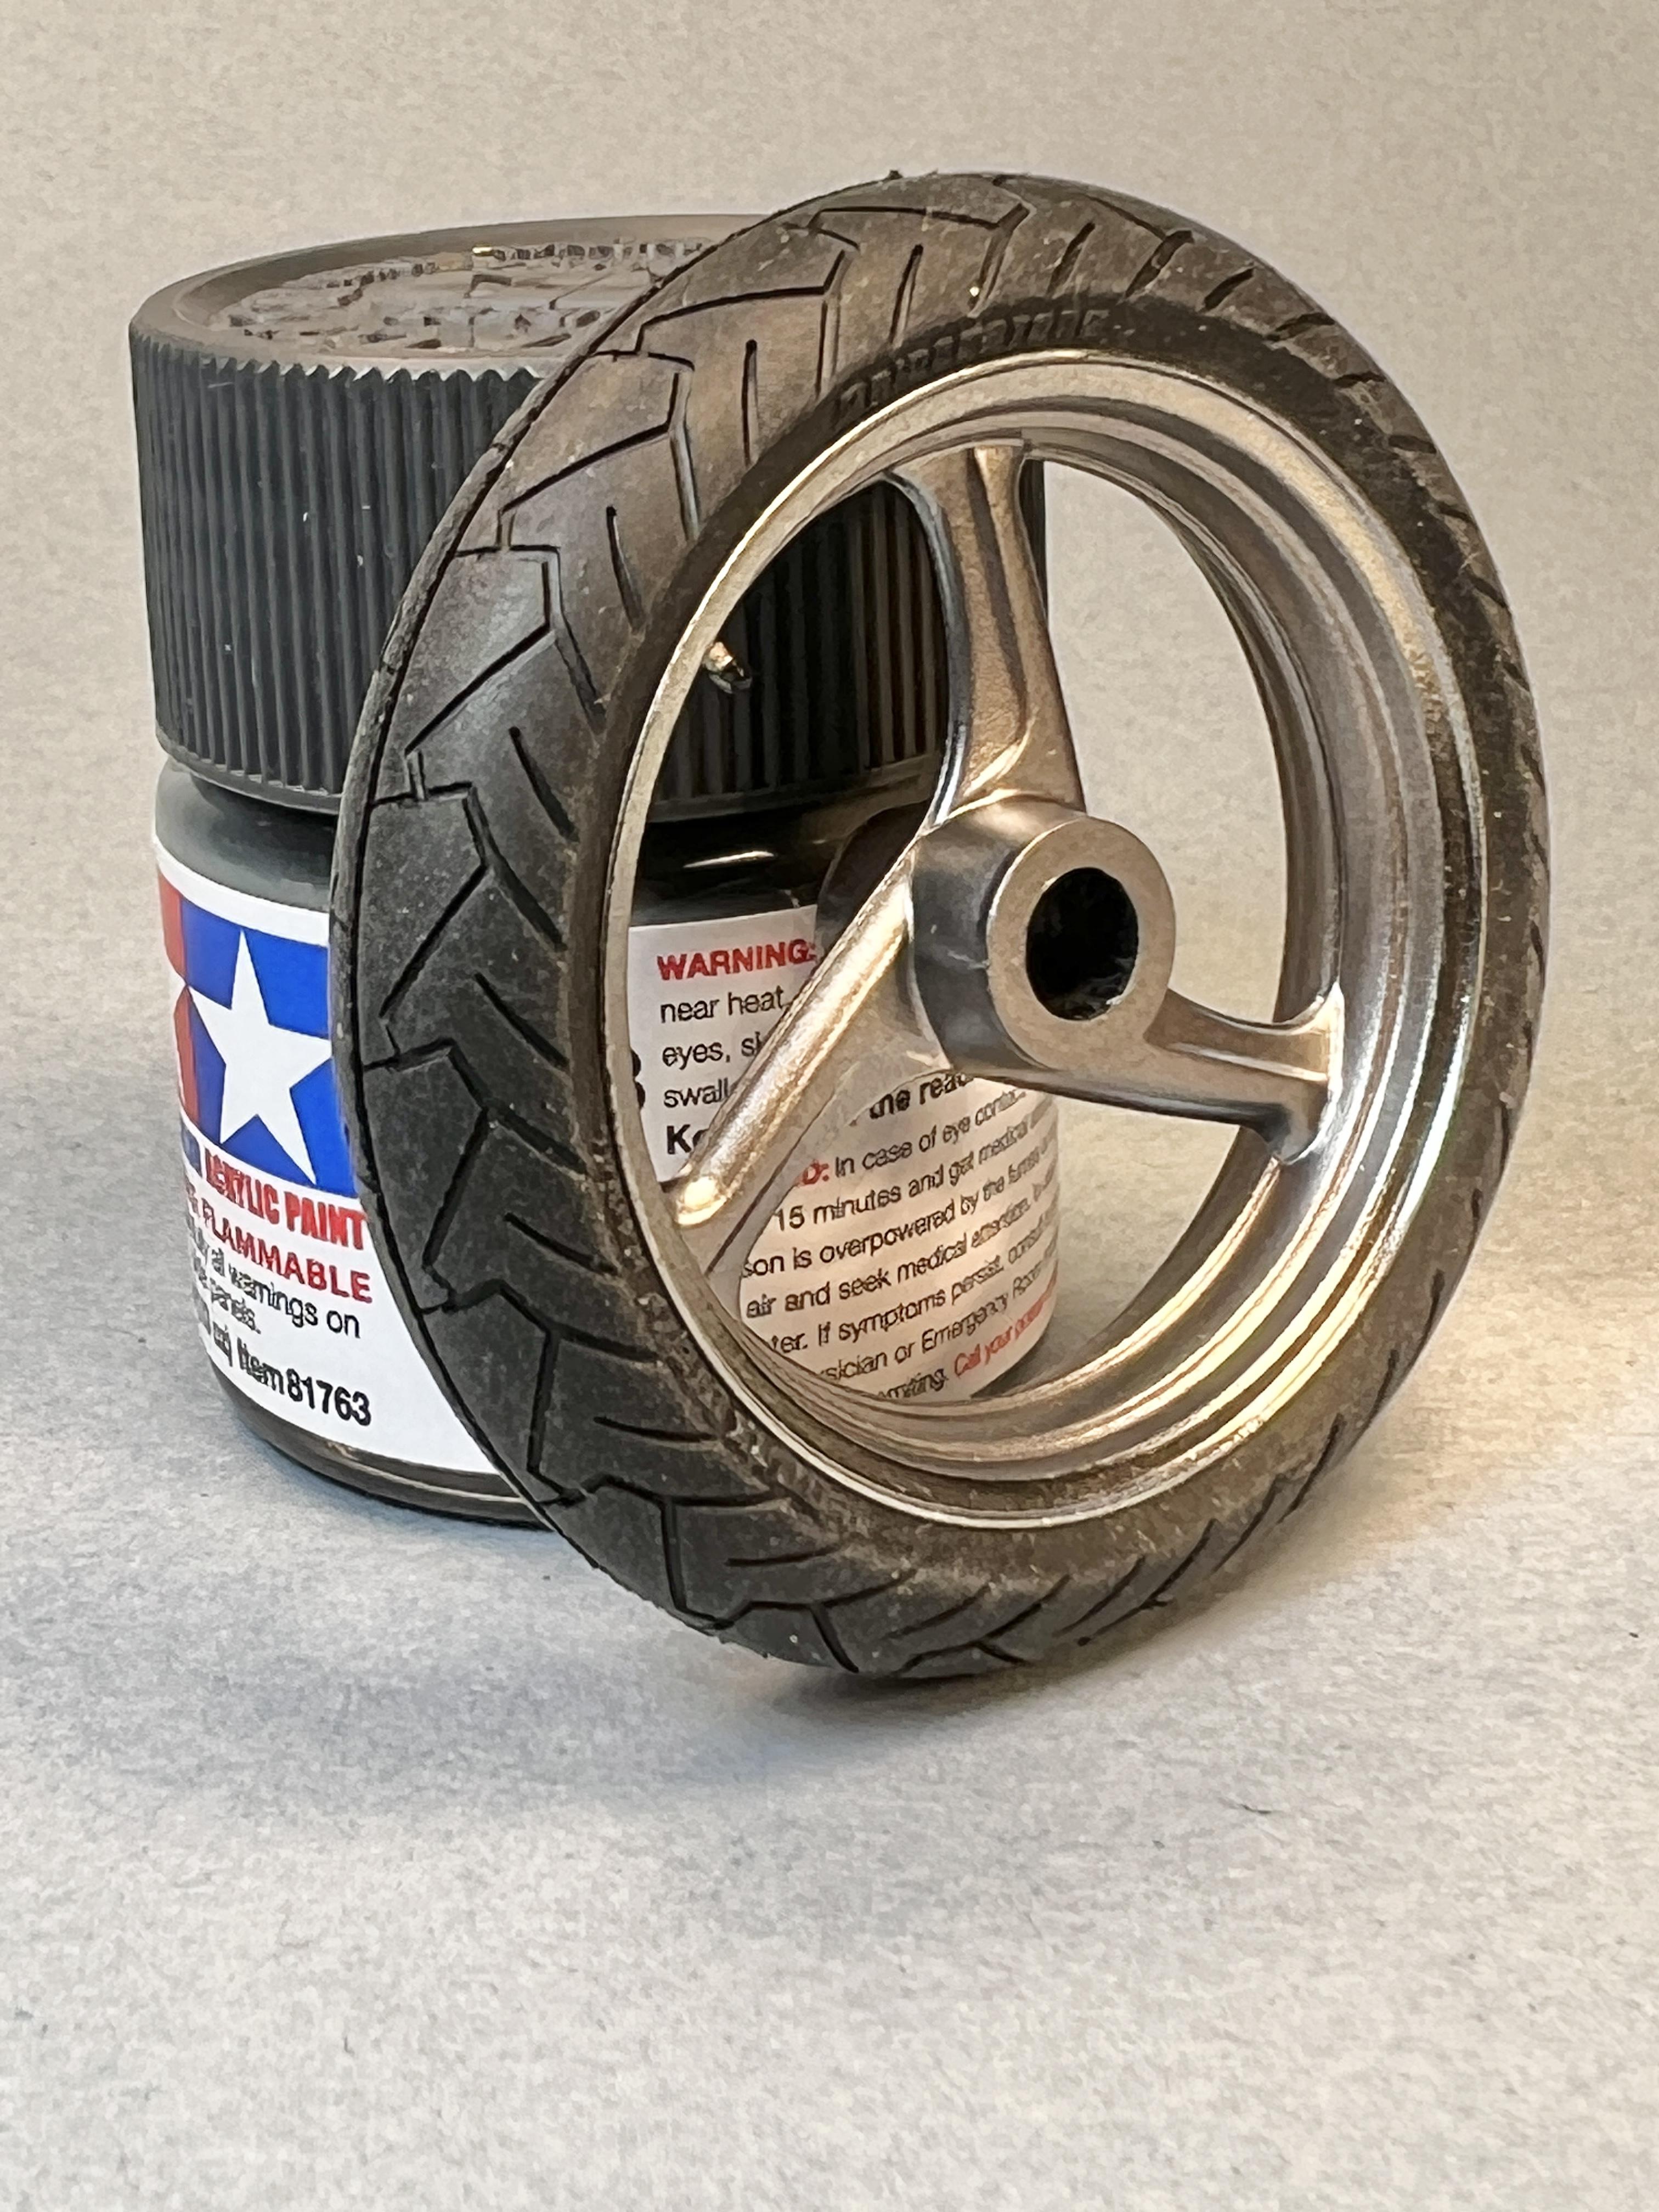
A little out of sequence, if you’re following the instructions but I figured I would do the front wheel right away as well. Painting was done the same as the rear wheel. The brake discs were drilled out and painted as per the online photo I found of the bike in the red colour scheme. Cheers, Wolf (who’s amazed at how much dust attracts to the rubber tires)
-
Beautiful build Bob. 2nd time around was the charm on the paintwork eh? Cheers, Wolf
-
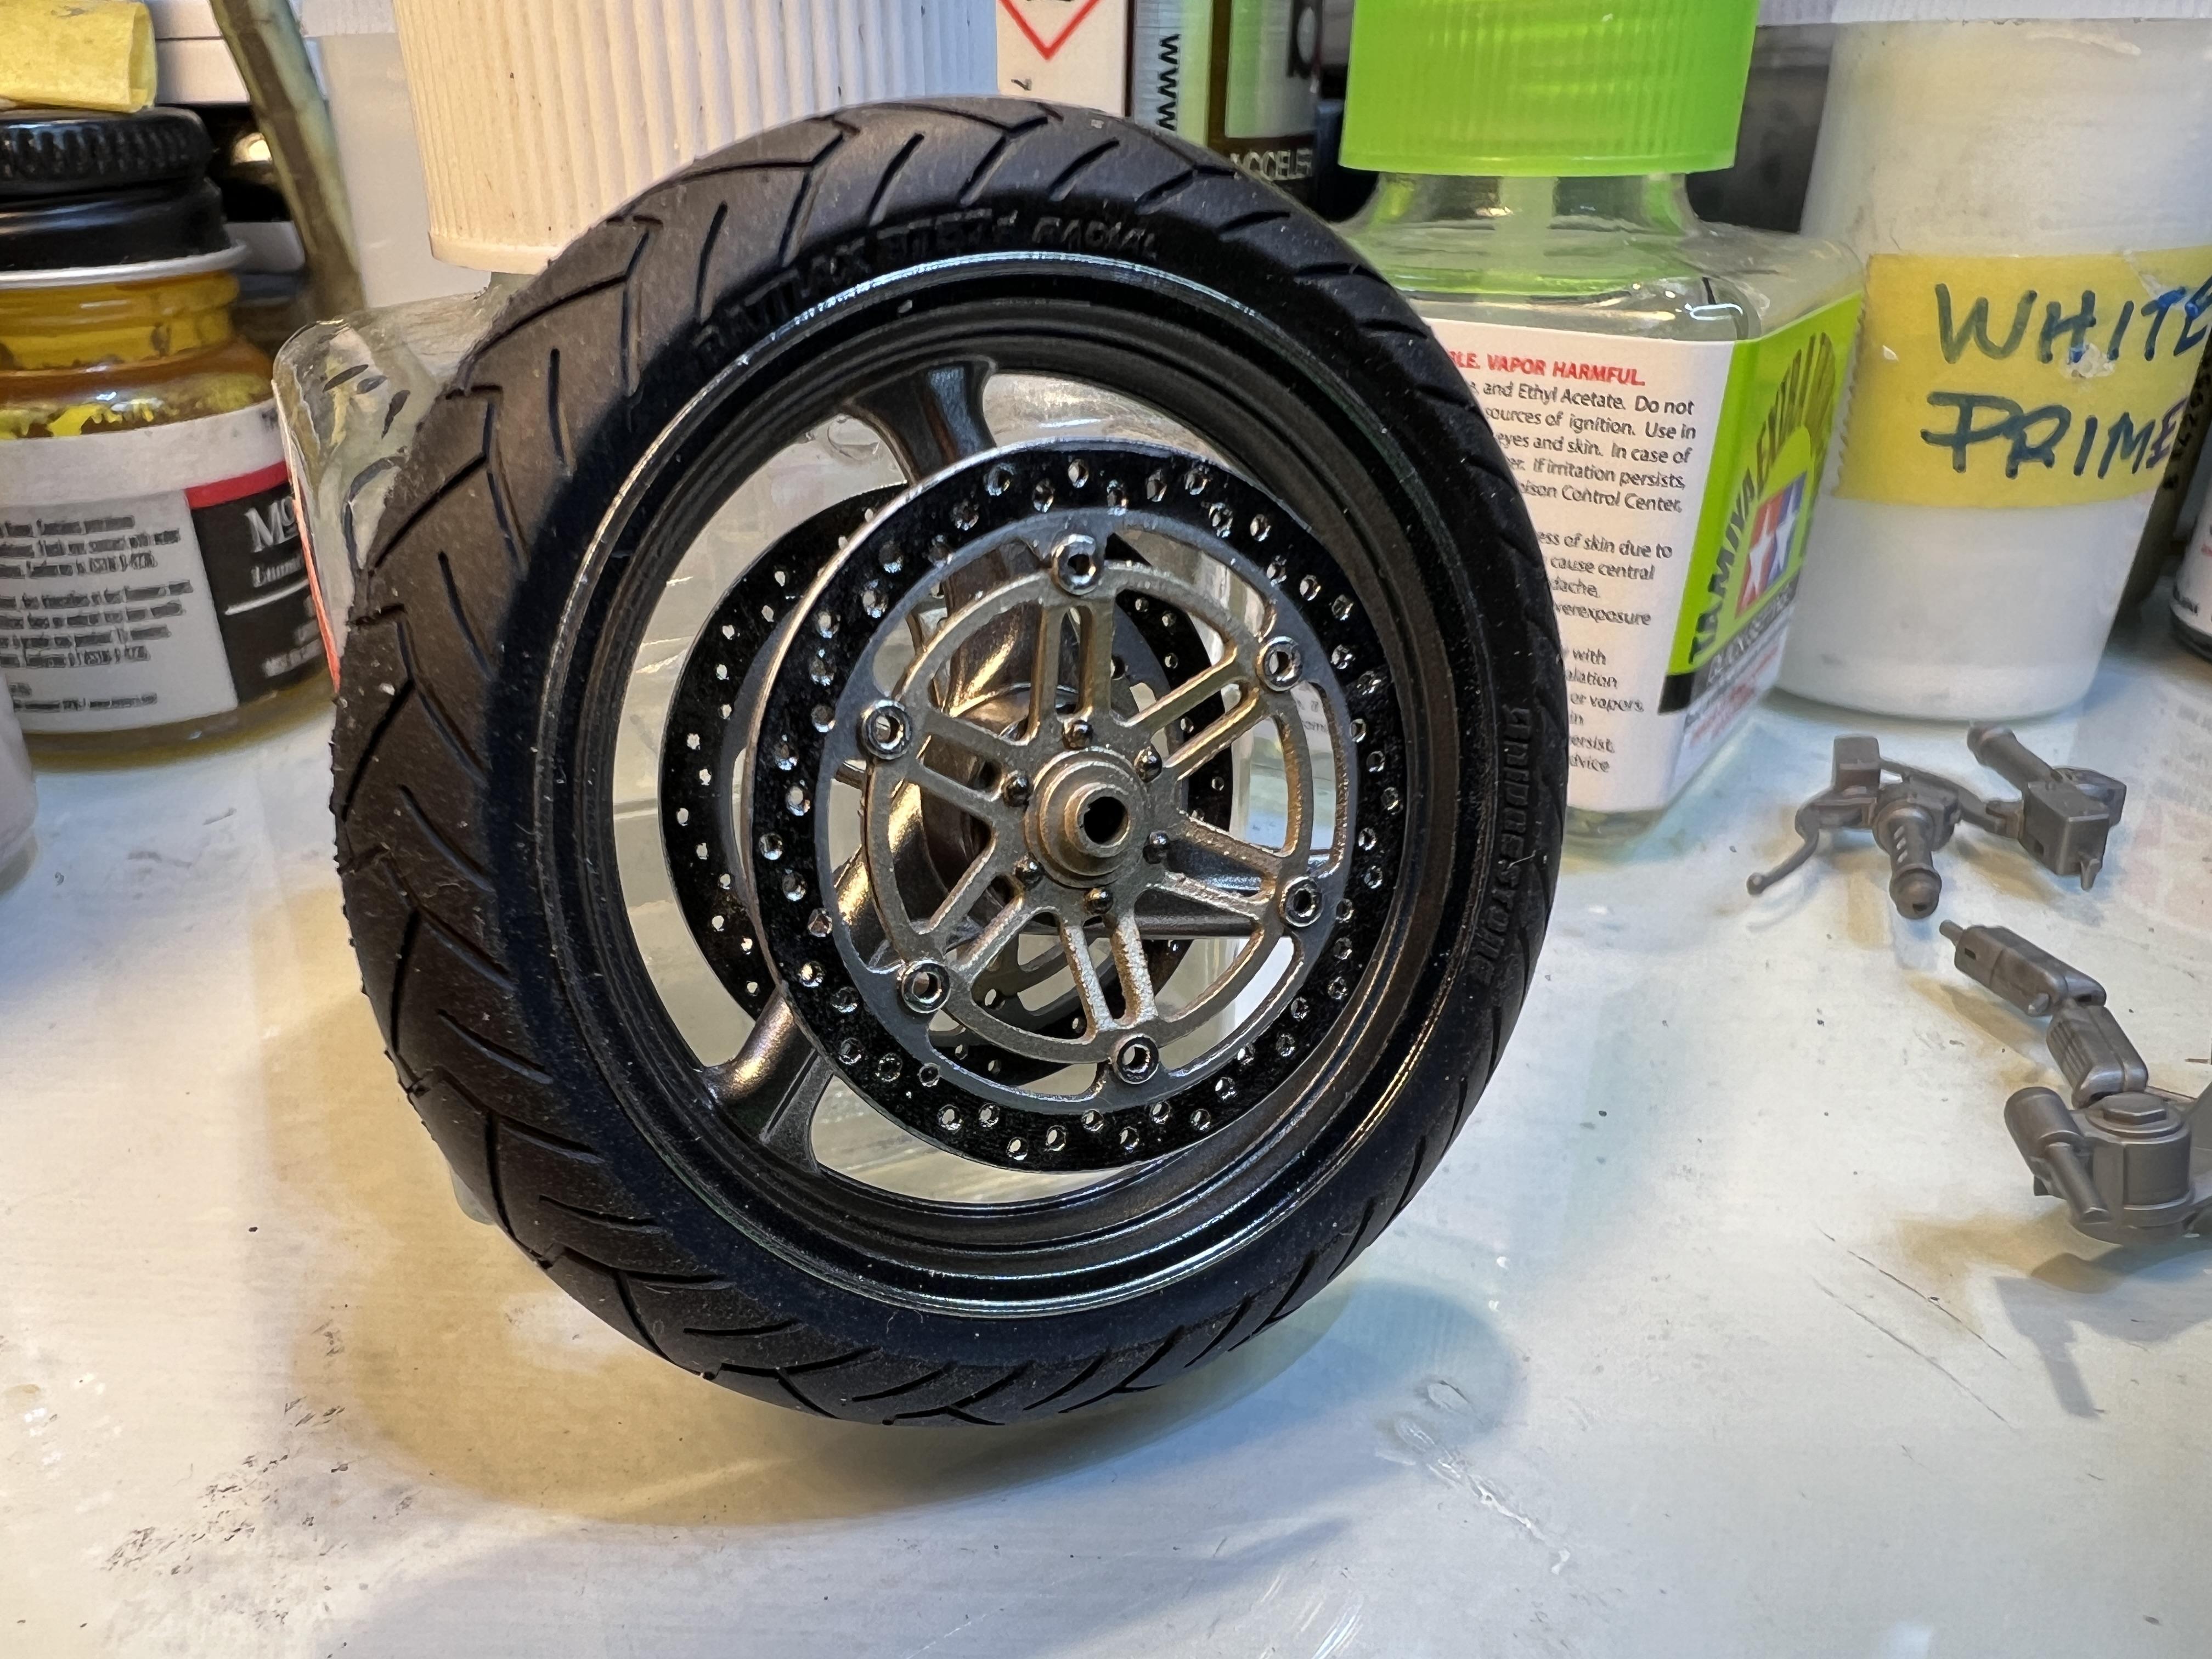
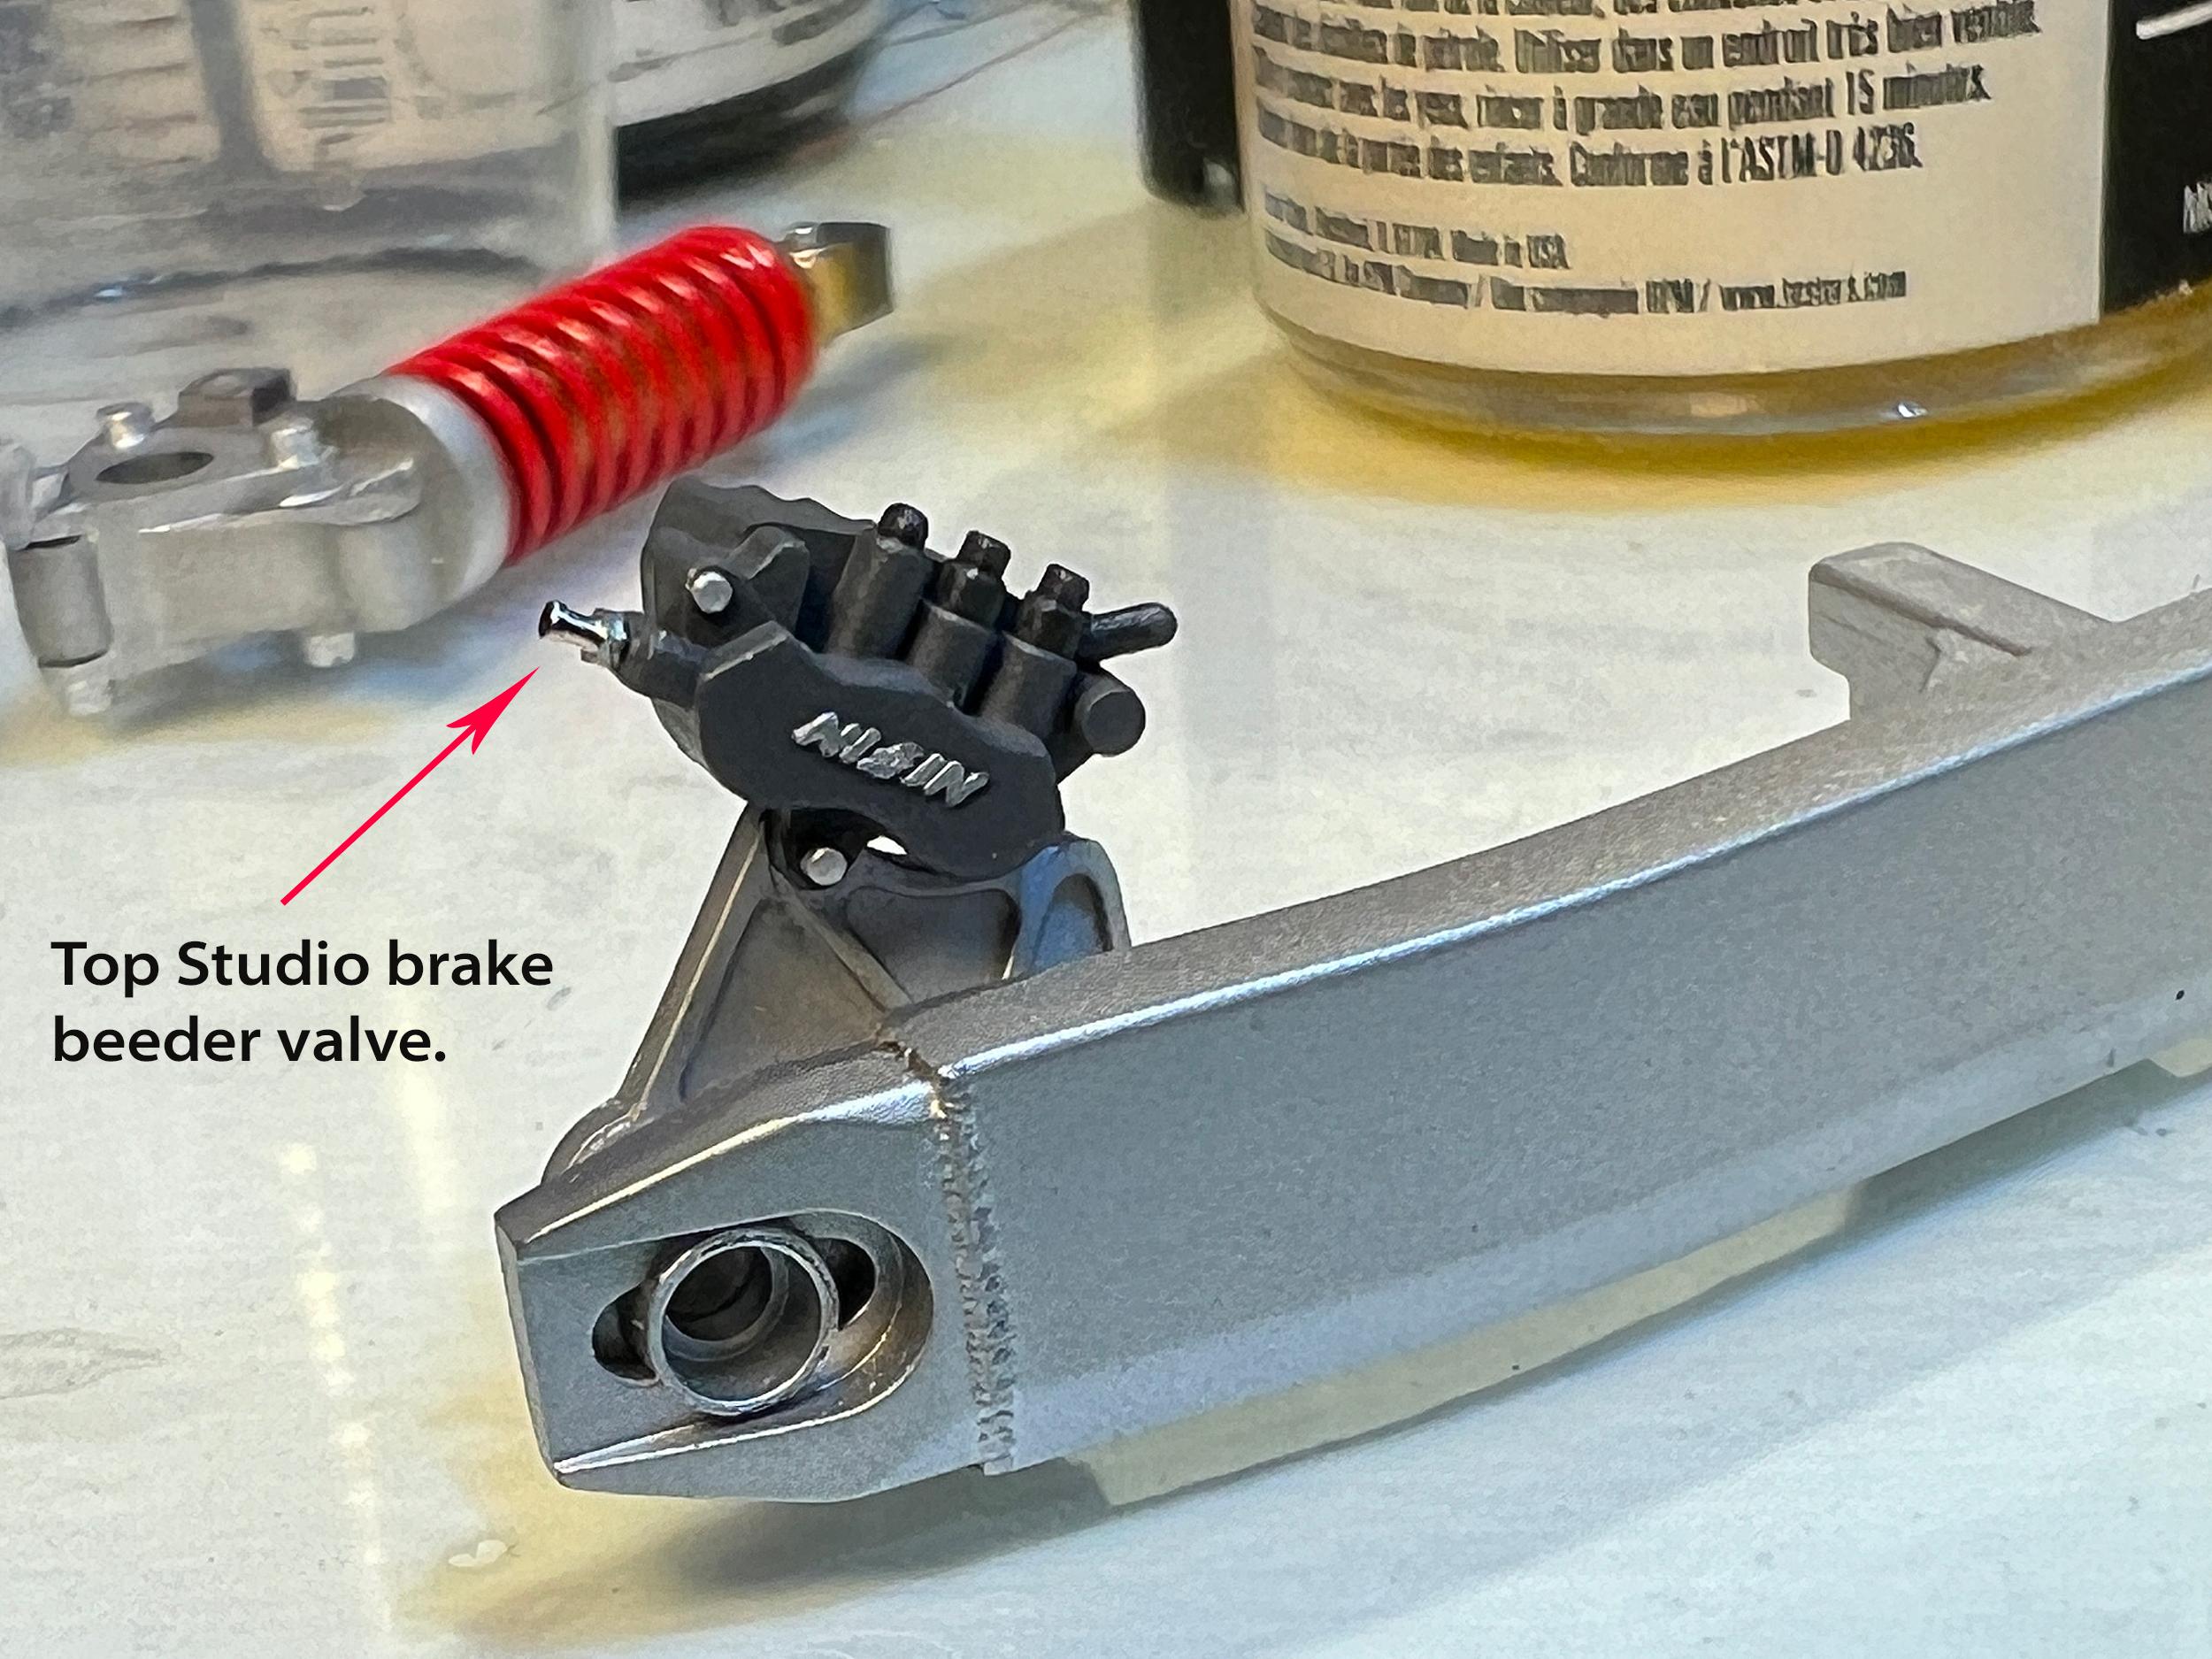
I made some nice headway on the rear suspension. The rear brake rotor had all the cooling holes drilled out using the molded dimples as a guide. Then the separate components were painted and a top studio brake bleeder valve was added to the rear caliper. These are beautifully machined and even the end is machined open! The rear rim was sprayed with Tamiya's Light Gun Metal lacquer and then the rim was masked off leaving just the outside edge exposed. That was painted Tamiya's Gloss Black lacquer and then Alclad II Polished Aluminum as per the photos I found online. The rest was painted as per the kit colour call outs and then the whole thing assembled. As with the frame, lots of masking was involved, and I'm happy with the results. Cheers, Wolf (who's enjoying being retired!)
-
Thanks John. Cheers, Wolf
-
One more fine example of thinkin' out o' the box. Love it Steve! Cheers, Wolf
-
Thanks for posting that Mike. Enjoyed that. Cheers, Wolf
-
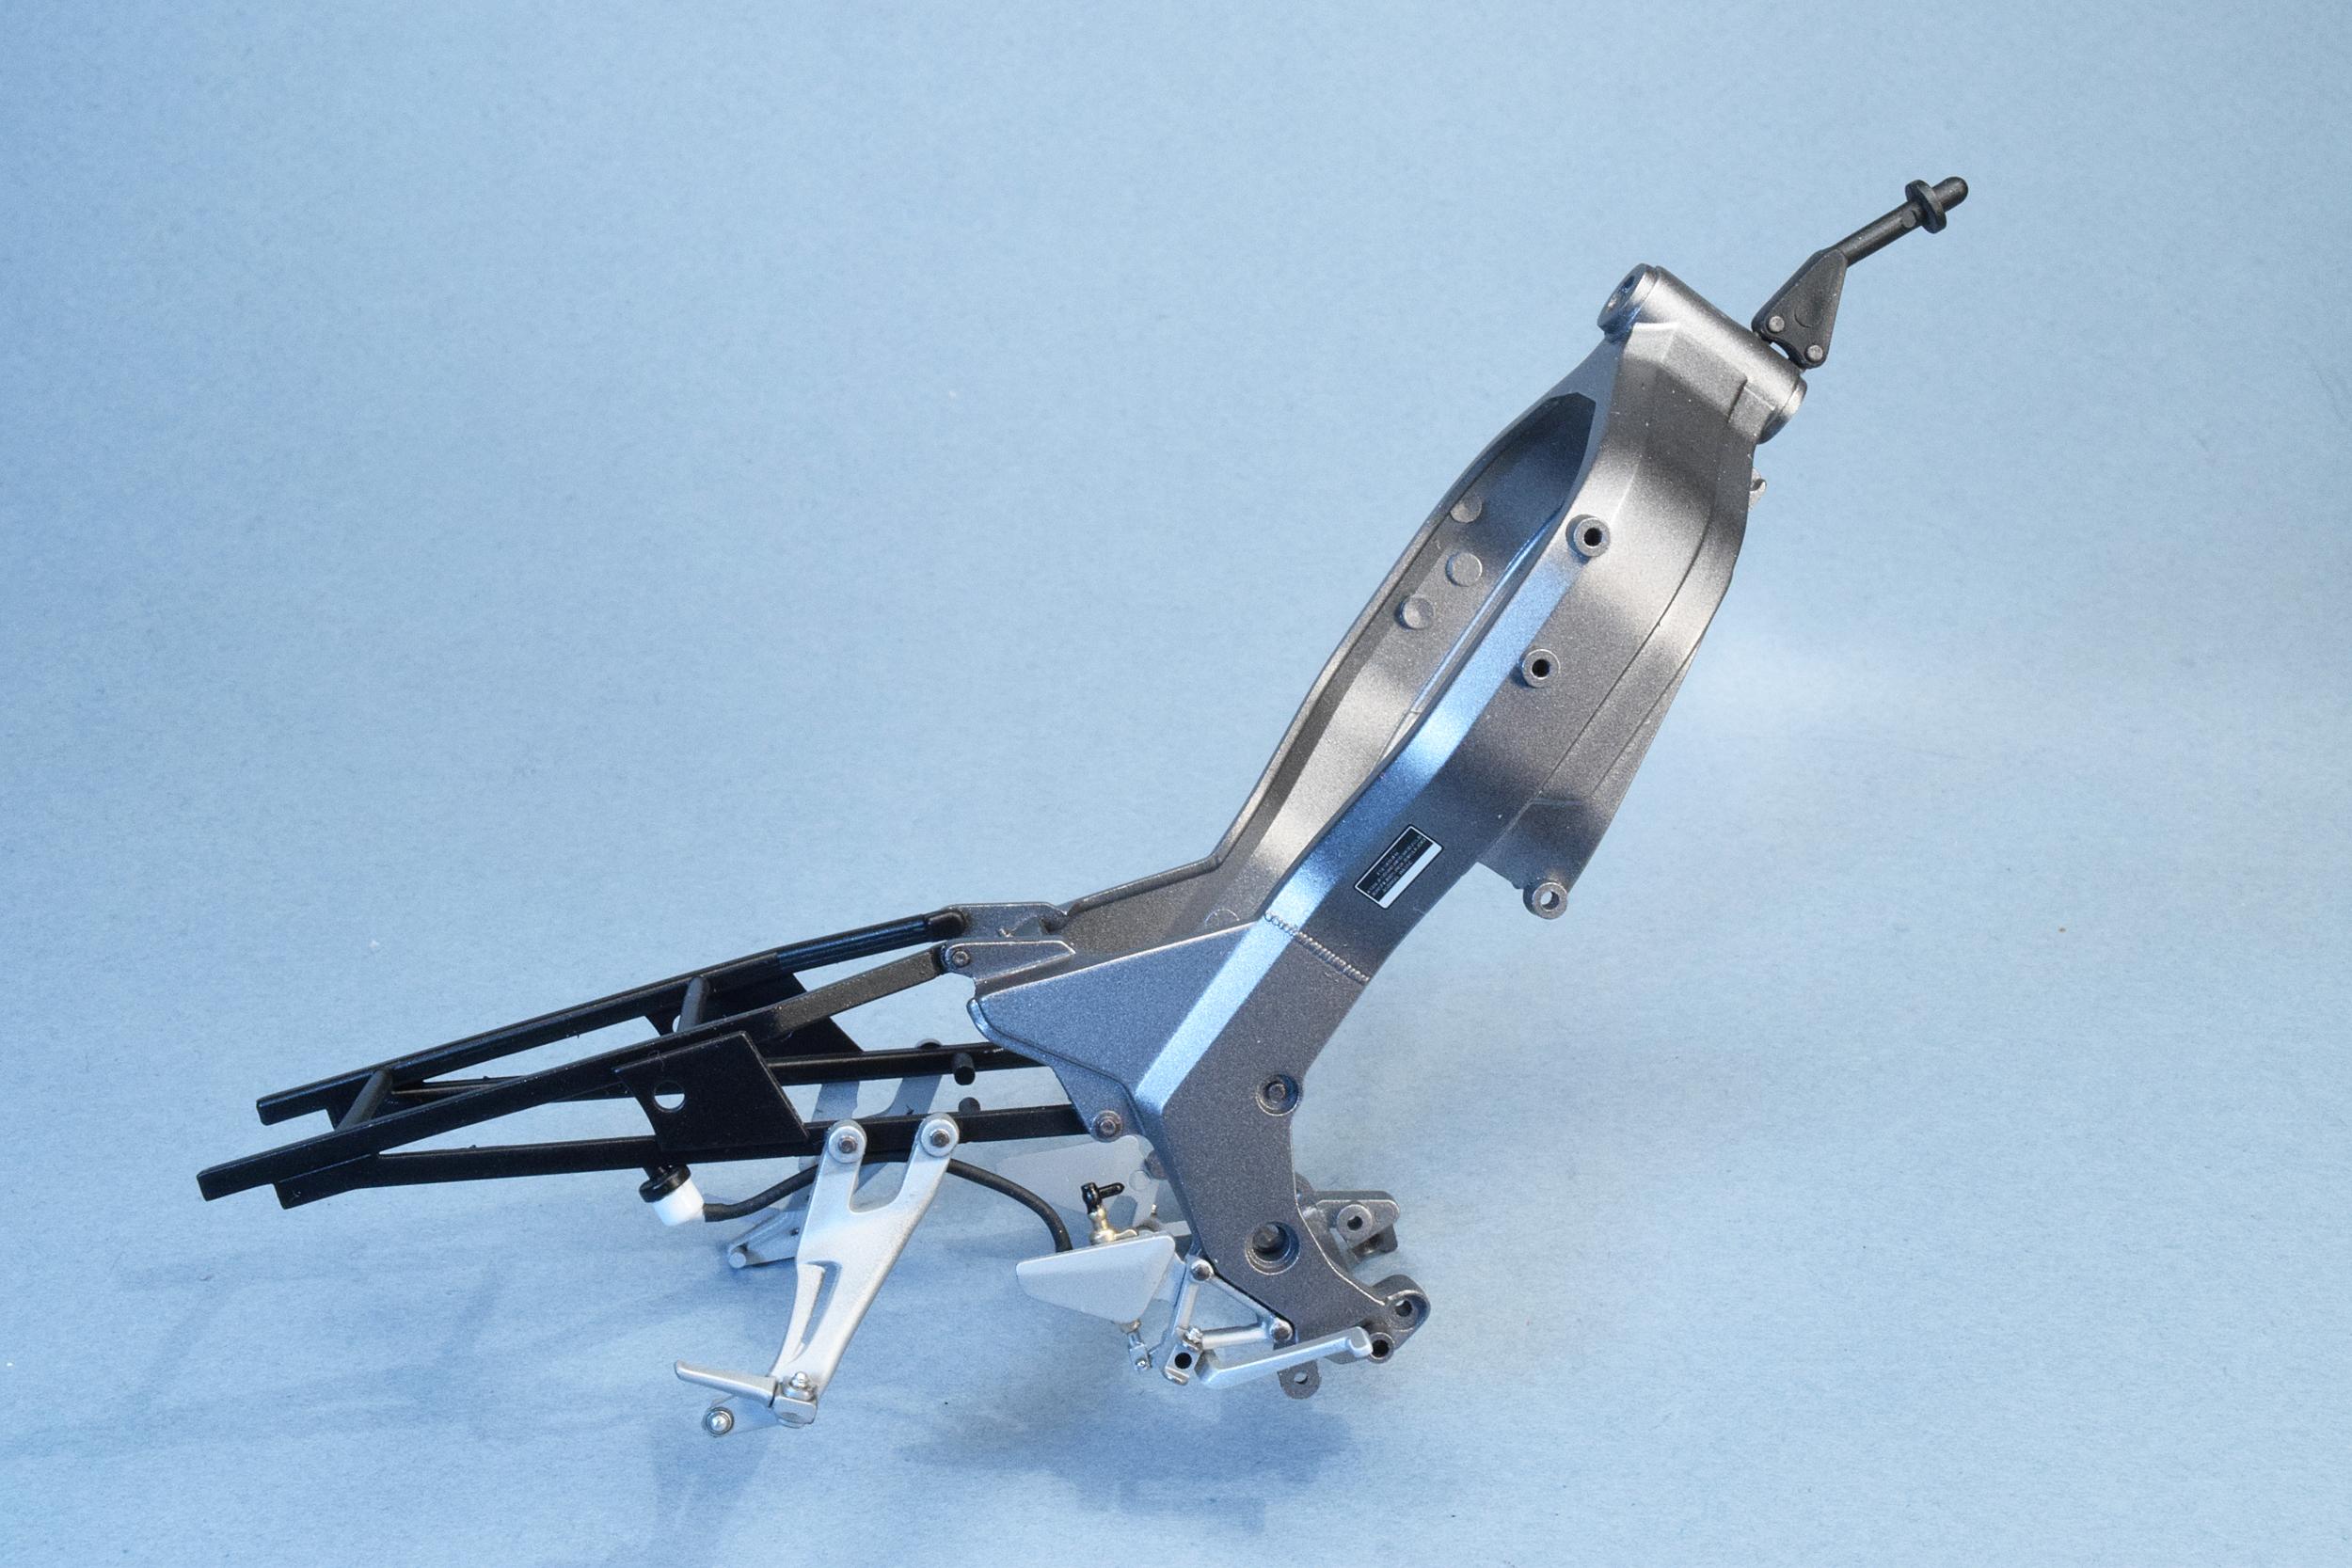
Construction starts with the frame, which makes sense, considering that everything you build after step #1 will attach to the frame. It's here that I encountered my first deviation from the kit instruction colour call outs. Tamiya says the bike is offered in Titanium Metallic, Mute Black Metallic, and Candy Muthos Magenta which I'll call Red for simplicity sake. Tamiya's colour call outs are applicable to the Titanium and Mute Black schemes but not the Red despite the fact that Tamiya gives you decal options for all three schemes. An internet search provided me with the colour photos of the bike in the Red scheme but it was up to me to decide exactly which colours I'd use so some custom colour mixing was going to be in order. As so many components that attach to the basic frame are different colours creative masking was also required. I suck at painting with a brush other than detail painting so 95% of my paint work is done with the airbrush. The frame is finished with all the colours and decals applied. A lot more creative masking will need to be done as more components are assembled and installed. Now on to the rear suspension, tire and rim, chain assembly, and rear brake caliber. Wolf (who used to ride but now prefers his Mercedes SLK 230)
-
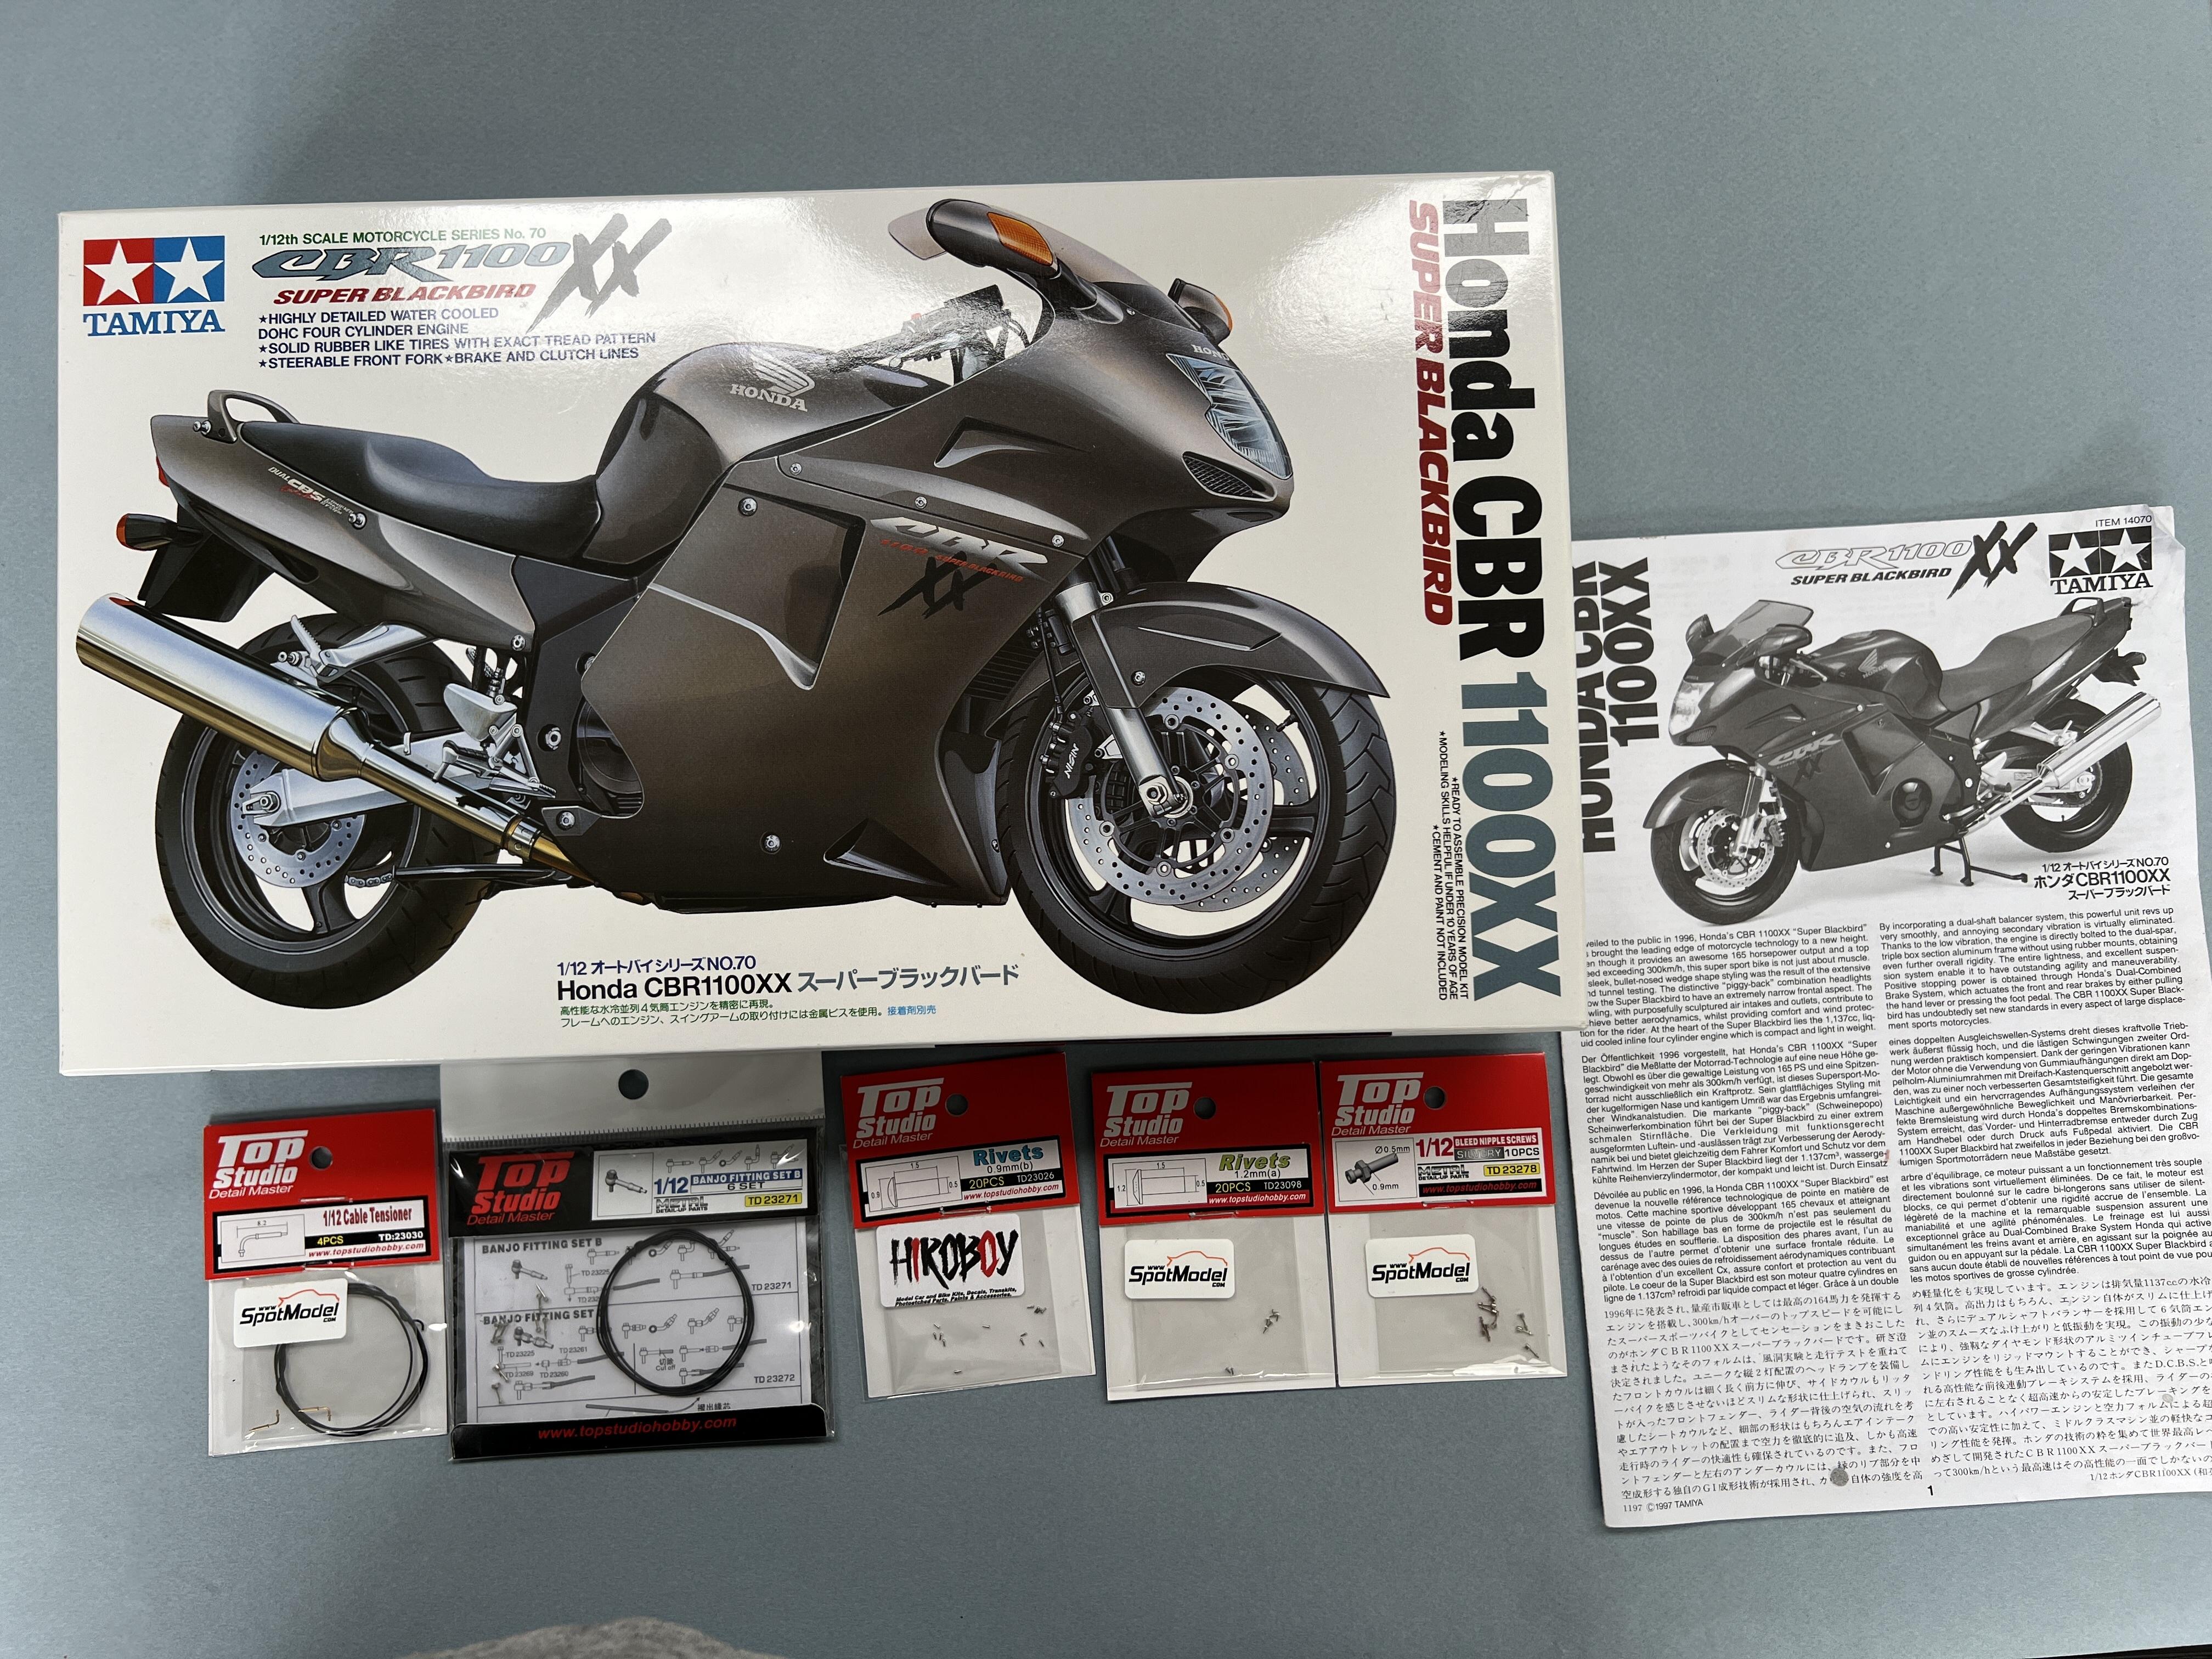
I purchased this kit earlier this year at my not so local hobby shop. Having worked at a Honda dealership for over 33 years and recently retired I have an affinity for most things Honda so getting this kit was right in my wheelhouse. Tamiya’s kits have long been some of my all time favourites and this model looks to be every bit as good as what I’m accustomed to. A few Top Studio extras and some scratch building are being added to bring up the detail level. Here’s the obligatory photo of the kit box and the Top Studio stuff I’ll be using. ……and the build starts now. Cheers, Wolf (who usually builds cars and things with wings)
-
Bob, I’m waving my lucky rabbit’s foot in your direction. It’ll all work out fine now. Cheers, Wolf